Blender 3D:零基础到专业级-单元3:拓展视野
Overview
::概述
NOTE: this tutorial is incomplete!
::需要注意的是:本教程不完整!
This tutorial will teach you how to effectively utilize textures and materials in Blender to create realistic eyes for characters. This tutorial will not teach you how to finish the eye. Because you did already learn that in previous tutorials. This tutorial was inspired by a great Maya tutorial in the Gnomon Workshop series by Alex Alvarez. My goal with this tutorial is to teach you how to get those same stunning results using Blender. Please check out Alex' tutorial as well, as it is very informative and covers more detail than I will be covering here. This tutorial assumes you know your way around the Blender interface and so I will not explain each key command as I go, but will instruct you in what steps to take and point out details such as key commands only when it seems relevant to do so. In addition, you will need some sort of image manipulation software, as this tutorial relies heavily on image-based textures, which we will be preparing outside of Blender. I will be using GIMP, but feel free to use Photoshop or whatever you're comfortable with.
::通过使用Blender,我们可以在线制作图像,并将其用于在线制作. 这本教程将教你如何有效地利用Blender中的纹理和材料来创建真实的眼睛. 这本教程不会教你如何完成眼睛. 因为你已经在以前的教程中学过. 这本教程是受到Alex Alvarez在Gnomon Workshop系列中的一个很棒的Maya教程的启发. 我本教程的目标是教你如何使用Blender获得相同的惊人的结果. 请查看Alex的教程,因为它非常有信息,并且涵盖了比我在这里涵盖的更多细节. 这本教程假定你知道Blender界面的路径,所以我不会在每一个关键命令中解释,但会指导你在哪些步骤中采取并指出关键
-
The 4 original Maya tutorials in video format [
[1]
]
::视频格式的4个原始的玛雅教程 [1]
OK, let's dig in...
::好吧,让我们挖掘...
Reference Material
::参考资料
Let's Take a moment to familiarize ourselves with the anatomy of the human eye. Do a Google image search and examine whichever diagram is to your liking. Now, you don't have to pay attention to every single feature, but do take note of the
cornea
, the
iris
, the
pupil
, and the
sclera
. These are the only parts that are visible to us when we look at a person's eyes, and therefore the only parts we will actually need to create. Many of the diagrams you find out there will be disproportionate, and so in order to know how large to make our features in relation to one another, it is best to view a large number of diagrams, a large number of eye photos, and also photos of plastic models of the eye, as plastic models tend to be truer to scale than 2D drawings. I also found a photo of a guy popping his eyes half-way out of his head. All of these together gave me a good feel for what the appropriate proportions are for a human eyeball. To some extent though, cornea size and sclera shape will vary on a person-to-person basis, so there is no precisely correct size, per se.
::让我们花一会儿熟悉人类眼睛的解剖学. 通过谷歌图片搜索,检查你喜欢的图表. 现在,你不必注意每一个特征,但请注意角膜,虹膜,瞳孔和膜. 这些是我们在观察一个人的眼睛时唯一可见的部分,因此我们实际上需要创建的部分. 你在那里发现的许多图表将是不成比例的,所以为了知道我们相对于彼此的特征有多大,最好查看大量图表,大量眼睛照片,以及塑料模型的眼睛模型照片,因为塑料模型往往比二维图纸更真实. 我还发现了一个男人的照片,他的眼睛从他的头上出来. 所有这些给了我一个很好的感觉,对于角膜和膜的比例是适合的人类眼睛
Building The Eye
::构建眼睛
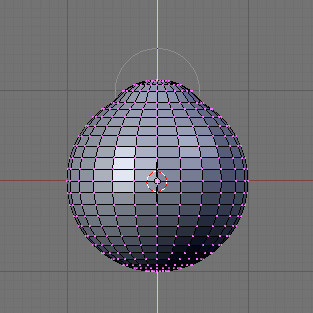
Creating a UV sphere. 24 segments, 24 rings, and a radius of 1 is recommended. The top of the UV sphere will become the cornea of the eye. So now let's go into
side view
, in the
orthographic
view, and with the topmost vertex selected and
proportional falloff
enabled,
grab
and raise this vertex along the
Z axis
. Don't click to finalize the edit just yet - first we will use the
mouse wheel
to control how much falloff is going to be applied. This process can require some finesse and multiple adjustments until the bump of the cornea is anatomically correct. You will want to set the falloff shape to "
sphere
". You can also make 2 balls, like in the Pocedural eyeball tutorial, and let the iris bend inwards of the inner ball.
::创建一个紫外球.建议24个段,24个环,半径为1.紫外球的顶部将成为眼睛的角膜.所以现在让我们进入侧面视图,在正写视图中,在顶部的顶点被选中,并启用比例落差,抓住并将这个顶点沿 Z 轴向上.不要点击完成编辑 - - 首先我们将使用鼠标轮来控制落差将被应用多少.这个过程可能需要一些细致和多次调整,直到角膜的凸起在解剖学上是正确的.你将希望将落差设置为"球"形状.你也可以像 Pocedural 眼球教程中那样做2个球,让虹膜向内球的内球曲.
If you like you can use a Torus for the iris, this is difficult but fun to play with.
::如果您喜欢,可以使用Toros用于虹膜,
Below is a render of the curve I ended up going with. You can use it as a guide when modeling if it helps you.
This is with a SubSurf of 3 applied
, so keep that in mind.
::下面是我最终使用的曲线的染. 如果你有帮助,你可以在建模时使用它作为指南. 这是一个应用了3的SubSurf,所以请记住.
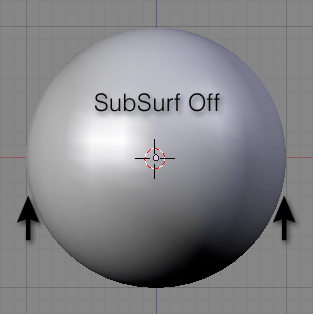
Now, some people may prefer to use a NURBS sphere for the geometry of their eyeball. If you are comfortable with NURBS modeling, and texturing NURBS models, go right ahead. It will give you a smoother and more rounded eyeball. I prefer not to complicate things with NURBS when polys will do just fine, and am guessing most of you feel the same, so I'm sticking with polys. This does however bring us to the topic of the SubSurface modifier and how it will affect your eyeball. When SubSurf is applied to a UV sphere such as our own, it causes the previously spherical shape to become slightly oblong. In other words, the eye will become nearsighted. This is barely noticeable, but it does happen, as a result of the way SubSurfing affects a UV sphere. You could create a UV sphere with more rings to ease this if it bothers you. It looks fine for our purposes though, to be honest. See the comparison in the animated GIF below.
::现在,有些人可能更喜欢使用NURBS球来对眼球的几何学.如果你对NURBS建模和NURBS模型的纹理感到舒服,那就继续吧.它会给你一个更光滑,更圆的眼球.我宁愿不要用NURBS复杂化事情,当多边形做得很好时,我猜大多数人都觉得一样,所以我坚持多边形.这让我们进入了SubSurface修饰器的主题,以及它将如何影响你的眼球.当SubSurf应用于我们自己的UV球时,它会导致以前的球形变得略长.换句话说,眼睛将变得近视.这几乎是不可见的,但它确实发生了,因为SubSurfing影响UV球的方式.如果你诚实地说,它看起来更好,你可以创
There is one last issue to address with regard to using a polygon-based eyeball. That is the small triangles that persist on the poles of the eyeball. These stubborn tris will remain and you will find that they result in an ugly and unnatural pinched effect when a specular highlight appears over the center of the cornea. Adding a SubSurface modifier will not make them go away. This didn't become apparent until after I did some texturing work and test renders, but I want to point it out to you now, before we get into all that. (See examples below)
::关于使用多边形眼球,还有一个最后的问题.那就是眼球两极上存在的小三角形.这些固的三角形会保留下来,当角膜中心出现一个镜像突出时,你会发现它们会产生丑和不自然的缩效果.添加一个SubSurface修饰器不会让它们消失.直到我做了一些纹理工作和测试染器之后,这才变得明显,但我现在想指出它,在我们进入所有这些之前 (见下面的例子).

Now repeat this process at the opposite pole of the eye (the optic nerve area).
::现在在眼睛的对面 (视神经区域) 重复这个过程.
We are now ready to begin texturing the eyeball.
::现在我们准备开始对眼球进行构造.
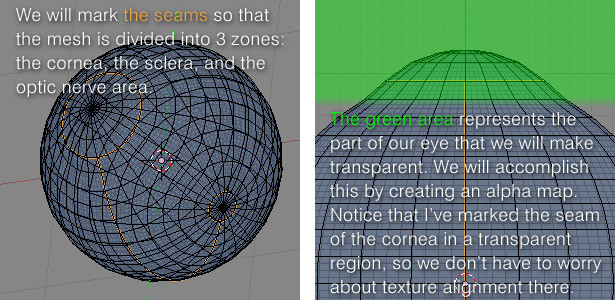
UV Mapping
::超紫外线映射
In
Edit Mode
, we will define the seams for our eye. Select the edges you want to mark as seams and type
Ctrl E
, then choose
Mark Seam
from the menu.
::在编辑模式中,我们将为我们的眼界定义接.选择您想要标记为接的边缘,输入Ctrl E,然后从菜单中选择标记接.
With all of your mesh selected, type
U
to unwrap. We can now see our unwrapped UV layout in the
UV/Image Editor
window. (For older versions of Blender, you might need to select
UV Face Select
mode to unwrap, but it's better if you download the latest.)
::选择了所有的网格,输入U解封. 我们现在可以在UV/图像编辑器窗口中看到我们解封的UV布局. (对于旧版本的混合器,您可能需要选择UV面部选择模式来解封,但如果下载最新版本,更好.)
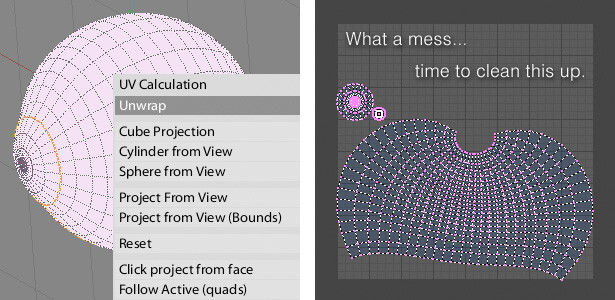
We will make the iris on another mesh so don't spent time on the cornea UV island.
::我们将在另一张网上做出虹膜,
Those two islands we see are the cornea and optic nerve area. We can move them out of our way by selecting any vertex on them and typing
L
to select all linked vertices. Then
G
to grab as usual.
::我们可以把它们移出我们的路,选择它们上的任何顶点,输入L来选择所有连接的顶点,然后按常规的方式抓取G.
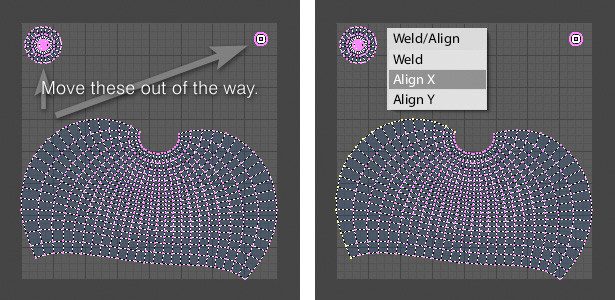
Grab
and move your straightened column of verts over to the left.
::抓住你的直立列的verts向左移动.
Constraining to the X axis, by typing the "
X
" key after you grab, is a good habit to get into while straightening these out.
::通过在抓住之后键入"X"键, 限制到X轴, 是一个好习惯,
Straightening out all of these vertices into a usable grid shape will take you some time so we won't do it that way. Having a rectangular grid will prove very helpful when we are texturing our eyeball. so we will use an Add-on for blender. You'll want to use Blender's grid as a reference and just align the rows and columns to it exactly. Yes, you can get it
exactly
aligned, since there is a snap-to-pixels feature, Click on snap-to-pixels in the drop-up menu in the uv/image editor header. (Don't move the 2 circles when snap to pixels is on cause that will ruin them.) You can scale the whole thing up later, once each row and column is evenly spaced. If you can, leave some space between your UV layout and the border of the layout area, if you "bleed" it to the edge, you may have texturing problems later. But you can scale it down later, so no problem. we will download the UV Tool from Daniel Banasik. A wonderfull free tool which can smooth an align the vertex loops to a beautiful grid with a little effort. The old method was aligning every single vertex 1 by 1 . Page of the tool [
[2]
]
::为了使所有这些顶点变得可用的网格形状,需要花费一些时间,所以我们不会这样做.当我们在对眼球进行纹理时,使用矩形网格将非常有帮助.所以我们将使用一个混合器的附加程序.您需要使用混合器的网格作为参考,并将行和列精确地对齐.是的,您可以将其精确地对齐,因为有点击到像素的功能,点击点击到像素在UV/图像编辑器头部的下拉菜单中. (当点击到像素时不要移动2个圆,这将导致它们.) 您可以稍后将整个事情进行缩小,一旦每行和列均间隔.如果您可以在布局区域边界之间留下一些UV布局,如果您"可以"对齐它
Installing an Addon is very simple. If you've like me not installed blender but use a standalone version it's done in no time. All you have to do is put a folder or file in a folder blender is reading for add-ons.
::安装一个附加程序是非常简单的. 如果你喜欢我没有安装混合器,但使用一个独立的版本,它是没有时间. 所有你需要做的就是把一个文件或文件中的混合器是阅读附加程序.
Just download it and Unpack it. What you've unpacked is, most of the time, precisely what you have to put in the add-on folder. In the blender standalone version folder (if you don't use a standalone version of blender, it's Operating system specific how to place an Add-on.): go to the folder with the name of the Version Number (at my version it is 2.75)-> scripts -> add-ons. then put it here. Save your work and quit blender. Then restart blender and open your work. Go to User Preferences under File in the blender program header (the uppermost) and go to addons. Go completely down and open the details of: UV: uv_tool. Then click the checkbox: most right and you're able to use it.
::只是下载它并解封它. 你解封的东西,大多数时候,正是你必须放入附加组件文件. 在混合器独立版本文件 (如果你不使用混合器的独立版本,它是操作系统特定的添加组件):去文件的名称版本号 (在我的版本是2.75) ->脚本 -> 附加组件. 然后把它放在这里. 保存你的工作和混合器. 然后重新启动混合器,打开你的工作. 去用户偏好下文件在混合器程序头部 (最上方) 和去添加组件. 完全下去,打开的详细信息:UV:uv_tool. 然后点击勾选框:最右边,你能够使用它.
Noob Note: Don't forget to save the user preferences.
::记住保存用户的设置.
If you, like me, love Disney-Pixar Movies you can recently download an Uncommercial (you're not allowed to earn money with it) free version of Renderman, the program Disney Pixar uses to render their movies. You can install it and use a third-party add-on (PR-man) to implement it in blender. But that will come in later tutorials.
::如果你喜欢迪士尼-皮克萨电影,你最近可以下载Renderman的非商业 (你不允许用它钱) 免费版本,这项程序是迪士尼皮克萨公司用来染他们的电影.你可以安装它并使用第三方附加程序 (PR-man) 在混合器中实现它.但这将在后面的教程中出现.
How to use:
::如何使用:
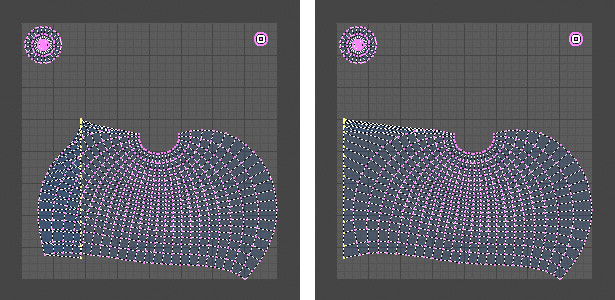
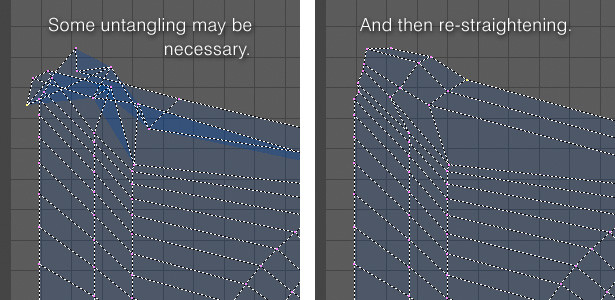
select the loop on the right side and click on align, do the same for the left. You can't do more than 1 loop at a time otherwise you'll go out of Edit Mode in the 3D View. Then go to 3D view put back in Edit Mode and go back to UV/Image Editor. You'll Also notice nothing has aligned. so do them loop for loop. Just select the loop and click on Align. It will be automatically placed correctly. Just move on till they're all done.
::选择右侧的循环,然后点击对齐,对左边也一样. 不然你会在3D视图中退出编辑模式. 然后进入3D视图,重新进入编辑模式,然后回到UV/图像编辑器. 你也会注意到没有任何对齐. 所以做循环循环. 只需选择循环,点击对齐. 它将自动正确地放置. 只需继续,直到它们全部完成.

It's important to pay attention to which way the UV layout is facing. Chances are the top of the sclera region is actually what you will want to be the bottom. It doesn't technically matter which way it's facing, but you will probably want it to look intuitive when you are painting the textures.
::重要的是要注意紫外线的布局是向哪个方向的. 很有可能是膜的顶部实际上是你想要的底部. 技术上它面向哪个方向并不重要,但你可能希望它看起来直观当你画纹理.
You can check this by going to the 3D view (or having split windows so you can see the 3D and UV views at the same time) and making sure everything is selected, then deselect 1 vertex close to the optic nerve or the cornea. Back in the UV/image editor the vertex will disappear all connected edges and maybe more from your UV map, so you can work out how the map corresponds to the actual mesh surface.
::你可以通过进入3D视图 (或分开窗口,以便同时看到3D和UV视图) 来检查此情况,并确保所有选项都被选中,然后取消选择视神经或角膜附近的1个顶点.在UV/图像编辑器中,顶点将从UV图中消失所有连接的边缘,也许更多,因此您可以计算图与实际网状表面的对应.
Once you're done,
save your .blend file
and then
save your UV Face Layout
. This is done in the
UV's: Export UV Layout
.
::保存你的UV面部布局. 这是在UV的:导出UV布局中完成的.
Preparing A Template For Texturing
::准备一个模板
Now launch your image editor and open the UV face layout you just saved. (You probably saved it as a .png file, since that is Blender's default format for UV layouts) So we are now looking at a UV grid with the square and the 2 islands.
::现在启动图像编辑器,打开你刚才保存的紫外线面部布局. (你可能将其保存为 .png 文件,因为这是 Blender 对于紫外线布局的默认格式) 所以我们现在正在看紫外线网格与正方形和 2 个岛屿.
Open gimp and rescale the image to 4092 by 4092.
::打开gimp并将图像缩小到4092x4092.
One other element that will be useful to have in our template is a layer of markers that denote where the equator of the eye is, because what looks like the middle on the UV layout is not actually the middle. To find the middle, go back into Blender and count the rings of your eye mesh, starting at the seam of the cornea. Once you get to the equator, take note of how many rings it took to get there. Go back to your image editor and mark that area. You can mark it with a guide, or mark it with a coloring of some sort - as long as it's clear to you that it indicates the equator of the eye mesh. It may also be useful to mark the point where the transparency of the cornea should begin.
::另一个元素是我们模板中有用的标记层,标明眼睛赤道的位置,因为UV布局上看起来像是中间的东西实际上不是中间. 为了找到中间,回到Blender,从角膜的接开始,计算眼睛网的环数. 一旦到达赤道,请注意到达那里需要多少环. 回到图像编辑器并标记该区域. 你可以用指南标记它,或者用某种颜色标记它 - 只要你清楚它表明眼睛赤道. 也可能有用标记角膜网的透明度应该开始的点.

Now we will make the texture. To begin make the inside of UV square and islands white, a neutral colour.
::现在我们将做出质地. 开始让紫外线的内部方形和岛屿白色,中性颜色.
Do this by selecting (round or square) the UV island or square and then clicking 2 times on the bucket and set the Affected area to Fill whole selection then switch the black and the white colour by clicking on the arrows in the toolbox (If you've no toolbox click on tools in the program header and click: new toolbox) and click with the bucket on the selected area and do this for every part of the eye.
::选择 (圆形或方形) 的紫外线岛或方形,然后双击桶,并将受影响区域设置为"填充"全选项,然后通过点击工具箱中的箭头来切换黑色和白色 (如果您没有工具箱,请点击程序头部中的工具,并点击:新工具箱),然后点击桶在所选区域,并对眼睛的每个部分进行此操作.
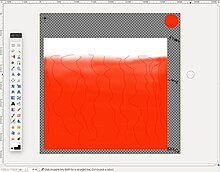
an eye is reddish at the back so make the back point directly reddish, I use FB2F05.
::眼睛在后面是红色的,所以让后面的点直接红色,我用FB2F05.
Select the back point so you can fill it with this beautiful colour.
::选择后面的点,这样你就可以填充它与美丽的颜色.
Select the square so you cannot "Spill" over the corners. We will paint the back with the same colour of the back point 'till over the middle of the eye. click the airbrush tool and increase the value of the size and also the flow if its a very transparent at the end it has to be very transparent.
::选择正方形,这样你就不能"溢出"过角. 我们将用同样的颜色的背点'直到在眼睛的中间画. 点击空气刷工具,并增加大小的值,也流量如果它的一个非常透明的最后它必须是非常透明的.
Noob Note: make the selection a little bit bigger then the square or the UV island to prevent seams.
::让选项稍微大一些,
Search for a nice iris texture:
::寻找一个漂亮的虹膜纹理:
-
Google: iris texture [
[3]
]
::谷歌:虹膜纹理
Make sure you have around 1024 by 1024 pixels.
::确保你的像素大约为1024*1024.
Open with gimp and crop it out by pressing image -> Crop to selection save it as .png and use it later. If it's a little bit to small, don't worry you won't render it that big.
::按下image -> Crop to selection以保存为.png,以后使用.如果它太小,不要担心它不会变得那么大.
If you like you can make blood vessels in the cornea with the pencil tool and the colour FF0000. Make sure you shrink the to about 10. Only don't try to copy my vessels cause they are to bad.
::如果你喜欢你可以在角膜用笔工具和颜色FF0000.确保你缩小到大约10.只是不要试图复制我的血管,因为他们太坏.
You can design your own texture to apply.
::您可以设计自己的纹理.
Save your texture as .png.
::保存你的纹理为.
Bump Map - The Sclera
::撞击地图 - - 斯克莱拉
If you want to use a bump map in your eye.
::如果您想使用眼中的凸起地图.
Create a material
for your eyeball. Then within that material
create a texture
. Name this texture something like "
BumpMap(Procedural)
". Set the texture type to
clouds
. A noise size of
0.25
with a noise depth of
2 or 3
is fine, and you can experiment with other values if you like. The other texture settings can be left at their defaults.
::创建一个材料为你的眼球. 然后在该材料创建一个纹理. 命名这个纹理类似"BumpMap(程序". 设置纹理类型云. 噪声大小为0.25的噪声深度为2或3是好的,你可以尝试其他值,如果你喜欢. 其他纹理设置可以留在他们的默认值.
Now we are going to bake this procedural texture to get an image-based UV texture that we can edit in our paint program. Why? Because there is not an even level of bumpiness around the eyeball. The sclera has bumps, while the cornea doesn't. If your cornea was bumpy, your vision would be distorted. We want our 3D eyeball to accurately convey this subtle difference when light is reflected from the surface.
::现在我们将把这个过程性质感烤成基于图像的紫外线质感,然后我们可以在涂料程序中编辑.为什么?因为眼球周围没有均的凸起. 眼膜有凸起,角膜没有. 如果你的角膜是凸起的,你的视力会被扭曲. 我们希望我们的3D眼球能够准确地传达光线从表面反射时的微妙差异.
Before baking the texture, there are some parameters we must specify. In the materials panel click the
Map To
tab. The Color button is depressed by default, so you can leave it as is. Make sure this is the only depressed button. Then
change the color to black
.
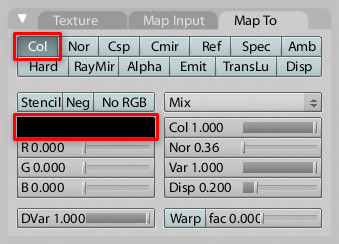
::在烤面料之前,我们必须指定一些参数. 在材料面板中,单击"映射到"选项卡. 默认情况下,颜色按是压缩的,所以您可以将其保持不变. 确保这是唯一压缩的按. 然后将颜色更改为黑色.
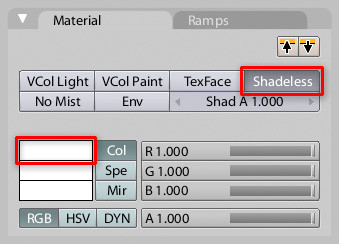
Now go to the
Material
properties. Change the diffuse color to
white
and click the
Shadeless
checkbox.
::现在进入"材料属性", 将分散色调改为白色, 单击"无色调"选项框.
Note: In this particular case it doesn't actually matter which of these colors is set to white and which is set to black. The end result is basically the same, and you can always invert the image later.
::值得注意的是,在这种情况下,无论哪种颜色是白色,哪种是黑色,最终结果基本相同,你也可以在以后反转图像.
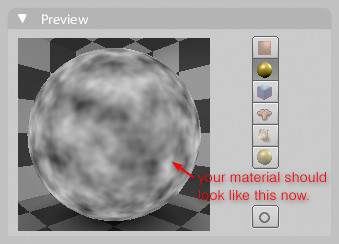
Check the Material Preview window to make sure it looks right.
::检查材料预览窗口以确保它看起来对.
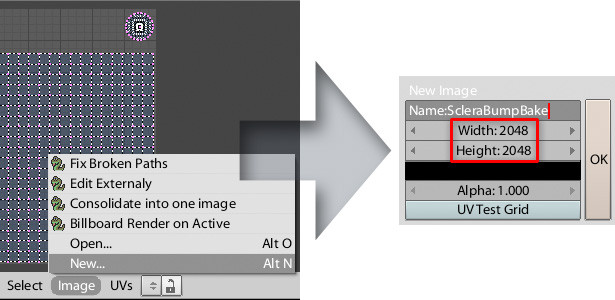
Time to bake your eye. Make sure your eyeball object is selected and go into
UV Face Select Mode
. Then
split your screen
and set one viewport to the
UV/Image Editor
. From the menu at the bottom of the UV/Image Editor, choose
Image > New
. Enter a name like "
ScleraBumpBake
" and set both the Width and Height to
2048
(to match your UV guide). Click "OK" and a new all-black image will appear behind the UV grid.
::时间眼睛. 确保选择眼球对象并进入UV面部选择模式. 然后将屏幕分割并将一个视窗设置为UV/图像编辑器. 从UV/图像编辑器底部的菜单中,选择图像>新. 输入"ScleraBumpBake"这样的名字并将宽度和高度设置为2048 (以匹配您的UV指南). 点击"OK",UV网格后面会出现一个全黑图像.
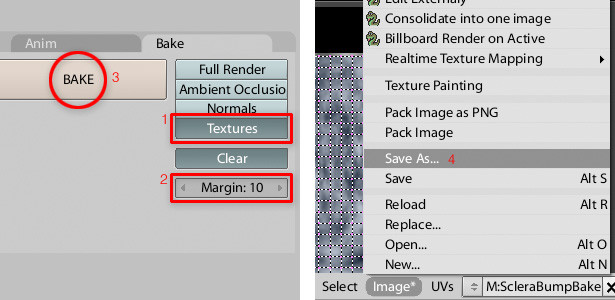
Go to
3D view
then in the render properties to Bake and click
Textures
at the Bake-mode drop down menu . Then set the margin to
10
and click the
BAKE
button. You will see the black image in the
UV/Image Editor
fill in with your bump texture. From the menu choose
Image > Save As Image
.
::进入3D视图,然后在染属性中到Bake,然后在Bake-mode下拉菜单中点击纹理.然后将边缘设置为10并点击BAKE按.您将看到UV/图像编辑器中的黑色图像填充您的凸起纹理.从菜单中选择图像> 保存为图像.
Now save your .blend file. You are able to make the rest of the eye yourself and if you forgot, read to previous tutorials.
::现在保存你的.blend文件.你可以自己做眼睛的其余部分,如果忘了,请阅读之前的教程.