Blender 3D:零基础到专业级-单元3:拓展视野
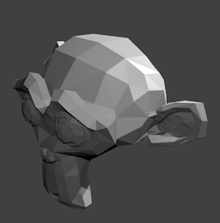
Open a new Blender document. Delete the default cube, and insert the Monkey (Suzanne) instead. Hit F12 to render. You should get something like this.
::打开一个新的Blender文档. 删除默认的立方体, 插入子 (苏珊娜) 代替. 按F12进行染. 你应该得到这样的东西.
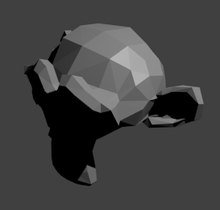
See how the character’s face—arguably the most important part you usually want to look at—is in shadow? That is absolutely terrible lighting.
::看到角色的脸, 无疑你最想看的部分是影子?
In this section, we will look at how to improve the lighting of this scene. The object of the game is not to get rid of
all
shadows, because flat-lit scenes tend to look pretty boring, too. Instead, we will look at how to make imaginative use of the placement and strength of highlights and shadows, to add interest and realism to the scene.
::在本节中,我们将探讨如何改善这一场景的照明.游戏的目的不是去除所有的阴影,因为平面照明场景也往往看起来很无聊.相反,我们将探讨如何创造性地利用亮光和阴影的位置和强度,为场景增加兴趣和现实性.
|
|
If you have any experience with photography
, a lot of this material should be familiar to you. Lighting in 3D rendering borrows a lot from the accumulated experience that photographers have had with lighting real-world scenes. However, because computer graphics cannot be 100% faithful to the laws of physics, some limitations apply. And also some tricks become possible that are simply not achievable in the real world.
|
In photography, there are basically two kinds of lighting setups: outdoor and indoor. In the real world, outdoor lighting (at least in daylight) is dominated by the Sun. This is a single, extremely strong light source. But there is also indirect sunlight reflected off other objects, including the sky, and these tend to soften the shadows and even add some colour to them. Outdoor close-up model photo shoots also frequently make use of metal sheets, held up by support crew, to deliberately add more of this indirect reflection and make the lighting of a model more even.
::在摄影中,基本上有两种照明设置:室外和室内.在现实世界中,室外照明 (至少在白天) 是由太阳主导的.这是一个单一的,极强的光源.但也有间接的阳光反射到其他物体,包括天空,这些往往会使阴影变软,甚至增加一些颜色.户外近距离模型拍摄也经常使用金属板,由支持人员举起,故意增加更多的间接反射,使模型的照明更加亮.在摄影中,近距离模型拍摄通常使用金属板,以增加更多的间接反射,使模型的照明更亮.在摄影中,近距离模型拍摄通常使用金属板,以增加更多的间接反射,使模型的照明更亮.在摄影中
Indoor (studio) lighting setups are commonly described in terms of the number of lights employed, commonly “one-point”, “two-point” or “three-point” for 1, 2 or 3 lights.
::室内 (工作室) 照明设置通常以使用的灯数来描述,通常为1,2或3灯的"一点","两点"或"三点".
In 3D graphics, you can cheat over this outdoor/indoor distinction. After all, the Sun is just another light source you can choose to place in a scene. Instead of metal reflectors, it is usually simpler to just add more lights, even if it is meant to be an outdoor scene. In Blender, the lights themselves need not show up in the render, only their illumination of the scene.
::在3D图形中,你可以欺骗这种室外/室内区别.毕竟,太阳只是你在场景中选择放置的另一个光源.而不是金属反射器,通常更简单地添加更多的光线,即使它是户外场景.在Blender中,光线本身不需要在染中显示,只需要它们对场景的照明.在Blender中,光线是最重要的.
One-Point Lighting
::一点照明
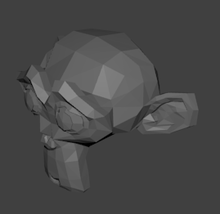
Continuing on from the above example, move the default lamp so it is roughly in the same location as the camera. Now your render should look something like this:
::继续从上述示例,移动默认灯,使其大致与相机相同位置.现在你的染应该看起来像这样:
This is similar to the lighting you get when you take a picture on a point-and-shoot or cameraphone with flash enabled: because the light source is close to the lens, you don’t see many shadows (think about it: the parts the light doesn’t reach are close to the parts your vision doesn’t reach), leading to a very flat image. This is why experienced photographers often try to avoid using the flash.
::这与你用指针拍摄或用闪光灯启动相机拍摄照片时所得到的照明相似:因为光源靠近镜头,你看不到很多阴影 (想想:光线不到达的部分靠近视力不到达的部分),导致图像非常平坦.这就是为什么经验丰富的摄影师经常试图避免使用闪光灯.
Two-Point Lighting
::两点照明
This time I have gone back to the default light position, and added a second light (“fill light”) close to the camera, reducing its strength to 0.5, while the original “key light” stays at 1.0. That way the second light fills in the shadows just enough to make things legible, without flattening out the lighting completely.
::这次我又回到默认的光位置,并将第二个光 (填光) 添加到相机附近,将其强度降低到0.5,而原来的关键光保持在1.0. 这样第二个光充满了足够的阴影,使物体可读,而不会完全平整照明.
Set the direction of the light using object rotation. The light must be selected, press the r and move the mouse to change the angle.
::通过对象旋转来设置灯光的方向.必须选择灯光,按下r键并移动鼠标来改变角度.
The important point is that
the key (brightest) light is not at the camera position
. That way, the image will contain some interesting shadows.
::重要的是,关键 (最明亮) 的光线不在摄像头位置. 这样, 图像将包含一些有趣的阴影.
Three-Point Lighting
::三点照明
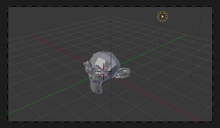
Now we add a
third
light, called the “backlight”. This is positioned behind and a little above the model, and serves to accentuate the upper silhouette (particularly the head and shoulders), and make our model stand out from the background. I set its energy to 2.0, to increase the effect. This screenshot shows what should be a good position for this light (it is directly above the green line of the Y-axis). Put it too close to Suzanne, and her bald head will glow a little
too
brightly.
::现在我们添加了第三个灯,称为"背光".它位于模型的后面,稍微高于模型,用于突出上部的轮 (特别是头部和肩部),使模型从背景中脱而出.我将其能量设置为2.0,以增加效果.这张截图显示了这个灯应该在什么位置 (它直接位于Y轴的绿线上方).把它放在苏珊娜太近,她的头会发出太多的光.
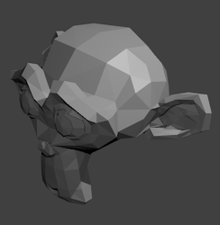
Now the render looks like this. Does the effect look familiar? You should have seen something like it in countless close-ups in film and TV, as well as portraits.
::现在的染效果是这样的. 效果是否熟悉? 你应该在电影和电视上看到类似的近距离拍摄,
Other Lighting Setups
::其他照明设置
Of course, there are countless other ways to light a scene. The above ones are mainly intended for close-ups and portraits. But where there are multiple characters in a scene, or even no characters at all and just the scene, you may want to position multiple lights to draw attention to some parts or characters while playing down other parts.
::当然,还有无数其他方法来照亮场景.上述方法主要是用于近距离拍摄和肖像.但在场景中有多个角色,甚至没有角色,只是场景,你可能想将多个灯光定位以吸引注意力,在播放其他部分时,吸引一些部分或角色.