Blender 3D:零基础到专业级-单元3:拓展视野
The Graph Editor is where you exercise the lowest-level control over the details of an animation, right down to the settings and placement of each keyframe. You
previously learned
how to create and delete keyframes; now you will learn how to get inside them and tweak them.
::图形编辑器是您对动画细节的最低级别控制的地方,甚至是每个关键的设置和放置.您之前已经学习了如何创建和删除关键;现在您将学习如何进入它们并调整它们.
Let’s start by creating a very basic animation, using the default cube. As you did in “
First Keyframes
”, set up a couple of Location keyframes, one at frame 1, and another positioning the cube a few widths away at frame 25. Scrub between these times in the Timeline, and confirm that the cube moves between those two positions.
::让我们从创建一个非常基本的动画开始,使用默认的立方体.就像你在"第一键"中所做的那样,设置几个位置键,一个在1处,另一个将立方体定位在25处.在时间线中,在这些时间之间擦拭,并确认立方体在两个位置之间移动.
Now, add a new window to the left of the 3D view
![]() , and change its type to Graph Editor
, and change its type to Graph Editor
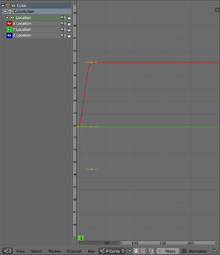
![]() . Provided the cube is still selected, it should show something like this. The Location controls at the left will likely initially appear collapsed to a single line; click on the right-pointing triangle so it points downwards, revealing the separate X, Y and Z Location control lines.
. Provided the cube is still selected, it should show something like this. The Location controls at the left will likely initially appear collapsed to a single line; click on the right-pointing triangle so it points downwards, revealing the separate X, Y and Z Location control lines.
::现在,在3D视图的左边添加一个新窗口,并将其类型更改为图形编辑器.如果立方体仍然被选择,它应该显示这样的东西.左边的位置控制可能会最初显示为单一行;点击右指三角形,以便向下指向,显示单独的X,Y和Z位置控制线.
The curves at the right are the
FCurves
; the colours for the X, Y and Z location curves correspond to the colours of the squares surrounding the eye icons in the control lines at left.
::右边的曲线是FCcurve; X,Y和Z位置曲线的颜色与左边控制线中的眼睛图标周围方块的颜色相对应.
|
|
Remember, the Graph Editor only shows animation data for
selected objects
. If you ever wonder why the right curves are not showing up here, make sure you have the right objects selected in the 3D view.
|
Note the following features of the display:
::需要注意以下显示器的特点:
-
The vertical green line represents the current frame. It always shows the same frame as the corresponding line in the Timeline
 , and also the frame number at the lower-left corner of the 3D view
 . Just as in the Timeline, you can set its position with LMB , or use the arrow keys to step forward/backward one frame (right/left arrows) or jump to the next/previous keyframe (up/down arrows).
::“垂直的绿线代表当前帧。它总是显示与时间轴中相应线相同的帧,以及3D视图左下角的帧数。就像在时间轴中一样,你可以用鼠标左键设置它的位置,或者使用箭头键向前/向后移动一帧(右/左箭头)或跳到下一个/上一个关键帧(上/下箭头)。” -
There is also a horizontal green line which is positioned with LMB . This can be used (together with the vertical line) for snapping selected control points to the specified value or time.
::还有一个带有LMB的水平绿线.它可以 (与垂直线一起) 用于将选定的控制点切换到指定的值或时间. -
The control points on each curve, at the position of each keyframe. These are black when not selected, or a pinkish colour when selected. Various keyboard shortcuts you should be familiar with from the 3D view also apply here: RMB to select one point (deselecting everything else), SHIFT + RMB to add/remove a point to/from the selection, A to toggle selecting everything/nothing, even B to do a box selection, even C ircle select is available.
::每个曲线上的控制点,在每个键框的位置.如果不选,它们是黑色的,如果选中,则是粉红色的.你应该从3D视图中熟悉的各种键盘快捷键也适用于这里:RMB选择一个点 (取消选择其他所有内容),SHIFT + RMB添加/删除点到/从选择中,A切换选择一切/无,甚至B进行框选择,甚至C ircle select可用. -
The little handles joined to each control point by straight lines. FCurves are
Bézier curves
, just like those commonly found in 2D illustration programs, or in Blender’s own
curve objects
. By default each control point gives a smooth curve, causing the position (or other object property) to smoothly accelerate and decelerate; but you can change the handle type with V , if for example you want a more sudden change.
::控制点的小柄通过直线连接到每个控制点.FCurves是贝齐尔曲线,就像2D插图程序中常见的曲线一样,或者在Blender的自己的曲线对象中.默认情况下,每个控制点都会给出一个光滑的曲线,导致位置 (或其他对象属性) 顺利加速和减速;但是如果你想要更突然的变化,你可以用V来更改控制点类型. -
The eye, speaker and padlock icons in each control line.
-
Clicking the eye icon causes the eye to close, and the corresponding FCurve to disappear from the display; this reduces clutter and makes it easier to edit just the right curve. Click the closed eye to open it again and make the hidden curve reappear.
::点击眼睛图标会导致眼睛关闭,并使相应的FCurve从显示屏消失;这减少了杂乱,使编辑正确的曲线变得更容易.点击闭眼睛重新打开它,使隐藏的曲线重新出现. -
Clicking the speaker icon
mutes
(temporarily disables) the effect of the corresponding curve, without actually deleting it. This may be useful for debugging complex motions. When muted, the radiating arcs disappear from the speaker, and the curve turns white; click the speaker again to unmute the curve.
::点击扬声器图标会使相应曲线的效果变得默默 (暂时禁用),而不会实际删除它.这可能对调试复杂的运动有用. 当默默时,发射弧从扬声器上消失,曲线变白;再次点击扬声器以解除曲线的默默. -
Clicking the padlock locks the curve against selection and editing, while keeping it visible. Clicking on the closed padlock opens it again, restoring the ability to select and edit the curve.
::点击挂锁将锁定曲线,防止选择和编辑,同时保持可见性. 点击关闭的挂锁将再次打开,恢复选择和编辑曲线的能力.
::每个控制线中的眼睛,扬声器和挂锁图标.点击眼睛图标会导致眼睛关闭,相应的FCcurve从显示屏消失;这减少了混乱,使得编辑正确的曲线变得更容易.点击闭眼睛重新打开它,使隐藏的曲线重新出现.点击扬声器图标会使相应的曲线的效果变得默默 (暂时禁用),而不会实际删除它.这可能对调试复杂的动作有用.当默默时,发射弧从扬声器中消失,曲线变白;扬声器再次点击解除曲线.点击锁会锁定曲线,防止选择和编辑,同时保持可见.点击闭锁会再次打开它,恢复选择和编辑曲线的能力. -
Clicking the eye icon causes the eye to close, and the corresponding FCurve to disappear from the display; this reduces clutter and makes it easier to edit just the right curve. Click the closed eye to open it again and make the hidden curve reappear.
-
Clicking on the text or background (i.e. not in any icon) on a control line with LMB selects the entire curve. You can also SHIFT + LMB to select multiple curves at once. Pressing DEL or X within the area of the control lines will get rid of the
entire
selected curve(s)!
::点击LMB的控制线上的文本或背景 (即不在任何图标中) 将选择整个曲线.您也可以同时选择多个曲线.按DEL或X在控制线区域内将消除整个选定的曲线 ()! -
You can scroll around the view with MMB . Or you can drag the scroll indicators, anywhere except at their ends.
::你可以使用MMB来滚动视图. 或者你可以拖动滚动指示器,除了在它们的末端. -
The view can be zoomed with the mouse wheel, as in the 3D view. However, this zooms both horizontally and vertically by the same factor. It is characteristic of the Graph Editor that the curves are likely to be stretched very tall, while squashed very narrow. To zoom on each axis independently, drag on the ends of the scroll indicators: lengthen them to zoom out, shorten them to zoom in.
::图表可以用鼠标轮放大,就像3D视图一样.但是,它以相同的因素在水平和垂直上放大.图表编辑器的特点是曲线可能被拉得很高,而被压得很窄.为了独立地放大每个轴,拖动滚动指示器的末端:将它们延长放大,缩短它们放大. -
You can also use Home and NUM. , just like in the 3D view, to zoom and centre the view on the entire set of curves or just selected curves or parts thereof.
::像3D视图一样, 缩放和将视图的中心放在整个曲线集或仅仅是选择的曲线或部分曲线上.
Set the current frame to something in-between the two keyframes, e.g. frame 12. Select RMB one of the control points at frame 25, and try moving G it around: how does it affect the cube in the 3D view? Constrained moves are very useful here:
::设置当前到两个关键之间的某个位置,例如12.选择RMB在25中的一个控制点,并尝试移动G:它如何影响3D视图中的立方体?受约束的移动在这里非常有用:
-
G Y to change the value of the FCurve at the control point without moving the keyframe in time
::改变控制点上的FCurve值,而无需在时间内移动关键 -
G X to move the control point in time without changing the value it gives to the FCurve. You can move one control point past another; Blender will automatically reconnect the curve segments to ensure the curve does not loop back on itself.
::G X 能够在时间内移动控制点,而不会改变它给 FCurve 的值.您可以将一个控制点移动到另一个控制点;混合器将自动重新连接曲线段,以确保曲线不会反复循环.
Also, go to frame 25 (the time of the second keyframe), and make sure nothing is selected. Now go to the Select menu, and choose the option “Column on Current Frame” (keyboard shortcut CTRL + K ): this selects all keyframes located at the current frame time. Now you could, e.g. use G X to adjust the position of all control points for this keyframe in time.
::另外,进入 25 (第二个键的时间),并确保没有任何选项.现在进入选择菜单,选择选项"当前上的列" (键盘快捷键 CTRL + K):此选项选择位于当前时间的所有键.现在你可以,例如使用 G X 来调整此键的所有控制点的位置.
Inserting and removing control points:
You can, of course, delete selected control points with DEL or X in the usual way. You can also insert control points at the current time with I : this will pop up a menu asking whether you want to insert control points for all editable channels (FCurves), or only the curves containing currently-selected control points. The new control points will be inserted so as to make minimal difference to the actual shapes of the curves; but you can of course tweak them around afterwards.
::插入和删除控制点:您可以以通常的方式删除选择的控制点,使用 DEL 或 X.您还可以在当前时间使用 I 插入控制点:此时会弹出一个菜单,询问您是否要为所有可编辑道 (FCurves) 插入控制点,或者仅包含当前选择的控制点的曲线.新控制点将插入以使曲线的实际形状变得最小;但您当然可以在以后调整它们.
Rescaling an entire animation sequence:
Supposing you painstakingly set up an animation sequence, only to discover that the total length of it is not quite right, either too long or too short. It is easy enough to lengthen the entire sequence (making it run slower), or shorten it (making it run faster).
::调整整一个动画序列的尺寸:假设你精心设置一个动画序列,但发现它的总长度不太对,要么太长,要么太短.很容易延长整个序列 (使其运行更慢),或者缩短它 (使其运行更快).
First of all, make sure all the affected objects are selected. In the Graph Editor, ensure all the relevant FCurves are visible and not locked. Set the current time to frame 1. Press A once or twice to ensure that
all
control points are selected.
::首先,确保所有受影响的对象都被选中. 在图形编辑器中,确保所有相关的FCurves都可见并且没有被锁定. 设置当前时间为 1. 按A一两次以确保所有控制点被选中.
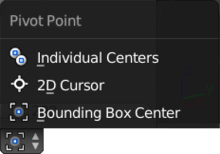
In the window header for the Graph Editor, find the Pivot Point menu (as at right). Make sure the “2D Cursor” option is selected. Now press S X to rescale the entire animation in time, keeping only keyframes at the current time (which you set to frame 1, remember) unchanged. Either type in a suitable number to get an exact new length, or adjust it by eye so the last keyframe ends up at the right frame number. As always, press ENTER to confirm the transformation.
::在图形编辑器的窗口头部,找到 Pivot Point 菜单 (如右图). 确保选择了 2D 标签 选项. 现在按 S X 按下即可及时调整整个动画,只保留当前时间的关键 (您设置为 1,请记住) 不变. 要么输入合适的数字以获得精确的新长度,要么通过眼睛调整,以便最后一个关键以正确的号结束. 如往常,按 ENTER 确认转换.