Blender 3D:零基础到专业级-单元3:拓展视野
What is a Lattice?
::什么是格子?
A Lattice is essentially a simple container that can be used to deform and manipulate a more complex mesh in a non-destructive manner (i.e. A lattice can be used to seriously deform a mesh then, if the lattice is later removed, the mesh can automatically return to its original shape).
::格子基本上是一种简单的容器,可以用来以非破坏性方式变形和操纵更复杂的网格 (即,可以使用格子严重变形网格,然后,如果后来删除了格子,网格可以自动恢复原来的形状).
How to add and use a Lattice
::如何添加和使用格子
A Lattice is added to the scene in the same way other objects are added. Either:
::格子是以相同的方式添加到场景中.
Noob Note
For Blender 2.62 or 2.63 users, I recommend referring to this
Lattice Modifier video tutorial
by Ed Lazor for animating the lattice, as numerous interface changes have occurred between Blender 2.4x and 2.6x.
::对于Blender 2.62或2.63用户,我建议参考Ed Lazor的Lattice Modifier视频教程来动画格子,因为Blender 2.4x和2.6x之间发生了许多界面变化.
-
Shift + A over the 3D window and choose
Lattice
from the pop-up menu, or
::在3D窗口上按Shift+A,从弹出菜单中选择格子,或者 -
Press Space over the 3D window and choose
Lattice
from the pop-up menu (
Note: does not work in recent versions of Blender.
), or
::在3D窗口上按空间,并从弹出菜单中选择格子 (注意:不适用于最新版本的Blender),或 -
Click
Add
in the 3D View window header (located at the bottom of the 3D View) and choose
Lattice
from the drop-down menu
::点击在3D视图窗口标题 (位于3D视图底部) 中添加并从下拉菜单中选择格子
The default Lattice looks just like a cube when first added except that it is just one Blender Unit (BU) wide whereas a mesh cube is 2 BU wide. When the Lattice is added, the window remains in
Object Mode
and the Lattice can be moved, resized and rotated like any other Blender Object.
::默认的格子在第一次添加时看起来就像一个立方体,但它只有一个混合器单位 (BU) 宽,而网状立方体是2BU宽.当加上格子时,窗口仍然处于对象模式,并且可以像任何其他混合器对象一样移动,改变尺寸和旋转.
On its own, a Lattice serves no purpose whatsoever since it can't be seen in a rendered image. Its only use is to manipulate another object and so, to be useful, we need to associate another object with it. The current method for doing this is by applying a "
Lattice Modifier
" to a Blender object.
::由于它不能在染图像中看到,因此它本身就没有任何用途.它唯一的用途是操纵另一个对象,因此,为了有用,我们需要将另一个对象与它关联起来.目前的方法是将"格子修改器"应用于混合器对象.
The basic workflow is:
::工作流程的基本原理是:
-
Add a mesh (cube, cylinder, cone, sphere, etc.)
::添加一个网格 (立方体,圆柱体,圆,球体等) -
Add a Lattice
::添加一个格子 -
In the Object Context
 of the Properties window, enter the name of the Lattice (The default name is Lattice, Lattice.001, Lattice.002, etc. - or you can give it a useful name that you'll remember later)
::在属性窗口的对象上下文中,输入格子的名称 (默认名称是格子,格子.001,格子.002,等等 - 或者你可以给它一个有用的名字,你会记得以后) -
Select the mesh
::选择网格 -
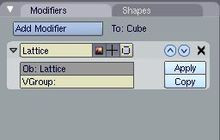
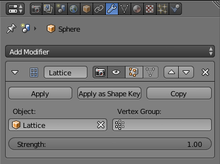
Go to the Modifiers Context
 in the Properties window. Click
Add Modifier
> Lattice
in the Properties window. Click
Add Modifier
> Lattice
::在属性窗口中,请访问修改器上下文. 点击添加修改器>格子
NOTE:
In older versions of Blender, a lattice was applied using a parent method - select the mesh, then select the Lattice, then press Ctrl + P and choose "Lattice Deform". While this method is still available, it does not offer the full functionality of the newer Lattice Modifier. If you use the parent method, you will need to press the "Make Real" button in the modifiers palette to enable the modifier functionalities. Using the method, the Lattice becomes a parent and a modifier. As a parent, it will act on the mesh in Object Mode whereas a true modifier lattice only influences the mesh when altered in Edit Mode.
::注意:在旧版本的Blender中,使用父方法应用了格子 - 选择网格,然后选择格子,然后按Ctrl + P并选择"格子变形".虽然这个方法仍然可用,但它不提供最新的格子修改器的全部功能.如果您使用父方法,则需要按修改器调色板中的"使其真实"按以启用修改器功能.使用该方法,格子将成为父和修改器.作为父,它将在对象模式中对网格进行作用,而真实修改器格子仅在编辑模式中更改时影响网格.
Now, we can change the Lattice in
Edit Mode
and any changes we make to it will affect the mesh.
::我们可以在编辑模式中更改格子, 任何我们对其进行的更改都会影响网格.
Note: Applying the Modifier Correctly
::注意:正确应用修改器
When adding the modifier to your object, you must enter exactly the same name as your lattice. The default is
Lattice
with a capital "L" but if you've changed it or have more than one Lattice, then you will need to enter the new name. When you enter a valid Lattice name, the name stays visible in the Ob: box. If your entry disappears then you've entered the name incorrectly.
::当添加修改器到你的对象时,你必须输入与你的格子完全相同的名称.默认是大写"L"的格子,但如果你已经更改了它或有多个格子,那么你需要输入新的名称.当你输入一个有效的格子名称时,名称在Ob:框中保持可见.如果你的输入消失了,那么你输入了错误的名称.
One simple way to get the right name is to select the Lattice, go to F9 , Link and Materials panel and where it says Ob:Lattice or Ob:Lattice.001 etc., move the mouse over this field and press Ctrl + C (
don't click on it, just hover over it
). This copies the Lattice name. Then select your object, go to the Lattice Modifier panel, hover the mouse over the Ob: field and press Ctrl + V to paste the name in. Now it should stay there and your Lattice should work in Edit Mode.
::获取正确名称的一个简单方法是选择格子,进入F9,链接和材料面板,在Ob:Lattice或Ob:Lattice.001等字段上,将鼠标移动到该字段上,然后按Ctrl + C (不要点击它,只需移动鼠标). 这复制了格子名称. 然后选择对象,进入格子修改器面板,移动鼠标到Ob:字段上,然后按Ctrl + V粘贴名称. 现在它应该停留在那里,你的格子应该在编辑模式中工作.
Noob note: I recommend the method with Ctrl + P for animation.
::我建议使用Ctrl+P来动画.
Basic Exercise:
::基本运动:
-
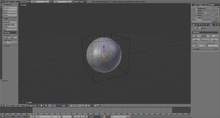
Start with a new Blender scene, delete the default cube and add a UVsphere ( Shift + A > Mesh > UV sphere). Accept the default 32 Segments and Rings. You could use any of the mesh shapes but because the sphere is heavily subdivided (
made up of lots of edges and faces
), you will get a better idea of what the Lattice is doing.
::开始一个新的混合器场景,删除默认的立方体,并添加一个UVsphere (Shift + A > Mesh > UV球).接受默认的32个段和环.你可以使用任何的网格形状,但由于球体是重分的 (由许多边缘和面组成),你会得到一个更好的想法,什么是格子. -
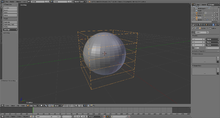
Tab back into Object Mode then add a Lattice. It is generally wise to resize the Lattice so that it surrounds the mesh it will be deforming. So, press S and enlarge the lattice to 2 BU wide.
::按一下"S",然后将格子扩大到2BU宽. 按一下"S",将格子扩大到2BU宽. -
Select ( RMB ) the Sphere and add a Lattice Modifier to it. Make sure that you type the exact Lattice name correctly into the box. Nothing appears to happen but that's fine. In newer Blender versions click the field under the label "Object:" and select the desired lattice object from the drop-down menu.
::选择 (人民币) 球体并添加一个格子修改器.请确保您正确地输入格子名称. 似乎没有发生任何事情,但没关系. 在较新的混器版本中,单击标签"对象:"下的字段,并从下拉菜单中选择所需的格子对象. -
Now select your Lattice, Tab into Edit Mode, select just one control point (a control point looks like a vertex) on the Lattice and move it around. You will see the sphere mesh stretching and squashing relative to that control point. Move each Lattice control point one at a time and see just how far you can deform the mesh. Zoom in your 3D window if you need a closer look.
::现在选择你的格子,进入编辑模式,在格子上选择一个控制点 (控制点看起来像一个顶点),然后移动它.你会看到球网相对于控制点而延伸和压缩.一次移动每个格子控制点,看看你能变形多少.如果需要更仔细看,请放大3D窗口. -
The control points of the Lattice can be moved, scaled and rotated in the usual ways. Try selecting a few of all the control points and scaling them ( S ) or Rotating them ( R ) and watch the mesh follow along.
::格子的控制点可以以通常的方式移动,缩放和旋转.尝试选择所有控制点中的一些并缩放它们 (S) 或旋转它们 (R) 并观察网格的跟随. -
Now, exit Edit Mode ( Tab ) and select the sphere in Object Mode. Go to the modifiers panel and press the big "X" button to remove the modifier. Despite all that deforming, the sphere immediately returns to its original size and shape. Nothing was really changed in the sphere's mesh data. Immediately re-apply the modifier as before and see the Lattice immediately apply its own deformation to the sphere again.
::现在,退出编辑模式 (Tab) 并选择物体模式中的球体.进入修改器面板,按下大"X"按去除修改器.尽管变形,球体立即恢复到原来的大小和形状.球体的网格数据中没有真正改变.立即重新应用修改器,并看到格子立即将自己的变形再次应用于球体.
Getting more involved with Lattice
::更多地参与Lattice
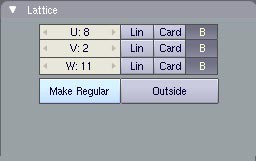
The default Lattice is two control points high, two wide and two deep, i.e., it is two control points wide in each direction (these are referred to as the U, V and W directions). However, we can change the number of control points in one, two or all directions. This is done by selecting the Lattice, going to the Lattice Panel ( F9 ) and changing the values in the U, V & W buttons. If you decrease one figure to a value of 1, the Lattice will become two-dimensional (planar). Decreasing two values to 1 will change the Lattice to a line (one dimension). This can be useful, especially if the remaining value is increased, but is not the most common usage of Lattice.
::默认的格子是两个控制点高,两个宽和两个深,即每个方向有两个控制点宽 (这些被称为U,V和W方向).但是,我们可以在一个,两个或所有方向中改变控制点的数量.这可以通过选择格子,进入格子面板 (F9 ) 并改变U,V和W按中的值来完成.如果您将一个数字减少到1的值,格子将变为二维 (平面).将两个值减少到1将将格子更改为直线 (一个维).这可能是有用的,特别是如果剩余值增加,但不是格子的最常见使用方式.
UVW settings for Lattice
::格子的UVW设置
NOTE:
The
"Make Regular"
button will set the UVW control points of an unscaled Lattice to be exactly one Blender Unit apart in each direction. The
"Outside"
button effectively removes all the internal control points which are added when the UVW settings are higher than 2.
::注意:按"使正常"将设置未缩放的格子的UVW控制点,在每个方向上分别为1个混合器单元.按"外"有效地删除所有内部控制点,当UVW设置高于2时,这些控制点会被添加.
In most situations you will want to increase some or all the values as this gives you more control over complex deformations, much like a subdivided mesh. How much you increase the UVW directions depends entirely on how much detailed control you need over deformations. As you've already seen basic squash, stretch, shear and simple deforms can easily be achieved with the default 2,2,2 Lattice but by increasing the UVW values a little, a whole new range of deform possibilities becomes available.
::在大多数情况下,你会想要增加一些或所有值,因为这让你对复杂的变形有更多的控制,就像一个分成网格.你增加UVW方向的程度完全取决于你需要对变形有多详细的控制.正如你已经看到的,基本的,拉伸,剪切和简单的变形可以很容易地通过默认的2,2,2格子实现,但通过增加UVW值一点,可以获得全新的变形可能性.

Three Lattices with different UVW settings
::三个格子与不同的UVW设置
One thing to understand, however, is that a Lattice cannot bend the individual edges of a mesh (the lines connecting any two vertices) so the mesh must contain enough edges in order to apply complex lattice deformations to it. These edges must be genuine edges and not the virtual edges created by a subsurf modifier (Correction: Yes, they
can
be edges generated by a subsurf modifier, provided the subsurf comes above the lattice in the modifier stack for the object being deformed; use the up/down-arrow buttons next to each modifier to rearrange them as necessary). Edges can also be added to a mesh using a variety of tools including subdivide, knife and loop cuts (some info on these [
[1]
]).
::然而,要了解的一件事是,格子不能曲网格的各个边缘 (连接任意两个顶点的线),因此网格必须包含足够的边缘,以便对其应用复杂的格子变形.这些边缘必须是真实的边缘,而不是由底层修饰器创建的虚拟边缘 (纠正:是的,它们可以是由底层修饰器生成的边缘,前提是底层在被变形对象的修饰器堆中的格子上方;根据需要,使用每个修饰器旁的上/下箭头按重新排列它们).边缘也可以使用各种工具添加到网格中,包括分区,刀和循环切割 (这些信息中的一些).
New Note: Use K to open a menu for the knife, loop cuts, etc. Knives are used to add a vertex to each line you left click and drag the cursor over, and loop cuts allow you to make multiple cuts into your active object.
::刀子是用来在左键点击和拖动光标的每一行上添加一个顶点, 循环切割允许你在活动对象中进行多个切割.
About loop cuts: Ctrl + R also is a direct shortcut to a loop cut. Furthermore, loop cuts' main uses are for subsurf modeling. In order to accomplish a hard edge in a subsurfed object (for example the edges and corners of a wooden table or the bumpers of a car) you must apply loop cuts to the faces surrounding the edge and place them very close to them (and parallel). Experiment with a simple subsurfed cube and you'll see. Keep in mind this is why when modeling it is highly recommended to use quads. A loop cut will only cut a quad face, or every face connected with it in one direction, but only quads. Another main reason why it is recommended to model with quad faces is regarding animation but I suppose other tutorials will deal with that later. More information:
[2]
::关于循环切割:Ctrl + R也是循环切割的直接快捷方式.此外,循环切割的主要用途是用于地下面建模.为了在地下面对象中实现硬边 (例如木质桌子的边缘和角落或汽车的保险) 您必须将循环切割应用于边缘周围的面部并将它们非常接近它们 (并行).尝试一个简单的地下面立方体,你会看到.请记住,这就是为什么在建模时强烈建议使用四边形.循环切割只会切割一个面,或与它相连的每个面部在一个方向,但只有四边形.另一个主要的原因是建议使用四边形建模是关于动画,但我想其他教程将以后处理这些信息: 更多 [2]
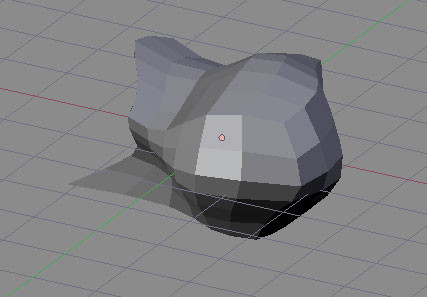
A simple subdivided cube after a complex lattice deformation
::复杂格子变形后的一个简单的分立方体
Intermediate Exercise
::运动的中期
For this exercise, start over with a new scene and repeat Steps 1 - 3 in the Basic Exercise above. Don't go into Edit Mode yet.
::对于这个练习,请从新场景开始,并重复上面的基本练习中的步骤1 - 3.
Basic Exercise:
::基本运动:
1. Start with a new Blender scene, delete the default cube and add a UVsphere (Spacebar>Add>Mesh>UVsphere). Accept the default 32 Segments and Rings. You could use any of the mesh shapes but because the sphere is heavily subdivided (made up of lots of edges and faces); you will get a better idea of what the Lattice is doing.
::1. 开始一个新的混合器场景,删除默认的立方体并添加一个UVsphere (空间>添加>网格>UVsphere).接受默认的32个段和环.你可以使用任何网格形状,但由于球体被重分 (由许多边缘和面组成);你将更好地了解格子在做什么.
2. Tab back into Object Mode then add a Lattice. It is generally wise to resize the Lattice so that it surrounds the mesh it will be deforming. So, press S and enlarge the lattice to 2 BU wide.
::2. 返回对象模式,然后添加格子.一般来说,更明智的是将格子的大小调整为它围绕着将要变形的网格.所以,按S,将格子扩大到2BU宽.
3. Select ( RMB ) the Sphere and add a Lattice Modifier to it. Make sure that you type the exact Lattice name correctly into the box. Nothing appears to happen but that's fine.
::3. 选择 (人民币) 球体并添加格子修改器. 确保您正确地输入格子名称. 似乎没有发生任何事情,但没关系.
-
In Object Mode, select the Lattice then press F9 and go to the Lattice Panel. Increase all the UVW values to 4. You will immediately see the change displayed in the 3D window.
::在对象模式中,选择格子,然后按F9进入格子面板.将所有UVW值增加到4.您将立即看到3D窗口显示的变化.
-
Tab into Edit Mode and play with the control points again. The first thing you might notice is that the corner control points have less influence now than before. This is because the effect is proportional to the distance of each point from the mesh. Move some points in the middle of a side face and you'll see the effect is significantly greater.
::按键进入编辑模式,再玩转控制点.你可能会注意到的第一件事是,角控制点现在的影响比以前少.这是因为效果与每个点与网格的距离成比例.移动一些点在侧面的中间,你会看到效果显著更大.
-
Try selecting groups of control points and pulling them away from the Lattice to stretch lumps and bumps out from the mesh. If you are familiar with the proportional edit tool, try that too - it works on Lattices just like it does on meshes.
::尝试选择控制点组,并将它们从格子拉开,以从网格中拉伸块和凸起.如果您熟悉比例编辑工具,也可以尝试 - 它在格子上工作,就像在网格上一样.
Try doing the same exercise but increasing values in only the W direction. (
U divides in the X direction, V divides the Y direction and W divides the Z direction
). So, set the UVW to 2,2,4 and play with the control points again in Edit Mode. Select the two rows of control points around the centre of the Lattice and scale them up ( S ) then Scale them down along Z-axis only ( S Z ). Try other transforms constrained on different axes for interesting, controlled results.
::尝试做同样的练习,但只在W方向增加值. (U在X方向分割,V在Y方向分割,W在Z方向分割).所以,将UVW设置为2,2,4并在编辑模式中再次使用控制点.在格子中心周围选择两个控制点的行,并将它们缩放 (S),然后仅沿Z轴缩放 (S Z).尝试在不同的轴上受制约的其他转换,以获得有趣的,可控的结果.
There are three different options for how the Lattice Modifier affects each UVW direction. These are Linear, Cardinal and B-Spline. All I can say is that B-Spline is the default and to find out what the difference is, press the buttons and see.
::对于格子修改器如何影响每个UVW方向有三种不同的选项. 这些是线性,枢纽和B-Spline. 我只能说B-Spline是默认的,要找出差异是什么,按下按看看.
Examples
::举例
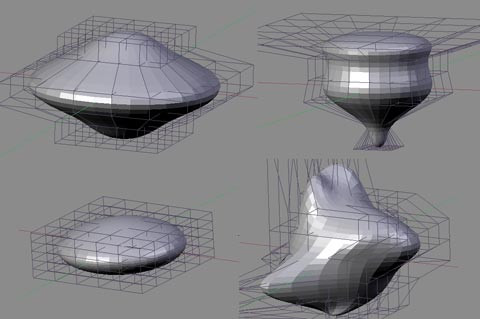
Some examples of a Lattice deforming a standard UV Sphere mesh (not smoothed)
::一些格子变形标准紫外球网的例子 (未光滑)
Making it stick
::让它坚持下去
To keep the mesh deformed permanently, you can select it and press the "APPLY" button in the Lattice Modifier panel. This "bakes" the mesh in the deformed position and disconnects it from the Lattice. The Lattice can then be deleted without the mesh returning to its original shape. This is useful if you are using the Lattice as a modelling tool rather than an animating tool.
::为了使网格永久变形,您可以选择它并按"APPLY"按在格子修改器面板中.这将""网格在变形位置并将其与格子断开.然后可以删除格子,而不会使网格恢复到原来的形状.如果您使用格子作为建模工具而不是动画工具,这很有用.
Also, instead of deleting the Lattice, you can use it to immediately modify another mesh. Simply move the Lattice over the new mesh in Object Mode then apply the Lattice Modifier to the new mesh. If the Lattice is already in a deformed state, the mesh will immediately be deformed too. Press Apply again to "bake" that mesh and keep re-using the already deformed Lattice on as many other meshes as you wish for matching results.
::此外,您可以使用它来立即修改另一个网格,而不是删除网格.只需在对象模式中将网格移动到新网格上,然后将网格修改器应用到新网格上.如果网格已经处于变形状态,网格也会立即变形.按下再次应用以""该网格,并继续在您希望的其他网格上重复使用已经变形的网格以获得匹配结果.
[Noob Note: I found it interesting that you can even apply the lattice deformation to the original object again once baked, and it will deform even further.]
::[小朋友:我发现有趣的是,你甚至可以将格子变形应用到原始物体,
Animating a Lattice
::动画一个格子
Creating Shape Keys
::创建形状键
We are going to animate the lattice using
Shape Keys
. Open a new Blender file, get rid of the default cube, and add a new UV Sphere with 32 segments and 32 rings. Then add a new Lattice and upscale it 2 times so it becomes visible ( S 2KEY Enter ). Scaling the lattice does not have any effect on shape of the sphere
until the lattice is deformed
. When adding new objects the 3D Cursor should be in the same spot (centering your cursor using Shift + C is recommended). Consequently the sphere and the lattice will have the same center. Finally, select the sphere, add a Lattice modifier, and select previously created lattice as object.
::我们将使用形状键动画格子.打开一个新的混合器文件,删除默认立方体,并添加一个新的UV球体,其中有32个段和32个环.然后添加一个新的格子并将其缩放2次,以便它变得可见 (S 2KEY Enter).在格子变形之前,格子的缩放对球体的形状没有任何影响.在添加新对象时,3D光标应该在同一位置 (建议使用Shift + C将光标定向).因此,球体和格子将具有相同的中心.最后,选择球体,添加一个格子修饰器,并选择先前创建的格子作为对象.
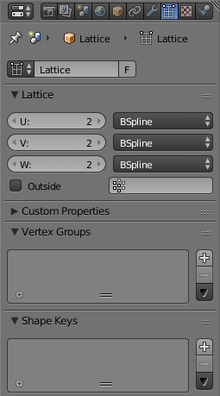
For the sake of simplicity we will only deform the sphere by making it wider or narrower. To achieve this, we will need to give our lattice more vertices that can be tweaked by adjusting the UVW parameters. In the Lattice context
![]() set the W to 6. Also check the "Outside" checkbox to have vertices only on the edges of the lattice cube (again, for the sake of simplicity).
Lattice parameters have to be set
before
adding any shape keys. You will not be able to change them later.
set the W to 6. Also check the "Outside" checkbox to have vertices only on the edges of the lattice cube (again, for the sake of simplicity).
Lattice parameters have to be set
before
adding any shape keys. You will not be able to change them later.
::为了简单,我们只会使球变形,使它变得更宽或更窄.为了实现这一点,我们需要给我们的格子更多的顶点,可以通过调整UVW参数来调整.在格子上下文设置W为6.还要检查"外"选项框,以确保只有格子立方体的边缘有顶点 (再次,为了简单).在添加任何形状键之前,必须设置格子参数.您将无法稍后更改它们.
Before deforming the lattice, add the "Basis" shape key:
::在变形格子之前,添加"基础"形状键:
-
Select the lattice.
::选择一个格子. -
Go to the Lattice Object Data context
 in the Properties window.
::在属性窗口中, 进入格子对象数据上下文. -
Under
Shape Keys
press the "+" button and the
"Basis"
key will appear (note that the UVW parameters are grayed out now).
::在"形状键"下按下"+"按,将出现"基础"按 (请注意,UVW参数现在已灰色化).
The "Basis" key represents our starting point (shape). When no others shape keys affect the shape of the lattice (their values are 0), its shape is only governed by the "Basis" key.
::"基础"键表示我们的起点 (形状).当没有其他形状键影响格子的形状 (它们的值为0),它的形状只受"基础"键的控制.
Now let's deform the sphere with additional shape keys to be able to animate the deformation later. The basic procedure is as follows:
::现在让我们用额外的形状键去变形球, 以后我们可以动画变形. 基本的过程如下:
-
Have the lattice selected in
Object Mode
.
::在对象模式中选择格子. -
Add a new shape key by clicking the "+" button once more. "Key 1" or similar should appear in the list. Naturally, you can rename the shape key by double-clicking on its name and entering a new one.
::通过再次点击"+"按添加一个新的形状键. "键1"或类似的应该出现在列表中.当然,您可以通过双击其名称并输入一个新的名称来重新命名形状键. -
Go to
Edit Mode
and deform the lattice to your liking.
You are editing the shape key that is currently selected.
::现在您正在编辑选定的形状键. -
Go back to
Object Mode
.
::返回对象模式.
You have probably noticed that your shape keys appear to have no effect when back in Object Mode. This is because their values are set to 0 by default. To change how your sphere really looks, select a shape key you have previously defined in the Lattice context
![]() , and set the
"Value"
slider to, for example, 1. If you have multiple shape keys defined, you may also "mix" them by setting multiple shape key values to non-zero. There are two more things to note:
, and set the
"Value"
slider to, for example, 1. If you have multiple shape keys defined, you may also "mix" them by setting multiple shape key values to non-zero. There are two more things to note:
::您可能已经注意到,当您回到对象模式时,您的形状键似乎没有任何影响.这是因为它们的值默认设置为 0. 要改变您的球体的真实外观,请选择您在格子上下文中先前定义的形状键,并将"值"滑块设置为,例如: 1. 如果您定义了多个形状键,则您也可以通过设置多个形状键值为非零来"混合"它们. 还有两个需要注意的事情:
-
The "Basis" key does not have a value. It is a starting point after all.
::"基础"键没有值.它毕竟是一个起点. -
In Edit Mode you edit shape keys one by one (separately). You could imagine that the value of the currently selected shape keys gets set to 1 and all other values are set to 0 while in Edit Mode.
::在编辑模式下,您可以单独编辑形状键. 您可以想象当前选择的形状键值被设置为1而其他所有值则设置为0在编辑模式下.
In this example we will create only two shape keys (beside the "Basis") and perform two simple deformations on the lattice (which will consequently deform the sphere, since the Lattice modifier is active), which will result in a goblet-like shape. Create a new shape key "Key 1" before deforming the lattice further. This way you will edit the new key instead of the "Basis". Go to Edit Mode and switch to front orthographic view (keys NUM1 and NUM5 ). Use Border Select ( B ) to select the top row of lattice vertices and upscale them in the XY plane (or non-Z directions, use S Shift + Z ). Go back to Object Mode, create shape key "Key 2" and, as shown before, downscale the second row of lattice vertices from the bottom. When back in Object Mode, you can set the value of both shape keys to 1 and observe the combined deformation of both keys. This will be our final shape in animation.
::在这个例子中,我们将仅创建两个形状键 (在"基础"旁边),并在格子上执行两个简单的变形 (因此将使球形状变形,因为格子修改器是活跃的),从而产生杯状的形状. 在进一步变形格子之前,创建一个新的形状键"键1". 这样您将编辑新的键而不是"基础".进入编辑模式并切换到前方正写视图 (键NUM1和NUM5). 使用边界选择 (B) 选择格子顶部的上一行并将它们缩放到XY平面 (或非Z方向,使用S 转移+Z).回到Object Mode,创建形状键"键2",并像之前所示,从格子下调第二行顶部. 当在Object Mode中,您可以将
Note that there is no "Limit selection to visible" button
![]() in Edit Mode when editing a lattice. When using Border Select or similar tool, the vertices are selected even if they are not visible, so there is no need to switch to wireframe view to be able to select whole rows in the Front view.
in Edit Mode when editing a lattice. When using Border Select or similar tool, the vertices are selected even if they are not visible, so there is no need to switch to wireframe view to be able to select whole rows in the Front view.
::注意在编辑格子时,编辑模式中没有"将选择限制为可见"按.当使用边界选择或类似工具时,即使顶点是不可见的,顶点也会被选择,因此无需切换到线框视图才能在前视图中选择整个行.
-
 Defining the first shape key.
::定义第一个形状键. -
 Defining the second shape key.
::定义第二个形状键. -
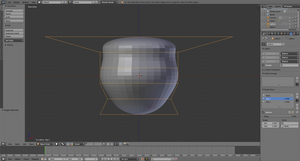 The result with both shape key values set to 1.
::结果的两个形状键值设置为1.
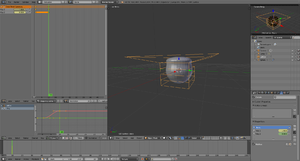
Animating Shape Key Values
::动画形状的关键值
In previous steps we have created our objects, added a Lattice modifier, and defined the shape keys. This is all we need to proceed to shape key animation. The concept is very similar to animation of any other values. We will be, however, using one additional tool. Folow these steps to set up the interface you will need:
::在之前的步骤中,我们已经创建了对象,添加了格子修改器,并定义了形状键.这就是我们需要进行形状键动画的全部.这个概念与其他任何值的动画非常相似.然而,我们将使用一个额外的工具.请遵循以下步骤来设置您需要的界面:
-
Open a new
Dope Sheet
 window or, even better, switch your
screen layout
to "Animation". Examples use the latter method.
window or, even better, switch your
screen layout
to "Animation". Examples use the latter method.
::打开一个新的药物表窗口,甚至更好地,将屏幕布局切换为"动画". -
In the Object Mode of 3D View select the lattice object.
::在3D视图的对象模式中选择格子对象. -
Switch the context of the Dope Sheet window to
"Shape Key Editor"
using the box in the window's header. Your shape keys should show up in the
Dope Sheet Summary
.
::使用窗口标题中的框将Dope Sheet窗口的上下文切换为"形状键编辑器".你的形状键应该出现在Dope Sheet总结中.
Shape key values have grey background. This means they are not animated (yet). We will make the sphere deform from its original shape ("Base" key) to the goblet-like shape (influenced by "Key 1" and "Key 2"). Before going forward with examples, we will learn the basic keyframing procedure for shape key values.
::形状键值具有灰色背景.这意味着它们尚未动画.我们将使球体从原始形状 ("基础"键) 变形为杯状形状 (受"键1"和"键2"的影响).在继续使用示例之前,我们将学习形状键值的基本键框程序.
-
Set the frame number
. Either position the green bar cursor in the Dope Sheet to the desired frame using LMB , or use controls in the Timeline window
 . For more information about frames see
Basic Animation
.
. For more information about frames see
Basic Animation
.
::设置号. 通过使用 LMB 将绿色标志符定位到所需的, 或使用时间表窗口中的控件. 关于的更多信息请参阅基本动画. -
Change the shape key values in the
Dope Sheet Summary
either by pressing LMB and dragging, or clicking on the slider and typing the desired value. Notice that Blender inserts a keyframe for changed values as soon as you do (indicated by yellow diamonds in the Dope Sheet). Keyframed values should change their background colour to yellow (means that the value is keyframed
in the currently selected frame
) or green (means that the value is keyframed
in some other frame
).
::通过按 LMB 和拖动,或点击滑块并输入所需值来更改药物表摘要中的形状键值.请注意,Blender 将在您这样做后,立即为更改的值插入一个键框 (用药物表中的黄色钻石表示). 键框值应将其背景颜色更改为黄色 (意味着该值在当前选择的框架中是键框) 或绿色 (意味着该值在其他框架中是键框). -
Once the keyframes are added, values of keyframed shape keys will be shown in the
Graph Editor
 as well, allowing you to fine-tune them to your liking using F-Curves.
::图形编辑器也会显示关键形状键的值, 让您可以使用F-Curves来精细调整它们.
Alternative method is to insert keyframes in the Lattice Object Data context
![]() . Select a Shape Key and adjust its value using the slider below. Then RMB the slider and select
"Insert Keyframe"
.
. Select a Shape Key and adjust its value using the slider below. Then RMB the slider and select
"Insert Keyframe"
.
::另一个方法是在格子对象数据上下文插入关键.选择一个形状键并使用下面的滑块调整其值.然后RMB滑块并选择"插入关键".
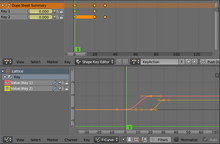
Now let's animate the sphere using this procedure. Make sure you see the Shape Key Editor context of the Dope Sheet and have your lattice selected in Object Mode of the 3D View. Shape keys should be shown in the Dope Sheet Summary. Set your frame to 1. This is the first frame of our animation (indicated by the "Start" field in the Timeline). In the Dope Sheet Summary set both shape keys values to 0 (note the diamonds -- keyframes -- appearing). This means that in frame 1 our sphere will be shaped only by the "Basis" key. Go to frame 10 and set the value of "Key 1" to 1. The following will cause the top of our sphere to deform during frames from 1 to 10. Do not forget to insert a keyframe for "Key 2" (value 0) at frame 10. To do this just set the value to 0 again or RMB →
Insert Keyframe
. Dope Sheet should show an orange line connecting the two diamonds, showing that values in these keyframes are the same (nothing is happening with this shape key). If you do not add this keyframe, the bottom will start deforming at the beginning of the animation. Meanwhile you may use the mouse wheel or drag the ends (dots) of the sliders in the Dope Sheet and Graph Editor windows to zoom in the view. Go to frame 20 and set the value of "Key 2" to 1. Similarly, this will cause the bottom of the sphere to deform during frames from 10 to 20
while the top is already deformed
. Finally, set the "End" field in the Timeline to 30, which will stop our animation at frame 30. Feel free to play your new animation using controls in the Timeline. Also feel free to add additional keyframes and tune the transitions to your liking in the Graph Editor. In addition, you might want to try scaling, moving, and rotating the
deformed
lattice (the situation at frame 30 for instance) in Object Mode of the 3D View to see what happens to the sphere.
::现在让我们使用这个程序来动画球. 确保你看到的形状键编辑器上下文的Dope Sheet,并选择了你的格子在对象模式的3D视图. 形状键应该显示在Dope Sheet总结. 设置你的到1. 这是我们的动画的第一个 (指示"开始"字段的时间表). 在Dope Sheet总结设置两个键值为0 (注意钻石 - 关键 - 出现). 这意味着在1我们的球将被仅由"基础"键. 进入10并设置"关键"的值为1". 下面将导致我们的球的顶部在1从10变形. 不要忘记插入一个关键" (关键值0) 在10. 为了做到这一点,只需将窗口设置为0或R
-
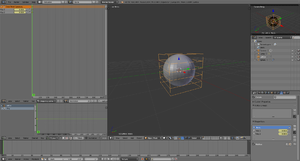 Frame 1
::框架1 -
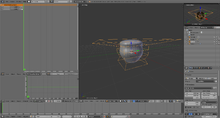
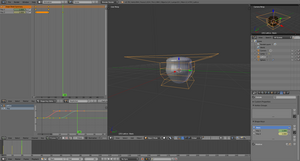
 Frame 10
::框架10 -
 Frame 20
::框架 20
Let the fun begin!
::让我们开始玩乐!
Now you have your object safely locked away inside your Lattice, you can still animate the object itself, inside the Lattice!
::现在你把你的物体安全地锁在你的格子里, 你仍然可以在格子里激活物体本身!
Why would I animate the object too?
::我为什么要动画这个物体?
Take the case of the classic cartoon eyeball which is taller than it is wide. If you just stretched the sphere object itself, instead of using a Lattice to deform it, then you couldn't properly rotate the eyeballs to look up and down because the whole "egg-shaped" eyeball would rotate and end up lying on its front or back. The eyes would literally pop-out of the head.
::举例来说,经典的卡通眼球比宽高.如果你只是拉伸球体本身,而不是用格子去变形它,那么你就不能正确地旋转眼球来看上下,因为整个"蛋形"眼球会旋转,最终躺在前面或后面.眼睛会从头部里跳出来.
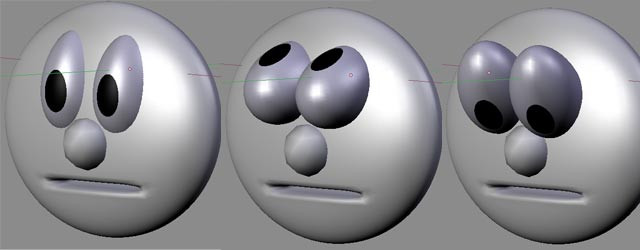
Cartoon eyes: The stretched spheres don't rotate properly.
::卡通眼睛:伸展的球体不能正常旋转.
If, however, you use a Lattice to deform the basic sphere to make it into a tall "egg" shape, you can still select the eyeball itself and animate it within the Lattice. Now when you rotate the eyeball, it will look up and down but still maintain its deformed shape within the head.
::眼球的形状是不一样的,但是,如果用格子把基本球形变形,使之变成一个高大的"蛋"形状,你仍然可以选择眼球本身,并在格子中动画它.现在,当你旋转眼球时,它会看上去,看下去,但仍然保持在头部的变形形状.
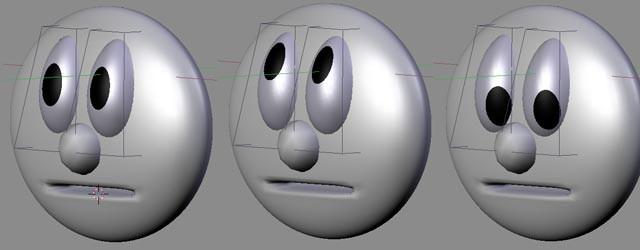
Cartoon eyes: Spheres deformed with Lattice can still be rotated with good results.
::卡通眼睛:用格子变形的球体仍然可以旋转,结果很好.