Blender 3D:零基础到专业级-单元3:拓展视野
How to make a ball bounce convincingly!
::如何让球跳得令人信服!
This tutorial assumes basic Blender awareness and some knowledge of using Blender Lattices as well as keyframes basics regarding the Blender Panels. Knowledge of IPO curves will prove useful later as we progress to more advanced techniques.
::本教程假定基本的Blender意识和一些知识使用Blender格子以及关键的基础关于的Blender面板.知识的IPO曲线将证明有用的后,我们进展到更先进的技术.
How hard can it be to move a ball?
::移动一个球是多么困难?
It would be easy to just put a sphere on the screen and animate it to move up and down but in all honesty, it would not look like a bouncing ball. It would not be convincing in any way.
::很容易把一个球放在屏幕上, 动画它向上和向下移动, 但说实话,
To be believable, the ball must use some of the most fundamental principles of good animation. In particular, the ball must
squash
and
stretch
and change
speed
as it falls, hits the floor, bounces and rises ready to fall again. With a little effort we can make that boring sphere look alive!
::为了让球看起来可信, 必须使用一些最基本的动画原理. 特别是, 球必须缩,伸展, 随着落下,撞击地板,反弹,并随时升起, 准备再次落下.
Why use a lattice?
::为什么要使用网格?
It is possible to make a simple bouncing ball animation without using a Lattice object but with the Lattice we can do more than just bounce the ball. For example, once we have a ball that bounces how we'd like it, we can later add rotation to the ball so it spins through the air and bounces then, as the bounces decrease, the ball can roll to a halt. Doing this without lattice would be a far more complex exercise as a rotating squashed and stretched sphere would look like it was wobbling in space
(like having the flat part of a flat tire spin around the tire instead of staying on the bottom, even while the wheel is turning)
.
::没有使用格子对象,也可以制作简单的跳球动画,但使用格子我们可以做得不止是跳球.例如,一旦我们有一个我们想要的方式跳球,我们可以稍后给球增加旋转,使其在空气中旋转,然后跳,随着跳跃的减少,球可以滚到停顿.如果没有格子,这将是一个更复杂的练习,因为旋转的压缩和拉伸的球体看起来像在空间中摇摆一样 (就像平板轮胎的平板部分在轮胎周围旋转而不是停留在底部,即使轮子在转动).
Let's begin then
::那么我们就开始吧
To begin, add a UVSphere (SPACE
add>mesh>UVShere
) in
Top View
(NUM7). It is important to add the objects in top view to keep their
Z-Axis
aligned upwards. Set Smooth and Sub-surf on the sphere if desired. Tab back into
Object Mode
then immediately add a Lattice(SPACE
add>Lattice
). Resize (SKEY) it so it closely surrounds the sphere. Make the edges of the lattice align with the circumference of the sphere as this will make animation easier.
::首先,在顶部视图 (NUM7) 中添加一个UVSphere (SPACE add>mesh>UVShere). 重要的是要在顶部视图中添加对象,以保持它们的Z轴对齐向上. 如果需要,在球体上设置Smooth和Sub-surf. 如果需要,重新进入对象模式,然后立即添加一个格子 (Lattice) ((SPACE add>Lattice). 调整尺寸 (SKEY),使其紧密地围绕球体. 让格子的边缘与球体的周长保持对齐,因为这将使动画更容易.
(By default the Lattice Object Name is "Lattice". It is good to give all your objects unique and sensible names, especially if you are planning a complex scene. So you might call the Sphere "Red_Ball" and the Lattice "Red_Ball_Latt" or something similar for easy reference and recognition later.)
(Noob Tip: I have formed the habit of naming everything in ALL CAPS. As the scene gets more complicated I can easily keep track of what I have named and what needs naming.)
:默认的格子对象名称是"格子".给所有对象独一无二的和有意义的名称是很好的,特别是如果你计划一个复杂的场景.所以你可以把球称为"Red_Ball"和格子称为"Red_Ball_Latt"或类似的东西以方便以后的参考和识别. (小知识人提示:我已经习惯于在ALL CAPS中命名所有东西.当场景变得更加复杂时,我可以很容易地跟踪我命名的东西和需要命名的东西.)
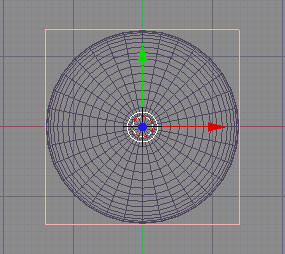
Top view of UV-Sphere inside selected Lattice
::在选定的格子内顶部的UV-Sphere
Make the lattice deform the sphere
::让格子变形球体
Prior to Blender 2.4, objects were parented to Lattices with a Lattice Deform option. In version 2.4+ you can select the object (the sphere) and apply a Lattice Modifier to it (Ob: Lattice). However, if you use this new method then the ball will not move where the Lattice moves and will not squash when the Lattice squashes and we want it to do both of these things.
::在Blender 2.4之前,对象被与格子关联,并有格子变形选项.在2.4+版本中,你可以选择对象 (球体) 并将格子修改器 (Ob:格子) 应用到它.但是,如果你使用这个新方法,那么球不会在格子移动的地方移动,并且当格子被压时不会压,我们希望它能做到这两件事.
Luckily you can still use the good old
Parent option
then use the Modifier palette to make the Lattice Deform "Real" . So select the sphere and THEN SHIFT SELECT the Lattice then
CTRL-P
to make parent and choose the "
Lattice Deform
" option. If you now select just the sphere, press
F9
and look in the Modifiers palette, you'll see a listing for "
Lattice parent deform
" with a button for "
Make Real
". You can either ignore this button or press it. It really won't matter for now. If we wanted to do some weird things to our ball, like kicking it or deforming it in other complicated ways, then we would have to use the "real" Lattice modifier option.
::幸运的是,你仍然可以使用旧的好父选项,然后使用修改器调色板来使格子变形为"真实".所以选择球体,然后 SHIFT SELECT 格子然后 CTRL-P 让父并选择"格子变形"选项.如果现在只选择球体,按F9并查看修改器调色板,你会看到一个"格子父变形"的列表,有一个"使其真实"的按.你可以忽略这个按或按下它.这真的不会影响现在.如果我们想对我们的球做一些奇怪的事情,比如它或以其他复杂的方式变形,那么我们必须使用"真实"格子修改器选项.
So, this may not be the purist approach to using a Lattice but it is a convenient way to achieve the results we're after. Basically, it works and is reasonably intuitive.
::这可能不是使用格子的纯粹方法, 但它是实现我们想要的结果的方便方法. 基本上, 它是有效的,
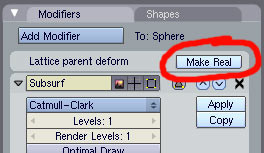
Lattice Modifier screen using parenting option.
::使用育儿选项的格子修改器屏幕.
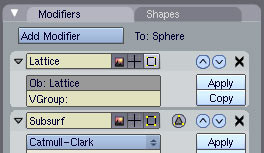
If you press "Make Real" you enable the full Lattice Modifier
::如果您按"使真实"你启用完整的格子修改器
(None of this seems to be necessary in later versions. The full Lattice screen comes up as soon as you Parent it.)
:在后来的版本中,这似乎不必做.只要您将其转载到父,就会显示完整的格子屏幕.
You can easily check if the Lattice is working the way we want it to by selecting the Lattice and resizing, moving or rotating it.
The ball should do everything the Lattice does.
I don't wish this to be a full lesson in Lattices so if you don't understand any of the above, or you're certain your Lattice is not working as it should, then please learn a bit about
lattices
before proceeding.
::通过选择格子,改变其尺寸,移动或旋转,您可以轻松地检查格子是否正确工作.球应该做格子所做的一切.我不希望这是一堂完整的格子课,所以如果您不了解上述任何内容,或者您确信您的格子不如意工作,那么在继续之前,请了解一下格子.
Time to animate!
::时间动画!
For our basic animation, we'll use just 23 frames starting with the ball high then falling, squashing, bouncing and ending up back where it started. When this is played back in the 3D window, it will loop and we'll see the ball bounce forever in one place.
::基本动画只需要23,从高处跳起,然后跌落,碎,跳跃,最后回到开始的地方. 当我们在3D窗口中播放时,它会循环, 我们会看到球永远在一个地方跳跃.
This part is easier done in "SCR:1 - Animation" Viewport configuration. It is also useful to have multiple orthographic views open in the viewport by right clicking on the resize viewport arrow and choosing "split area" then making a top view, side, etc...
::这部分在"SCR:1 - Animation"视窗配置中更容易完成.在视窗中通过右键点击调整视窗大小的箭头并选择"分割区域",然后在视窗中打开多个正写视图,然后制作顶部视图,侧面等也很有用...
Go to
Front View
(Num1) Press F10 and set your start (Sta) frame to Frame 1 and your end frame to Frame 23. Then make sure you're on
Frame 1
(Shift+Left Arrow) to start animating. Note that we are
animating the Lattice
, not the ball. Everything we do to the lattice will directly affect the ball too.
::进入前视图 (Num1) 按F10并将开始 (Sta) 置为1和结束置为23. 然后确保您在1 (Shift+左箭头) 开始动画. 请注意,我们动画的是格子,而不是球. 我们对格子所做的任何事情都将直接影响球.
Note: all the modifications to the lattice must be done in 'Object' mode. If not, they will affect all the frames.
::注意:所有修改格子必须在"对象"模式中进行.否则,它们将影响所有.
Select the Lattice (
NOT
the ball) then do the following on the corresponding frames:
::选择格子 (不是球),然后对相应的框架做以下操作:
-
FRAME 1:
Press IKEY and set a
key
for LocRotScale - the ball's start position (high).
::按下IKEY键,然后设置LocRotScale - 球的起始位置 (高). -
FRAME 11:
Move the Lattice to ground level and
key
LocRotScale again
(keep the fall distance small for now)
.
::图 11: 将格子移动到地面,然后再次键入LocRotScale (暂时保持小落差距). -
FRAME 13:
Leave Lattice in same position as frame 11 and
key
LocRotScale again.
:: 13:将格子置于与 11相同的位置,然后再次键入LocRotScale. -
FRAME 23:
Move Lattice back to start position (use Num (N) Panel if you need to)and
key
LocRotScale again.
::23:将格子移回起始位置 (如果需要使用Num (N) 面板) 并再次键入LocRotScale.
(Noob note- This may seem obvious, but move the lattice BEFORE you insert the keyframe.)
::在插入键框之前移动格子.
These four frames give a basic up and down animation with a pause at the bottom. We can add squash on Frame 12 to finish off.
::让我们在第12上加上 squash 完成.
-
FRAME 12:
Place the cursor at the base of the Lattice then set the Rotation/Scaling Pivot to "3D Cursor"
 Scale the Lattice down along the Z-Axis
SKEY-ZKEY
and see the ball squash.
IKey
LocRotScale again.
Scale the Lattice down along the Z-Axis
SKEY-ZKEY
and see the ball squash.
IKey
LocRotScale again.
::12:将光标放置在格子底部,然后将旋转/缩放轴设置为"3D光标" 沿Z轴SKEY-ZKEY向下缩放格子,看看球球. IKey LocRotScale再次.
When you have set all five keys, you can cycle through the frames and you should see the following result on the Key frames we just set.
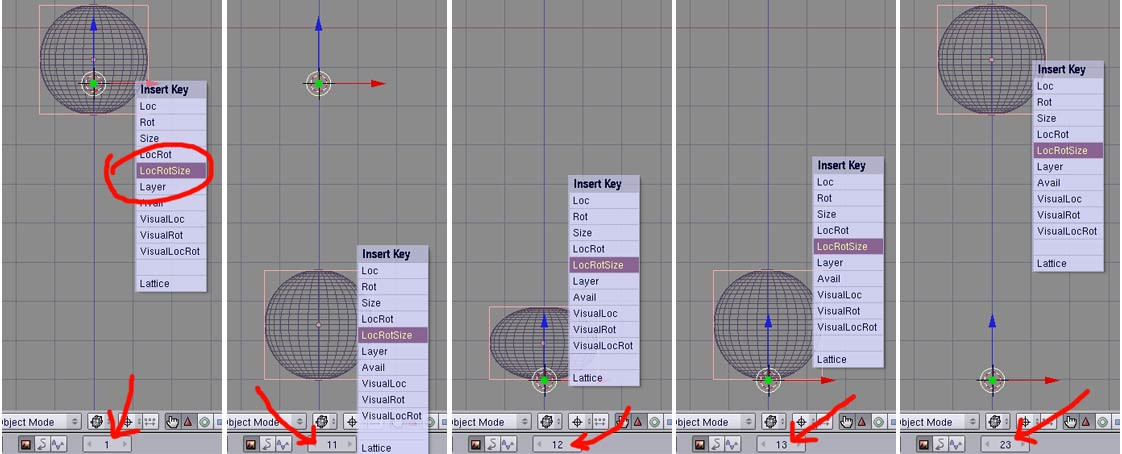
Screenshots of the 3D window, front view, on each of our five key frames.
::您可以在我们刚才设置的关键中看到以下结果. 截图的3D窗口,前景,在我们每一个关键上.
If you press
Alt-A
now in the
3D window
, you should see the ball bounce. Even though the squash happens on just one frame, it still reads properly in our minds and is a vast improvement over an animation with no squash at all.
(Press
RMB
or
ESC
to stop the animation playback)
.
::现在,如果在3D窗口中按下Alt-A,你应该看到球跳.即使球跳只发生在一个上,它仍然在我们的脑海中正确地读取,并且比没有球跳的动画有很大的改进. (按RMB或ESC来停止动画播放).
If you have a camera and lighting suitably set up you could render the animation out and use Blender's "PLAY" button to loop the rendered animation. See the bottom of the page for an OpenGL render made from the steps above. Add material to the ball and a ground plane for a more interesting result.
::如果您有相机和照明适当设置,您可以将动画染出来,并使用Blender的"PLAY"按来循环染动画.请参阅页面底部以从上述步骤中制作的OpenGL染.为球添加材料和地面平面以获得更有趣的结果.
Looking at the IPO Curves
::查看IPO曲线
If you want the ball to bounce three times then you could repeat the above instructions three times over - if you have the patience - but Blender has a better, easier way.
::如果你想让球跳三次, 那么你可以重复上述指令三次 - 如果你有耐心 -
Select the Lattice then open up an IPO (
I
nter
PO
lation) window and zoom into the group of keys. If you select LocZ and SizeZ from the channel list on the right, you should see something like this (I've added labels to the screenshot):
::选择格子,然后打开IPO (InterPOlation) 窗口,并放大到键组. 如果从右边的频道列表中选择LocZ和SizeZ,您应该看到这样的东西 (我已经添加了标签到截图):
Note the IPO Type here is "Object". Purists may be disturbed or perplexed by this but if you remember, we're not really using our Lattice in the purist, Lattice Modifier form. Don't worry about it though. It works.
::纯粹主义者可能会感到困惑,但如果你记得,我们并没有真正使用纯粹主义的格子,格子修改器形式. 不过,不要担心. 它工作.
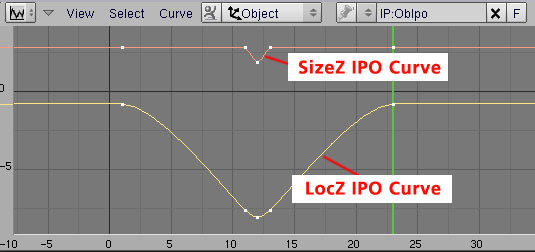
IPO curve for Lattice, showing LocZ and SizeZ channels.
::拉蒂斯的IPO曲线显示了LocZ和SizeZ频道.
This shows the relative position on the Z-Axis and size in the Z-Axis of the Lattice. You can see that the Size remains constant until frame 11, then reduces, then goes back and remains constant until frame 23. Similarly, the LocZ curve shows how the ball starts high, falls then stops before rising again. The rounded bottom of the LocZ curve occurs because the IPO curve maps the centre point of the Lattice and when we squash it, the centre point lowers slightly.
::这显示了Z轴上的相对位置和Z轴上的尺寸.你可以看到,尺寸在11之前保持不变,然后减少,然后回落,直到23保持不变.同样,LocZ曲线显示了球如何从高开始,跌落然后停止然后再次上升.LocZ曲线的圆底发生,因为IPO曲线映射了格子的中心点,当我们压它时,中心点略微下降.
Of special interest is that by default, Blender uses Bézier curves for IPOs and this gives us rounded tops on the curve. This means the ball starts moving slowly downward then moves faster until the reaches the bottom. Also, as it nears the top, it slows down again. This is good because this is exactly what happens in reality when a ball rises and falls
(It could be better - but it's a good start)
.
::特别有趣的是,默认情况下,Blender 对于 IPO 使用贝齐尔曲线,这给我们曲线上的圆顶. 这意味着球开始慢慢向下移动,然后移动更快,直到达到底部. 此外,当它接近顶部时,它再次减速. 这很好,因为这正是球升降时实际发生的事情 (它可能更好 - 但这是一个好的开始).
While in the IPO window, select both curves then press
KKEY
and you'll see each key frame indicated by a vertical line. (Note: You can also press
View->Show Keys
if you can't remember this shortcut - this has helped me in the past.)
::在IPO窗口中,选择两个曲线,然后按KKEY,您将看到每个键框以垂直线表示. (注意:如果您不记得这个快捷方式,您也可以按查看->显示键 - 这已经帮助我在过去.
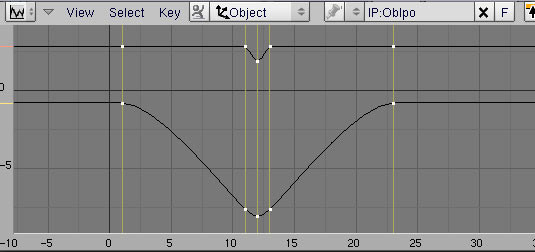
IPO window set to show key frames
::设置IPO窗口显示关键
Press
AKEY
to select all key frames then duplicate (Shift-D) them. The curves will seem to deform but when you drag the frames to the right, they will sort themselves out. Position them so the "first" frame is at Frame 24 and the new end frame is now Frame 46. Reset the End Frame in the Scene (F10) window then watch the animation again. It's not bad. You can repeat this process for more bounces. (To have it bounce forever throughout a long animation, ignore the above procedure and just set the "Extend Mode" to "Cyclic" in the Curve menu. You'll have to adjust the curve a little on the first and last frame but you only do it once and Blender repeats the change for all other cycles.)
::按键选择所有关键然后重复 (Shift-D). 曲线看起来会变形,但当你将拖向右,它们会自己排序. 将它们放置在"第一个"在24处,新的终端现在是46. 在场景 (F10) 窗口中重置终端,然后再次观看动画. 这并不坏. 你可以重复这个过程以获得更多的跳跃. (要让它在长时间的动画中永远跳跃,请忽略上述程序,并在曲线菜单中将"扩展模式"设置为"周期性".你必须在第一个和最后一个上调整曲线,但你只做一次,Blender会重复所有其他周期的变化.)
Noob Note:
Instead of IPO window, go to Graph Editor. I was not able to find any way to get yellow lines at each Keyframe, as above, but using A put Bezier handles at each keyframe. I need to experiment to find out how to use them. SHIFT D worked as above.
::笔记: 没有找到任何方法可以在每个关键上得到黄色线,但使用每个关键上的A put Bezier手柄. 我需要实验来找出如何使用它们. SHIFT D像上面一样工作.
It's not bad for a start but there's a lot more to do to this ball before applying for that animation job.
::开始时不错, 但在申请动画工作之前,
Note: In newer versions of Blender, you can go to Graph Editor, Select all graphs with AKEY, and select Channel-Extrapolation Mode-Make Cyclic. This will extrapolate the existing graphs to cover the total frames.
::注意:在较新的版本的Blender中,您可以进入图形编辑器,选择使用AKEY的所有图形,并选择道-推算模式-使循环.这将推算现有的图形以覆盖总.
Saving The Animation
::拯救动画
How do you tell Blender where to save the animated frames? The answer is in the “Output” mini-window that you see in the Render settings (F10). Near the top of this are two editable text fields, the first of which is initially set on my Linux system to “
/tmp/
” and the second to “
//backbuf
”. The first one is the output pathname or directory prefix used to save the generated frames as JPEG files when you press the “ANIM” button. If it has no “#” characters in it, then it is used as a directory prefix; thus, the default will be to save the animation frames as
/tmp/0001.jpg
,
/tmp/0002.jpg
etc. Alternative, if you put in a filename spec with “#” characters in it, the hashes will be replaced with the frame number. Thus, if I set the field to “
/home/ldo/Documents/BlenderTuts/ball####.jpeg
”, then the frames will be saved to that
/home/ldo/Documents/BlenderTuts
directory and be named
ball0001.jpeg
,
ball0002.jpeg
etc.
::如何告诉Blender保存动画的位置?答案在于在输出小窗口中,在染设置中 (F10).在上面有两个可编辑的文本字段,其中第一个在我的Linux系统上最初设置为/tmp/,第二个为//backbuf.第一个是输出路径名或目录前,用于在按ANIM按时将生成的保存为JPEG文件.如果它没有#字符,则它被用作目录前;因此,默认将保存动画为/tmp/0001.jpg,/tmp/0002.jpg等. 另一个选择,如果您将一个文件名以字符,它中的哈希字符将被替换为目录字符.因此,如果我
So what next?
::接下来是什么?
In real life and in a typical cartoon, balls don't just bounce forever in one spot. They move along and slowly lose their bounce before rolling to a halt. And they have more character than our bouncing ball.
::球在现实生活和典型的卡通中, 不只是在一个地方跳动, 它们在移动, 慢慢失去跳动, 滚动到停顿. 而且它们比我们的跳动球有更多的特征.
Things to consider next:
::接下来要考虑的事情:
-
Perfecting the squash - maintaining volume
::完善南瓜 - 保持体积 -
Adding stretch
::增加拉伸 -
Look at acceleration and deceleration
::看看加速和减速 -
Rotate the ball as it bounces
::旋转球,因为它跳 -
Reduce the bounce height over time
::随着时间的推移,减少弹跳高度 -
Move the ball around as it bounces
::移动球周围,因为它跳
See this
ANIMATION LINK
(580kb, AVI-DivX) for an idea of how you can achieve interesting results with just a little more effort. but its k? k
::如何通过更少的努力获得有趣的结果.
Links
::链接
Principles of bouncing ball animation:
http://www.idleworm.com/how/anm/01b/bball.shtml
::弹球动画的原理:http://www.idleworm.com/how/anm/01b/bball.shtml
Blender 2.49B bouncing ball animation:
http://www.youtube.com/watch?v=BEY_6dFdUJY
::混器 2.49B 跳球动画:
Blender 2.49B vector blur animation, to add realism to your animations:
http://www.youtube.com/watch?v=qY4WcNgEXv8
::混器 2.49B 矢量模糊动画,为您的动画添加现实主义: