Blender 3D:零基础到专业级-单元3:拓展视野
We're going to create a camp fire with a simple particle system. This tutorial is based on the method described in the
Blender Manual
. The result of this tutorial is shown in
Fig. 1
, the Blend-File is included at the bottom of this page.
::我们将用简单的粒子系统来制造一个野火. 本教程是基于混合器手册中描述的方法. 本教程的结果显示在图1中,混合文件包含在本页面底部.
If you need more realistic looking fire, you should use the method described in
BlenderArt Magazine No. 16
, though that method is more advanced and uses Compositing Nodes heavily.
::如果您需要更现实的火焰,您应该使用BlenderArt杂志第16号所描述的方法,尽管该方法更先进,并且大量使用复合节点.
The starting point of the tutorial is how fire behaves physically. The flames are made of hot gases. These accelerate upwards due to their lower density in contrast to the cooler air in the environment. Flames are in the middle hot and bright, to the outside they are darker.
::导学教程的起点是火的物理行为.火焰是由热气体组成的.由于它们的密度较低,与环境中的冷空气相比,它们向上加速.火焰在中间是热和明亮的,向外是黑暗的.火焰的表面是热和明亮的,而向外的表面是暗的.火焰的表面是热和明亮的,而向外的表面是暗的.火焰的表面是热和明亮的,而向外的表面则是暗的.火焰的表面是热和明亮的,而向外的表面则是暗的.火焰的表面是暗的,而向外的表面则是暗的.火焰的表面是暗的,而向外的表面则是暗的.火焰的表面是暗的,而向外的表面则是暗的.
The particle system
::粒子系统
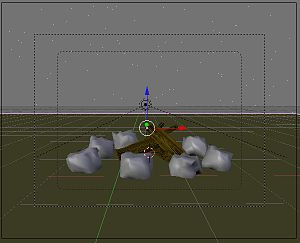
I've created the usual scene with some stones and a few pieces of wood (the wood is by courtesy of Teeth). (
Fig. 2a
).
::我用一些石头和一些木头创建了通常的场景 (木头是Teth的礼貌). (图2a).
| Noob note: I made the stones by adding an Icosphere of 3 subdivisions, and then used the proportional edit falloff ( OKey ) with the random falloff mode. And then subdivide and smooth. |
| Noob note 2: For the wood I used a modified Plane with an Image texture created with GIMP |
-
Add a
Plane
in the middle of the stones.
::在石头中间添加一个飞机.
This will become the particle emitter.
::这将成为粒子发射器.
-
Rename the
Plane
object to "Emitter".
::将飞机对象的名称改为"发射器".
If you use good names you will find it much easier to orientate yourself in your scene later. Having 100 objects named "Cube.something" will make it very difficult to quickly select a desired object.
::如果使用好的名称,你会发现自己在以后的场景中更容易定位.拥有100个名为"Cube.something"的对象,很难快速选择所需的对象.
-
Subdivide the plane once in
Edit
mode.
::在编辑模式下,将飞机分成一个部分. -
Change the shape of the plane, so that it's shape equals the base of the fire.
::改变飞机的形状,使其形状等于火的底部. -
Change to object mode.
::切换到对象模式.
-
Change to the
Particle
buttons of the
Object
buttons.
::切换到对象按中的粒子按. -
Create a particle systems (
Add New
in the
Particle System
panel - and make sure the plane is selected!).
::创建一个粒子系统 (在粒子系统面板中添加新 - 并确保选择平面!). -
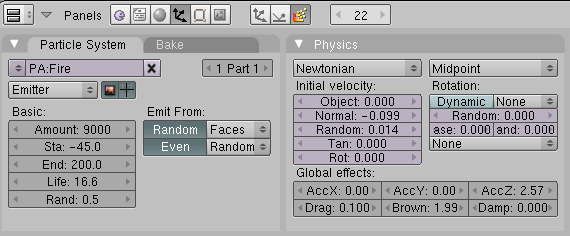
Type: Emitter
The plane emits the particles.
-
Amount:
9000 The total amount of particles.
::总量:9000颗粒的总量 -
Sta:
-45 The simulation shall start before the rendering, to have a fully developed flame in the first frame.
::模拟应在染前开始,在第一中充分发育火焰. -
End:
200 The simulation shall last 200 frames - here: the particles are emitted till frame 200.
::结束: 200 模拟时间为 200 - 这里:粒子发射到 200 . -
Life:
16.6 I've adjusted the lifetime of the particles to their speed. Both parameters together regulate the height of the flame.
::生命周期: 16.6 我已经调整了粒子的生命周期与它们的速度. 这两个参数一起调节了火焰的高度. -
Rand:
0.5 The lifetime is changed randomly.
::兰德: 0.5 生命周期随机变化.
::类型:发射器 飞机发射粒子. 量:9000 总颗粒量. 阶段:-45 模拟应在染前开始,在第一中具有完全发育的火焰. 结束:200 模拟应持续200 - 在这里:粒子发射到200. 寿命:16.6 我已经调整了粒子的寿命以其速度. 两个参数一起调节火焰的高度. 兰德: 0.5 寿命随机改变. -
Amount:
9000 The total amount of particles.
-
Emit from:
-
Random
::随机的 -
Faces
::面部 -
Even
::没有 -
Random
::随机的
::发出来自: 随机面孔 即使随机 -
Random
This creates particles with a random distribution on the faces of the emitter object.
::这就会在发射物体的面部产生随机分布的粒子.
|
|
Please note, that the particle simulation is only fully calculated if the bake parameters in the
Bake
panel match the positive lifetime of the particles. If you want to run the simulation longer than 250 frames, you have to increase the
End
frame in the
Bake
panel as well. This is independent whether you want to bake or not.
|
The movement of the particles is controlled with particle physics. You set the
Initial Velocity
and let the physics do the rest.
::粒子的运动是通过粒子物理控制的. 你设置初始速度,让物理做其余的工作.
-
Normal:
-0.099 The particles are emitted slightly against the direction of the face normal. This leads to a bit wider fire at the base.
::正常: -0.099 颗粒的发射略微与正面的方向相反. 这导致底部的火力稍微扩大. -
Random:
0.014 This creates a random start velocity as well in speed as in direction (you could use a texture to randomize only the speed, see the discussion page for that).
::随机:0.014 这会在速度和方向上产生随机的起始速度 (你可以使用纹理来随机化速度,请参阅讨论页面).
After you have given the particles an initial velocity they are moved by forces.
::粒子被力量所移动.
-
AccZ:
2.57 A force in positive Z direction (upwards).
::Z: 2.57 A 强力在正Z方向 (向上).
|
|
As far as I can see AccZ does not exist in later versions(2.69 in my case); the alternative appears to be to set the
Physics
to
Fluid
and set a positive Buoyancy (something around 0.75 looks reasonable).
|
-
Drag:
0.1 Air drag decelerates the particles.
::阻力:0.1空气阻力减速了粒子. -
Brown:
1.99 Random movement simulates agitated air movement.
::棕色:1.99随机运动模拟了激动的空气运动.

The particle system is finished. Until now is doesn't look like much (see the white Blob in
Fig. 2c
). Therefore the emitter will get a material, this material will be animated.
::粒子系统已经完成.到目前为止,它看起来不太像 (见图2c中的白色斑块).因此发射器将获得一种材料,这种材料将被激活.
Material
::材料
-
Create a new material for the emitter, call the material
Flames
.
::创造一个新的发射器材料, 称之为"火焰". -
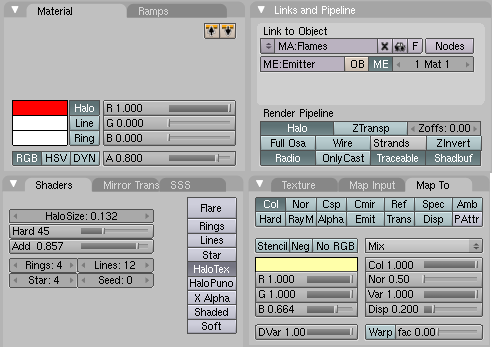
Activate the
Halo
button in the
Links and Pipeline
panel. Else we couldn't set the particle parameters. The particles would be rendered with the default Halo values.
::激活链接和管道面板中的Halo按. 否则我们无法设置粒子参数. 粒子将以默认的Halo值进行染. -
Halo
color: 1/0/0 (red)
::光颜色: 1/0/0 (红色) -
Alpha:
0.8 The particles shall always be a bit transparent.
::粒子总是有点透明. -
HaloSize:
0.132 I wanted many, but fairly small particles.
::它们的光大小为0.132 -
Hard:
45 The transition from fully transparent to fully opaque.
::硬: 45 从完全透明的转变为完全不透明的. -
Add:
0.875 Several
Halos
over each other combine their power. This makes the fire in the center really bright.
::添加:0.875 几个相互相处的光环结合了它们的力量. 这使得中心的火变得非常明亮. -
HaloTex:
A Halo can bear an individual texture, but only the texture in the first texture slot is evaluated.
:: HaloTex:Halo可以承受单个纹理,但仅评估第一个纹理槽中的纹理.
To give the Halo a bit more structure, give it a texture:
::为了给"光环"更多的结构,
-
Add a new texture in the first texture slot.
::在第一个纹理槽中添加一个新的纹理. -
Map To:
-
Col
::其他 -
Color: Bright yellow (1/1/0.664)
::颜色:明亮的黄色 (1/1/0.664)
::图表 转到: 颜色: 明亮的黄色 (1/1/0.664) -
Col

-
Use an adjusted
Clouds
texture with a
NoiseSize
of 0.6.
::使用调整后的云纹理,噪声大小为0.6.
Animation of the particle material
::粒子材料的动画
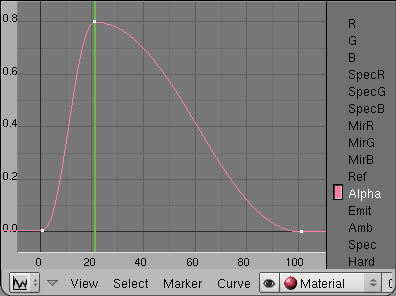
The particles "pop" into life and vanish suddenly. We should change that. Therefore we're going to animate the
Alpha
value of the particles.
::粒子"突然"出现并突然消失. 我们应该改变这一点. 因此我们将动态化粒子的α值.
-
Make sure the material buttons are visible in the buttons window.
::确保在按窗口中可以看到材料按. -
Change to frame 21, move the mouse cursor over the button window and press
I
->
Alpha
. This is going to be the maximum visibility of the particles.
::转到第21, 移动鼠标标在按窗口上, 按一下I->Alpha. 这将是粒子的最大可见度. -
Change to frame 1. Change the
Alpha
value to 0 and insert the next key.
::改变为1. 将阿尔法值改为0并插入下一个键. -
Change to frame 100. Change the
Alpha
value to 0 again and insert the third key.
::换成100,再把阿尔法值换成0,然后插入第三个键.
If you want to see the IPO curve in the
IPO Editor
window you must change the
IPO Type
selector in the window header from
Object
to
Material
.
::如果您想在IPO编辑器窗口中看到IPO曲线, 您必须将窗口头部中的IPO类型选择器从对象更改为材料.
|
|
Note:
An animation of particle material is mapped from the first 100 frames to the lifetime of the particles. I.e. if the material is faded out during the first 100 frames (the ipo curve is 100 frames long) the particle will be faded out during it's own lifetime, no matter how long that is. This holds true however only for
Point
visualization of particles, not for object visualization.
|
The
Alpha
value therefore changes during the individual lifetime of each particle from 0 to 0.8 and back to 0 (
Fig. 3c
).
::因此,在每个粒子的个体寿命期间,α值从0到0.8并返回0 (图3c).
|
|
Note:
In Blender 2.6, IPO curves no longer exist. Select the graph editor view to get the same capabilities. Also note that in the texture settings from the previous section you need to enable (and set to 1) the Alpha setting in the "influence" section, otherwise the Alpha animation will be applied to the particle system as a whole not to the individual particles.
|
Rendering
::渲染
Our particle animation is finished.
::我们的粒子动画完成了.
-
Change the end frame in the
Anim
panel of the rendering Buttons to 200 and click on
Anim
.
::改变染按的 Anim 面板中的终端为 200 个,然后点击 Anim.
Note: If after rendering your particles are too small, such that the fire doesn't look realistic, try increasing the
Halo size
slightly. I used 0.300 instead of 0.132
::试试增加Halo的尺寸. 我使用了0.300而不是0.132
To actually let the fire glow you have to use one or more lamps and animate them as well. But that would be part of another tutorial ...
::为了让火焰发光,你必须使用一个或多个灯,并使它们活跃起来.