Blender 3D:零基础到专业级-单元3:拓展视野
[Note: In newer versions of Blender, the reactor particles are gone.]
::现在, 反应堆中的粒子已经消失了.
[if you use 2.6x version of blender, then you could watch the YouTube video {particles from particles part1/2}. It's a great tutorial, but the part 2 of it uses compositing, which is described in this book a little later. Therefore, you could apply the knowledge you have learnt from this book to animate the explosions!]
::[如果你使用2.6x版本的混合器,那么你可以看YouTube视频{粒子从粒子部分1/2}.这是一个很棒的教程,但它的第二部分使用组合,这在本书稍后描述.因此,你可以应用从本书中学到的知识来动画爆炸!]
How to create a firework from particles? We will use cascaded particle systems especially of the type
Reactor
. Abstract:
::如何从粒子中制造烟花? 我们将使用级联粒子系统, 特别是反应器类型. 摘要:
-
We create a emitter object in the appropriate size.
::我们创建一个适当大小的发射物体. -
Than we use three successive particle systems:
-
the first of the type
Emitter
::首个发射器类型 -
the second of the type
Reactor
. This system reacts to the death of the emitter particles.
::这种系统对发射粒子的死亡作出反应. -
the third again of the type
Reactor
. This systems reacts to the proximity of the second systems and thus creates a "drag".
::这种系统会对第二个系统的接近产生反应,从而产生"拖动".
::接下来我们使用三个连续的粒子系统:第一个是发射器类型的,第二个是反应器类型的. 这种系统对发射粒子的死亡作出反应. 第三个又是反应器类型的. 这种系统对第二个系统的接近作出反应,从而产生"拖动". -
the first of the type
Emitter
-
We create three different materials (one of them animated) and assign them to the three particle systems.
::我们创造了三种不同的材料 (其中一种是动画) 并将它们分配给三个粒子系统.
The Emitter
::发射者
We use a
Plane
as emitter object. Scale it to your liking. I have used a relatively large particle system, so my plane has a length of 15 BU (Blender units).
::我们使用飞机作为发射物体. 根据您的喜好进行缩放. 我使用了一个相对较大的粒子系统,所以我的飞机长度为15BU (混合器单位).
-
Add a particle system (
Fig 2a
, left hand side).
-
Amount:
25
::额度: 25 -
Sta:
1
::工作阶段: -
End:
250
::结束时间: 250 -
Emit from:
-
Random
::随机的 -
Faces
::面部 -
Even
::没有 -
Random
::随机的
::发出来自: 随机面孔 即使随机 -
Random
-
Initial Velocity
-
Normal:
22
::常见情况: 22 -
Random:
7
::随机: 7
::开始速度 常态: 22 随机: 7 -
Normal:
22
-
AccZ:
-9.8
::: -9.8 : -9.8 : -9.8 -
Visualisation:
Line
-
Back:
1.1
::背部:1.1
::视觉化:线回: 1.1 -
Back:
1.1
::添加一个粒子系统 (图2a,左侧).数量: 25 个 阶段: 1 结束: 250 发射: 随机面 偶 随机 起始速度 正常: 22 随机: 7 率: -9.8 可视化: 线回: 1.1 -
Amount:
25
A few particles (25) are created in the first 250 frames of the animation and emitted upwards. Gravitation, velocity and lifetime are adjusted so, that the particles reach the end of their lifetime at the topmost point of their trajectory.
::在动画的前250中,创建了少数粒子 (25) 并向上发射.重力,速度和寿命被调整,使粒子在轨道的最高点达到生命周期的终点.
The
Line
visualization lets the particles appear as long drawn-out line.
::线可视化使得粒子看起来像长长的线.
-
Bake
the particle system. Use 500 as the
End
frame for bake. 300 would be sufficient here, but 500 do no harm.
::烤颗粒系统. 使用500作为的终端框架. 300在这里会足够,但500没有伤害.
Noob Note: Bake is in the Bake tab next to particle system tab in particle buttons window.
::在""选项卡旁边的"粒子系统"选项卡.
The plane will get a
Halo
material.
::飞机将获得一个Halo材料.
-
Activate
Halo
in the
Links and Pipeline
panel.
::在链接和管道面板激活Halo. -
Halo:
color red
::环:红色 -
Halo Size:
0.421
::环形大小:0.421 -
Hard:
35
::硬度: 35
I've adjusted the size and hardness of the halo so long until I liked it, so there is no specific reason to use these values.
::我已经调整了光环的尺寸和硬度, 直到我喜欢它,
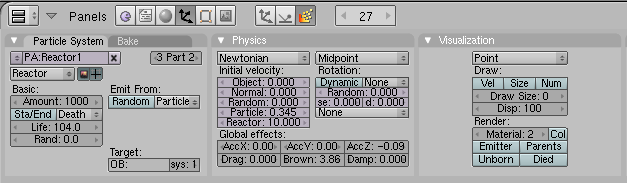
Reactor 1
::反应堆1
-
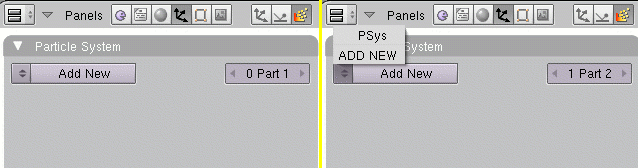
Click on the arrow next to
1 Part 1
in the
Particle System
panel.
::在粒子系统面板中点击1部分1旁边的箭头. -
The settings for the first particle system are no longer shown, now it reads
1 Part 2
(
Fig. 2a
, right hand side).
::现在已经没有显示第一颗粒子系统的设置,它读取1部分2 (图2a,右侧). -
Click on
Add New
, now it reads
2 Part 2
.
::现在它读到2部分2.
You just have created a second particle system. Rename this system, a good naming convention will help you a lot to keep the overview.
::换个名字给这个系统,一个好的命名规则将帮助你保持总体情况.
-
Activate
React on: Death
.
::激活对死亡的反应. -
Life:
104
::生命: 104 年 -
Emit from:
Particles
::发出来自:颗粒
You don't have to set anything for the
Target
. It is not necessary to set the target object if it is the same object as the reactor. You just have to set the number of the target particle system eventually.
::没有必要为目标设置任何东西. 如果目标对象与反应堆相同,则不必设置目标对象. 您只需要设置最终目标粒子系统的数量.
The
Reactor
particles react on the
Death
of the particles of the target system. They will be emitted from the point that the particles occupy at their death.
::反应堆中的粒子会对目标系统的粒子死亡产生反应.
To control the movement of the system, I have made following setting in the
Physics
panel:
::为了控制系统的运动, 我在物理面板中设置了以下设置:
-
Particle:
0.345
::颗粒:0.345 -
Reactor:
10
::反应堆: 10 -
AccZ:
-0.09
::: -0.09 在 -
Brown:
3.86
::棕色: 3.86
Because of the
Reactor
setting the star is moving away from the emitting particles. The
Brown
movement lets the trajectory appear trembling like affected by wind.
::由于反应堆的设置, 恒星正在远离发射粒子. 布朗运动使轨迹看起来像受风影响一样.
-
Set the material number to "2" in the
Visualization
panel.
::在可视化面板中将材料号码设置为"2" -
Bake the system, again use 500 as end frame.
::烤系统,再次使用500作为终端框架.
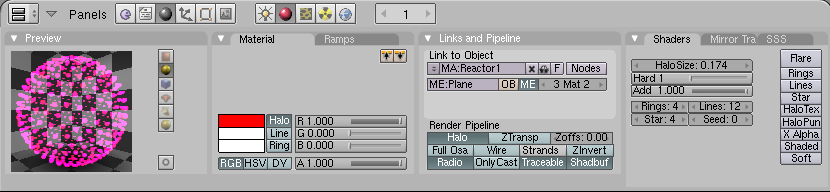
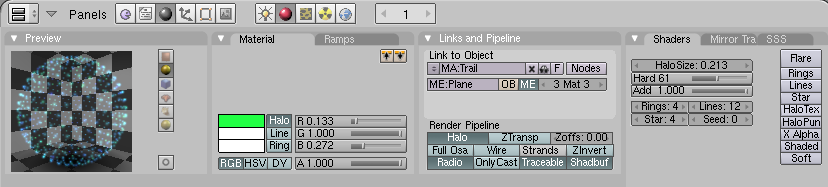
Material 2
::材料2
-
At first you have to assign a new material in the
Link and Materials
panel of the
Editing
Buttons.
::首先,你必须在编辑按的链接和材料面板中分配一个新材料. -
Use the material settings from
Fig. 3b
,
::使用图3b中的材料设置, -
The material also gets a
Clouds
texture with
Noise
depth "3", simply leave all other settings unchanged.
::材料还获得了云纹理, 噪声深度为3", 仅仅让其他设置保持不变.
The texture is actually superfluous here, but the next particle system is given the same texture, and colors should be adjusted a bit.
::接下来的粒子系统得到相同的质感, 颜色应该稍微调整.
-
Animate the
Alpha
value of the material.
-
Set the first Ipo key in frame 1 (
Alpha=1
). To do that move your mouse cursor over the
Buttons
window. Press
I
->
Alpha
(and change ipo type to material in the ipo curve editor if you are using that).
::设置第一个Ipo键在1框 (Alpha=1). 为了做到这一点,将鼠标标 cursor移动到按窗口. 按I->Alpha (如果您使用它,请将Ipo类型更改为Ipo曲线编辑器中的材料). -
Set the second Ipo key in frame 86 (
Alpha=0.75
).
::在86 (Alpha=0.75) 中设置第二个Ipo键. -
Set the third key in Frame frame 101 (
Alpha=0.0
).
::在"框架框架101" (Alpha=0.0) 中设置第三键.
::动画材料的Alpha值. 设置第一个Ipo键在1 (Alpha=1). 为了做到这一点,将鼠标标光标移动到按窗口. 按I->Alpha (并将ipotyp更改为ipotyp编辑器中的材料,如果您正在使用它). 设置第二个Ipo键在86 (Alpha=0.75). 设置第三个键在101 (Alpha=0.0). -
Set the first Ipo key in frame 1 (
Alpha=1
). To do that move your mouse cursor over the
Buttons
window. Press
I
->
Alpha
(and change ipo type to material in the ipo curve editor if you are using that).
The second particle system is faded off relatively quickly, but the particles don't disappear suddenly.
::另一种粒子系统相对快速消失, 但粒子并不会突然消失.
Smoke Trail
::烟雾的路径
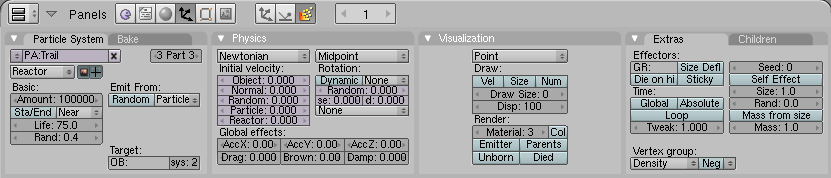
The third (and last) particle system is again a
Reactor
system and is reacting to the second system. It's going to react to the
Nearness
of the particles. Without moving the variation of the particles is created with a texture and a random variation of their lifespan. What Blender considers as close can be changed with the particle
Size
.
::第三个 (最后一个) 粒子系统又是一个反应器系统,它与第二个系统发生反应.它将对粒子的接近产生反应.在不移动的情况下,粒子的变化是通过纹理和它们的寿命的随机变化而产生的.Blender认为接近的可以通过粒子大小改变.
-
Create a third particle system (like you created the second).
::创建一个第三个粒子系统 (就像你创建第二个一样). -
Use the settings from
Fig. 4a
. Important are the settings:
-
Amount:
100000
::额度: 100000 -
React on:
Near
::响应: 接近 -
Emit from:
Particles
::发出来自:颗粒 -
Life:
75
::生命:75 -
Rand:
0.4
::兰德:0.4 -
Target Sys:
2
::目标Sys: 2 -
Material:
3
::材料: 3
::使用图4a中的设置.重要的是设置:数量:100000 反应:近距离发射:颗粒寿命:75 Rand:0.4 目标Sys: 2 材料: 3 -
Amount:
100000
-
Bake the system, again use 500 as end frame.
::烤系统,再次使用500作为终端框架.
Material 3
::材料3
-
At first you have to assign a new material (the third) to the object in the
Link and Materials
panel of the object buttons.
::首先,您必须在对象按的链接和材料面板中为对象分配一个新材料 (第三个). -
Assign the existing
Clouds
texture from material 2 also to material 3, but select a dark blue as target color (in the
Map To
panel).
::将现有的云纹理从材料2也分配到材料3,但选择深蓝色作为目标颜色 (在"映射到"面板中).
Render
::提供
-
Render your animation, use end frame 500.
::提供动画,使用500.
That's all. I hope you were able to follow the tutorial. Criticism and suggestions, write best on the talk page or improve the article directly.
::只有这么多. 希望你能跟随教程. 批评和建议,在讨论页面写最好的或直接改进文章.