Blender 3D:零基础到专业级-单元3:拓展视野
|
|
|
Note all the blender users of version 2.6X, 2.7X
: Using sort of a domain to dissolve the particles by using the alpha parameter of the material is how I did it. You should understand along the way. I’ll write the sentences in key sequences to reduce the size. So [s], 0.5, [enter] means to scale the object by 0.5. Don’t worry you’ll learn keyed physics here.
::对于所有版本2.6X,2.7X的混合器用户:使用某种域来通过材料的α参数来溶解粒子是我做的.你应该在路上理解.我将按键序列写句子来减少大小.所以[s],0.5,[enter]意味着将对象缩小0.5.不要担心你会在这里学习键化的物理.
-
Open a new blender file.
::打开一个新的混合器文件. -
Delete the default cube.
::删除默认的立方体. -
[shift]+[A],text.
::转移+A,文本 -
[num0]
::[数字] -
In the menu, below the tool shelf check align to view.
::在菜单中,在工具架下方,勾选对齐以显示. -
Select the text object, [alt]+[c], convert to mesh.
::选择文本对象, [alt]+[c],转换为网格. -
[shift]+[a], add Suzanne.
::加入苏珊娜. -
[ctrl]+[2], not the numpad.
::没有使用numpad. -
Set smooth.
::设置顺. -
In the modifier’s tab apply the subsurf immediately.
::在修改器的标签下立即应用下面的表格. -
If you want you can scale the objects.
::如果你想,你可以调整物体的尺寸. -
Add a particle system to text object.[I leave the renaming parts to you]
::添加一个粒子系统到文本对象. [我把重命名的部分留给你] -
In the emission subpanel of the text object’s particle system: Number:5000; Start/end(both):1; Emit from: faces, check random and even distribution, random; Physics: none; Uncheck emitter in the render subpanel and choose none rather than halo.; Set all to zero in the field weight’s sub panel(actually I didn’t notice much difference it even being on).;
::在文本对象的粒子系统的发射子面板中: 编号:5000; 开始/结束 (两者):1; 发射从: 面孔,检查随机和均分布,随机; 物理: 没有; 在染子面板中取消发射器的选项,选择没有而不是光环; 在字段重量子面板中设置所有为零 (实际上我甚至没有注意到它被打开的差异). -
Now add a particle system to Suzanne and give it the same particle system but make sure to have it made to a single user(just press the ‘2’ beside the system name).
::现在给苏珊添加一个粒子系统, 给它同样的粒子系统, 但确保它只为一个用户 (只需按下系统名称旁的2). -
[shift]+[a], uv sphere.
::超级波动的时间 -
Selecting the sphere, [alt]+[g](just in case).
::选择球体, [alt]+[g] (只为备案). -
[s],2000,[enter].
::现在我们要做的是, -
[ctrl]+[2],set smooth and apply the modifier.
::[ctrl]+[2],设置顺滑并应用修饰器. -
Give the same particle system to the sphere.
::给球体一个相同的粒子系统. -
Now [num0](assuming you’re not already in camera view).
::现在[num0] (假设你还没有在摄像头的视线中). -
[LMB] on the pass partout(the greyed out area except for the camera).
::只有摄像机可以拍摄. -
[shift]+[a], add cube.
::增加立方体. -
Give the cube a particle system.
::给立方体一个粒子系统. -
Assign the same particle system but let’s make a few changes: In the physics subpanel select keyed.; In the render subpanel choose halo.; In the menu labeled keys, click the ‘+’ icon thrice and set the target object to text , Suzanne and sphere in order.; Now select the Suzanne’s particle system in the keys menu, check use timing and set it to 200. Now select the sphere’s and set the time to 7025! ( well this is just to lower the speed we won’t render this).; And set the life time of these particles to 500.(this is in the emission subpanel).;
::指定相同的粒子系统,但让我们做一些更改:在物理子面板中选择keyed;在染子面板中选择halo;在标记键的菜单中,点击+图标三次,并将目标对象按顺序设置为文本,苏珊娜和球;现在在键菜单中选择苏珊娜的粒子系统,检查使用时间并将其设置为200.现在选择球体并将时间设置为7025! (好吧,这只是为了降低我们不会染的速度);并将这些粒子的寿命设置为500. (这是在发射子面板中). -
In the timeline header set the end frame to 300.
::在时间线头部设置终端为300. -
Now for the material. Select the cube and: Give it a new material.; Select halo.; Size: 0.03; Hardness: 16; Add: 1; RGB: As you desire how the particles appear.(I did RGB=0, 0.106, 0.8); Now go to frame 260 and insert a keyframe to alpha value.; Now go to frame 270 and insert make the alpha value zero and insert another keyframe.;
::现在是材料. 选择立方体:给它一个新的材料; 选择光环; 尺寸:0.03; 硬度: 16; 添加: 1; RGB: 随您的意愿,粒子的出现. (我做了RGB=0,0.106,0.8); 现在进入框架260并插入一个关键到α值.; 现在进入框架270并插入使α值为零并插入另一个关键; -
Set the scene’s gravity off.
::让场景中的重力起作用. -
[ctrl]+[F12]( I suggest you render this one in xvid rather than png it’s fun)
::建议你用xvid来染这个, 而不是用png,
I will show on this page two ways to let particles take the shape of other objects.
::我将在本页面上展示两种让粒子变成其他物体的方法.
-
keyed particle physics (
Img. 1a
)
::关键粒子物理 (图1a) -
a harmonic force field with a damping of 1. The force field is emitted by another particle system, so that each particle is attracted by another particle (
Img. 1b
).
::一个波力场,其阻尼值为1. 强力场由另一颗粒子系统发射,使每个粒子被另一个粒子吸引 (图1b).
- v2.48
- The second method is easier to control, but I've found that it may not work exact enough. Even if you use RK4 as calculation method, there are some glitches in the precision of the calculation, so that your particles may not come to a standstill (depending on the size of the particles and their number this may be visible or not).
- v2.49
- That the particles didn't come to a standstill has been a bug that Jahka has fixed in 2.49. So if you use Version 2.49 and upwards you will find it easier to work with the harmonic force field.
|
|
Plan Ahead!
Make it easy for yourself. If you know beforehand what will happen at each important frame, you will save a lot of time fiddling with the parameters.
|
Keyed Physics
::关键物理
So here we're going to use keyed particle physics and quite a few different particle systems.
::我们将使用关键粒子物理学和一些不同的粒子系统.
Basically this is the way to go:
::基本上是这样:
-
Use mesh objects and let them emit particles.
::使用网状物体,让它们发射粒子. -
Each system moves to another system because of the keyed physics.
::每个系统都会移动到另一个系统, -
Choose a good visualization of the particles and animate that also.
::选择一个好的粒子可视化, 并动画. -
At last the hard part: sync the different animations.
::现在,我们来看看最难的部分:同步不同的动画.
The animation shall last 300 frames, this will be 12 seconds.
::动画的时间为300,这将是12秒.
- - In the first 2 seconds the word "Blender" shall appear (frame 1 to 50).
- - Than Suzanne shall build up in 3 seconds (frame 51 to 150).
- - Suzanne shall be clearly visible for a few frames (frame 151 to 200).
- - After that the form shall dissolve and the particles move a bit until they vanish (frame 200 to 300)
Preparing the scene
::准备场景
-
Remove the cube.
::移除一个立方体. -
Add a text object
Blender
. Name it
Blender-first
.
::添加一个文本对象Blender. 命名为Blender-first. -
Add a
Suzanne
(
Add->Mesh->Monkey
). Name it
Suzanne-first
.
::添加一个苏珊娜 (Add->Mesh->Monkey). 给它起名为苏珊娜-第一. -
Convert the text object to a meshobject, because only mesh objects can emit particles (menu:
Object->Convert Object Type->Mesh
).
::将文本对象转换为meshobject,因为只有网格对象才能发射粒子 (菜单:对象->转换对象类型->网格). -
Move the objects to their final positions, also the camera.
::移动物体到它们的最终位置, 也是摄像机. -
Clarification required - what are the final positions?
(
Noob note
: the author probably means to move the camera and objects to a right position for viewing the animation correctly.)
::需要澄清 - 最后的位置是什么? (笔者可能是想将相机和物体移动到正确的位置以正确地观看动画.
We need every visible object twice.
::我们需要每一个可见的物体两次.
-
Duplicate
Blender-first
and call the duplicate
Blender-last
.
::复制混合器-第一,并调用复制混合器-最后. -
Duplicate
Suzanne-first
and call the duplicate
Suzanne-last
.
::复制苏珊娜-第一,并称复制苏珊娜-最后.
One problem is that the objects have different sizes. So how many particles shall be used to create a clearly visible form? Since the most difficult object is Suzanne, I have first chosen an acceptable representation and set everything else accordingly. But I will discuss the settings of the objects in order, and not in the way I did it in reality.
::一个问题是,物体有不同的尺寸.那么要用多少颗粒来创造一个清晰可见的形状?因为最困难的物体是苏珊,我首先选择了一个可接受的表示,并根据此设置了其他所有东西.但我将讨论物体的设置,而不是我在现实中所做的方式.
Set up the particle systems
::设置粒子系统
Blender-first:
::首先用机:
-
Add a particle system to
Blender-first
.
-
Amount
20.000
::总额为20,000 -
Sta:
1,
End:
50,
Life:
50
::阶段: 1,结束: 50,生命: 50
::添加一个粒子系统到混合器-第一.数量20,000 状态:1 结束:50,生命:50. -
Amount
20.000
-
Emit from:
-
Random/Faces/Even/Random
::随机/面孔/偶数/随机
::从:随机/面孔/偶数/随机发射 -
Random/Faces/Even/Random
Leave all other settings at default. This object will appear in the first 50 frames. After that the object has to vanish in the 51st frame.
::让所有其他设置默认. 这个对象将出现在前50. 之后该对象必须在第51消失.
-
Insert a layer key for
Blender-first
in frame 50 (mouse over the 3D window,
I
->
Layer
).
::在50中插入Blender-first的层键 (鼠标在3D窗口上,I->Layer). -
Change to frame 51.
::换成第51. -
Move the object to layer 20 (
M
->select layer, bottom right box). Make that layer visible.
::将对象移动到20层 (M->选择层,右下方框).使该层可见. -
Insert the next layer key for the object.
::插入对象的下一个层键. -
Make layer 20 invisible again (select layer 1).
::让20层再次变得不可见 (选择1层). -
Change back to frame 1.
::换回第一.
Suzanne-first
::苏珊娜第一
-
Add a particle system.
-
Amount
20.000
::总额为20,000 -
Sta:
50,
End:
100,
Life:
200 (we don't need this long life but the lifetime doesn't matter as long as it's long enough)
::开始: 50,结束: 100,生命: 200 (我们不需要长寿,但只要足够长,寿命就不重要)
::添加一个粒子系统.数量20,000 状态: 50,终点: 100,寿命: 200 (我们不需要这么长的寿命,但只要寿命足够长,寿命就不重要) -
Amount
20.000
-
Emit from:
-
Random/Faces/Even/Random
::随机/面孔/偶数/随机
::从:随机/面孔/偶数/随机发射 -
Random/Faces/Even/Random
-
Visualization: None
::没有可视化
Leave all other settings as default. These particles shall not move and they shall not be visible. They are simply a target to the next system.
::让所有其他设置为默认. 这些粒子不应移动,也不应可见. 它们只是下一个系统的目标.
-
Animate the layer of this object also. Move it out of sight in frame 151.
::动画这个物体的层. 在151中移除它.
Blender-last
::混合器最后一个
These particles shall move from the shape "Blender" to the "Suzanne" shape.
::这些粒子将从"混合器"形状转移到"苏珊娜"形状.
-
Add a particle system to
Blender-last
.
-
Amount
20.000
::总额为20,000 -
Sta:
51,
End:
51,
Life:
100
::演员: 51, 结束:51, 生命: 100
::添加一个粒子系统到混合器-最后.数量20,000 状态:51,结束:51,生命:10 -
Amount
20.000
-
Emit from:
-
Random/Faces/Even/Random
::随机/面孔/偶数/随机
::从:随机/面孔/偶数/随机发射 -
Random/Faces/Even/Random
-
Physics:
-
First/Keyed
It is the first system of a chain (a very short chain in this example) of systems.
::它是链中的第一个系统 (在这个例子中是一个非常短的链). -
Keyed Target:
Suzanne-first,
Psys:
1. Target is the first particle system of "Suzanne-first".
::目标是"苏珊娜第一"的第一个粒子系统.
::物理:第一/关键 它是链系统中的第一个系统 (在这个例子中是一个非常短的链). 关键目标:苏珊娜-第一,Psys: 1. 目标是"苏珊娜-第一"的第一个粒子系统. -
First/Keyed
It is the first system of a chain (a very short chain in this example) of systems.
-
Set time to
Absolute
in the
Extras
panel. We're going to animate the material of the particles, I want all particles to change at once in a certain frame.
::我们将动画粒子的材料,我想让所有的粒子在特定的中同时发生变化.

Suzanne-last
::苏珊娜最后一个
These particles shall dissolve the form, so at first they take the shape and move around randomly afterwards.
::这些粒子将会溶解成形,所以它们首先会形成形状,然后随机地移动.
-
Add a particle system to
Suzanne-last
.
-
Amount
20.000
::总额为20,000 -
Sta:
151,
End:
151,
Life:
150,
Rand:
0.5. The lifetime is randomized from 151/2 to 151 frames. [Noob Note: In 2.49a, you can't set the start later than the end, so you must first change the end to 151, then change the start.]
::时间: 151, 终点: 151, 生命: 150, 兰德: 0.5. 生命周期是随机从151/2到151. [Noob 注: 在2.49a中,你不能设置开始时间比结束时间晚,所以你必须先将结束时间更改为151,然后更改开始时间.]
::添加一个粒子系统到苏珊娜-last.数量20,000 个 状态:151,结束:151,生命:150,兰德:0.5.寿命是随机从151/2到151. -
Amount
20.000
-
Emit from:
-
Random/Faces/Even/Random
::随机/面孔/偶数/随机
::从:随机/面孔/偶数/随机发射 -
Random/Faces/Even/Random
-
Bake:
End
frame 300. Though we don't use baking here, you have to set the
End
frame in the
Bake
panel. Else the last 50 frames wouldn't be calculated.
:::最后的300虽然我们不使用在这里,你必须在面板设置最后的.否则最后的50不会被计算. -
Time: Absolute
::时间:绝对

Animate the Brownian motion of the particles.
::激活粒子的布朗运动.
-
Open an
Ipo
window.
::打开一个Ipo窗口. -
Select
Ipo Type
particles.
::选择Ipo型的粒子. -
Select the
Brown
channel (
LMB
).
::选择棕色频道 (LMB). -
Ctrl-Click
with the left mouse button in the
Ipo
window to create an Ipo-key for the selected channel.
::在 Ipo 窗口中使用鼠标左键点击以创建为所选频道的 Ipo 键. -
Create a curve similar to
Img. 2b
.
Brown
= 0 to frame 200, than increase to
Brown
= 4 in frame 217.
::创建一个类似图 2b. 布朗 = 0 200, 增加到布朗 = 4 217.
Material
::材料
Blender-first and Blender-last will get the same material, Suzanne-first is invisible anyway, but Suzanne-last will get a material. The material of the three objects is very similar, but I have animated the visibility of the particles to match the brightness of the objects.
::混合器-第一和混合器-最后将得到相同的材料,苏珊娜-第一是无形的,但苏珊娜-最后将得到一个材料. 三个物体的材料非常相似,但我已经动画了粒子的可见性,以匹配物体的亮度.
Suzanne-last
::苏珊娜最后一个
-
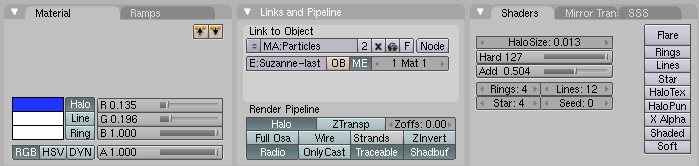
Create a simple
Halo
material like that in
Img. 2c
.
::创建一个简单的光环材料, 就像图像2c.
This is nothing special, relatively small particles with a relatively "sharp" edge. The
Add
parameter gives more brightness if particles overlap, I think this is a nice effect here.
::添加参数给出了更多的亮度,如果粒子重叠,我认为这是一个很好的效果.
Blender-first
::混合器-首先
-
Assign the material also to "Blender-first".
::另外,还要将材料分配给"混合器". -
Make the material a
Single User Copy
by clicking on the small number next to the material name.
::通过点击材料名称旁边的小数字,使材料成为单用户副本. -
Set
Alpha
to 0.438.
::将阿尔法设置为0.438.
Blender-last
::混合器最后一个
-
Assign the "Blender-first" also to
Blender-last".
::指定"混合器第一"也用于混合器最后. -
Make the material a
Single User Copy
by clicking on the small number next to the material name.
::通过点击材料名称旁边的小数字,使材料成为单用户副本. -
Animate the alpha value of the material.
-
Insert an
Ipo
key for
Alpha
in frame 50.
::在第50中插入Alpha的Ipo键. -
Change to frame 150.
::换成150的. -
Set
Alpha
to 1.
::将阿尔法设置为1. -
Insert an
Ipo
key for
Alpha
.
::插入一个Ipo键为Alpha.
::动画材料的alpha值. 在50中插入Alpha的Ipo键. 切换到150. 将Alpha设置为1. 插入Alpha的Ipo键. -
Insert an
Ipo
key for
Alpha
in frame 50.
Now the brightness of all systems are matched.
::现在所有系统的亮度都匹配了.
Links
::链接
-
Manual about Particle physics
::关于粒子物理学的手册
Harmonic Force Fields
::波力场
So here we will use
Harmonic
force fields. The Text "Blender" shall be transformed to the text "2.5" and than to the text "The big leap forward" (
Img. 1b
).
::现在我们将使用力场. 文本"混合器"将被转换为文本"2.5"而不是"大跃进" (图1b).
-
Use mesh objects and let them emit particles. Only the particles from the first object are visible and move.
::使用网状物体,让它们发射粒子.只有第一物体的粒子是可见的和移动的. -
The other particle systems use an animated
Harmonic
force field to attract the particles from the first system.
::其他粒子系统使用动态波力场来吸引来自第一个系统的粒子. -
The particles from the first system take the place of the other particles.
::其他粒子的位置. -
Choose a good visualization of the particles and animate that also. This is difficult and maybe you should animate the visualization at last.
::选择一个好的粒子可视化,并动画. 这很难,也许你应该动画的可视化最后. -
At last the hard part: sync the different animations and force fields.
::现在是最困难的部分:同步不同的动画和力量场.
Preparing the scene
::准备场景
-
Remove the cube.
::移除一个立方体. -
Add three text objects:
-
"Blender"
::混合器 - "2.5"
-
"The big leap forward"
::"大飞跃向前"
::添加三个文本对象:"混合器" "2.5" "大飞跃" -
"Blender"
-
Convert the text objects to mesh objects (menu:
Object->Convert Object Type->Mesh
).
::将文本对象转换为网格对象 (菜单:对象->转换对象类型->网格).
Set up the particle systems
::设置粒子系统
-
Give each of the three objects its own particle system.
::给这三个物体各自一个粒子系统. -
The first object "Blender" gets following system:
-
Type
Emitter
::发射器类型 -
Amount
=4000. We need a lot of particles, to fill the last text evenly. If you want to make the animation even better, you could animate the
Halo
size of the particles to match the density of the different objects.
::需要很多粒子,以使最后的文字均填充. 如果你想让动画更好,你可以动画粒子的光环大小,以匹配不同物体的密度. -
Sta(rt)
=1,
End
=10,
Life
=250. The particles are created from the first to the 10th frame and live for 250 frames.
::阶段 (r) =1,终点=10,寿命=250.粒子从第一个到第十个中产生,并活250.
::第一个对象"混合器"得到以下系统: 类型发射量=4000. 我们需要很多粒子,以均填充最后的文本. 如果你想让动画更好,你可以动画粒子的光环大小以匹配不同对象的密度. 阶段 (r) =1, 结束=10, 寿命=250. 粒子从第一个到第十个创建,并活250. -
Type
Emitter
Only the particles of this system will be visible later.
::只有这个系统的粒子在以后才会被看到.
-
Change the calculation method from
Midpoint
to
RK4
. We need the extra precision here.
::我们需要更精确的计算方法.
The objects "2.5" and "The big leap forward" will get particle systems with very similar settings:
::它们将会得到非常相似的粒子系统:
-
"2.5":
-
Type
Emitter
::发射器类型 -
Amount
=4000
::额度=4000 -
Sta(rt)
=30,
End
=30,
Life
=70. So all the particles are emitted in frame 30 and live 70 frames. So their force field (which we give them soon) will start in frame 30 also. If you want a smoother transition you should give the particles a bit more time to be emitted (like from frame 30 to frame 40).
::,,,,,,,,,,,,,,,,,,,,,,,,,,,,,,,,,,,,,,,,,,,,,,,,,,,,,,,,,,,,,,,,,,,,,,,,,,,,,,,,,,,,,,,,,,,,,,,,,, -
Emit from
Random
/
Faces
/
Even
/
Random
.
::从随机/面孔/偶数/随机发射. -
Phyics
None
. The target particles shall not move.
::没有物理. 目标粒子不应移动. -
Visualisation
None
. The target particles are not rendered.
::没有可视化. 目标粒子没有染.
::"2.5":类型发射量=4000 级 (r) =30,终点=30,寿命=70.所以所有的粒子都在 30 中发射,并且活 70 .所以它们的力场 (我们很快就会给它们) 也将在 30 中开始.如果你想要一个更顺的过渡,你应该给粒子发射更多时间 (比如从 30 到 40 ).从随机/面孔/偶数/随机发射.物理没有.目标粒子不应移动.可视化没有.目标粒子不被染. -
Type
Emitter
-
"The big leap forward": All settings as for "2.5", except
Sta
,
End
and
Life
.
-
Sta
=101,
End
=101,
Life
=90.
::生命周期为90年.
::"大飞跃":所有设置为"2.5",除了Sta,End和Life. Sta=101,End=101,Life=90. -
Sta
=101,
End
=101,
Life
=90.
The force fields
::强力场
The
particle systems
of the objects "2.5" and "The big leap forward" will get a force field now. The objects
don't
get a force field.
::现在"2.5"和"大跃进"的粒子系统将会得到一个力场.
-
Select the object "2.5".
::选择一个对象"2.5". -
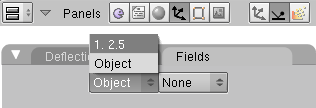
Select the particle system in the
Field
panel of the
Physics
buttons (
Img. 3a
).
::在物理按的"场"面板中选择粒子系统 (图3a).
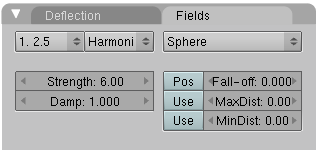
-
Use field type
Harmonic
. Now the particles from the object "2.5" do attract the particles from the object "Blender".
::使用字段类型"波". 现在来自"2.5"物体的粒子确实吸引了来自"混合器"物体的粒子. -
The
Strength
of the force field determines the time the particles need to reach the target. Set it accordingly.
::强度的强度决定了粒子到达目标的时间. -
The
Damp
(ing) makes sure, that the particles move to their target but not beyond.
::湿使得粒子能够移动到目标,但不能超越目标.
Do the same for the object "The big leap ...", i.e. select the particle system and give it a
Harmonic
force field.
::对于"大跃进"...的物体也做同样的事情,即选择粒子系统并给它一个力场.
I have used a
Wind
field in the last frames to blow the particles away.
::我在最后几中使用了风场来吹走粒子.
(Noobie Warning: When i followed the tutorials up to this point, i didn't know how to use wind. I thought selecting
Wind
instead of
Harmonic
would create the effect but then blender froze on me (I am guessing it went away and calculated wind for every single particle). so don't try wind yet. Wind is instructed in later tutorials.)
:Noobie警告:当我跟随教程到这个点,我不知道如何使用风. 我认为选择风而不是波会产生效果,但然后混合器结在我 (我猜它走了,计算风每一个粒子).所以不要尝试风.风在后面的教程中指示.)
Links
::链接
-
The Blend file to download
::需要下载的组合文件 -
The manual about force fields
::关于力场的手册