Blender 3D:零基础到专业级-单元3:拓展视野
Billboard
visualization of particles - and especially their animation - is one of the more arcane concepts in Blender. We're going to shed some light on this. Billboard visualization is extremely powerful, everything that can be done with a halo can also be done with a billboard. But billboards are real objects, they are seen by raytracing, they appear behind transparent objects, they may have an arbitrary form and receive light and shadows. They are a bit more difficult to set up and take more render time and resources.
::粒子的广告牌可视化 - - 特别是它们的动画 - - 是 Blender 中最难理解的概念之一. 我们将对此进行一些阐明.广告牌可视化非常强大,任何可以用光环做的事情也可以用广告牌做. 但是广告牌是真实的物体,它们被光线追踪所看到,它们出现在透明物体后面,它们可能具有任意的形式并接收光和影子.它们的设置有点困难,需要更多的时间和资源.
Billboards
are aligned square planes. If you move an aligned billboard in a circle around an object, the billboards always faces the center of the object. The size of the billboard is set with the Size of the particle.
::广告牌是对齐的方形平面.如果你在一个物体周围绕一个圆移动一个对齐的广告牌,广告牌总是面向物体的中心.广告牌的大小是设置与粒子的大小.
Texturing billboards is done by using uv coordinates that are generated automatically for them.
::标签是通过使用自动生成的紫外线坐标来完成.
-
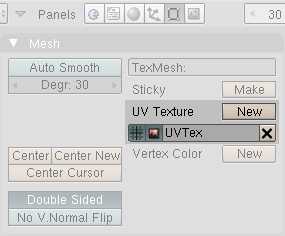
The main thing to understand is that if the object doesn't have any UV Layers, you need to create at least one in the objects Editing buttons for any of these to work (
Img. 1a
).
::首先要明白的是,如果对象没有任何UV层,你需要在对象中至少创建一个编辑按,以便其中任何一个工作 (图1a). -
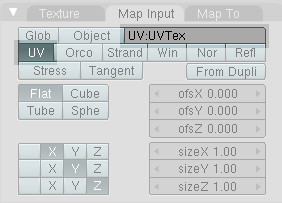
Moreover, material should be set to UV coordinates in the Map Input panel (
Img. 1b
).
::此外,在地图输入面板 (图1b) 中,应将材料设置为紫外线坐标.
|
|
Splitting a texture
::分离一个纹理

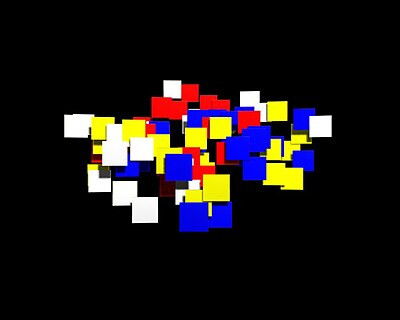
The simplest thing we can do is to give every billboard its own fraction of an image texture. We're going to use a simple image (
Img. 2a
, right hand side) and split this in four parts (
UV Split
= 2, horizontally and vertically).
::我们最简单的方法是给每一个广告牌一个图像的部分. 我们将使用一个简单的图像 (图2a,右侧) 并将其分成四部分 (UV Split=2,横向和垂直).
-
Create the UV coordinates (simply click on
New
next to
UV Texture
in the
Mesh
panel).
::创建UV坐标 (只需在网格面板中单击"新"的位置). -
Create a particle system.
::创建一个粒子系统. -
Activate
Billboard
visualization.
::启动广告牌可视化 -
Set
UV Split
to 2.
::设置紫外线分离到2 -
Offset: Random
to randomly choose one of the images sections. None would give only the first of the four fields, so all billboards would be red, linear would first use red, then blue, then white and then yellow repeatedly.
::偏移:随机随机选择图像部分之一.没有一个只会给出四个字段中的第一个,所以所有的广告牌都会是红色的,线性会首先使用红色,然后蓝色,然后白色,然后黄色. -
Set
UV Channel
to
Split
. This creates the necessary UV coordinates, that are stored in the UV layer. If you use another UV channel, you need a second (or third) UV layer to store the coordinates (see below for an example).
::将UV频道设置为分离. 这将创建必要的UV坐标,这些坐标将存储在UV层中. 如果您使用另一个UV频道,则需要第二个 (或第三个) UV层来存储坐标 (请参见下面的示例). -
Fill in the field
UV
with the name of the coordinate set (here "UVTex").
::在"UV"字段中填写坐标集的名称 (以下"UVTex").
-
Now create a material for the particle emitter.
::现在为粒子发射器创造材料. -
Add a texture if not there already.
::如果还没有, -
Set
Map Input
to
UV
. If you only have one active
UV
layer this is used by default, but if you want to continue this tutorial you have to fill in the name of the UV set also (i.e. "UVTex").
::如果您只有一个活跃的UV层,则默认使用此,但如果您想继续本教程,则必须填写UV集的名称 (即"UVTex"). -
Load the texture as Image texture.
::作为图像纹理加载纹理.
Now every billboard gets a random section of the texture (see
Img. 2b
).
::现在每个广告牌都得到了纹理的随机部分 (见图2b).
Animating Alpha in relative particle time
::关于粒子时间的阿尔法动态化
Now we're going to combine the texture split effect with an animation of the billboard alpha. This is done in
relative particle time
, i.e. in the lifetime of each particle.
::现在我们将纹理分裂效应与广告牌alpha的动画结合起来. 这是在相对粒子时间,即每个粒子的生命周期中完成的.
Billboard time is setup completely different than particle time.
::标签时间与粒子时间完全不同.
-
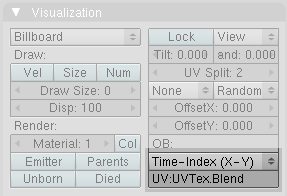
Create a new UV layer (the second one). Name it "UVTex.Blend". Naming is not important here as long as it is unique.
::创建一个新的UV层 (第二个). 命名为"UVTex.Blend". 命名在这里并不重要,只要它是唯一的. -
Select the UV channel
Time-Index (X-Y)
in the
Visualization
panel of the particle system. Fill in the name of the newly created UV layer "UVTex.Blend". This creates an additional set of UV coordinates in this UV layer.
::在粒子系统的可视化面板中选择UV频道时间指数 (X-Y). 填写新创建的UV层名称"UVTex.Blend". 这将在该UV层中创建一个额外的UV坐标集.
Now both UV layers with different UV coordinates will be used. The material settings:
::现在将使用两种不同紫外线坐标的紫外线层.
-
Activate
RayTransp
and
TraShadow
.
::激活雷传输和影子. -
Add a second texture to your material.
::给你的材料添加第二种质地. -
Map Input
also
UV
, but now use the UV layer "UVTex.Blend".
::图表输入也使用紫外线,但现在使用紫外线层"UVTex.Blend". -
Map To:
-
Invert Alpha
and
Invert Spec
::逆转阿尔法和逆转特征 -
No RGB
(since we're going to use a colorband texture)
::没有RGB (因为我们将使用色带纹理) -
DVar
= 0 to set Alpha to zero where the colorband is black.
::在颜色带为黑色的位置设置阿尔法为零.
::图到:反向阿尔法和反向规格 没有RGB (因为我们将使用色带纹理) DVar = 0将阿尔法设置为黑色的色带为零. -
Invert Alpha
and
Invert Spec
This is one of the possible combinations for using a texture to make a material transparent (
Img. 3b
), there are several other methods that work as well.
::这是使用纹理使材料透明的可能组合之一 (图3b),还有其他几种方法也可以.

The texture is really the most important thing here.
::质地是最重要的.
-
Use a linear
Blend
texture.
::使用线性混合质. -
Activate
Colorband
for full control.
::激活色带进行完全控制.
|
|
The left hand side of the colorband if the first frame of the particle life time. The right hand side is the last frame of the particle life time.
|
-
Adjust the colorband to your liking.
::调整颜色带以满足您的喜好.
I've mapped the texture so, that "white" means full opacity, black full transparency.
::我已经绘制了图谱, "白"意味着完全不透明, 黑色完全透明.

See this
animation
for the result of the combined textures.
::看到这个动画的结合质感的结果.
Animating billboard color
::动画广告牌颜色

I will show here a second example for animating with a billboard texture, because this is so important. We're going to change the color during the lifetime of the billboard, but you can animate every property that way that can be influenced by a texture. Additionally you can animate the material itself, this is done in absolute time for billboards. So you can mix relative and absolute time animations.
::我会在这里展示第二个用广告牌纹理动画的例子,因为这很重要. 我们将在广告牌的生命周期中改变颜色,但是你可以动画任何可能受纹理影响的属性. 此外,你可以动画材料本身,这是在广告牌的绝对时间里做. 所以你可以混合相对和绝对时间动画.
-
Open a new file.
::打开一个新的文件. -
Remove the cube and add a plane.
::取出立方体,然后添加一个平面. -
Add an UV layer to the plane
::增加一个UV层到平面 -
Add a particle system with
Billboard
visualization and
UV Channel
Time-Index. Fill in the name of the UV layer.
::添加带有标牌可视化和UV频道时间索引的粒子系统. 填写UV层的名称.
The particle life time is 50 frames.
::粒子的寿命为50.
-
Add a material to your plane.
-
Basis color
Yellow
.
::基本颜色是黄色.
::增加一个材料到你的飞机. 基础颜色黄色. -
Basis color
Yellow
.
-
Use a linear blend texture. If you would use a color band here, you could create an even more colorful animation.
-
Map Input
UV
::图片输入UV -
Fill in the name of the UV layer.
::填写紫外线层的名称. -
Map To
Col
. I've used a dark blue color here.
::我用了深蓝色的颜色.
::图像输入UV填写UV层的名称. 图像到COL. 我使用了深蓝色. 图像输入UV填写UV层的名称. 图像输入UV填写UV层的名称. 图像输入UV层的名称. 图像输入UV层的名称. 图像输入UV层的名称. 图像输入UV层的名称. 图像输入UV层的名称. 图像输入UV层的名称. 图像输入UV层的名称. 图像输入UV层的名称. 图像输入UV层的名称. -
Map Input
UV
Now the linear blend texture sets the amount of blue color that is mixed to the basis color of the material.
::线性混合纹理将蓝色的混合量与材料的基本颜色相结合.
-
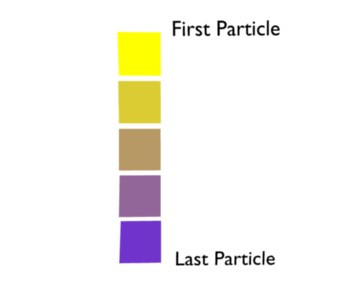
At the left hand side the blend texture has a value of 0, so zero blue is mixed to the base color in the first frame of the particle lifetime.
::在左边,混合质感的值为0,所以零蓝色在粒子生命周期的第一中与基色混合. -
At the right hand side the blend texture has a value of 1, so 100% blue is mixed to the base color in the last frame of the particle lifetime.
::在右边,混合质感的值为1,所以在粒子生命周期的最后一中,100%的蓝色与基色混合.
Changing the starting color of a billboard
::改变广告牌的起始颜色
If you flip the Blend texture, you get a different effect. Now every Billboard gets another starting color, but keeps that color during it's lifetime.
::现在每张广告牌的起始颜色都不同, 但在使用期间保持着相同的颜色.
Have I mentioned that you may use multiple textures on a billboard, combining all effects?
::您可以在广告牌上使用多种纹理,