Blender 3D:零基础到专业级-单元3:拓展视野
In this tutorial, we will be making a simple skirt, and using the cloth physics system to make it fall in realistic-looking folds.
::在本教程中,我们将制作一个简单的子,
Making the Skirt Mesh
::子的网状造型
-
Open Blender and delete the default cube, if you aren't looking down on the scene, press NUM7 .
::打开混合器并删除默认立方体, 如果您没有在下面的场景, 按NUM7 . -
Shift + A →
Add → Mesh → Circle
::转移 + A → 添加 → 网格 → 圆 -
The circle will be created, and in the Tool Shelf on the left you should see a panel appear for adjusting its settings. Set the number of vertices to about 12.
::您可以在左边的工具架上看到一个调整设置的面板. 设置顶点数为12个. -
Switch to Edit Mode with Tab . All the circle’s vertices should be initially selected; if not, use A to select them all.
::切换到使用 Tab 的编辑模式. 首先应该选择所有圆的顶点; 如果没有,请使用 A 来选择它们. -
Press E to extrude a second copy of the vertices; press S Shift + Z to scale the extruded vertices in the X and Y directions. These will make up the hem of the skirt; scale it out to as large as you like. Note that this is positioning the skirt out flat horizontally, instead of hanging down as you would expect; Blender’s cloth animation system will take care of that, and this positioning gives maximum opportunity for the skirt to fall in dramatic folds.
::按E挤出第二个顶点;按S 转换 + Z以X和Y方向缩放挤出顶点.这些将构成的边缘;将其缩放到您喜欢的尺寸.请注意,这将使平坦地水平定位,而不是像您预期的那样垂下;Blender的布料动画系统将照顾这一点,这种定位为以戏剧性的折叠而下降提供最大的机会. -
Now we will need to subdivide the mesh. The physics can only act on actual vertices, so the more of these we have, the more realistic the cloth effect will be. Select all vertices in the skirt, press W and select the “Subdivide” option. A panel will appear in the Tool Shelf for controlling the settings for the subdivision operation; set the number of cuts to, say, 4.
::现在我们需要将网格分成部分. 物理只能对实际的顶点进行作用,所以我们拥有越多的顶点,布效果就越现实. 在子中选择所有顶点,按W并选择"分成部分"选项. 工具架上将出现一个控制分成部分操作设置的面板;设置切割数为,例如,4. -
While you’re at it, switch to OBJECT mode and look in the Tool Shelf for a pair of “Shading” buttons titled “Smooth” and “Flat”
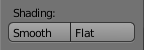 , and click on “Smooth”.
::在此过程中,切换到对象模式, 在工具架上查找一对"遮"按,
Creating the Vertex Group
::创建了"顶峰集团"
-
Now we have to specify that the waist of the skirt will stay fixed in place as it falls: deselect all vertices, and select the innermost ring of vertices. The quickest way to do this is to hold down Alt + Shift and click with RMB on one of the edges bordering the hole in the middle. With the entire ring of vertices selected, go to the Mesh Object Data context
 in the Properties window, find the “Vertex Groups” panel, and click the
+
sign to create a new group. This will initially be called “Group”; perhaps give it a more meaningful name (like “Waist”), and click “Assign” to put the selected vertices into the new group.
in the Properties window, find the “Vertex Groups” panel, and click the
+
sign to create a new group. This will initially be called “Group”; perhaps give it a more meaningful name (like “Waist”), and click “Assign” to put the selected vertices into the new group.
::现在我们必须指定子的腰部在下落时保持固定:取消选择所有顶点,并选择最内侧的顶点环.最快的方法是按住Alt + Shift,然后在中间的洞边缘的边缘之一点击RMB.选择了整个顶点环,进入属性窗口的网状对象数据上下文,找到顶点组面板,并点击+符号创建一个新组.这将最初被称为组;也许给它一个更有意义的名称 (如腰),然后点击赋值将选择的顶点放入新组.
-
Tab out of Edit Mode into Object Mode. The skirt should still be selected.
::子应该仍然被选中. -
Go to the Physics tab
 in the Properties window (last icon in the row at the top). This will just show a few buttons to begin with
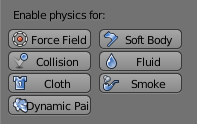 .
.
::在属性窗口中 , 进入物理选项卡 (上方行中的最后一个图标). 这里只会显示一些按 . -
Click the “Cloth” button; a whole lot of other settings should appear, most of which can be left at their default values (make sure the checkbox at the top of the “Cloth Collision” panel is checked). However, check the box titled “Pinning”; now you can click in the field just below it to bring up a popup menu of all the vertex groups in the mesh; this should just contain the one entry named “Waist” you created earlier, so select that.
::点击"布料"按;应该会出现很多其他设置,其中大部分可以留在默认值 (请确保"布料碰撞"面板顶部的选项框被勾选).但是,请勾选标题为"钉"的框;现在您可以点击下面的字段,以显示网格中的所有顶点组的弹出菜单;这应该只包含您之前创建的"腰部"一条条条目,所以选择它. -
Now the magic happens ... rotate the view to an oblique one to give yourself a good view of the process, and hit Alt + A . You should now see the skirt fall from its horizontal position to a more natural vertical one, developing some folds in the process.
::现在魔法发生了...把视图转向斜视图,让你对整个过程有很好的了解,然后按 Alt+A. -
After the animation has run through at least one complete cycle, hit ESC to stop it.
::在动画完成至少一个完整的循环后,按ESC来停止它.
Prior to Keeping the Folds
::在保持折叠之前
Before doing the next step, we need to enable one of the standard addons that come with Blender. This will let us make a copy of any stage of the physics simulation into a separate object.
::接下来我们需要启用Blender的标准附加功能, 这将使我们能够将物理模拟的任何阶段复制成单独的对象.
Go into the User Preferences window and bring up the “Addons” tab. Look for the “Animation Corrective shape keys” addon (typing “shape k” into the search box should be enough to find it).
::进入用户偏好窗口,并打开"添加"选项卡. 寻找"动画修改形状键"附加组件 (输入"形状k"到搜索框应该足以找到它).
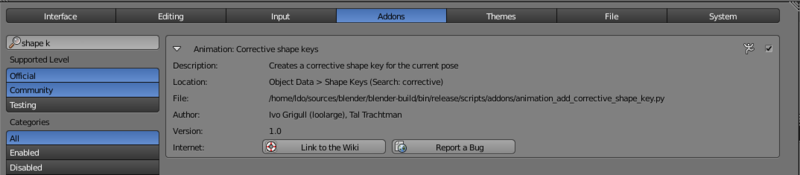
Enable it. Now back to the 3D view...
::现在回到3D视图...
Keeping the Folds
::保持折叠
-
Use the left- and right- arrow keys to step through the animation one frame at a time, until you find a position for the skirt that you like.
::通过左和右箭头键, 一个图片一一段, 直到找到你喜欢的子位置. -
When the 3D view is showing a nice shape for the skirt, go to the mesh data tab in the Properties window, and look for the “Shape Keys” panel. Click with
LMB
on the down-arrow just below the
+
and
-
signs, and in the menu that appears, you should see the item “Create duplicate for editing”
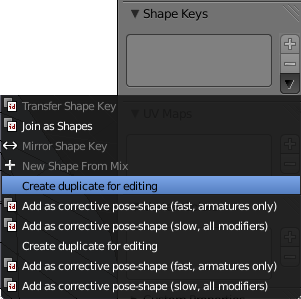 . Select that.
::当3D视图显示子的漂亮形状时,请进入属性窗口的网格数据选项卡,并查找"形状键"面板. 点击"+"和"-"符号下方的下行箭头上的LMB,在显示的菜单中,您应该看到"创建重复版以进行编辑"项. 选择此项. -
It looks like nothing has happened, but in fact you now have a second copy of the skirt mesh, “baked” into the position corresponding to the current frame of the animation. Try using the arrow keys to move through the animation, and you will see the baked copy remain in the chosen position.
::现在你有了第二个子网,烤到与动画当前相对应的位置.试着用箭头键移动动画,你会看到烤的副本仍然在所选择的位置. -
At this point, you can delete the original animated skirt mesh (or move it to another layer for future reuse), leaving the nicely-folded copy.
::在此时,您可以删除原始的动画网 (或将其移动到另一个层以供将来重复使用),留下精心折叠的副本.

Extra Practice
::额外的练习
-
You will notice at some points during the animation, the folds of cloth pass right
through
each other, which is of course impossible with real cloth. To prevent this, you could go to the “Cloth Collision” panel in the Physics tab, and click the “Self Collision” checkbox. Rerun the animation ( Alt + A ) to see the difference; what other effects does it have?
::在动画中,你会注意到,在某些时候,布的折叠会直接穿过彼此,这当然是不可能的.为了防止这种情况,你可以进入物理选项卡中的"布碰撞"面板,并点击"自碰撞"选项框.重新运行动画 (Alt + A) 来看看差异;它还有什么其他效果? -
Maybe the folds don’t look realistic enough. Go back to the original mesh, bring up “Subdivide” again and subdivide it by a couple more levels. Rerun the animation ( Alt + A ). It should take a bit longer for the first cycle, but do the results look better?
::动画的图像是如何看待一个人,并不是一个人. 动画的图像是如何看待一个人,并不是一个人. 动画的图像是如何看待一个人,并不是一个人. -
This YouTube tutorial might also help:
http://au.youtube.com/watch?v=mgYhZ3hWwTQ
happy animating!
::现在, 让我们一起来看看这个视频吧!