Blender 3D:零基础到专业级-单元3:拓展视野
Prologue
::序言
This is the
Blender wind and soft body tutorial
. This tutorial will try and help your knowledge of using Soft Body and the Fields and Deflection panels in Blender 3D. (For best results, I recommend you use Blender version 2.43 or higher). Don’t forget to save your work at various points throughout the tutorial.
::这是Blender的风和软体教程. 本教程将尝试帮助您了解使用软体和Fields和Deflection面板在Blender 3D中的知识. (为了获得最佳效果,我建议您使用Blender版本2.43或更高). 别忘了在教程中的各个点保存您的工作.
Setting up scene
::设置场景
The plane
::飞机
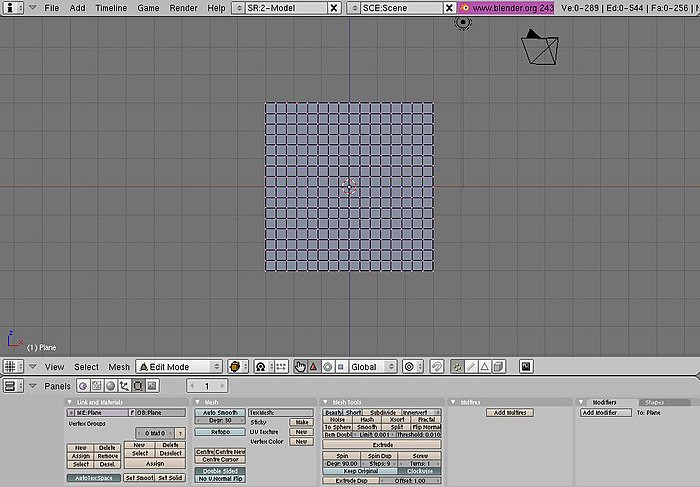
Delete the default cube [X key, or yes, even the Delete key] and enter Front view mode [Num. Pad 1]. Add a plane, scale 3 times [S key, 3, Enter] and sub-divide 4 times until you get something like the shape below. If your computer can handle more, and you want more, sub-divide as many times as you like, but if your PC is struggling with this, undo once or twice.
::删除默认的立方体[X键,或是,甚至删除键]并进入前视图模式[数. Pad 1].添加一个平面,缩放3次[S键,3 Enter]并分为4次,直到得到下面的形状.如果您的计算机可以处理更多,并且您想要更多,可以分为您喜欢的次数,但如果您的PC在此方面遇到困难,请撤销一次或两次.
The wind items
::风的项目
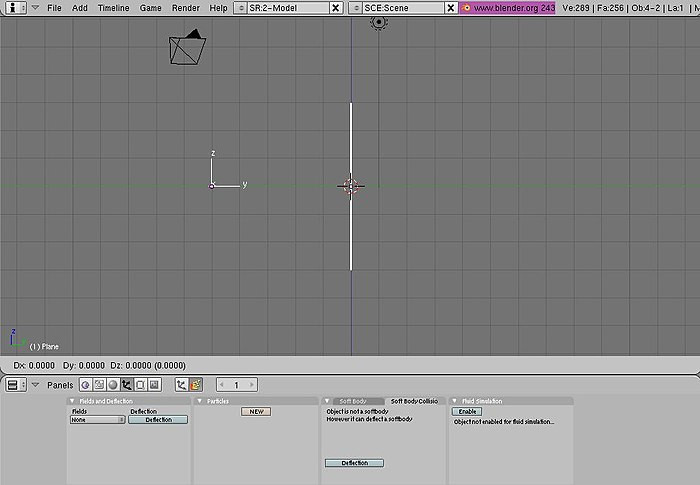
TAB out of edit mode (if you haven’t done so already), enter side view [Num Pad 3] and add an empty. Clear the rotation [ALT + R] and rotate it 90° [R, 90]. Place it about -5 from the centre [G, y, -5] and make sure its still in the middle of the X axis. Your scene should look like the picture below:
::编辑模式的 TAB (如果您还没有这样做),输入侧面视图[Num Pad 3]并添加空. 清除旋转[ALT + R]并旋转90°[R, 90]. 将其从中心[G, y, -5]放置约-5并确保它仍然在X轴的中间. 您的场景应该看起来像下面的图片:
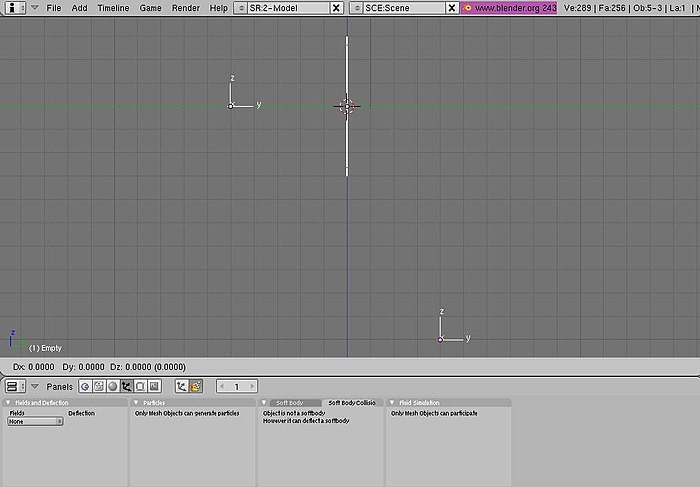
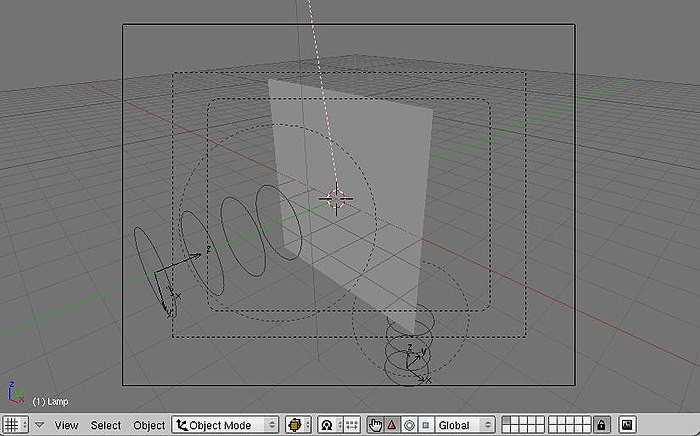
For the second wind item, add an empty like before and clear its rotation, but DON’T rotate it any more. Move it along the Y axis by 4 places [G, Y, 4] and -10 by the Z [G, Z, -10]. And now your scene should look something like this (with all items selected).
::对于第二个风物,添加一个空的像之前一样,并清除其旋转,但不要再旋转它.沿Y轴移动它4个位置[G,Y, 4]和-10的Z[G,Z,-10].现在你的场景应该看起来像这样 (所有的项目都已选).
And that’s all your items you’ll need for this. Onto the harder part.
::现在我们要做更难的事情.
Designating each object's job
::指定每个对象的任务
The plane
::飞机
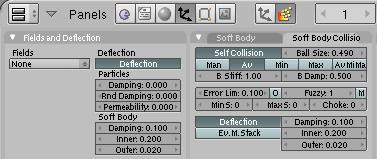
Now, the plane will become a soft body, so enter the Object Panel [F7], click on the Physics Button (beside the three arrows, see second picture below) and click on the soft body button. You will get a load of boxes, but we only need to look at the Grav, Goal, and the bottom parts:
::现在,飞机将变成一个软体,所以进入对象面板[F7],点击物理按 (在三箭头旁边,见下图),然后点击软体按. 你会得到很多盒子,但我们只需要看看Grav,Goal和底部部分:
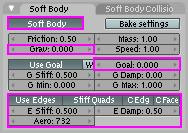
Change the values of these as shown above. Change the Aero part to 732 (if you go up to 1000, it changes the final output by a bit).
::改变这些值如上所示. 改变Aero部分为732 (如果升至1000,它会改变最终输出).
Now, click on the Soft Body Collision tab and click on the Self Collision and Deflection buttons. You don’t need to change any of the numbers here. The buttons window should look something like this:
::现在,点击软体碰撞选项卡,然后点击自动碰撞和偏移按. 你不需要改变任何数字. 按窗口应该看起来像这样:
Now we will move on to the Empty items which will be the wind.
::现在我们将继续到空物品,
Creating the wind
::创造风
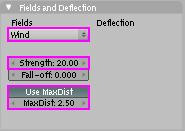
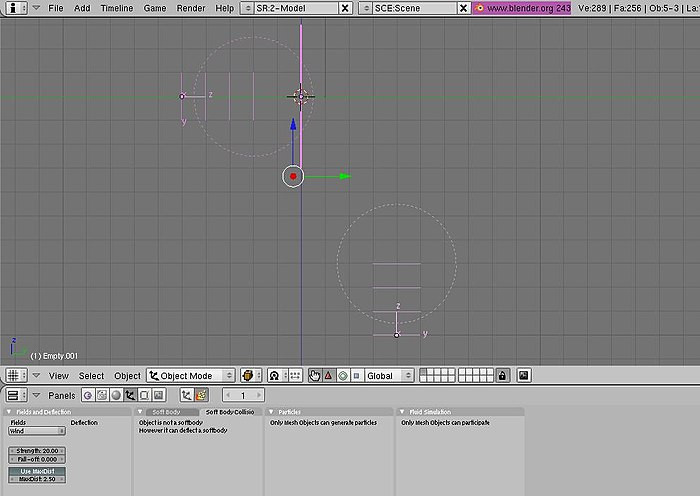
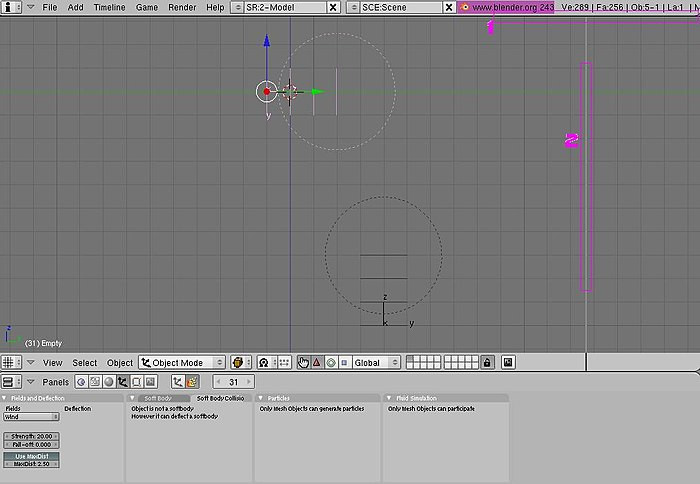
The two empty’s we created earlier will be the items that will act like wind, and when you render at the end, they will be invisible, just like the wind. Anyway, select one of the empty’s and enter the Physics panel. Click on the box under the Fields and select “Wind”. (Blender 2.5+ note: First you will have to choose "Force Field", then change the Type to "Wind".) Change the Strength to 20, click on Use MaxDist and change MaxDist to 2.5.
::我们之前创建的两个空将是像风一样的物品,当你在最后染时,它们将像风一样是不可见的.无论如何,选择其中一个空并进入物理面板.点击"Fields"下的框,选择"Wind". (混合器2.5+注:首先你必须选择"力场",然后更改类型为"风").将强度更改为20,点击"使用最大距离",将最大距离更改为2.5.
Do the same for the other empty. Your scene should look something like this:
::另一个空的部分也一样.
The movement
::运动
This is probably the most complicated part, but shouldn’t take long.
::这可能是最复杂的部分,
The Empty on the left
::左边的空洞
In side view [Num pad 3], select the empty on the left and do the following: 1. Press [I key] and then select LocRotScale from the list it gives you. This inserts a key frame, saying that on this frame, keep the Location, Rotation and scale the same throughout the rest of the movie, unless it comes across another key frame, which might tell it to move or stay the same. Now, press the Up Arrow Key until you get to frame 31 (about 3 times). If you don’t know where the box is that tells you what frame your on, check the following picture:
::在侧面视图[Num pad 3]中,选择左边空的,然后执行以下操作: 1. 按下[I键],然后从列表中选择LocRotScale. 这插入一个键框,说明在这个框上,保持位置,旋转和缩放在电影的其余部分相同,除非它遇到另一个键框,这可能会告诉它移动或保持相同. 现在,按上箭头键直到你到达 31 (大约 3 次). 如果您不知道告诉您在哪个上,请检查以下图片:
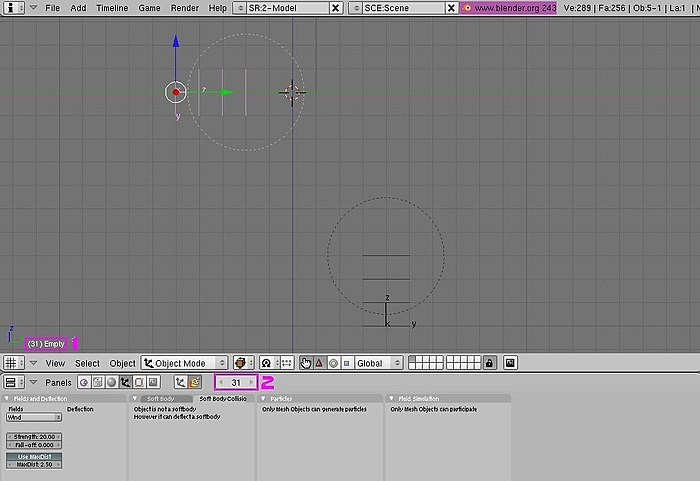
Number 1 shows the current frame number and the name of the selected object while number 2 shows the current frame and allows you to change the frame with the arrows on either side.
::显示当前数和所选对象的名称, 而2显示当前, 并允许您使用两侧的箭头更改.
Back to the movement
::回到运动
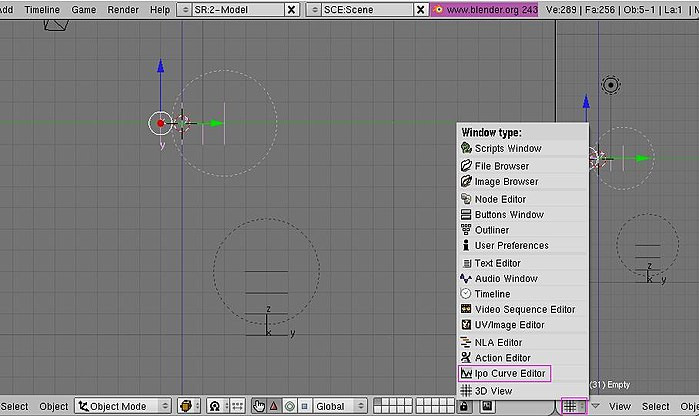
On frame 31, select the empty on the left (the one selected in the picture above) and press [G key]. Now press [Y key] and press “4”, then [Enter key]. Now press [I key] and select LocRotScale again. Now, if you press and hold the Left Arrow Key, you should see the Empty move back to its starting place. Now, to check the curve guide (called the "IPO Curve Editor"); right-click on the top panel (number 1 in picture below), then select "Split Area" and click when the line is a bit out from the side (number 2 in picture below).
::在31中,选择左边空的 (上图中选中的) 并按下[G键]. 现在按下[Y键]并按下4,然后[Enter键]. 现在按下[I键]并再次选择LocRotScale. 现在,如果按住左箭头键,您应该看到空的空位移回到起始位置. 现在,检查曲线指南 (称为"IPO曲线编辑器");右键在顶部面板 (下图中的第1号),然后选择"分割区域"并点击当线从侧面稍微脱出时 (下图中的第2号).
Now, click on the box (shown below) and select "IPO Curve Editor" from the menu.
::现在,点击下面的框, 从菜单中选择"IPO曲线编辑器".
Noob note
In Blender 2.6+ the
IPO Curve Editor
has been replaced by the
Graph Editor
, which allows you to edit F-curves.
::在Blender 2.6+中,IPO曲线编辑器已经被图形编辑器所取代,它允许您编辑F曲线.
This window just shows where the key frames you entered are, and how much the shape changes, moves or rotates. Now, go back to frame 1 and press [ALT]+[A], which plays the animation. You should see the "wind" hit the sheet and the sheet will blow away. Pretty nice, huh? Now, it would be fine like that (I’ll show you how to get rid of the blockyness in the last part), but say you want to hit the sheet again and send it upwards? We will use the second empty for this.
::现在,回到1,按下[ALT]+[A],播放动画. 你应该看到"风"击中纸张,纸张会被吹走. 很好,? 现在,这很好 (我会告诉你如何在最后部分摆脱阻塞),但假设你想再次击中纸张并将其发送到上方? 我们将使用第二个空白.
Select the second empty (the one on the bottom). Insert a key frame ([I key], LocRotScale) on frame 1 and frame 50. Go to frame 60, grab the empty and move it up 8 places ([G key], [Z key], 8). Insert a key frame ([I key], LocRotScale) and then go back to frame 1. You have completed the basics, and the most of this tutorial. Now, press [ALT]+[A key] and watch your animation.
::选择第二个空框 (下面的). 在1和50框上插入一个键框 ([I键],LocRotScale). 进入60框,抓住空框,将其移动8个位置 ([G键],[Z键],8). 插入一个键框 ([I键],LocRotScale),然后回到1框. 您已经完成了基础知识,以及本教程中的大部分内容. 现在,按下[ALT]+[A键],观看动画.
Finishing touches
::最后的修饰
Blockiness
::结性
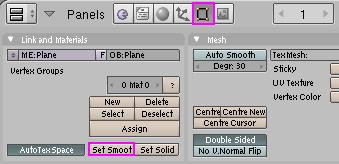
Now, to sort out the blockiness, go to the Editing buttons panel [F9] and select the "Set Smooth" button.
::现在,为了整理这些块,请进入编辑按面板[F9]并选择"设置光滑"按.
Now if you preview again ([ALT]+[A]) you should see the plane is smoother, but might be a bit unrealistic (i.e. not acting like real cloth). Now, that can’t be helped, the only way to get rid of it is to subdivide the plane several more times, but that will put a LOT of strain on your computer, so I wouldn’t recommend doing it unless your computer can handle it.
::现在,如果您再次预览 ([ALT]+[A]) 您应该看到飞机更光滑,但可能有点不现实 (即不像真正的布).现在,这不能帮助,唯一的方法是摆脱它是分别飞机几次,但这将把很多压力在你的计算机,所以我不建议这样做除非你的计算机可以处理它.
Background
::背景
First of all, got to the Scene panel [F10] and over at the Format panel, change SizeX to 400 and SizeY to 300. Now, to change the background colour when you render, go to the shading panel [F5] and select the World buttons. Now, in the World panel change HoR to 0, HoG to 0.80 and HoB to 1.0.
::首先,进入场景面板[F10] 进入格式面板,将SizeX 变为400,SizeY 变为300.现在,在染时更改背景颜色,进入影子面板[F5] 选择世界按.现在,在世界面板中将HoR 变为0,HoG 变为0.80,HoB 变为1.0.

All that does is just changes the background colour to a brighter, nicer shade of blue. Now, I’m just getting a bit lazy, so I’ll just explain this part with a picture: (don’t forget to select the plane).
::现在,我只是变得有点惰,所以我只会用图片来解释这个部分: (不要忘记选择平面).
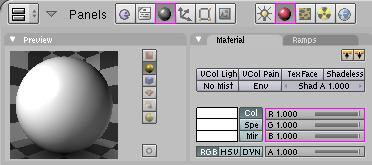
Change the values and press the buttons shown in the picture. This will change the colour of the plane to white.
::改变值,然后按下图中显示的按. 这将改变飞机的颜色为白色.
The only problem now is the light. Press [F12] and you should see what I mean. There's no light shining on the plane where the camera is, so its just shaded dark. To fix that, select the light and go to the shading panel [F5]. You now have options for the light. Click on the "Sun" button and press [ALT]+[R] to clear rotation. Now, in side view [Num pad 3] press [R] and then type -45. Enter top view [Num pad 7] and press [R] and then -45. This now shines the light in the direction of the plane, but, if like mine, the light is above the plane in top-view, press [G], [Y] and then -5. The line coming out of the light source should be roughly pointing at the centre of the plane. Here’s what your window should look like:
::现在唯一的问题是光.按F12,你应该看到我的意思.在相机所在的平面上没有光照,所以它只是阴暗的.为了解决这个问题,选择光并进入遮阳面板F5.你现在有光的选项.点击"太阳"按并按ALT+R清除旋转.现在,在侧面视图中按R然后输入-45.输入顶部视图,然后按R然后输入-45.这现在将光照在平面的方向上,但如果像我一样,光在平面上方的顶部视图中,按G,Y然后输入-5 光源的线应该大致指向平面的中心.你的窗口应该是这样的:
The pink line is the light. This was taken in camera view [Num pad 0]. Render the frame and you should see what the final product looks like. Move to any frame you want and press [F12] and it will show the rendered image for that frame. Now, rendering the entire animation might, in fact, will take a long time unless you have a completely new PC, are using a big server like DreamWorks (one of the big PC’s, used for rendering images faster) or have a quicker renderer, I don’t use any external renderers, and am stuck using a PC that is about 2 years old (in other words, full of junk). It took my PC less than 5 minutes to render 100 frames, and the last 25 were just blank (as the plane just flew above the camera). To change the amount of frames to render, and to render the full animation, here’s what you press:
::粉红色线是光线. 这是摄像头视图[Num pad 0]中拍摄的. 染,你应该看到最终产品的样子. 移动到任何你想要的,按F12,它将显示该的染图像. 现在,染整个动画可能实际上需要很长时间,除非你有一个全新的PC,使用一个像DreamWorks这样的大服务器 (用于更快的图像染的大PC之一) 或有一个更快的染器,我不使用任何外部染器,并且用一个大约2年历史的PC (换句话说,充满垃圾). 我的PC花了不到5分钟染100,最后25只是空白 (因为飞机刚刚飞过摄像头). 要改变数,染动画,按下这里
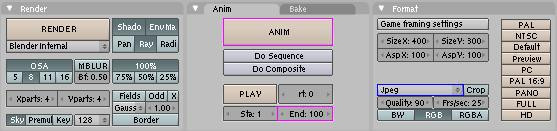
The box that says End:100 lets you select what frame you finish rendering the animation on (NOTE: the Sta:1 button lets you select what frame to start rendering the animation). When you press the ANIM button, it starts rendering the animation. The Box covered in blue, that says Jpeg, lets you change the format of the image in the end.
::框中写着 End:100,可以选择在哪个中完成染动画 (注:Sta:1按可以选择开始染动画的哪个).当你按下 ANIM按时,它就开始染动画.蓝色的框,写着 Jpeg,可以让你在最后更改图像的格式.
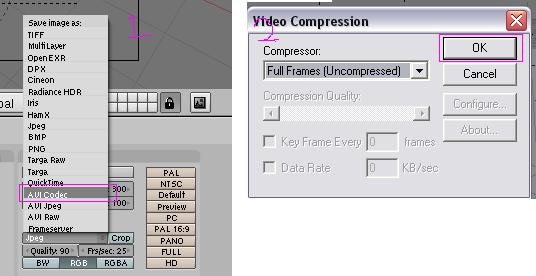
To export the animation as an AVI format, select the AVI button shown below, then press OK. Now, you need to Animate the sequence again, so press the ANIM button again.
::现在,你需要再次动画序列,所以再次按下ANIM按.
The finished.AVI will be saved in a folder with the rest of your rendered images. It should be saved in a folder called tmp, which (on a Microsoft computer) is in My Computer/tmp. The name of the file will be whatever your start and end frames are, so in this movie, mine is called 0001_0100.avi. You can now do whatever you want with your movie now, and hopefully you have learned a trick or two that will be helpful later on in your Blender career.
::完成的AVI将被保存到一个文件中,其中包含您的其余染图像. 它应该被保存到一个文件中,名为tmp,它 (在微软计算机上) 位于My Computer/tmp. 文件的名称将是您的开始和结束,所以在这个电影中,我的文件名是0001_0100.avi. 现在您可以随意使用您的电影,希望您已经学会了一些技巧,以后在您的Blender生涯中会有所帮助.
Final result
::最终结果
Here is an animated.gif of my final result: (imported into Macromedia Flash and exported as an animated.gif)You are required to be an auto confirmed user or uploader. I made a gif with a frame-step of 4.
::您必须是自动确认的用户或上传者. 我用4级制作了一个gif.