Blender 3D:零基础到专业级-单元3:拓展视野
Introduction
::引言 时间
This tutorial is intended as an intermediate introduction to the Blender game engine, in the form of a game, and is the sequel to
Platformer: Creation and Controls
. It will require a familiarity with the Blender UI, simple commands (such as
AKEY
to select) and basic modeling skills. The game we will create within Blender will have the following features:
::本教程旨在作为一个游戏形式的Blender游戏引擎的介绍,是Platformer:Creation and Controls的续集.它需要熟悉Blender的UI,简单的命令 (如AKEY) 和基本的建模技能.我们在Blender中创建的游戏将具有以下特征:
-
a protagonist controlled by means of the WASD keys
::通过WASD键控制的主角 -
a maze surface without walls
::一个没有墙壁的迷宫表面 -
death on falling off the maze
::死亡在迷宫中跌倒 -
multiple levels
::多个层次 -
dynamic obstacles
::动态障碍 -
a goal within the maze that will transfer you to the next level
::迷宫中的一个目标将你转移到下一个层次
This tutorial was written for version 2.44 and has been tested for all later versions (as of April, 2008)
::本教程是为2.44版本编写的,并已对所有后续版本进行测试 (截至2008年4月)
Maze Surface
::迷宫表面
Now we'll make the maze. When you are creating the path of the maze surface keep in mind that you need a start and a goal.
::现在我们将会做一个迷宫. 当你在创造迷宫表面的路径时请记住你需要一个开始和一个目标.
-
Clear the scene; Select all (
AKEY
), delete selected items (
XKEY
→
ENTER
)
::清除场景; 选择所有 (AKEY),删除所选项 (XKEY → ENTER) -
Go into top view (
NUM7
)
::进入顶部视图 (NUM7) -
Add a grid (
SPACE
→ Add → Mesh →
Grid
) with X and Y resolution of 16
::添加一个X和Y分辨率为16的网格 (SPACE → Add → Mesh → Grid) -
Scale grid by 24 times (
SKEY
, type 24,
ENTER
)
::缩小格子24倍 (SKEY,类型24,ENTER) -
Enter edit mode with the grid selected (
TAB
)
::进入编辑模式,选择网格 (TAB) -
Go into face select mode (
CTRL+TAB
→
Faces
)
::进入面部选择模式 (CTRL+TAB → 面部) -
Start selecting faces so as to make a two dimensional maze (use
BKEY
to draw selection boxes)
::开始选择面部,使一个二维迷宫 (使用BKEY绘制选择框) -
With the faces selected, duplicate those faces (
SHIFT+D
,
RMB
)
::选择了面,复制这些面 (SHIFT+D,人民币) -
Move those faces away from the original grid (
GKEY
or the movement wiget
CTR+ALT+GKEY
)
::移动这些面远离原始网格 (GKEY或运动 CTR+ALT+GKEY) -
Delete original grid
::删除原始网格 -
Center your maze using
GKEY
or by pressing the
Center
button in the
Mesh
panel of the Editing buttons (
F9
)
::使用GKEY或按下编辑按 (F9) 的网格面板中的中枢按来将迷宫集中
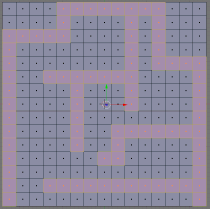
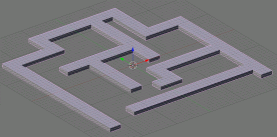
You should now have a two dimensional maze. In the game engine, we only see one side of every face, so this maze will not appear to be there when seen from below, and will be obviously two dimensional when seen from the surface of the maze itself. This is undesirable so we will make our maze 3 dimensional by extruding the maze surface down.
::现在你应该有一个二维迷宫. 在游戏引擎中,我们只看到每个面部的一面,所以这个迷宫从下面看起来不会存在,从迷宫表面看起来显然是二维的. 这不理想,所以我们将通过向下挤出迷宫表面来使我们的迷宫变得三维.
-
Go into side view (
NUM3
)
::进入侧面视图 (NUM3) -
Select all the faces (
AKEY
)
::选择所有面孔 (AKEY) -
Extrude down, -1 unit (
EKEY
→
Region
), hold
CTR
to constrain to 1 unit increments, or manually type in the value -1, like you scaled the grid in the beginning.
::按下来, -1 单位 (EKEY → 区域), 按住 CTR 限制 1 单位的增量, 或手动输入 -1 值, 就像你在开始时缩放了网格一样. -
LMB
to accept the operation, or
RMB
to cancel the move of the faces. If you cancel it, the faces will have extruded, but will simply not have moved. You can undo the operation (
CTRL+Z
), or delete the vertices/faces you have extruded (
WKEY
→
Remove Doubles
).
::选择 LMB 接受操作,或 RMB 取消面的移动.如果您取消它,面将被挤出,但将不会移动.您可以撤销操作 (CTRL+Z),或删除您挤出的顶点/面 (WKEY → Remove Doubles).
Your maze is now complete, only lacking someone trapped in it...
::你的迷宫现在已经完整, 只有一个人被困在迷宫里...
Character
::特征
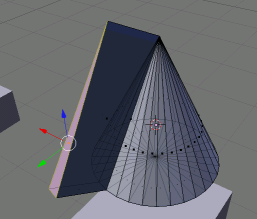
We will create a very basic character sufficient to illustrate the concepts meant to be conveyed in this tutorial. You can make a character as complex or basic as you desire, but it is important to always have an indicator of direction on your protagonist, otherwise the player may become confused. So, we will use a primitive with a 'nose' (i.e. a face or vertex extruded away from the object center in order to provide a point of rotational reference). I'll use a cone for this tutorial, simply because they don't roll very easily.
::我们将创建一个非常基本的角色,足以说明本教程中所要传达的概念.你可以随心所欲地制作一个复杂或基本的角色,但重要的是要始终在主角上有一个方向指示器,否则玩家可能会感到困惑.所以,我们将使用一个具有"鼻子"的原始 (即从对象中心挤出面或顶点以提供旋转参考点).我将为本教程使用一个圆,因为它们不太容易滚动.
-
Enter top view (
NUM7
)
::输入顶部视图 (NUM7) -
Add the cone (
SPACE
→
Mesh
→
Cone
, use default values)
::添加形 (SPACE → 网格 → 形,使用默认值) -
Select cone and enter Edit mode (
TAB
)
::选择圆并进入编辑模式 (TAB) -
Enter face select mode (
CTRL+TAB
→
Faces
)
::进入面部选择模式 (CTRL+TAB → 面部) -
Select a face on the side of the cone
::选择一个面孔在的侧面 -
Extrude it about 1/4 of a unit or less (
EKEY
)
::挤出它大约1/4的单位或更少 (EKEY) -
Merge the extruded face to make the nose pointy (
WKEY
→
Merge
→
At Center
)
::合并挤出面使鼻子尖 (关键 → 合并 → 在中心) -
Enter object mode (
TAB
)
::进入对象模式 (TAB) -
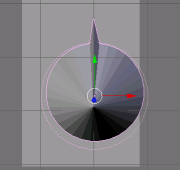
Rotate the cone so the nose is aligned with the positive Y axis (
RKEY
, align with the green arrow)
::旋转,使鼻子与正Y轴对齐 (RKEY,与绿色箭头对齐)
You've got your character now (Not exactly Pixar-like, but it will do for now). Now we just need to give it motivation.
::现在你有了你的角色 (不完全像皮克斯,但现在就够了).
Note: From points 8 to 9 it would seem that the cone should rotated so that the “nose” is aligned with thee Y-axis in object mode, but after doing this I encountered the cone still moved in the original Y-axis direction (before rotation). To remedy this I did the alignment of the “nose” to the Y-axis in edit mode instead, this seems to have solved the problem.
::注意:从第8至第9点看来,应该旋转,使鼻在对象模式下与Y轴对齐,但在这样做之后,我发现仍然在原始Y轴方向 (旋转前) 移动.为了纠正这一点,我在编辑模式下将鼻与Y轴对齐,这似乎解决了这个问题.
Motion
::运动
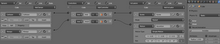
We'll now make the character move, via the use of the WASD keys. In order to do this, game logic needs to be associated with the WASD keys. Copy the configuration seen in the screenshot, taking care to include the convex hull polytope collision in the top left as well as depressing the 'L' buttons, which make the force and torque local to that object rather than global. If the force was global, the protagonist would continue moving in a straight line, even when turning.
::现在我们将通过使用WASD键使角色移动.为了做到这一点,游戏逻辑需要与WASD键相关联.复制屏幕截图中的配置,注意在左上方包含凸体的多型碰撞,并按下"L"按,使力和扭矩局部而不是全球.如果力是全球性的,主角将继续直线移动,即使在转动时.
-
Go to the Logic buttons (The purple pac-man icon or
F4
)
::进入逻辑按 (紫色的 pac-man 图标或 F4) -
Add four Sensors, Controllers and Actuators.
::增加四个传感器,控制器和执行器. -
Maximize the logic window (
CTRL+UPKEY
)
::最大化逻辑窗口 (CTRL+UPKEY) -
Copy the configuration seen in the screenshot below.
::复制下面的截图中的配置.

(Note: I made the simulation using Actor->Dynamic since there was no way to use both dynamic and rigid body in 2.49b. After some testing it appears to work correctly.)
:注意:我使用Actor->Dynamic进行了模拟,因为在2.49b中没有办法同时使用动态和刚性体.经过一些测试,它似乎工作得很好.
dLoc/dRot vs Force/Torque
::电压变速器的变速器的变速器的变速器
The character logic in this tutorial is very similar to that of the previous platformer logic, but it differs in that it uses force and torque rather than dLoc and dRot, respectively. The difference between these two is that force and torque move and rotate the object within the bullet physics engine, applying friction and collision to the process, whereas dLoc and dRot move and rotate the object without regard for any other 'actors' (objects factored in to the physics engine's calculations). Although dLoc and dRot would serve in most maze games, many other instances demand force and torque. However, most of these instances occur in more complicated games with a multitude of interactions with dynamic objects. Later in this tutorial we will add dynamic objects to our maze, and the reasons for using force will become clear.
::本教程中的角色逻辑与之前的平台游戏逻辑非常相似,但它不同的是它使用的是力和扭矩,而不是分别dLoc和dRot.这两者之间的区别在于力和扭矩在子弹物理引擎中移动和旋转物体,对过程施加摩擦和碰撞,而dLoc和dRot在不考虑任何其他"演员" (物理引擎计算中的物体) 的情况下移动和旋转物体.虽然dLoc和dRot在大多数游戏中都能发挥作用,但许多其他实例需要力和扭矩.然而,大多数这些实例发生在与动态物体相互作用的更复杂的游戏中.在本教程中,我们将在我们的迷宫中添加动态物体,并且使用力的原因将变得清晰.
Testing
::测试
Now the time has come for the first test of our game.
::现在是游戏的第一次测试的时候了.
-
Add a light source well above the maze (
SPACE
→
Lamp
→
Lamp
), align in front view (
NUM1
)
::在迷宫上方添加一个光源 (SPACE → Lamp → Lamp),在前视线上对齐 (NUM1) -
Press
NUM5
to enter perspective viewmode, which gives a realistic view, rather than a view in which objects stay the same size with distance. Be sure to switch back to orthographic view when you are editing (
NUM5
)
::按 NUM5 进入视角视图模式,它提供了一个现实的视图,而不是一个视图,其中对象保持相同的大小与距离. 确保在编辑时切换回正写视图 (NUM5) -
Enter textured mode (
ALT+ZKEY
) -- press
ZKEY
to switch back to solid view mode
::进入纹理模式 (ALT+ZKEY) -- 按ZKEY 转回固体视图模式 -
Switch into top view (
NUM7
) or camera view once we install the camera (
NUM0
)
::切换到顶部视图 (NUM7) 或摄像头视图一旦我们安装摄像头 (NUM0) -
PKEY
to play the game
::玩游戏的PKEY -
ESC
to escape testing the game
::为了逃避游戏测试
If you receive a "No camera" error, disregard it. We'll be adding a camera later.
::如果您收到"没有摄像头"错误,请无视. 我们将稍后添加摄像头.
If your character doesn't move at all make sure you drew the connecting 'wires' between the actuators in the logic panel, as well as setting the "Actor" "Dynamic" and "Rigid Body" buttons to True.
::如果你的角色根本不移动,请确保你在逻辑面板中画了执行器之间的连接'线', 并将"演员"",动态"和"刚性"按设置为真.
You should now have a nosy cone that speeds around the maze.
::现在你应该有一个探的形,

(
Noob Question 1
: My cone likes to rotate without me pressing A or D. It also likes to find hidden/nonexistant bumps on the maze surface. How do I fix this? )
:无人问答1:我的圆喜欢在我不按A或D的情况下旋转.它也喜欢在迷宫表面找到隐藏/不存在的凸起.我如何解决这个问题?
(
Answer to NQ1
: If I understand your question right. If i used torque to turn and force to move forward and pressed forward then turned it started spinning out of control. My solution was to use rotation instead of torque.)
::答案:如果我理解你的问题,如果我用扭矩转向,用力向前转向,然后按前转,它就会失控.我的解决方案是使用旋转而不是扭矩.
Noob question 2
: The cone just goes through the maze. How do I make the maze block the cone?
::如何让迷宫阻圆?
Answer to NQ2
: First make sure your cone is not even partially inside the maze before starting the game engine. Secondly, select your cone (named "Protagonist" in my example), then go back to the "physics" properties in your property window. If you do not see the property window press the
NKEY
and look on the right of your screen. Under "Physics type" make sure to have selected in the scroll down menu "Dynamic" or "Rigid body". Then, scroll down to "collision bounds" and check the box. You shall also select a shape from the "bound" drop down menu, for example "cone".
::答案:首先,在启动游戏引擎之前,确保你的子甚至没有部分进入迷宫.其次,选择你的子 (在我的例子中命名为"主角"),然后回到你的属性窗口中的"物理"属性.如果你不看到属性窗口,按NKEY,然后看看屏幕的右侧.在"物理类型"下,确保在滚动菜单中选择"动态"或"刚性体".然后,滚动到"碰撞界限"并勾选框.你还必须从"绑定"下拉菜单中选择一个形状,例如"子".
Falling
::跌落
We will now implement the "death on falling off maze" feature. In order to accomplish this, we'll add something that allows us to check whether the cone has fallen off the maze or not. The simplest way to do this is with a 'skydome' object the entire maze is within, and although there are a number of more elegant ways to accomplish the goal, we will use the skydome method for its simplicity to replicate. From now on we'll need to test the maze with both layers one and two enabled (
SHIFT+2KEY
)
::现在我们将实现"死亡落下迷宫"功能.为了实现这一点,我们将添加一些让我们检查是否已经落下迷宫的东西.最简单的方法是使用一个"天顶"对象整个迷宫是内,虽然有很多更优雅的方式来实现目标,我们将使用天顶方法,因为它的简单性复制.从现在开始,我们需要测试迷宫的两层一和二启用 (SHIFT+2KEY)
-
Add a new cube
::添加一个新的立方体 -
resize it to gargantuan proportions (
SKEY
, just large enough to encompass the maze, and all within it)
::缩小到巨大的比例 (SKEY,只是足够大,以包括迷宫,和所有在内) -
Facultative: Move it to layer 2 (
MKEY
,
2KEY
,
Enter
)
::选择:将其移动到第二层 (MKEY,2KEY,Enter)
Now that you have a massive cube, go to the logic panel and add one Sensor, Controller, Actuator set, and set them as seen in the screenshot.
::现在你有了一个巨大的立方体, 进入逻辑面板, 添加一个传感器, 控制器, 执行器集, 并设置它们如屏幕截图所示.
-
Sensor: Touch, under "property" put the name of your character (here "Protagonist")
::触摸,在"属性"下放你的角色的名字 (在这里"主角")
This restart the scene if the protagonist (and only the protagonist, hits the floor)
::这重新启动场景如果主角 (只有主角,打到地板)
-
Controller: And
::控制者: -
Actuator: Scene, restart
::执行器:现场,重新启动 -
Properties: Physics (last icon on the left), enable actor button as well as "ghost" and "invisible"
::属性:物理 (左边的最后一个图标),启用演员按以及"幽灵"和"隐形"
This will let the dynamic obstacles, which are added later on, fall through and not get stuck there!
::这样可以让后面增加的动态障碍, 通过而不是卡住!

If you test you game now, you should see the game be restarted when you fall off the maze. As we discussed earlier, faces are one-sided in the game engine, so you should not be able to see the cube.
::像我们之前讨论过的,游戏引擎中的面孔是单面的,所以你不应该看到立方体.
(
Newbie Question 1
: When I did this, my cone just kept on falling. When I moved the cube back to layer 1, it worked fine. Am I missing something?) (newb note: ok i had the same problem every time i was just in layer 1 but when i was just in 1 then i just kept falling)
::问:我在做这个的时候,我的圆一直在下降. 当我把立方体移回第一层时,它工作得很好. 我错过了什么吗?
(
Answer
: The tutorial says to create the cube in layer 2, although the layer shouldn't matter. Make sure you test the game with both layers one
and
two selected. Also double check the logic for the 'skycube')
:答案:教程说要在第二层创建立方体,尽管该层不重要.请确保您在选择一层和二层时测试游戏.还要对"天立方体"的逻辑进行复查)
(
Answer2
: I had the same problem. I fixed this by replacing the cube with a grid, scaled and placed under the maze. The grid had the touch logic mentioned above.)
:答案2:我也遇到了同样的问题.我用一个网格来替换立方体,缩放并放置在迷宫下面.网格有上面提到的触摸逻辑.)
(
Answer3
: Same here. I thought I'd remove "Protagonist" from the material reference, but that wouldn't do if the bricks fell down and touched the cube, it'd just restart the level... the solution: create a property in the cone, a bool value named "isCone" (=true), then in the cube add a sensor 'collision' that checks for the object's property 'isCone' and keep the rest as shown.)
:答案3:同样.我想从材料引用中删除"主角",但如果掉下来触及立方体,就不会,它只会重新启动水平...解决方案:在中创建一个属性,一个名为"isCone" (=true) 的 bool值,然后在立方体中添加一个检查对象属性"isCone"的传感器"碰撞",并保持剩下的情况.
(
Answer4 (to restart when block hits cube)
:Do all as the pic shows you and RMB the cone and go to links and pipelines and rename the MA: to cone or whatever you want, then RMB the cube then in the Touch sensor then rename the MA: to whatever you called the other MA: . :D this is in 24.9b)
::转换MA:到或你想要的任何东西,然后在RMB立方体然后在触摸传感器然后重命名MA:到你叫其他MA: .:D这是24.9b)
(
Answer5
: For blender 2.57a you need to place a plane or something under the maze. Then give it (touch -> and -> Scene(restart)) game logic. If it isn't working make sure that actor is selected under physics tab.)
:答案5:对于混合器2.57a,你需要在迷宫下放置一架飞机或其他东西.然后给它 (触摸 -> 和 -> 场景(重新启动)) 游戏逻辑.如果它不工作,请确保在物理选项卡中选择了演员.
(
Question 2
: How do I make the box translucent? Right now all I see, also when testing, is the skybox. Also, when I put the box underneath the maze, it works fine, but then none of the objects have shading, while when not showing layer 2 everything looks shaded. Can anybody give a solution? This is in 2.48a)
:问题2:如何使盒子变半透明?现在我看到的,也是在测试时,是天空盒子.另外,当我把盒子放在迷宫下面时,它工作得很好,但没有一个物体有遮,而当不显示层2时,一切都看起来有遮.有人能给出解决方案吗?这是2.48a)
(
Answer
: To make something transparent- press
F5
; press the "Material Buttons" button; under the Links and Pipeline tab press Halo and ZTransp, unpress Shadbuf; under Material make A 0.000.)
::按F5;按"材料按";在链接和管道选项卡下按Halo和ZTransp,取消按Shadbuf;在材料下按A 0.000).
Killing Floor
::杀伤地板
To add tension to your game, you can give motion to the floor. It will rise with time!
::让地板变动, 让游戏变得更加紧张.
-
Add a static Plane, and set its logic panel as described above.
::添加一个静态平面,并设置它的逻辑面板,如上所述. -
Add an ALWAYS sensor and connect it to a AND controller and connect it to a MOTION actuator that has a vertical linear velocity of 0.01 (along the z-axis).
::添加一个 ALWAYS 传感器,并将其连接到 AND 控制器,并将其连接到具有 0.01 的垂直线性速度的 MOTION 执行器 (沿 z 轴).
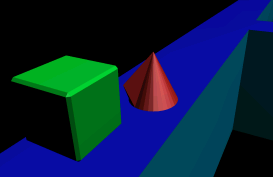
This way it will slowly come up. To make it evident to the player that the floor is rising, change the color of it (for example blue for water) and make it visible again.
::为了让玩家清楚地看到地板正在升起,改变它的颜色 (例如水的蓝色),使其再次显现.
You've just added some tension to your game! If you run out of time, you will touch the floor and restart! If you need more time, simply put a lower vertical linear velocity.
::现在,你只需要增加一点压力,如果时间不够,你会触及地板,重新开始.
Camera
::摄像机
SPACE
→
Camera
near the protagonist cone. There are two easy ways to do the camera: logic camera and child camera. In this case you might be better off with the logic camera, but it really is a matter of personal preference.
::空间 → 主角附近的摄像头.有两种简单的摄像头方式:逻辑摄像头和儿童摄像头.在这种情况下,你可能更好地使用逻辑摄像头,但这真的只是个人的喜好.
-
Logic Camera:
Add to the camera's logic panel
-
Sensor: Always
::传感器:始终 -
Controller: And
::控制者: -
Actuator: Camera, to object "Cone" (or whatever your protagonist is called--look under the object panel when you have the protagonist selected) height 5, min 5, max 10.
::摄像机,对象"" (或者无论你的主角是什么叫 - - 看下面的对象面板当你有主角选择) 高度5,分5分,最大10分.
::逻辑摄像头:添加到摄像头的逻辑面板 传感器:总是控制器:和执行器:摄像头,对象"" (或无论你的主角是什么叫 - - 看下面的对象面板当你有主角选择) 高度5,分钟5,最大10. -
Sensor: Always
-
Child Camera:
Select the camera, then select the protagonist (order is important) then
CTRL+PKEY
to parent the cone to the camera. Align the camera in a view that you like, and test the game.
::儿童摄像头:选择摄像头,然后选择主角 (顺序很重要),然后CTRL+PKEY以对照摄像头的形. 将摄像头对准到你喜欢的视图,并测试游戏. -
First Person Camera:
Well, this one doesn't really count as another method, but if you're willing to redo your motion to just move the camera instead of the character, (just do everything you did for the character for the camera) you can run around in the first person. Or you can just put the camera in the cone because one of the sides always are invisible (look in texture mode) and parent it to the cone. REMEMBER: To access the ingame camera during gameplay, before you start, hit ctrl 0 or you can go to (view > camera)
::首先,你需要在游戏中使用相机,然后在游戏中使用相机. 首先,你需要在游戏中使用相机. 首先,你需要在游戏中使用相机. 首先,你需要在游戏中使用相机. 首先,你需要在游戏中使用相机. 首先,你需要在游戏中使用相机.
(
Newb Question 1
: No matter what I do (even delete the camera!), when I hit 0 or ctrl+0, I always see either only the death plane (I used a plane below the maze instead of a cube around it) or nothing, depending if I have layer 2 selected or not. There's only the one camera (or none, if I delete it), according to the Oops Schematic. What's wrong?)
:新人问题1:无论我做什么 (甚至删除相机!),当我按0或ctrl+0时,我总是只看到死亡平面 (我使用了迷宫下面的平面而不是周围的立方体) 或什么都没有,这取决于我是否选择了2层. 根据Oops Schematic,只有一个相机 (或者没有,如果我删除它). 什么是错误的?)
(
Answer
: Ctrl+0 assigns the selected object as a camera. To solve your problem select your camera and press ctrl+0, to enter camera view press 0)
::选择的对象作为摄像机. 解决问题请选择摄像机,然后按Ctrl+0,进入摄像机视图按0
Beautification
::美化
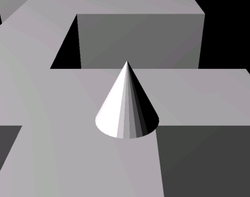
Blender is a great 3D modeling program, and with such a vast number of tools at your disposal, you should be able to make your game look better than this:
::您可以使用大量的工具, 让您的游戏看起来更好:
We'll add one or two textures to each of our objects.
::我们将为每一个物体添加一到两种纹理.
-
Select the object you want to texture
::选择要纹理的对象 -
Go into edit mode if you want your object to have more than one color
::进入编辑模式,如果您想要对象有多种颜色 -
Select all the faces you are going to assign to a color (
CTRL+TAB
→
Faces
)
::选择所有将要分配到颜色的面孔 (CTRL+TAB → 面孔) -
Go to the edit panel (
F9
) on the buttons window
::在按窗口上进入编辑面板 (F9) -
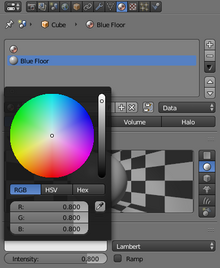
Near the left there should be a panel that says "Material". Click on the buttons highlighted in the screenshot
::靠近左边应该有一个面板说"材料". 点击屏幕截图中突出显示的按 -
Adjust the color of that material by clicking on the white field under "Diffuse". A color picker appears. Pick a color you like!
::通过点击"扩散"下的白色字段来调整该材料的颜色. 显示一个颜色选择器. 选择你喜欢的颜色!
Mist
::雾
It looks better now, but when the camera is nearly horizontal, you can see where the camera stops rendering the maze. You can fix this by selecting the camera and, in its edit buttons, changing its clipping range... but there is a better way. Mist.
::现在看起来更好,但是当摄像机几乎水平时,你可以看到摄像机在哪里停止染迷宫.你可以通过选择摄像机,在它的编辑按中,改变它的剪切范围来解决这个问题...但有更好的方法.雾.
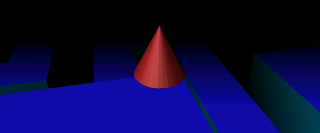
Mist obscures everything a certain distance away, is the same color as the world texture, and can be handy. We'll add some mist to our game so the player can't see too far ahead of him, thus making the game too easy.
::雾会遮蔽在一定距离的东西,与世界纹理的颜色相同,而且可以很方便. 我们将在游戏中添加一些雾,这样玩家就无法看到自己前面的太远,从而使游戏变得太容易了.
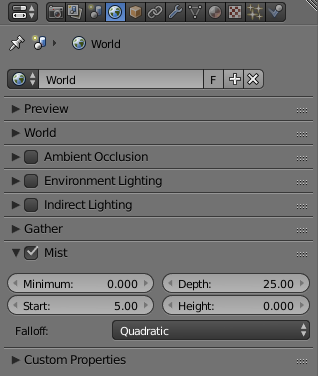
We'll make the mist quite close, although you can vary the distance. Go to the Material button, and to the World sub-buttons, then copy the settings in the screenshot.
When you test this out, make sure you are in texture mode to see the mist.
::让雾非常近,虽然你可以改变距离. 进入"材料"按,然后进入"世界"子按,然后复制屏幕截图中的设置. 当你测试这个时,请确保你在纹理模式中看到雾.
(
Question
: I copied the screenshot but i can't get the mist to work. What's going on?)
::问题:我复制了截图, 但雾无法工作.
(
Answer
: Change Start to a smaller value like 15.)
:答案:将开始值更改为15等较小的值)
(
Question
: Is the screenshot correct, or are my sizes different. I found that a mist distance of 10 was barely visible, yet a distance of 1 had a much better effect. Is this normal?)
:问题:屏幕截图是否正确,还是我的尺寸不同.我发现10的雾距离几乎看不见,但1的距离有更好的效果.这是正常的吗?)
(
Question
: I have been able to create the mist, and can see it when I start the game, but the background colour is still grey, so the maze is obscured but everywhere else is still grey.
::游戏开始时可以看到它, 但背景色仍然是灰色的,
Levels
::层次
Now all that remains is to create the next level with some obstacles.
::现在剩下的就是用一些障碍物来创建下一个层次.
-
Add a cube at the end of the maze, just above the floor level so the cone can touch it (
SPACE
→
Add
→
Mesh
→
Cube
)
::在迷宫的尽头增加一个立方体,在地板水平的上方,这样可以触摸它 (空间 → 添加 → 网 → 立方体) -
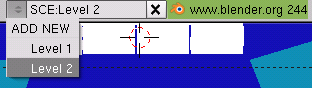
Press the Scene dropdown menu and select "ADD NEW" →
Full copy
::按下"场景"下拉菜单,选择"添加新" → 完整副本 -
You can now go back to the Maze Surface section to make a new maze mesh
::现在你可以回到迷宫表面部分, 创建一个新的迷宫网格 -
Go back to level one via the Scene menu
::通过"场景"菜单返回一级 -
Select the End of level cube
::选择一个平面立方体的末尾 -
Change its logic panel to resemble this:
::改变它的逻辑面板,使其看起来像这样:
-
Sensor: Touch, coneMat
::传感器:触摸, coneMat -
Controller: And
::控制者: -
Actuator: Scene, Set Scene, Scene.001 (or whatever you named your level 2)
::执行器:场景,设置场景,场景001 (或你叫你的第二层)
(noob: When I went into level 2 my player name changed to coneMat.001 and I had to change all my goals and the giant restart cube assignments.)
Answer: Rename the coneMat.001 to whatever you had the material named for the first scene - this fixed it for me.
::答案:把conemath.001改为你在第一场景中给的任何东西 - - 这对我来说是解决的.
(noob: In my level 2 my cone hits the cube and nothing happens!)
Answer: Make sure that the Sensors, Controllers and Actuators tabs under the Logic panel (F4) are connected with wires.
::答案:请确保逻辑面板 (F4) 下的传感器,控制器和执行器选项卡连接有线.
(noob: When I went to level two I can't see anything!
:新人:当我去第二层我什么都看不到!
To make it so multiple objects have to be touched (or acquired by the character, as it may be), give each object the logic settings described above and change the actuator type to Message with the subject "goalget". If you'd like the object to disappear after it is collected, add an Edit Object actuator to the object of the type "End Object", and link it to the existing AND controller.
::要使它如此多个对象必须被触摸 (或由字符获得,可能是),给每个对象上述逻辑设置,并将执行器类型更改为主题"goalget"的消息.如果你希望对象在被收集后消失,请将一个Edit Object执行器添加到类型"End Object"的对象中,并将其链接到现有的AND控制器.
Next, select the massive cube that restarts the level upon contact with the character. If you chose not to include one such cube, create an empty at the start of the level (so you can easily find it again later). Give the cube or empty the following logical operators:
::接下来,选择与角色接触时重启级别的巨大的立方体.如果您选择不包括其中一个立方体,在级别的开始创建一个空白 (这样您可以很容易地在以后再次找到它).给立方体或空白下列逻辑运算符:
-
Sensor: Message, goalget
::传感器: 消息,目标 -
Controller: And
::控制者: -
Actuator: Property, Add, wincon, -1
::执行器:属性,加,温孔,-1
-
Sensor: Property, Equal, wincon, 0
::传感器:属性,等,温康, 0 -
Controller: And
::控制者: -
Actuator: Scene, Set Scene, Scene.001 (or whatever you named your level 2)
::执行器:场景,设置场景,场景001 (或你叫你的第二层)
Then click "Add Property" and give it the Type Int, the Name wincon, and a value equal to the number of objects needed to be collected to complete the level (if all of them, make it equal to the number contained in the level). This can be expanded to include other multiple win conditions besides the collection of an item by making the completion of each condition subtract from "wincon".
::然后点击"添加属性"并给它类型Int,名字wincon,和值等于需要收集的对象数量来完成级别 (如果所有,使其等于包含在级别中的数量). 这可以扩展到包括其他多个win条件除了收集一个项目,使每个条件的完成减去"wincon".
You now have a multilevel maze game. Feel free to elaborate on the gameplay mechanics and models so they look better.
::现在你有一个多层次的迷宫游戏. 随时可以详细说明游戏机制和模型,让它们看起来更好.
Noob note: I typed in where i thought everything should go but it's not doing anything. I'm not sure of what I'm looking for while in playmode.
::玩模式下我不确定我在寻找什么. 玩模式下我在寻找什么?
Dynamic obstacles
::动态障碍
This part of the tutorial will assume increased skills and knowledge of the Blender interface and basic commands. As such, this section will be written less specifically, and the shortcuts for all basic commands will not be covered here. From this point on, this tutorial is of an intermediate level. If you cannot follow this part of the tutorial, you can learn the basic functions used below in an
earlier tutorial
.
::教程的这一部分将假定对Blender界面和基本命令的技能和知识有所提高.因此,本节将不太具体地写,并且所有基本命令的快捷键将不会在这里覆盖.从此以后,本教程是中级的.如果您不能遵循本教程的这一部分,您可以学习下面在以前的教程中使用的基本功能.
We will now add some dynamic obstacles. In this case, they will constitute a 'brick' wall that can be broken through by your character.
::现在我们将添加一些动态障碍. 在这种情况下,它们将构成一个""墙,
-
Add a cube
::增加一个立方体 -
Scale it (in edit mode) to the dimensions 1,0.5,0.5
::缩放到尺寸为 1,0.5,0.5 -
Bevel it (WKEY) recursion 1, size 0.03 (press space to enter value manually)
::按一下空格以手动输入值 -
In logic panel, set it to Actor, Dynamic, Rigid body, Mass 0.5
::在逻辑面板中,设置为主动,动态,刚性,质量0.5 -
Go right below that to click Bounds and leave it on "Box". That makes Blender realize that what you added is a box, and should act like it (instead of rolling, it will slide now)
::这使得Blender意识到你添加的是一个框,应该像它一样行事 (而不是滚动,它现在会滑动) -
Move it to an intersection in your maze (GKEY) and duplicate it until you have a brick wall (ALT DKEY, LMB)
::移动到一个交叉点在你的迷宫 (GKEY) 和复制它,直到你有一个墙 (ALT DKEY, LMB)
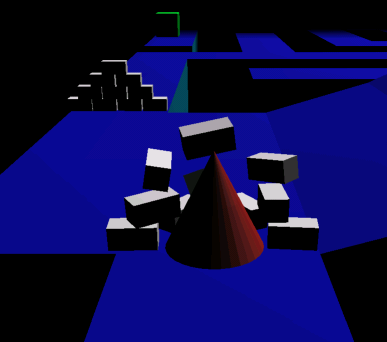
You now have a barrier that your character can break through.
::你现在有了你角色可以突破的障碍.
Conclusion
::结论
You have now learned enough of the Blender Game Engine (BGE) to create your own game. If you wish to go very far into Blender games, I recommend you learn Python, as trying to make a full game within the graphical interface for the BGE is like trying to dig a grave with the blunt half of a toothpick. Blindfolded. And the toothpick is glued to your forehead. However, you are now well on your way to becoming a game-maker! For a basic beginner tutorial about Python, "
Open Source Video Game
" series.
::现在你已经学会了足够的Blender游戏引擎 (BGE) 来创建自己的游戏.如果你想深入到Blender游戏中,我建议你学习Python,因为试图在BGE的图形界面中创建一个完整的游戏就像试图用牙棒的半部分挖墓一样. 眼睛被绑住. 牙棒被粘在你的额头上. 然而,你现在已经在成为游戏制作者的道路上了!对于一个关于Python的基本初学者教程",开源视频游戏"系列.
If you have any questions, concerns, or 'noob notes', please post them in the discussion page for this tutorial, and not in the tutorial itself.
::如果您有任何问题,关注,或"新手笔记",请在本教程的讨论页面上发布,而不是在教程中.