Blender 3D:零基础到专业级-单元3:拓展视野
Prologue
::序言
One way to add a realistic feeling to your 3d environment in a game engine is to create a skybox. A skybox is a large cube which has on its inside a projection of a 360° environment. When the player (camera) is inside this environment, the scene is rendered with the illusion of being inside a gigantic world. This is a similar effect to Quicktime VR (see
http://www.fullscreen360.com/
for examples). And, by setting up the skybox as a simple cube shape, you place the least amount of strain on the graphics engine. It's a great advantage for your game with very little overhead.
::在游戏引擎中为3D环境增加现实感的一种方法是创建一个天空盒.天空盒是一个大的立方体,其内部有一个360°环境的投影.当玩家 (摄像头) 处于这个环境中时,场景呈现出一个巨大的世界.这与Quicktime VR类似 (参见 http://www.fullscreen360.com/).通过将天空盒设置为简单的立方体形状,您可以对图形引擎施加最少的压力.这对于您的游戏具有很少的开销来说是一个很好的优势.
This tutorial will show you how to create skyboxes relatively easily from panoramic photos. My favorite part is, you can do it easily using free tools such as Blender and the Gimp.
::如何从全景照片中轻松创建天空框. 我最喜欢的部分是,你可以使用免费工具,如Blender和Gimp轻松地创建.
Using the Gimp to manipulate images is not really in the scope of this tutorial... check out some other page on using that software. You should have an understanding of how to edit images and apply alpha channels. (You could also use the Gimp to apply a polar coordinate texture to your rectangular image in order to create a fisheye image. Hint: it's not the sphereize filter.)
::修改图像的方法并不在本教程的范围之内...请查看其他使用该软件的页面. 您应该了解如何编辑图像和应用alpha通道. (您也可以使用Gimp将极坐标纹理应用于矩形图像以创建鱼眼图像. 提示:这不是球形化过器.)
Gather your graphics
::收集你的图形
You can take panoramic images yourself using a regular digital camera and a tripod. A quick way to accomplish this is to draw marks on your tripod base at every 30 degrees (think of the hours on a clock face). Make a single mark on the swivel of your tripod to allow you to line up your shots -- twelve shots at 30 degrees each. Then, using a program such as
the Gimp
or the incredibly cool
Autostitch
to merge the photos into one big panorama.
::你可以用普通的数码相机和三脚架拍摄全景图像. 快速的方法是每30度在三脚架底部画一个标记 (想象一下钟表上的时间). 在三脚架的旋转上画一个标记,让你把照片排成一行 - - 每个30度的12张照片. 然后,使用Gimp或令人难以置信的酷Autostitch等程序将照片合并成一个大全景.
Or, if you're lazy like me, you can just grab photos online to use as templates to create original images. There are also many places you can download non-copyrighted photos for free as well. One resource for cloudy sky textures, as well as panoramic photography instructions, is Philippe Hurbain's site
Philo's Home Page
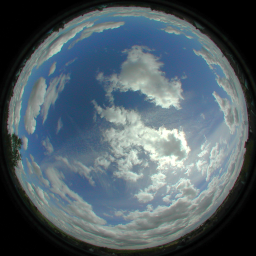
. This tutorial will use a fisheye sky photo from his copyright-free Panoramic Skies images collection.
::像我一样,你也可以在网上拍摄照片,用作模板创建原创图像. 还有很多地方可以免费下载无版权照片. 对于阴天纹理以及全景摄影指令的一个资源是菲利普·赫尔贝恩的网站Philo's Home Page. 本教程将使用他免权版权的全景天空图像集合中的鱼眼天空照片.
You'll also probably want a photo for your ground, unless you prefer to use real models such as buildings in your skybox. This
earlier chapter
on creating landscapes can be incorporated into setting up your skybox. However, this tutorial will use the sky photo for the top half of our world, and a panoramic landscape with an alpha channel for the bottom half. I've created a ground image using copyright-free textures obtained from
Accustudio
.
::你也可能想要一个照片为你的地面,除非你更喜欢使用真实模型,如建筑物在你的天空箱. 创建景观的前一章可以纳入你的天空箱的设置. 然而,本教程将使用天空照片为我们的世界上半部分,和一个全景景观与阿尔法通道的下半部分. 我使用从Accustudio获得的版权免费纹理创建了一个地面图像.
Here are the images I'll be using (you'll want to use images with higher resolution): Note that the sky has trees, etc.
::需要使用更高分辨率的图像:请注意天空有树木等.
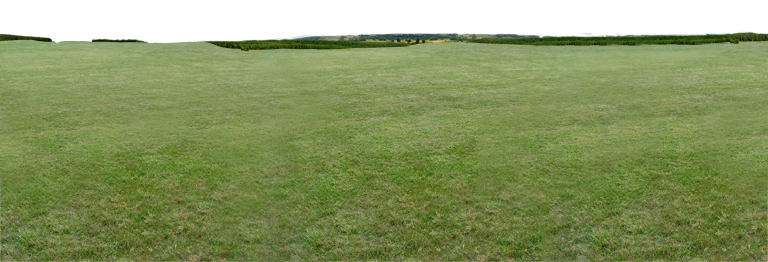
Note: I've outlined the horizon of the ground texture with an alpha channel which will allow me to place the ground mesh right against the sky mesh with a very natural feel.
::我用一个α通道勾勒了地面的地平线, 这样可以让我把地面网与天空网对准,
Create a dome for the sky
::创造一个天空的圆顶
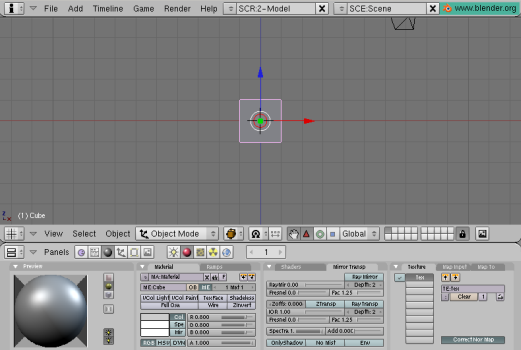
Open a new file in Blender. Your default new file will probably be a two-unit cube in the center of the screen, with a single light source and a camera. You can delete the light source because we won't be needing it. Leave the cube, because that is what will become our skybox.
::在Blender中打开一个新文件. 默认的新文件可能是屏幕中间的两个单位立方体, 只有一个光源和一个摄像头. 你可以删除光源, 因为我们不需要它. 留下立方体, 因为这将成为我们的天空盒.
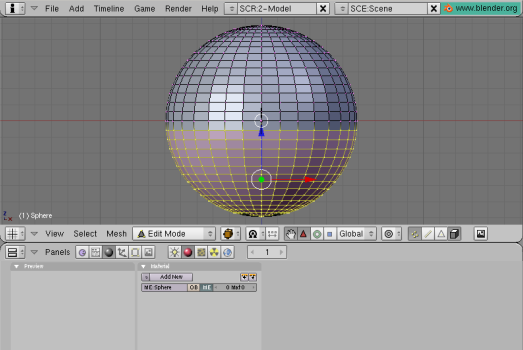
The cube will be the center of our environment, so use Object->Snap->Cursor To Selection if your cursor is not centered. Then, from the top view [KEYPAD-7], Use [KEY-SPACEBAR] to insert a new mesh; make it a UV sphere. I find a 32-segment, 32-ring sphere to be sufficient. We create the sphere from the top view because that is the projection from which we want to add the sky texture.
::立方体将是我们环境的中心,所以如果你的光标没有中心,请使用Object->Snap->Cursor To Selection.然后,从顶部视图[KEYPAD-7],使用[KEY-SPACEBAR]插入一个新的网格;使其成为一个紫外线球.我认为一个32段,32环球足够.我们从顶部视图创建球,因为这是我们想要添加天空纹理的投影.
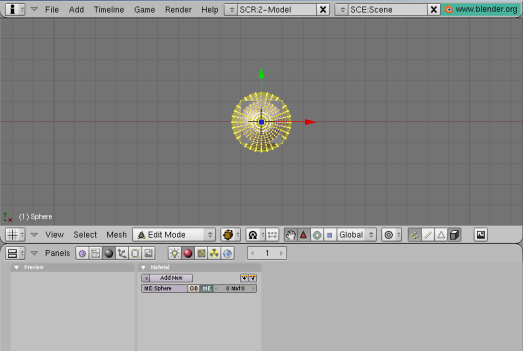
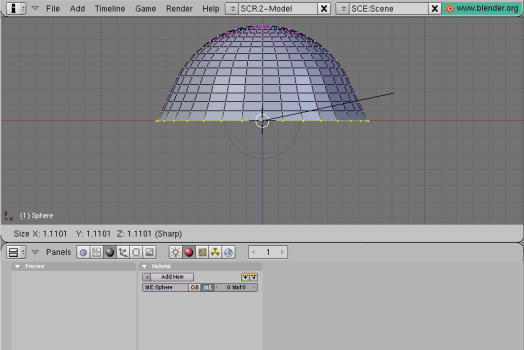
Scale up the sphere so it resembles a large "arena" in comparison to your cube, and select and delete the lower half of the vertices, using the front view [KEYPAD-1] and [KEY-B] to create a bounding box. It helps if "Select Visible" is turned off so you can select all of the vertices in one go.
::缩放球体,使其与立方体相比看起来像一个大"竞技场",并选择和删除顶点的下半部分,使用前视图[KEYPAD-1]和[KEY-B]创建一个边界框.如果"选择可见"被关闭,这样你就可以一次选择所有顶点.
Turn on proportional editing with [KEY-O], then select the bottom row of vertices and scale them up with [KEY-S] so that the bottom of the sphere gets a bell shape. Because the projection of the sky texture will be from the Y-axis (ceiling) we need the bottom faces of the sphere to be at an angle, to catch the texture. (Faces perpendicular to the projection will look like smears.) Alter the influence of proportional editing with [KEY-PAGEUP] and [KEY-PAGEDOWN]. Linear or Sharp falloff works best with the sphere shape.
::使用 [KEY-O] 启动比例编辑,然后选择顶点的底行,并使用 [KEY-S] 缩放它们,使球体的底部具有钟形.由于天空纹理的投影将来自Y轴 (天花板),因此我们需要球体的底面处于角度,以捕捉纹理. (垂直于投影的面将看起来像涂抹).使用 [KEY-PAGEUP] 和 [KEY-PAGEDOWN] 改变比例编辑的影响.线性或利的落后最适合球体形状.
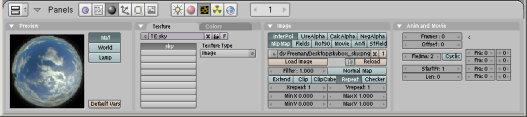
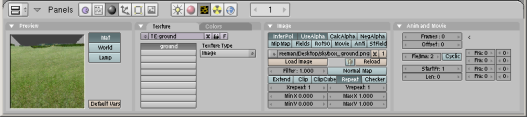
Now you're ready to add your sky texture to this mesh. In the Materials menu, create a new material and a new texture. Be sure to set your material not to receive shadows by clicking the "Shadeless" button. Then, in the Texture menu, set the texture type to Image, and click the Load Image button to insert our sky texture. Back in the Materials->Texture->Map Input menu, you may need to scale your image to get rid of the distorted textures at the edges of the fisheye by setting the Size to, say, 0.950 for X, Y and Z.
::现在您准备好将您的天空纹理添加到这个网格中. 在 材料 菜单中,创建一个新的材料和一个新的纹理. 确保通过点击"无阴影"按设置您的材料不接收阴影. 然后,在 纹理 菜单中,将纹理类型设置为图像,然后点击 装载图像按插入我们的天空纹理. 回到 材料-> 纹理-> 地图输入菜单中,您可能需要缩放您的图像以消除鱼眼边缘的扭曲纹理,例如,设置大小为 0.950 X,Y 和 Z.

At this point, if you wish, you can reposition the camera and render the scene to see how your sky mesh looks.
::现在,如果你愿意, 你可以重新定位相机,
Create a dome for the ground
::创建一个圆顶的地面
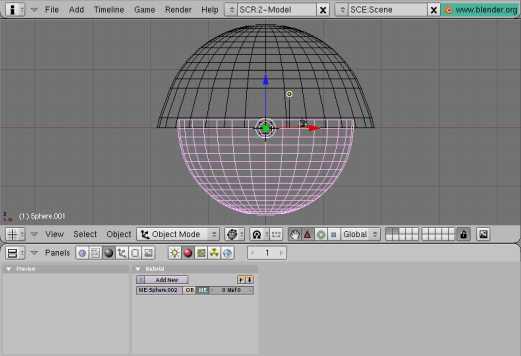
I found it easiest to move the sky dome to a new layer with the [KEY-M] move to layer command. Then you can select the cube, Object->snap cursor to selection if you need to, select the top view [KEYPAD-7] and insert another UV sphere just as before -- except this time, remove the top hemisphere of vertices. I left an extra row of vertices at the "equator", scaled up, to function as a "billboard" to display the horizon of our ground texture with the alpha channel. This sphere should be slightly smaller than the sky hemisphere.
::我发现最容易的是用[KEY-M]移动到层命令将天空圆顶移动到一个新层.然后,如果需要,你可以选择立方体,Object->快点指针到选择,选择顶部视图[KEYPAD-7]并插入另一个UV球,就像以前一样 - - 除了这次,删除顶部半球的顶点.我在"赤道"上留下了一个额外的顶点行,缩放,作为一个"广告牌",以显示我们地面纹理的地平线与α频道.这个球应该比天空半球小一点.
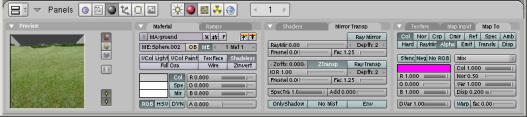
This time, I will apply the ground texture with a tube projection, so it is projected onto the mesh horizontally [Materials panel | Map Input tab | Tube button]. Because I have an alpha channel on this texture, I click "Use Alpha" in the Texture menu and Map To -> both Col and Alpha buttons [Materials Panel | Map To Tab | -> both Col and Alpha buttons]. You will also need to set ZTransp in the Mirror Transp menu [Materials Panel | Links and Pipelines Tab | ZTransp button] so that your alpha channel shows up in the envmap (which will become your skybox), and Alpha to 0 [Materials panel | Material tab | A slider ] to allow the masked areas to be transparent. (Alpha channels appear to require Z buffering to appear on procedural textures.) Also, you may need to adjust the offset of the ground texture (Y-axis), so that the horizon appears properly on the "billboard" area of your ground hemisphere.
::这次,我将用管投影应用地面纹理,所以它将水平投射到网格上. 因为我在这个纹理上有一个alpha通道,我点击"使用alpha"在纹理菜单和MapTo -> Col和Alpha按[Materials PanelMapTo. Tab. -> bothCol和Alpha按]. 你还需要在镜像转换菜单中设置ZTransp[Materials Panel. 链接和管道Tab. ZTransp按]这样你的alpha通道会显示在envmap (这将成为你的天空箱),Alpha为0[Materials. 面板. 材料. 页页. 滑块]让掩盖区域是透明的. (Alpha通道似乎需要Z buffering显示在程序纹理上.) 此外,你可能需要调整地面的纹理
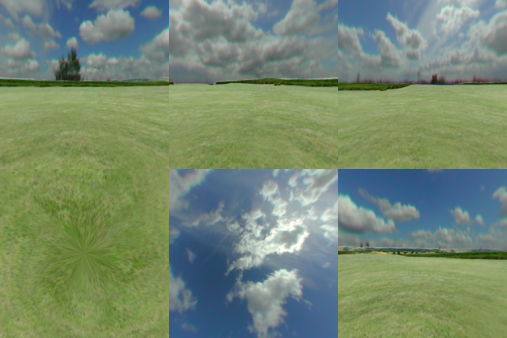
Again, you can reposition the camera and render the scene to make sure everything is properly aligned. Be sure to activate the layer where you moved the sky mesh. Your results will look similar to the following image. Set OSA on in the render screen for best results. Also, use higher resolution images with cleaner alpha channels -- the image below is rather blurry and you can see a halo around the horizon.
::再次,你可以重新定位相机并染场景以确保一切都对齐.请确保激活你移动天空网格的层.你的结果将与下面的图像相似.在染屏幕中设置OSA以获得最佳结果.还可以使用更高分辨率的图像,使用更清晰的α频道 - 下面的图像相当模糊,你可以看到地平线周围的光环.

Render the environment map
::呈现环境地图
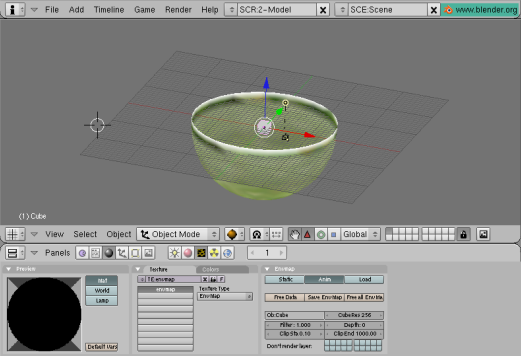
The last step is to use the procedural Envmap texture to project the dome textures onto the cube, which will become our skybox. Select the cube and create a new material. Set the material to "Shadeless" [Materials Panel | Materials Tab | Shadeless button]. Add a new texture and make its type Envmap. Set the CubeRes [Envmap tab | CubeRes setting ] to whatever you want the resolution of your skybox to be (512 is a good resolution for a game; 1024 or 2048 are fairly high-res; I stuck with low-res for this tutorial). If your sky & ground hemispheres are very physically large, you may also need to increase the ClipEnd value to include all of the faces. You may want to set the Envmap calculation to Anim so you don't have to keep freeing envmap data if you're experimenting. (Anim automatically clears Envmap data with every render, otherwise you must click 'Free Data' to reset the Envmap.)
::最后一步是使用程序Envmap纹理将圆顶纹理投射到立方体上,它将成为我们的天空盒. 选择立方体并创建一个新材料. 将材料设置为"无阴影" [材料 板材料标签 无阴影按]. 添加一个新纹理并使其类型为Envmap. 将 CubeRes [Envmap标签 立方体设置] 设置为您想要的天空盒的分辨率 (512是游戏的好分辨率; 1024或2048是相当高分辨率; 我在本教程中使用低分辨率). 如果您的天空和地面半球在物理上非常大,您可能还需要增加ClipEndmap值以包括所有面. 您可能需要设置Envmap计算,以便您不必保持空的
Once you've created the Envmap texture, you should be ready to render the Envmap for your skybox. If you want to set your file format such as JPG or PNG, you should do that first. Then, simply go to the render screen and click "Render." Again, make sure all layers are visible. The rendering window appears. First, Blender renders the environment map of the cube. Afterward, the camera view is rendered, at which point you can hit [KEY-ESCAPE] to stop rendering -- we are only interested in the environment map which is already complete.
::一旦你创建了Envmap纹理,你应该准备好为你的天空箱染Envmap.如果你想设置文件格式,如JPG或PNG,你应该先这样做.然后,简单地去染屏幕并点击"染".再次,确保所有层都可见.染窗口出现.首先,Blender染立方体的环境地图.之后,摄像头视图被染,在这一点上,你可以按[KEY-ESCAPE]停止染 - 我们只对已经完成的环境地图感兴趣.
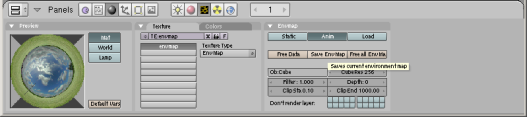
Select the cube again, then get to its texture menu. You will see the newly-rendered Envmap on the sample texture. Click "Save EnvMap" in the texture menu to save the rendered Envmap.
::再选立方体,然后进入它的纹理菜单.你会在样本纹理上看到新染的Envmap.在纹理菜单中点击"保存EnvMap"以保存染的Envmap.
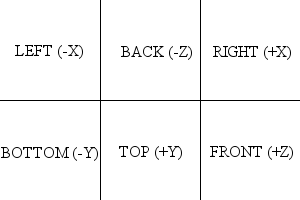
Blender environment maps are saved as a 3x2 matrix of squares, as seen here:
::混合器环境地图以3x2矩阵的方格形式保存,如下图所示:
The cube faces are in the following order.
::立方体面的顺序如下:
You can now load this image as an envmap texture in a new cube, which you can incorporate into your game as a skybox. This file can also be edited in the Gimp to remove any unwelcome artifacts such as trees, buildings, jet trails, etc. Also, because I used a tube projection on the lower hemisphere, in the bottom face of the envmap you see a strange star shape at the "pole." You'll most likely have a floor in your game, so you probably won't see that face anyway, but sticklers can avoid it with clever use of the Filters->Distorts->Polar Coords filter in the Gimp or Filter->Distort->Polar Coordinates (Polar to Rect.) in Photoshop. Patching also works well.
::现在你可以将这个图像作为一个envmap纹理加载到一个新的立方体中,你可以将其作为一个天空盒整合到你的游戏中.这个文件也可以在Gimp中编辑,以删除任何不受欢迎的文物,如树木,建筑物,喷气轨道等.另外,因为我在下半球上使用了管投影,在envmap的底面你在"极"上看到一个奇怪的星形.你很可能会在你的游戏中有一个地板,所以你可能不会看到那个脸,但管家们可以通过聪明地使用Gimp中的过器->偏离->极坐标过器或在Photoshop中使用过器->偏离->极坐标 (极向向直角) 来避免它.补丁也很好.
To make the skybox appear as a static background in your game, vertex-parent it to the current active camera object.
::为了使天空框在游戏中出现静态背景, 将其与当前活动的摄像头对象进行顶点对比.
Video Tutorial
::视频教程
Ira Krakow's Blender 2.49 Skybox Tutorial:
http://www.youtube.com/watch?v=azkk3JrM5Es
::伊拉·克拉科夫的Blender 2.49天空盒教程: