Blender 3D:第四单元:与高级教程起飞
UPDATED FOR 2.7 USERS
::更新为2.7个用户
This is a continuation of the previous tutorial,
Landscape Modeling I: Basic Terrain
. In this tutorial, we will make our terrain look even better by using some texture stenciling to add multiple textures where we want them in the landscape. This tutorial assumes that you have a basic understanding of how to use Blender (how to add/remove a mesh, how to change views, etc...)
::这是一个继续前一个教程, 景观建模I:基本地形. 在这个教程中,我们将使我们的地形看起来更好,使用一些纹理版添加多个纹理,我们希望他们在景观. 这个教程假设你有一个基本的理解如何使用混合剂 (如何添加/删除网格,如何更改视图,等等)
Creating the Stencil
::创造笔
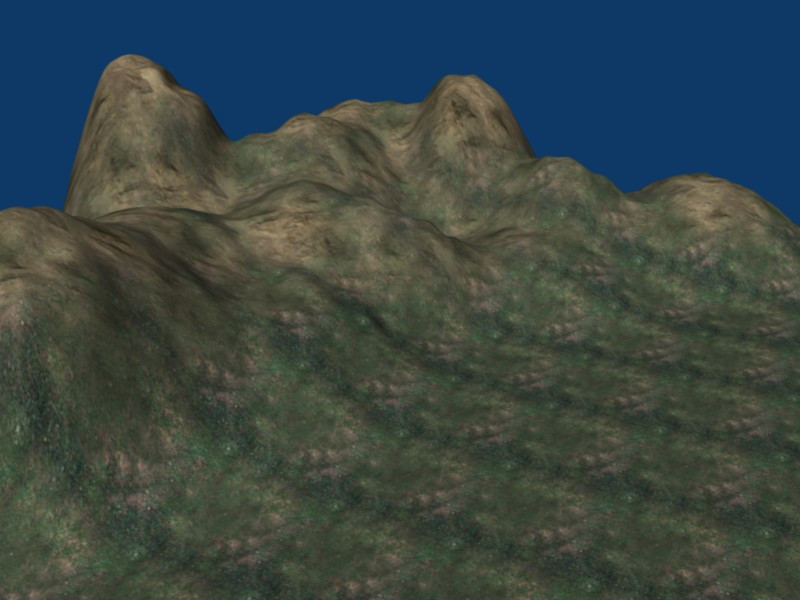
The landscape from the previous example looks pretty good, but the entire thing has the same texture, so it doesn't look very natural. Let's add some rocks to those hills. If we just add a second texture to our material, it will completely cover the previous one. What we want is to have the first texture only show in certain places and the second texture cover the rest. In order to do this we'll have to create a stencil, which is like a mask that determines where textures appear on the material. The stencil is a black and white image, similar to a heightmap, except the intensity of each pixel determines how much of the next texture will appear (black = 0%, white = 100%). I highly recommend viewing
this
tutorial for a more in depth description of how stencils work. If you think you have the gist, then continue on here. [Note: Link is broken now] We're going to create our own stencil to determine where we want rock in the landscape by "painting" on the object.
*IMPORTANT*
The next few steps will be performing temporary modifications to your scene, so be sure to save your file before you continue so that the changes will not be saved!! Also, if you have a subsurf modifier on the landscape, remove that at this time as it drastically slows down the following process.
::前面的例子中的景观看起来很好,但整个东西的纹理相同,所以看起来不太自然.让我们在这些山上添加一些岩石.如果我们只是在我们的材料添加第二个纹理,它将完全覆盖前一个.我们想要的是让第一个纹理只显示在某些地方,第二个纹理覆盖其余部分.为了做到这一点,我们必须创建一个模板,这就像一个面具,决定在材料上出现的纹理.模板是一个黑白图像,类似于高度图,除了每个像素的强度决定下一个纹理的多少将出现 (黑色=0%,白色=100%).我强烈建议查看本教程以了解更多的深度如何模板工作.如果你认为你有本质,然后继续在这里. [注:链接被打破]我们现在要
-
Select the landscape object and switch from "edit mode" or "object mode" to "
Vertex
Paint mode". This is found in the Mode drop down menu, on the 3D View header. This mode lets you paint the object, and thereby change the color value of each vertex. When in Vertex Paint mode, you'll notice your object change color to a pixelated version of the texture that is applied to it. This is because with that texture applied, each vertex will be drawn with the colors you see.
::选择景观对象,并从"编辑模式"或"对象模式"切换到"顶点绘画模式".这可以在Mode下拉菜单中找到,在3D视图头部.这个模式允许你绘制对象,从而改变每个顶点的颜色值.当在顶点绘制模式中,你会注意到你的对象改变颜色,以像素化版本的纹理,应用到它.这是因为,应用了这种纹理,每个顶点将被绘制与你看到的颜色.
Noob Note
: Vertex Paint mode is in the drop down menu that contains Object mode and Edit mode. Just select the object while in Object mode, click the drop down menu, and select Vertex Paint mode from the list.
::值得注意的是: Vertex Paint 模式位于下拉菜单中,包含对象模式和编辑模式. 在对象模式中选择对象,单击下拉菜单,并从列表中选择 Vertex Paint 模式.
-
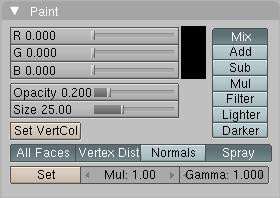
Switch to the Editing menu (
F9
) and you'll see a new tab called Paint. Notice the sliders labeled Opacity and Size. Opacity determines how much to blend the selected color with the existing colors when you paint. So 0.2 means that when you click, you'll get 20% of the selected color mixed with whatever is currently there. Over on the right are different options to combine to colors. We want to mix, so as we paint the colors will mix together and give us a nice smooth blend. Size is the size of your cursor while painting, and thus how many vertices are affected. Keep in mind that does not change as you zoom in and out, so a size of 10 can actually paint more pixels if you're zoomed way out than a size of 30 if you're zoomed way in.
::切换到编辑菜单 (F9) 您将看到一个新的标签叫做画. 注意标签为不透明度和大小的滑块. 不透明度决定了如何混合选择的颜色与现有的颜色当你画. 所以0.2意味着当你点击,你会得到20%的选择的颜色与任何当前有混合. 在右边有不同的选择组合到颜色. 我们想要混合,所以我们画颜色将混合在一起,给我们一个漂亮的光滑的混合. 大小是你画时的光标的大小,因此有多少顶点. 记住,当你放大和缩小时不会改变,所以10大小实际上可以画更多像素如果你放大了,而不是30大小如果你放大了.
-
Change the color to black and click the button that says Set VertCol (in 2.48 version, that button is below the color square and named 'SetVCol'). This will change the color of your entire object to black. You'll notice that the object is not lit in Vertex Paint mode, so when the entire object is black it can be difficult to see where your hills are. You'll have to move the camera around to see the shapes.
::改变颜色为黑色,然后点击按,说Set VertCol (在2.48版本中,该按位于颜色方块下方,并命名为'SetVCol'). 这将改变整个对象的颜色为黑色. 你会注意到在垂直涂料模式中对象没有亮光,所以当整个对象是黑色时,很难看到你的山丘在哪里. 你必须移动相机来看到形状.
[Another newbie recommends: if you switch to the "object" buttons (f7) and turn on "Wire" under "Draw Extra" in the "Draw" panel/tab you should see a wireframe on top of the vertex colors you are painting, which makes it much easier to see where the hills are. Remember to switch this back off when you have finished painting.]
::[另一个新手建议:如果你切换到"对象"按 (f7) 并打开"画"面板/选项卡中的"额外画"下的"线"你应该看到一个线框在顶部的顶点颜色你画,这使得它更容易看到山丘.记住,当你完成画时,把它关掉.]
-
Now we're going to paint the places where we want rock to show through. Change the paint color to white. It's less likely that grass will grow on steep slopes, so start painting the tops and edges of the steeper hills white by holding down
LMB
and dragging your mouse (think MSPaint). If you didn't heed my earlier advice and still have a subsurf modifier in effect, the painting will be very choppy, so remove that now.
::现在我们要画出我们想要岩石透过的地方. 将油漆颜色改为白色. 在的坡度上生长的草不太可能,所以开始用 LMB 按住并拖动鼠标 (如 MSPaint) 画更的山顶和边缘. 如果你没有听从我之前的建议,并且仍然有下面的修改器,画将非常,所以现在删除它. -
As you're painting, try to make some spots pure white by going over them again and again, but don't make any one area of white too large as this will make a huge area be all rock, and we're trying to blend two textures.
::试着让一些斑点变得纯白, 通过反复地画它们, 但不要让任何一个白色区域变得太大, -
This process can just be trial and error getting the landscape painted the way you want. Once we apply our stencil later you may decide there's too much rock in one area, or not enough in another and go back and change it. A few things to keep in mind:
-
20% opacity means that most of the original texture (grass, in our case) will show through, so the rock won't be very noticeable if at all. You'll have to go over the same spots a few times to increase the intensity.
:: 20% 的不透明度意味着大部分原始质地 (如我们所说的草) 都会透过,所以岩石如果有,就不会很明显. -
You don't want a dramatic change from grass to rock, so be sure to blend white areas with black. That's why we're using the 20% opacity instead of just bumping it up to 100%.
::没有任何的形, 没有任何的形, 没有任何的形, -
Make your patches random and spotty. This will end up creating a more realistic effect once we combine the textures.
::让你的贴片随机和斑点. 这将最终创造一个更现实的效果,
::这过程可以是试错,让景观按照你想要的样子绘制.一旦我们应用了我们的笔,你可能会决定在一个区域有太多的岩石,或者在另一个区域没有足够的岩石,然后再去改变它. 需要记住的一些事情:20%的不透明度意味着大部分原始纹理 (在我们的情况下,草) 将会透过,所以岩石将不会很明显,如果有的话. 你必须几次遍历相同的斑点来增加强度. 你不想从草到岩石的显著变化,所以一定要将白色区域与黑色混合在一起. 这就是为什么我们使用20%的不透明度,而不是把它撞到100%. 让你的斑点随机斑点. 这最终会产生更现实的效果,一旦我们结合了纹理. -
20% opacity means that most of the original texture (grass, in our case) will show through, so the rock won't be very noticeable if at all. You'll have to go over the same spots a few times to increase the intensity.
-
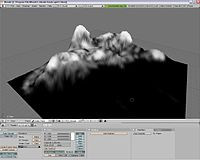
Once you're done you should have something that looks like this. Notice the mixture of white and black in some places, how it doesn't just go from pure white to pure black as you move down the hills. This will make a more natural blend and it will cause random rocky areas mixed in when the grass. Now we need to turn this into our stencil.
::完成后,你应该得到这样的东西. 注意某些地方的白色和黑色混合,你下山时它不会从纯白色变成纯黑色. 这会产生更自然的混合,它会导致草混杂的随机岩石区域. 现在我们需要把这变成我们的版. -
Go to the overhead view (
NUM7
) and make the projection orthographic if it's not already (
NUM5
).
::现在我们可以使用"高空视图" (NUM7) 来进行投影, -
Zoom in/out (
Mouse Wheel
or
NUM+
/
NUM-
) until the plane almost occupies the entire window.
::放大/缩小 (鼠标轮或NUM+/NUM-) 直到飞机几乎占据了整个窗口. -
Move the 3D cursor and any lamps or cameras away so that they're not over the landscape and take a screenshot.
::移动3D光标和任何灯或摄像头,
-
Open your favorite image editor (I'm a traditionalist, so I still like MSPaint), and cut out the image of landscape. This is now your stencil. Save it under your favorite format.
::打开你最喜欢的图像编辑器 (我是一个传统主义者,所以我仍然喜欢MSPaint),并切出景观的图像. 这现在是你的版. 保存在你最喜欢的格式下. -
Re-open the saved version of your landscape to undo the changes we made to create the stencil.
::打开保存的风景, 取消我们创建版的修改.
So why did we make our stencil this way? This allowed us to actually paint on our terrain so that we ensure we get the rock exactly where we want it. Using this method, you can customize your stencil to any object, as long as it has enough vertices. For example, if we just had a flat plane made of 4 vertices, this technique would not have worked because we could only paint the corners. That's why in the previous tutorial I recommended using a high (but not too high) number of vertices in your grid.
::那么为什么我们用这种方式制作了我们的模板?这让我们能够在地形上绘制,这样我们就可以确保我们把石头准确地放在我们想要的地方.使用这种方法,你可以将你的模板定制为任何物体,只要它有足够的顶点.例如,如果我们只是有一个由4个顶点组成的平面,这个技术就不会起作用,因为我们只能画角.这就是为什么在上一门教程中我建议在你的网格中使用高 (但不太高) 的顶点数.
Applying the Stencil
::应用笔
So now we need to apply the stencil to the landscape to mix our grass and rock textures together.
::现在我们需要将版涂在景观上,
-
Return to either Object Mode or Edit Mode (
TAB
), it doesn't matter which.
::返回对象模式或编辑模式 (TAB), 不管是哪一种. -
Go to the Texture menu (
F6
) and add two new textures in the material (you should already have the grass texture).
::进入"纹理"菜单 (F6), 在材料中添加两个新纹理 (你应该已经拥有草纹理). -
Make texture 2 (the first new one you added) an image and load your stencil from file. Do not repeat this in the x or y directions. We want it to map to the entire object.
::让图形2 (你添加的第一个新图形) 成为图像,并从文件中加载你的模板. 不要在x或y方向重复这个操作. 我们希望它映射到整个对象. -
Make texture 3 an image and load your rock texture from file. This one you do want to repeat, just as you did the grass.
::让3个图像,然后从文件上加载你的岩石图像. -
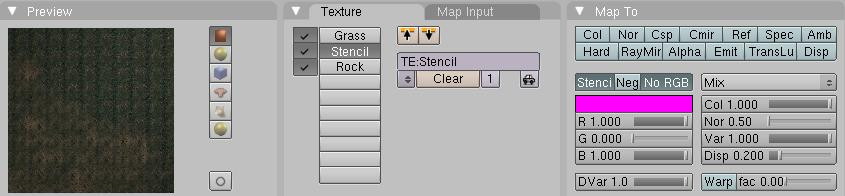
Now return to the Materials menu and select your stencil texture. It's a good idea to name your textures, materials, objectives, etc... so that they're easily identifiable.
::现在回到材料菜单,选择您的版纹理. 很好地命名您的纹理,材料,目标等... -
With your stencil texture selected, switch to the tab labeled MapTo. Deselect Col (which maps the texture to the color), and select Stencil and No RGB. Stencil will treat this image as a stencil, and No RGB treats it as a black and white image. If you didn't select this second option your stencil wouldn't work.
::选择了您的模板纹理,切换到标记为 MapTo 的选项卡. 取消选择 Col (将纹理映射到颜色),然后选择 Stencil 和 No RGB. 模板将将此图像视为模板,而 No RGB 将其视为黑白图像. 如果您没有选择第二个选项,则您的模板将无法工作.
-
In the preview tab you should notice your material change so that the grass and rock are now mixed. If you render, you'll see a much more realistic landscape than the one from the previous tutorial!
::现在草和岩石混合在一起. 如果您染, 您将看到一个比前一个教程更真实的景观!
Noob Info:
Be sure that for the rock - texture
col
is selectet because we want to color the landscape with the rock-texture! Otherwise it doesn´t work.
Select Rock-Texture -> Map To -> col
::确保为岩石质地col是selectet因为我们想要用岩石质地col来染色景观!否则它不工作.选择岩石质地 -> 地图到 -> col
Adding Snow
::增加雪
Since you already have some nice mountains, why not add some snow to them? Adding snow is easy. All you have to do is add a fourth texture AFTER all the others. Make this texture the same as your stencil.
::既然你已经有了一些漂亮的山,为什么不给它们添加一些雪呢? 添加雪很容易. 你只需要在所有其他之后添加第四种纹理. 让这个纹理与你的版相同.
-
Make sure you're in Shading (F5) > Texture Buttons (F6) > Textures.
::确保您在"影子 (F5) ">"纹理按 (F6) ">"纹理"中. -
Click on an empty panel beside Texture Type
::点击"纹理类型"旁的空面板 -
Click on the little box to the left of Add New
::点击"新增"的左边的小框 -
Choose your stencil from the menu (hint: it helps if you name your textures)
::从菜单中选择您的标签 (提示:如果您命名您的纹理,这将有所帮助) -
Render and see the results.
::让我们看看结果.
If you made your stencil properly, you should have some nice, snowcapped peaks. It's not much, but it's enough for a quick fix. If it isn't even, you probably didn't make your stencil properly (meaning pretty much all white on the peaks, and not much anywhere else). Of course, there are better ways to do this, ways I wouldn't know about; I discovered Blender merely three days before the time of writing. I leave it up to you to see the effect: I only have so much room and bandwidth for pictures!
::如果您正确制作了您的模板,您应该有一些漂亮的,雪顶的峰.这不是很多,但足以快速修复.如果它不等,您可能没有正确制作您的模板 (意味着几乎所有的峰值都是白色的,而不是其他地方).当然,有更好的方法来做到这一点,我不知道的方法;我在写作之前仅仅发现了Blender三天.我让你看看效果:我只有一定的空间和带宽用于图片!
This effect works by saturating the underlying color with white, depending on the amount of white in your stencil. A light gray will saturate it only a bit, whereas a bright, 100% white will cover it very clearly and efficiently. If you look closely, you'll see that the light gray on the stencil DOES make a difference, but it's not immediately visible and requires lots of fidgeting with the Render Preview and texture options. You might also try fiddling with the Stencil and NoRGB option, although it worked fine for me with both turned off (I use Blender 2.48a)
::这种效果是通过使底层颜色以白色和,这取决于你用什么样的图表.浅灰色只会稍微和,而明亮的100%白色会非常清晰和有效地覆盖它.如果你仔细看,你会看到图表上的浅灰色确实有所不同,但它不是立即可见的,并且需要大量的动,可以使用染预览和纹理选项.你也可以尝试使用图表和NoRGB选项,尽管它在我关闭两者时都很好 (我使用Blender 2.48a)
Some challenges:
::一些挑战:
-
Try to change the color of the snow. Hint: RGB
::试着改变雪的颜色.提示:RGB -
I've yet to do this, but try making snow out of a heightmap.
::我还没有做这个, 但试着用高度图画出雪.
Multiple Stencils
::多种笔
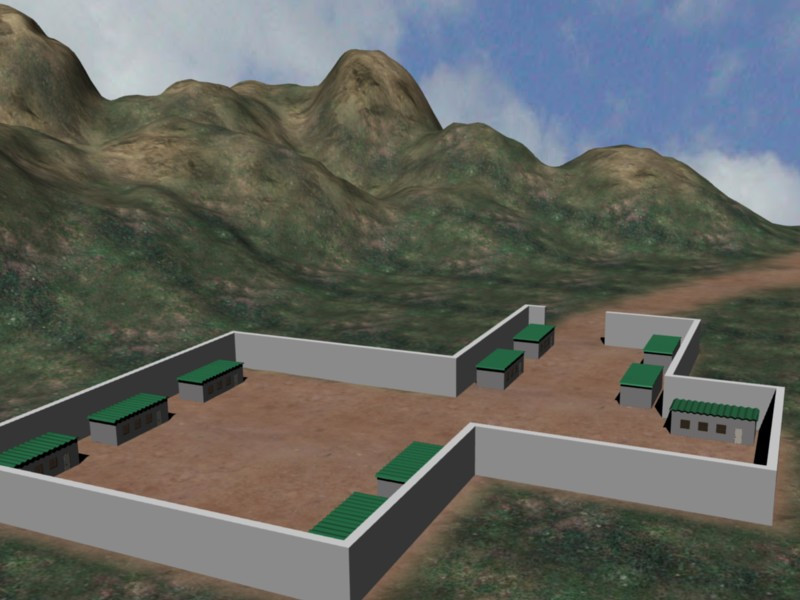
Remember in the first tutorial when I said to leave part of the landscape flat, because I'd be using it later? Well it's time to use it. I want to eventually use the landscape as the backdrop for a military base, so let's texture the ground around where the base will go to give it a dirt ground and road leading to it.
*IMPORTANT*
Just as before, the next few steps will be performing temporary modifications to your scene, so be sure to save your file before you continue so that the changes will not be saved!!
::记得在第一篇教程中我说要把部分景观平整,因为我会在以后使用它?现在是时候使用它了. 我希望最终把景观用作军事基地的背景,所以让我们在基地的周围构造地面,给它一个脏地和通往它的道路. *重要* 就像之前一样,接下来的几步将对你的场景进行临时修改,所以请确保在继续之前保存你的文件,这样变化就不会被保存了!!
-
Switch to the Vertex Paint mode in the mode menu on the 3D View header.
::在3D视图头部的模式菜单中切换到顶端涂料模式. -
Go to an overhead view (
NUM7
) and make the projection orthographic (
NUM5
)
::转到一个空中视图 (NUM7) 并使投影正写 (NUM5) -
Once again, paint the entire object black by selecting the color black in the Paint tab and clicking on Set VertCol.
::在"涂装"选项卡中选择黑色并点击"设置颜色". -
For the next few steps, you may need to
TAB
back and forth from Vertex Paint mode to Object mode to make sure you're painting in the correct area. Make the opacity of the painter 1.0 and the size 10 so that we can work very precisely.
::接下来,您可能需要从垂直画模式到对象模式来往返, 以确保您在正确的区域画. 让画机的不透明度为1.0和尺寸为10,这样我们就可以非常精确地工作.
-
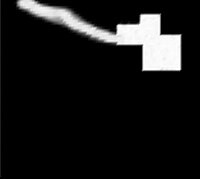
Paint an area over the flat terrain in the shape of a generic military base, like you see here.
::画一个平坦地形的区域, 形成一个一般的军事基地, -
Reduce the opacity back down to 0.2 and increase the size to 20.
::减少不透明度回0.2和增加大小到20 -
Paint the road leading away from the base. We've reduced the opacity and increased the size so that the road will blend more with the landscape around it instead of being more defined like our base.
::我们减少了不透明度,增加了尺寸, 使道路与周围的景观融为一体, -
Once you have your stencil looking the way you want, take a screen shot and save it. Then revert back to your previous environment (before you started painting on it).
::一旦你把版画看得像你想要的那样,就拍下一个屏幕截图,保存它.然后回到你以前的环境 (在你开始涂上之前). -
Go to the Texture menu (
F6
) and add two new textures.
::进入"纹理"菜单 (F6) 并添加两个新的纹理. -
Load your stencil into the forth texture (the first new one), and the dirt image into the fifth texture. Once again, remember to set the x and y repeat for the dirt texture.
::将您的模板装入第四个纹理 (第一个新图),并将污垢图像装入第五个纹理. 再一次,请记住为污垢纹理设置x和y重复. -
In the Materials menu (
F5
) select your new stencil and go to the MapTo tab. Deselect Col again, and select Stencil and No RGB. Notice the new preview.
::在"材料"菜单 (F5) 中选择您的新标签,然后进入"MapTo"选项卡.再次取消选择"Col",然后选择"标签和没有RGB".请注意新的预览. -
Wait a second, where's the dirt path?!? Here's the problem and the reason I've included this section: stencils are cumulative. That is, the first stencil defines which portions of ALL successive textures will be drawn, including other stencils! In order for our new dirt path to show up, we need to make sure it's part of the first stencil.
::待一下,路在哪里?!?问题是,我把这个部分包括在内:笔是累积的.也就是说,第一个笔定义了所有连续纹理的哪些部分将被绘制,包括其他笔!为了让我们的新路显示出来,我们需要确保它是第一个笔的一部分.

-
Open your first stencil (the one you used to add rocks to the hills) in your image editor and combine the new stencil with it. The result should appear somewhat like this. Be sure that when you combine your dirt stencil with your rock stencil that the dirt stencil remains the same size and in the same place. That is, you want the two to be perfectly aligned.
::在图像编辑器中打开第一个 (你用来将岩石添加到山丘上的) stencil,并将新 stencil与它结合.结果应该看起来有点像这样.请确保当你将你的泥 stencil与你的岩石 stencil结合时,泥 stencil保持相同的大小和相同位置.也就是说,你希望两者完美对齐. -
Reload your first stencil on your material, the one we used for the rocks. Now the preview should look the way we want it to, and if you render you will see your new dirt area on the flat part of the landscape. You can add even more stencils the same way. Here is how all of the textures blend together:
::重新加载你在材料上的第一张笔,我们用在岩石上的那张.现在预览应该看起来是我们想要的样子,如果染,你会看到你的新污垢区域在平面部分的景观.你可以以同样的方式添加更多的笔.这就是所有纹理如何融合在一起:
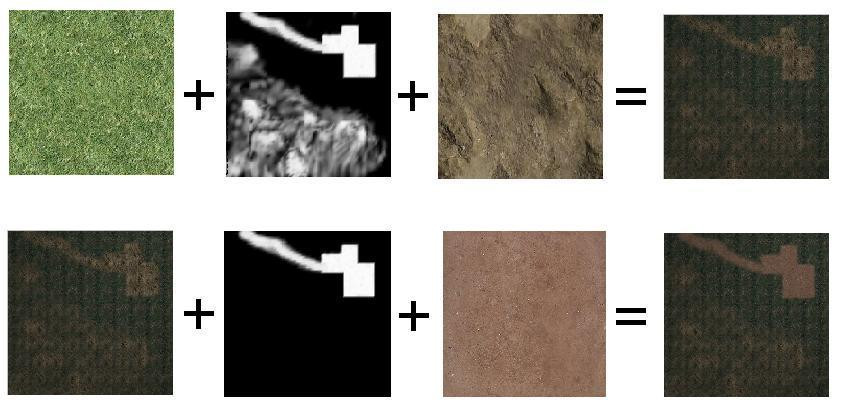
NOTE
I had to replace the grass texture in the above image since I could not find the licensing information for it. I apologize for the inconsistencies in the diagram that result from this.
::备注:由于无法找到许可信息,我不得不替换上图中的草纹.我为图表中出现的不一致而道歉.
Well there you have it! This is a pretty useful method of texturing complex objects. Check out our new landscape and how it compares to the previous, boring, single-textured landscape!
::现在我们可以看到一个很好的方法来构造复杂的物体. 看看我们的新景观与以前的无聊的单一构造景观相比,
Once again, if you have any issues with the tutorial, or feedback (positive or negative), drop it in the discussions.
::如果您对教程或反 (正面或负面) 有任何问题,
For 2.7 blender users:
::对于2. 7 位混合器使用者:
-
first you add the material
::首先你添加材料 -
leave the grass texture at the default
::让草的纹理在默认 -
add the next two textures , the stencil and the rock, soil etc texture as stated in the above tutorial.
::添加下两个纹理, 版和岩石, 土壤等纹理如上述教程中所述. -
go to the stencil texture
::转到模板纹理 -
in the influence panel, uncheck col
::在影响面板中,取消勾 -
check 'RGB to intensity' button
::检查"RGB变强度"按 -
check stencil
::检查模板 -
others everything as their default values are good
::其他一切作为他们的默认值是好的
-For me, with settings above, the rock texture was not very visible. It may help to play around with the color intensity settings in the influence panel (increase in the rock texture, and decrease in the grass texture) -
::对于我来说,在上面的设置下,岩石质地是不太明显的. 在影响面板中调整颜色强度设置 (岩石质地增加,草地质量减少) 可能有所帮助 -