Blender 3D:第四单元:与高级教程起飞
The Color-Map-Normal
::颜色地图的正常情况
For more advanced Blender users, you probably have at one time or another wanted to create something very detailed and realistic, only to realize that one modeled head or one cool building has taken an enormous amount of memory, and rendering (or worse, animating!) something like that would probably take days! Well there is an awesome trick you can use to create intricate details and design shading, with a relatively low amount of faces. You can use blender to create and apply normal maps, which are RGB colored maps that can be used as a texture to calculate how light will bounce of an objects surface. All you need is blender and photo-editing software to tweak the picture a bit.
::对于更高级的 Blender 用户,你可能曾经想创建一些非常详细和现实的东西,但却意识到一个模拟的头部或一个酷的建筑物需要大量的内存,并且染 (或更糟的是,动画!) 这样的事情可能需要几天! ,有一个很棒的技巧,你可以用它来创建复杂的细节和设计阴影,相对较少的面部. 你可以使用 Blender 来创建和应用正常地图,这是 RGB 彩色地图,可以用作纹理来计算光线如何反射到物体表面. 您只需要 Blender 和照片编辑软件来调整图像.
Creating a Normal Map
::创建一个普通的地图
You can very easily create a normal map once you figure out all the necessary settings. You can start by either making a high-poly count version of your object, or making the material that will be applied to the object to make the normal map.
::一旦你弄清楚所有必要的设置,就可以很容易地创建一个正常的地图.你可以从创建对象的高多元数版本开始,或者创建将被应用到对象上来创建正常地图的材料.
High-Poly Version
::高聚合物版本
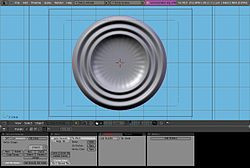
We will first start by making a simple object with a high-poly count. Start up blender, and let's delete everything there first, then go to top-view, orthographic, and start by adding a camera.
::我们首先要做一个简单的对象, 具有高多元数. 启动混合器, 让我们先把所有东西删除, 然后进入顶部视图, 拼写,
![]()
Next, start with a circle, with a radius of 2 and 32 vertices in circumference. Keep it filled. Select the edges of the circle, keeping the inner vertex unselected, and extrude edges only. Scale the new vertices by 1.1. Repeat this with only the outermost vertices 6 more times, until you have a ring of 7 vertices and a center vertex. Now, we will refer to the center vertex as center, the innermost ring as Ring 1, and the outermost ring as Ring 7. Deselect all vertices, then select all vertices of ring 2, 4, and 6 (This can easily be done by holding the Alt and Shift keys, then selecting an edge adjoining two vertices of the same ring for each ring). With these rings selected, move it 0.4 in the Z direction. Now, let's smooth this bowl out. In the editing index, under the modifiers tab, add a subsurf modifier of 2, and then apply the modifier. Then under the links and materials tab, select Set Smooth. Next after the object looks all nice and smooth, select your Camera and move it positive in the Z direction so it's positioned directly above the object looking straight down at it, and edit the camera Lens properties so that it is set to Orthographic, and scale the lens so that it includes all the bowl and fills up the camera space as much as possible.
::接下来,从一个半径为 2 的圆圈开始,并将周围的顶点保持在 32 个.保持其充满.选择圆圈的边缘,保持内顶点未选,并且只挤出边缘.将新的顶点缩放 1.1. 仅使用最外的顶点再做 6 次,直到你有 7 个顶点和中心顶点的环.现在,我们将把中心顶点称为中心,最内环称为环 1,最外环称为环 7. 取消所有顶点,然后选择 2,4 和 6 个环的顶点 (这可以通过按住 Alt 和 Shift 键,然后选择一个与同一环的两个顶点相邻的边缘来轻松完成). 随着这些选定的环,将其移动 0.4 在 Z 方向. 现在,让这个碗. 在盘子下方,添
Creating the Color-Map Material
::制作彩色地图材料
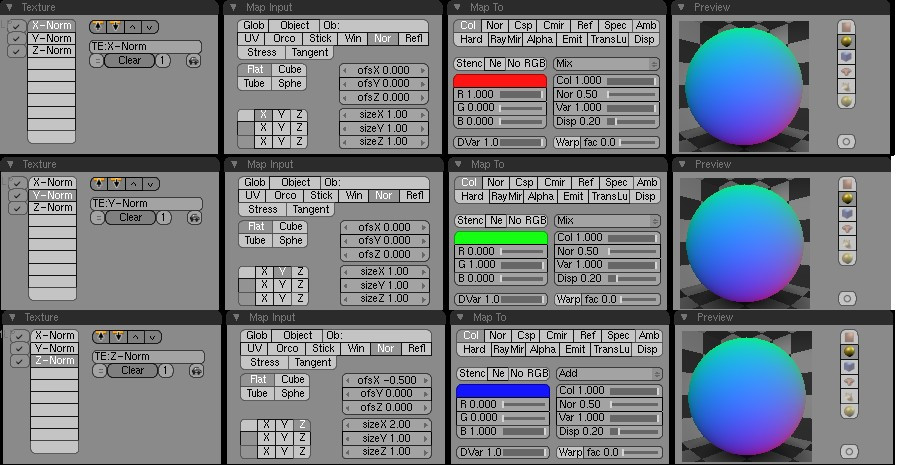
Now, to be able for the Render to apply the colors on the right areas of the object. For this, we will start by applying a material the bowl. Make this material 0.0 on the R, G, and B spectra, and depress the shadeless button. Now, go to the textures index and add 3 textures to the material, and set them as "Blend" textures with "Lin" depressed (a linear calculation). For these 3 textures, name them something to do with either "Red"/"Green"/"Blue" or "X"/"Y"/"Z" in that order, because doing this will ensure you keep the channels in order. The following image will show
all
settings that need to be set to make the material work.
::现在,为了让染器能够在对象的正确区域应用颜色. 为此,我们将从应用材料开始. 在R,G和B光谱上使这个材料为0.0,然后按下无阴影按. 现在,进入纹理索引,将材料添加3个纹理,并将它们设置为"混合"纹理,压低"Lin" (线性计算). 对于这些3个纹理,请以"红色"",绿色"",蓝色"或"X"",Y"",Z"为名,因为这样可以确保保持通道的顺序. 下图将显示所有需要设置以使材料工作的设置.
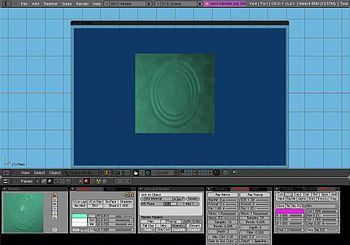
Now before your Rendering you want to make the World texture to be completely black, so this way it won't interfere when you apply it as a normal map. Now Render your image, and hit F3 to save. It should come out to something like this.

::现在在染之前,要让世界图像完全黑色,这样当你把它应用到普通地图时,它就不会干扰. 现在染你的图像,然后按F3保存. 它应该像这样.
As a final note in this subsection, what I suggest doing is deleting the bowl and saving the file as something like "BlenderForNormals.blend" so if you ever want to make another normal, the area and materials are already set up and all you need to do is import or create the object. Just a suggestion.
::建议删除碗并将文件保存为"BlenderForNormals.blend"这样的文件, 如果您想创建另一个正常, 区域和材料已经设置,
Applying as a Normal Map
::作为一个普通的地图
Well we got the image, now let's apply it and make it come out as a low poly-count texture. So, let's continue by deleting the high poly bowl and instead add a plane in the middle of the camera. Now, apply a material to the object and make the material hard, soft, rocky, wet, or however you want it to look. After you've made the plane how you want, add a texture to the material, and make it an image texture. Load the image as the texture, depress the normal map button, and set the normal spacing to object. Now, on the materials index under the Map To tab, make sure the Col button is relieved and instead depress the Nor button. Just add a lamp above the plane, and Render! You should now have the same shading effect as the original bowl, with about 0.01% of the original faces--one.
::现在我们有了图像,现在让我们应用它,让它变成一个低多数的纹理. 所以,让我们继续删除高多数的碗,然后在相机中间添加一个平面. 现在,将材料应用到对象上,使材料硬,软,岩石,湿,或者你想要的样子. 制作平面之后,将材料添加一个纹理,并使它成为一个图像纹理. 将图像加载为纹理,按下正常的地图按,并将正常的间隔设置为对象. 现在,在材料索引下,在"映射到地图"选项卡下,确保COLON按被减轻,然后按下NOR按. 只要在平面上方添加一个灯,然后Render! 现在你应该得到与原始碗相同
If your Render comes out odd, it may be because the shading is being applied too heavily. You can alter this by adjusting the Nor slider directly below the "Mix" drop-down menu. O used about 0.2 and it came out just fine, like this picture.
::如果你的染器出现奇怪,可能是因为遮光太过重.你可以通过调整 Nor 滑块直接在"Mix"下拉菜单下进行调整. O 使用了大约 0.2 并且它出来很好,就像这个图片.
Congratulations, that's all there is to normal mapping. It's a simple technique with many great uses!
::简单的技术, 有很多好用处!