Blender 3D:第四单元:与高级教程起飞
You
previously read
about techniques for controlling fireflies in renders done with Blender Cycles, and how, when all else fails and tweaking renderer parameters doesn’t help, it is time to roll out the Despeckle filter. Sometimes a despeckle applied across the entire image may be too blunt, leading to unwanted effects in parts of the image where there are no fireflies.
::您之前已经读过 Blender Cycles 染器中控制火虫的技术,以及当其他一切都失败,并且调整染器参数无效时,该如何推出 Despeckle 镜.
But never fear. There are yet more options in Blender’s compositor that we have yet to explore, to give us even finer control over the application of despeckling, and hopefully avoid the final, desperate measure of hand-retouching (shock! horror!) individual blemishes in an image-editing program.
::但不要担心. 在Blender的作曲器中还有更多的选项我们还没有探索,
The basic principle is, fireflies are caused by specific interactions of types of materials and lighting, hence they will only occur in particular parts of the image. By separating out the problematic materials/lighting cases, we can selectively apply the filter just to them, minimizing side-effects on parts of the image that look just fine.
::基本原理是,虫是由材料类型和照明的特定相互作用引起的,因此它们只会出现在图像的特定部分.通过分离有问题的材料/照明情况,我们可以选择性地将镜应用于它们,从而最大限度地减少对图像中看起来很好的部分的副作用.
We will present a way to do the separation.
::我们将提出一种方法来进行分离.
Finer Despeckling: Separate Lighting Passes
::细致的清除:单独的照明通道
Separating The Lighting Passes
::隔离闪电通道
The Cycles renderer has the capability to separate out different kinds of light paths into separate
passes
for individual processing. Consider the diagram on the
Blender wiki
, showing how the direct lighting, indirect lighting and colour calculations are broken down by diffuse, glossy and transmission light paths, before being combined together with emission and environment lighting. We can split out all these passes, and use compositor nodes to recreate the standard combination as described there. But we can also intersperse our own processing onto particular passes, leaving the others untouched.
::循环染器有能力将不同类型的光路分为单独的传递,用于单独处理.请考虑Blender wiki上的图,显示直接照明,间接照明和颜色计算如何被分散,光泽和传递光路分解,然后与排放和环境照明相结合.我们可以将所有这些传递分开,并使用组合节点来重建标准组合,如在那里所述.但我们也可以将自己的处理插入特定传递,而不会影响其他传递.
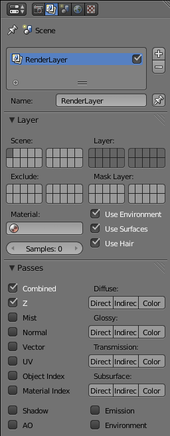
To tell Blender that we want to extract the light passes, go to the Render Layers
![]() context in the Properties
context in the Properties
![]() window, and look for the Passes panel. Notice the four groups of 3 buttons each for “Direct”, “Indirect” and “Color” grouped under “Diffuse”, “Glossy”, “Transmission” and “Subsurface”? (Depending on your Blender version, the “Subsurface” group might not be present.) Click all these buttons, and also check the “Emission” and “Environment” boxes just below.
window, and look for the Passes panel. Notice the four groups of 3 buttons each for “Direct”, “Indirect” and “Color” grouped under “Diffuse”, “Glossy”, “Transmission” and “Subsurface”? (Depending on your Blender version, the “Subsurface” group might not be present.) Click all these buttons, and also check the “Emission” and “Environment” boxes just below.
::要告诉Blender我们想要提取光传递,请进入属性窗口的染层上下文,并查找传递面板.请注意四组3个按,每个按为"直接","间接"和"颜色",分组在"扩散","光泽","传输"和"表面下"? (根据您的Blender版本,"表面下"组可能不存在) 点击所有这些按,并检查下面的"发射"和"环境"框.
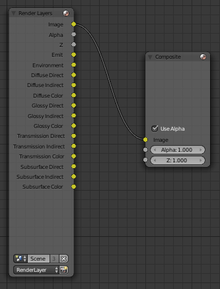
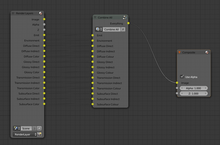
Now if you go back to the compositor window, you should see that the RenderLayers node has sprouted a whole lot of extra output terminals, one for each of the buttons/checkboxes you clicked.
::现在如果您回到编译器窗口, 您应该看到RenderLayers节点已经生长了大量额外的输出终端,
Next, we want to recombine these to mimic the behaviour that Blender provides by default. If you go back to that Blender Wiki diagram above, you will see that, for each shader type (diffuse, glossy etc), the direct and indirect light passes are added together, and the sum is then multiplied by the colour calculation. The result from all the passes is then added together.
::接下来,我们要重新组合这些以模仿Blender默认提供的行为.如果你回到上面的Blender Wiki图表,你会看到,对于每个遮光器类型 (扩散,光泽等),直接和间接光通过被加在一起,然后总和乘以颜色计算.所有通过的结果被加在一起.
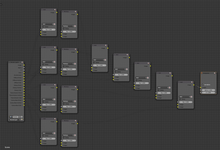
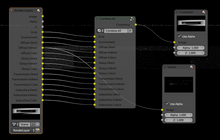
The Blender compositor has standard node types for adding and multiplying colours. Armed with this information, you might immediately set to work putting together an intricate node setup to implement the formula depicted in that diagram, perhaps ending up with something like at right.
::混合器编译器有标准的节点类型来加和乘色. 有了这些信息,您可以立即开始工作,组建一个复杂的节点设置来实现图中所描述的公式,最终可能会得到像右图这样的东西.
Show this to a seasoned computer programmer, and they will perform the gesture known as a “
facepalm
”. Yes, technically this will work, but it is quite complicated-looking and error-prone. Supposing you get a connection wrong: how would you find it? How would you debug your node program?
::给一个经验丰富的计算机程序员看,他们会执行一个叫做"面部掌握"的手势.是的,从技术上讲,这会起作用,但它看起来相当复杂,容易出错.假设你错误地连接:你怎么找到它?你如何调试你的节点程序?
For, make no mistake,
nodes are a programming language
. Putting together a node setup is very much like writing a computer program. One of the important principles is
don’t repeat yourself
. That is, if you find yourself doing the same sequence of steps more than once, it makes sense to spell it out once, and then next time just tell the computer to do the same thing again.
::对于,不要误会,节点是一个编程语言.组装一个节点的设置就像写一个计算机程序.其中一个重要的原则是不要重复自己.也就是说,如果你发现自己做了同样的步骤序列多次,有意义的拼写一次,然后下次只告诉计算机做同样的事情.
|
|
In programming,
laziness is a virtue
. Programmers spend a lot of their time thinking up ways to avoid work, by getting the computer to do it.
|
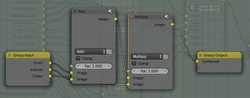
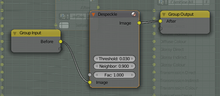
So let us see how a programmer would approach this same problem. To start with, consider the most basic operation, which is: add the direct and indirect components, and multiply by the colour. So create a pair of Mix nodes, one to do the Add and the other to do the Multiply, and wire them appropriately. Turn them into a group CTRL + G , and add group inputs and outputs as in the diagram.
::让我们看看程序员如何处理这个问题.首先,考虑最基本的操作,即:添加直接和间接组件,并乘以颜色.所以创建一对混合节点,一个做添加,另一个做乘,并将它们适当地连接.把它们变成一个组 CTRL + G,并添加组输入和输出如图所示.
To change the names of the inputs and outputs, you can select them in the list that appears in the Properties shelf N in the Node Editor window, then type a new name in the appropriate field just below the list.
::为了更改输入和输出的名称, 您可以在Node Editor窗口的属性架 N中显示的列表中选择它们, 然后在列表下方的适当字段中输入一个新的名称.
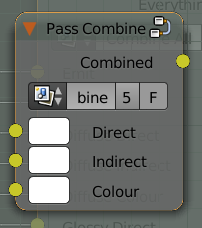
Having done all the wiring, TAB out of the group, so you can give it a name. Here I call it “Pass Combine”. See how naming the inputs and outputs helps make it clearer what the node is for? And if you want to see the details, just TAB into the node for more. This technique is called
abstraction
, where you start by seeing only the overview, but you can progressively peel back the layers to see more and more detail, but only where you want to. This is an important technique for dealing with complexity, which is what programmers do every day.
::完成了所有的布线,TAB从组中取出,这样你就可以给它一个名字. 这里我称之为"Pass Combine". 看看命名输入和输出有助于更清楚地说明节点是什么? 如果你想看到细节,只需TAB进入节点以获得更多. 这种技术被称为抽象,你开始只看到概述,但你可以逐渐剥离层来看到越来越多的细节,但只在你想要的地方. 这是一个处理复杂性的重要技术,这是程序员每天做的.
We will need four instances of this group, plus another bunch of Mix nodes to add them all together. We are adding 6 quantities, so we will need 5 Mix nodes. Again, I make a group to combine all these adders, just to make things neater.
::我们需要这个组的四个实例,再加上另外一堆Mix节点来把它们加在一起. 我们在加6个数量,所以我们需要5个Mix节点. 再次,我创建一个组来组合所有这些加数,只是为了让事情更整洁.
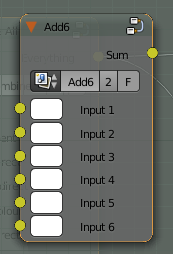
I call the resulting group “Add6”. Blender only provides nodes to add two quantities at a time, yet here we have made our own custom node that can take 6 inputs at once. Neat, huh?
::结果的组是"Add6". 混合器只提供一个节点来一次加两个量,但我们已经做了一个自己的自定义节点,可以同时接收6个输入. 很好,?
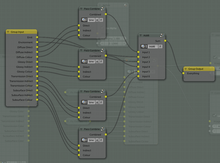
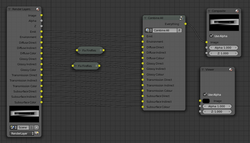
So now we combine our building blocks into a new building block that computes the combination of all the passes, and looks like this.
::现在我们将我们的构建块组合成一个新的构建块, 计算出所有通道的组合, 看起来像这样.
Note the ordering of the group inputs, to ensure a nice and neat arrangement when we connect this node up below. You can rearrange the inputs by selecting one from the list in the Properties Shelf N and using the up- and down-arrow buttons next to the list to change its position.
::注意组输入的排序,以确保在下面连接这个节点时有个漂亮而整洁的排列.你可以通过在属性架N中从列表中选择一个输入来重新排列输入,并使用列表旁边的上下箭头按来改变其位置.
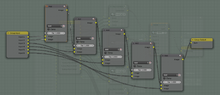
And then when we connect that building block (here called “Combine All”) into all the RenderLayers outputs, our complete node setup now looks like this.
::接着我们将这个构建块 (这里称为"Combine All") 连接到所有RenderLayers输出中, 我们的完整节点设置现在看起来像这样.
Compare this with the original simple-minded recreation of the pass-combining algorithm: which would you rather be presented with when you open a Blender document?
::您希望在打开Blender文档时看到哪个?
|
|
Groups within groups:
When you have one node group within another, you may become confused over the behaviour of the TAB key: will it exit the current group, or take you into an inner one? If you select an inner group, it will go into that, of course. But if you’re trying to get out,
click on a node that isn’t a group
. You always have two of these, the Group Input and Group Output nodes, handily marked out by their yellow title bars. So click on one of those before pressing TAB , and that takes you out of the group.
|
Fixing The Fireflies
::修复火虫的情况
Anyway, now that we have separated the lighting passes, such that we can recombine them to produce the original image anyway, how do we actually go about fixing the fireflies?
::现在我们已经分开了照明通道, 我们可以重新组合它们以产生原始图像, 我们如何修复?
First we have to isolate which passes are producing the fireflies. Click the “Backdrop” checkbox in the header of the compositor Node Editor window. Now, CTRL + SHIFT + LMB on the RenderLayers node, and you should see a new Viewer node automatically appear and connect itself to the first output terminal on that node. At the same time, the background of the window changes to show the image produced by that output terminal. The first terminal should be showing the complete image, including the fireflies.
::首先我们必须隔离哪些传递产生火虫. 点击编译器节点编辑器窗口的头部中的"后台"选项框. 现在,在RenderLayers节点上,按Ctrl + SHIFT + LMB,你应该看到一个新的Viewer节点自动出现并连接到该节点上的第一个输出终端. 同时,窗口的背景会改变以显示该输出终端生成的图像. 第一个终端应该显示完整的图像,包括火虫.
Keep pressing CTRL + SHIFT + LMB , and the Viewer node will connect to each output terminal in turn. Some may be all black or all white, but don’t worry, just keep going. When you come to the Diffuse Indirect output, you should see something like at right, mostly dark, but with noticeable fireflies. Make a note and keep going; I also found that the Glossy Indirect output was another source of problems in this case.
::继续按下CTRL+SHIFT+LMB,Viewer节点将轮流连接到每个输出终端.有些可能全黑或全白,但不要担心,只要继续.当你到达扩散间接输出时,你应该看到右边的东西,大多是黑暗的,但有明显的火虫.记住并继续;我还发现光泽间接输出是此案中的另一个问题来源.
So we need to insert a Despeckle node between the Diffuse Indirect output from the RenderLayer node, and the corresponding Diffuse Indirect input on our Combine All node. But instead of just making a simple Despeckle node, let’s make a custom node group. Why? Because we’ll need it in two places. So rather than having to set it up twice, just do the setup once, and insert two instances. That way, we can adjust the despeckle settings in just one place, and have it automatically take effect wherever there is an instance. Also, maybe we want to try other filters in combination with or instead of Despeckle; again, we would only need to make the change in one place, and it would automatically affect all instances.
::所以我们需要在RenderLayer节点的Diffuse间接输出和我们Combine All节点的相应的Diffuse间接输入之间插入一个Despeckle节点.但是,我们不仅仅要做一个简单的Despeckle节点,我们需要一个自定义的节点组.为什么?因为我们需要它在两个地方.所以,而不是必须设置两次,只要做一次设置,插入两个实例.这样,我们就可以在一个地方调整despeckle设置,并且在任何一个实例中自动生效.也许我们想要尝试其他过器与Despeckle结合或代替Despeckle;我们只需要在一个地方进行更改,它将自动影响所有实例.
“Don’t repeat yourself”, remember?
::记得没有重复自己?
So here we are, with a couple of instances of our custom “Fix Fireflies” node group inserted in the most troublesome light paths.
::现在我们在最麻烦的光路中插入了我们自定义的"修复火虫"节点组.

And here is the resulting render.
::这就是结果.
Conclusion
::结论
Fireflies can be troublesome, particularly because there is no 100%-foolproof way of getting rid of them. After all, if there were, why not just build it in as an automatic part of every render? This pair of pages has presented a range of techniques for dealing with them, from simple to complex. Of course it makes sense to try the simple ones first, and only if they’re not good enough, is it worth expending effort on something more complex.
::火虫可能会很麻烦,特别是因为没有100%的防伪方法来摆脱它们.毕竟,如果有,为什么不把它作为每个染的自动部分?这两页介绍了处理它们的各种技术,从简单到复杂.当然,首先尝试简单的方法是有意义的,只有如果它们不够好,那么花费更多精力去做更复杂的事情才是值得的.
See Also
::另见
-
This
video
by Bartek Skorupa, which was the inspiration for this page.
::让我们一起来看看这段影片.