Blender 3D:第四单元:与高级教程起飞
The Armature Object
::骨架对象
Armature Object is like any other object type:
::骨架对象就像其他对象类型一样:
-
It has a center, a position, a rotation and a scale factor.
::它有一个中心,一个位置,一个旋转和一个尺度因子. -
It can be edited.
::这可以编辑. -
It can be linked to other scenes, and the same armature data can be reused on multiple objects.
::它可以与其他场景联系起来, 同样的具数据可以在多个对象上重复使用. -
All animation you do in object mode is only working on the object, not the armature's contents like bones.
::任何在对象模式下所做的动画都只能在对象上工作,
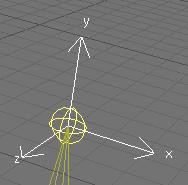
Try it now: add an armature to your scene: SPACEKEY --> Add --> Armature.
::现在试试:为你的场景添加一个具: SPACEKEY --> Add --> Armature.
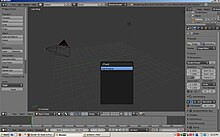
Or you can press the Shift + A keys, and select single bone from the armature menu.
::您可以按下Shift+A键, 从具菜单中选择单个骨头.

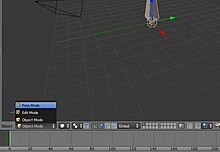
When you add a new armature, you'll enter editmode automatically. To switch between modes, use the TABKEY or the dropdown menu in the Header of the 3Dview window (This might not be the case with blender 2.49b, you won't enter edit mode in that version):
::当你添加一个新的具时,你会自动进入编辑模式. 为了在模式之间切换,使用TABKEY或3Dview窗口的标题中的下拉菜单 (这可能不是混合器2.49b的情况,你不会在该版本中进入编辑模式):
The Edit Panel When in Object Mode
::在对象模式下编辑面板
This is how the edit panel looks after you have added a new armature and switched to object mode (TABKEY):
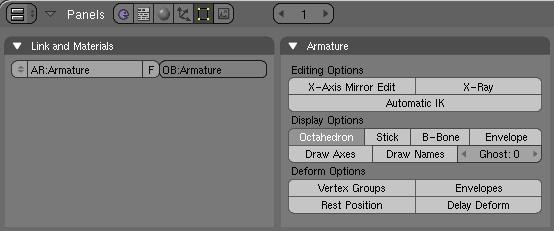
::在添加一个新的具并切换到对象模式 (TABKEY) 之后,编辑面板的样子是这样的:
-
Link and Materials panel:
-
The AR: field let you rename your armature Datablock. The dropdown is a quick way to select which Armature datablock you want to connect to this armature. You can keep more than one version for the same character. Useful when you have a special move to achieve in a shot, you can turn on an armature for a special purpose.
::随着 AR: 字段的出现,您可以更名您的具数据块.下拉列表是一个快速的方式来选择您想要连接到这个具的哪个具数据块.您可以为同一角色保留多个版本.当您在一张镜头中要实现特殊动作时,可以启动一个具以实现特殊目的. -
The F button is an option to assign a Fake user to the Armature. Again if you have more than one armature for your character, it's a good idea to turn the Fake on, because if your armature datablock is not used (linked) it's not going to be saved in your .blend files. You can always do batch Fake-assignment of armatures by opening the Datablock browser (SHIFT-F4KEY), go in Armature datablock, select all the armatures you want to keep, and Press the FKEY.
::按F按是将假用户分配给具的选项.如果您的角色有多个具,那么打开Fake是个好主意,因为如果您的具数据块没有使用 (链接),它将不会被保存到您的.blend文件中.您可以通过打开数据块浏览器 (SHIFT-F4KEY) 进行批量假具的分配,进入具数据块,选择您想要保留的所有具,然后按FKEY. -
The OB: field is just to Rename your armature Object to something more cool and useful than Armature... Armature.001...
::医生界只能把你的具物品改名为比具更酷,更有用的东西...
::链接和材料面板:AR:字段让你重新命名你的具数据块.下拉式是快速选择你想要连接到这个具的具数据块的方法.你可以为同一个角色保留多个版本.当你有一个特殊的动作在一张镜头中实现时,你可以为特殊目的打开一个具.F按是将假用户分配到具的选项.再次,如果你的角色有多个具,这是一个好主意,把假设打开,因为如果你的具数据块没有使用 (链接),它不会被保存到你的 .blend 文件中.你可以通过打开数据块浏览器 (SHIFT-F4KEY) 总是进行批量假设分配具,进入具数据块,选择你想要保留的所有具,然后按重命名具. OB -
The AR: field let you rename your armature Datablock. The dropdown is a quick way to select which Armature datablock you want to connect to this armature. You can keep more than one version for the same character. Useful when you have a special move to achieve in a shot, you can turn on an armature for a special purpose.
-
Armature panel:
-
Editing Options:
-
X-Axis Mirror Edit: Not really useful now, it's more of an editmode option. This feature tells Blender you want to replicate all of your bones on one part of the Armature to the other. It's a clean way to just do half the job ;). The axis of mirroring is X so left<-->right in frontview (NUMPAD_1KEY) and the center is the center of the armature object. We will see this feature in detail in the next page.
::X-Axis Mirror Edit:现在不太有用,它更像是一个编辑模式选项.这个功能告诉Blender你想复制一个部分的骨头到另一个部分.这是一个干净的方式,只做一半的工作;).镜像的轴是X,所以左<-->右在前景 (NUMPAD_1KEY) 和中心是具对象的中心.我们将在下一页详细看到这个功能. -
X-Ray: This option will let you see the armature through anything in the scene, solid or not. It's useful to see where your bones are in your character so you can select them.
::X射线:这个选项可以让你通过场景中的任何东西来看到具,不管是固体还是非固体.它很有用,可以看到你的骨头在角色的位置,这样你就可以选择它们. -
Automatic IK is a Posemode option. It lets you pose a chain of bones as if the bone you were holding was an ik target. More info in Posemode page.
::自动 IK 是一个Posemode选项.它允许你摆设一连串的骨头,就好像你手中的骨头是ik目标.更多信息在Posemode页面.
::编辑选项:X轴镜像编辑:现在不太有用,它更像是一个编辑模式选项.这个功能告诉Blender你想复制你的所有骨头在一个部分的具到另一个.这是一个干净的方式只是做一半的工作;).镜像的轴是X所以左<-->右在前视图 (NUMPAD_1KEY) 和中心是具对象的中心.我们将在下一页详细看到这个功能.X射线:这个选项将让你看到具通过任何在场景中的东西,固体或不.它是有用的,看看你的骨头在你的角色,所以你可以选择它们.自动IK是一个Posemode选项.它让你摆设一链骨头,好像你持有骨头是一个目标IK.更多信息在Posemode页面. -
X-Axis Mirror Edit: Not really useful now, it's more of an editmode option. This feature tells Blender you want to replicate all of your bones on one part of the Armature to the other. It's a clean way to just do half the job ;). The axis of mirroring is X so left<-->right in frontview (NUMPAD_1KEY) and the center is the center of the armature object. We will see this feature in detail in the next page.
-
Display Options: These options give you the chance to visualise your bones in various ways. Also note that there is some specific options and features regarding the display mode you're in.
-
Octahedron: This is the default view. Nothing exciting except you have a good idea of the rolling of the bones.
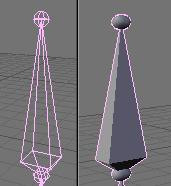
::八面体:这是默认的视图.除了你对骨头的滚动有很好的概念之外,没有什么令人兴奋的. -
Stick: This display mode is really useful when you have a lot of bones in your view. It lets you "unclutter" the screen a bit. It draws the bones as tiny sticks.
::棒:当你在视图中看到很多骨头时,这种显示模式非常有用.它让你"整理"屏幕一点.它将骨头绘制成小棒. -
B-Bones: It's more a feature than a display mode. This is only useful to visualise the effect you get when you activate the B-bones (Bézier-Bones). Each bone acts like a curve handle and lets you get extremely curvy poses. This will be exposed in the following pages.
::贝齐尔骨:它更多的是一个功能,而不是一个显示模式.这只有用于可视化你激活B骨 (贝齐尔骨) 时得到的效果.每个骨头就像一个曲线柄,让你得到极其曲线的姿势.这将在下面的页面中暴露. -
Envelope: Again it's more a feature than a display mode. But in this case the visualisation will be useful to tweak your rig later. Envelope lets you easily tell which part of your character this bone will animate and it's visually possible to change the zone of influence exclusively in this display mode. The zone is only visible in Editmode or Posemode though.
::封面:这也是一个功能而不是一个显示模式.但在这种情况下,可视化将有用,以后调整你的设备.封面让你很容易地知道这个骨头将动画你的角色的哪一部分,并且在这个显示模式中可以视觉地更改影响区域.该区域只在编辑模式或Posemode中可见. -
Draw Axes: To draw the axes on each bone of the armature when you are in Editmode or Posemode. Useful when you want to know where you are and which axis to use in a constraint for example. Mental note: Y is up, Z is depth and X is side, contrary to object for which Z is up, Y is depth and X is side.
::绘制轴:当你处于编辑模式或位置模式时,在具的每个骨头上绘制轴.当你想知道你在哪里以及在约束中使用哪个轴时,这很有用. 记住:Y是上方,Z是深度和X是侧面,与对象相反,Z是上方,Y是深度和X是侧面. -
Draw names: This lets you see names of bones whatever the mode you are in. It's useful again to edit your armature, create parent dependencies or add constraints.
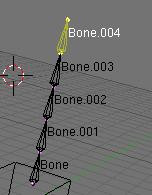
::绘制名称:这让你看到骨头的名称,无论你在哪种模式.它又有用,可以编辑你的具,创建父依赖或添加约束. -
Ghost: This option lets you see a ghost of the armature in frames behind and over the current time. This is only working when you have an action linked to the armature, as we will see later.
::幽灵:这个选项让你在当前时间的后面和后面的中看到一个装甲的幽灵. 这只能在与装甲相关的动作时工作,我们稍后会看到. -
Step: This option lets you choose the frames interval between ghost instances.
::步骤:此选项允许您选择幽灵实例之间的间隔.
::显示选项:这些选项让你有机会以各种方式可视化你的骨头. 还要注意的是,关于你处于的显示模式,有一些特定的选项和功能. 八面体:这是默认的视图. 除了你对骨头的滚动有很好的了解之外,没有什么令人兴奋的. 棒:当你在视图中有很多骨头时,这个显示模式真的很有用. 它让你"清理"屏幕. 它将骨头绘制成小棒. B-骨头:它更多的是一个功能而不是一个显示模式. 这只有用于可视化你激活B-骨头 (Bézier-骨头) 时得到的效果. 每个骨头就像一个曲线柄,让你得到曲线姿势. 这将在下面的页面上曝光. 封 -
Octahedron: This is the default view. Nothing exciting except you have a good idea of the rolling of the bones.
-
Deform options:
-
Vertex Groups & Envelope: These two toggles let you choose if you want the armature to deform your character using the Vertex Groups and/or the Envelopes. We will see that later.
::顶点组和封面:这两个切换让你选择是否希望具使用顶点组和/或封面来变形你的角色.我们稍后会看到. -
Rest position: This will bring the character back to factory default (item as Editmode), and no actions will be applied to the armature so you can easily edit it in the middle of an animation.
::休息位置:这将使角色回到工厂默认状态 (项目为编辑模式),并且不会对具进行任何操作,因此您可以在动画中方轻松编辑它. -
Delay Deform: This was useful before as the old system was
very
slow. What it does is when you do a manipulation to the rig, it waits until you finish to update the view. Can still be useful though.
::延迟变形:这以前很有用,因为旧系统非常慢.它所做的就是当你对钻机进行操作时,它会等到你完成更新视图.尽管如此,它仍然可以有用.
::变形选项:顶点组和封面:这两个切换让你选择是否希望具使用顶点组和/或封面变形你的角色.我们将稍后看到.休息位置:这将把角色带回工厂默认 (item as Editmode),并且不会对具应用任何操作,因此你可以在动画中方便地编辑它.延迟变形:这以前很有用,因为旧系统非常慢.它所做的就是当你对具进行操作时,它会等到你完成更新视图.尽管如此,它仍然可以有用. -
Vertex Groups & Envelope: These two toggles let you choose if you want the armature to deform your character using the Vertex Groups and/or the Envelopes. We will see that later.
::镜像面板:编辑选项:X轴镜像编辑:现在不太有用,它更像是一个编辑模式选项. 这项功能告诉Blender你想复制你的骨头在一个部分的镜像到另一个. 这是一个清洁的方式,只是做半个工作; 镜像的轴是X所以左<-->右在前视图 (NUMPAD_1KEY) 和中心是镜像对象的中心. 我们将在下一页详细看到这个功能. 射线:这个选项将让你看到镜像通过任何在场景,固体或不固体. 这项功能是有用的,看看你的骨头在你的角色,所以你可以选择它们. 自动 IK是一个PoseMode. 它让你假设一个链的骨头,就像你是 ik. 在PoseMode. 这让 -
Editing Options:
Extra Practice
::额外的练习
This YouTube tutorial might also help:
Link
The short tutorial might be a help
Link 2
::这篇YouTube教程也可能有帮助:链接