Blender 3D:第四单元:与高级教程起飞
Now you've got your
armature
, but it's not much use until you add some more bones to it. Think about your body for a moment -- you've got this thing you call a 'skeleton', which for our purposes corresponds more or less to an armature object. Your skeleton consists of a number of bones (about 206, to be precise), but generally these are not independent from each other. If you move your femur (the bit of your leg between your pelvis and your knee) then conveniently the rest of your leg moves with it. In that example, the tibia/fibula would probably be counted as one bone, with the femur as their 'parent' bone. In this way, you build up a hierarchy of bones, making animation much simpler.
::现在你有了具,但它没有什么用处,除非你再添加一些骨头. 想想一下你的身体 - - 你有这个叫做"骨架"的东西,这对我们的目的来说大致上与具对应. 你的骨架由多个骨头组成 (大约206个,要准确),但通常它们不是彼此独立的. 如果你移动你的大腿骨 (你的骨盆和膝盖之间的腿部),那么你的腿的其余部分便于移动. 在这个例子中,大腿骨/大腿骨可能会被计算为一个骨头,大腿骨作为他们的"母"骨头. 这样,你建立了一个骨头的等级,使动画变得更简单.
Editing an Armature Object gives you the chance to add, move or connect bones together. Whilst in edit mode, you will see all of the bones within the currently selected Armature.
::编辑一个装甲对象可以给你添加,移动或连接骨头. 在编辑模式下,你会看到当前所选装甲中的所有骨头.
When you create a new armature in Object mode a single bone will automatically be created for you, centered at the cursor position. Blender will then switch straight to Edit mode to allow you to add further bones. At this point we're just defining the default 'rest' position of the bones and specifying how they connect together -- you'll have to wait until
the next chapter
to find out how to create specific poses.
::当你在Object模式中创建一个新的具时,一个单一的骨头将自动为你创建,以光标位置为中心.然后Blender将直接切换到Edit模式,允许你添加更多的骨头.此时我们只是定义了骨头的默认"休息"位置,并指定它们如何连接在一起 - 你必须等到下一章才能找到如何创建特定的姿势.
Now the basics about bones
::现在,关于骨的基本知识
Having created and selected an armature in Object mode, you can add and modify the bones in this armature by switching to Edit mode.
::在Object模式中创建和选择一个具, 您可以通过切换到Edit模式来添加和修改这个具中的骨头.
-
You can add a new bone at cursor position by pressing SPACEKEY in the 3DView --> Add --> Armature.
::您可以在3DView -> Add -> Armature中按SPACEKEY, 在光标位置添加一个新的骨头. -
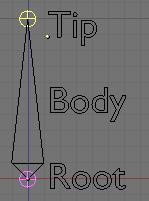
A bone has two ends: a root (the lower part) and a tip (the upper part). You can select and move the tip or the root independently with RMB, or you can select the entire bone by clicking on its body.
::骨头有两个端:根 (下部) 和尖端 (上部).你可以选择和移动尖端或根独立使用人民币,或者你可以选择整个骨头点击它的身体. -
You can extrude a new bone from the selection using EKEY. This will create a bone connected to the original one, meaning the Root of the new bone will follow the Tip of the original one. You can also CTRL-LMB to extrude a new bone. It will extrude to where you clicked.
::您可以使用 EKEY 从选择中挤出一个新的骨头. 这将创建一个与原始骨头连接的骨头,这意味着新骨头的根将遵循原始骨头的提示. 您也可以 CTRL-LMB 挤出一个新的骨头. 它将挤出到您点击的地方. -
Alternatively, you can connect two existing bones by selecting them one after the other and pressing CTRL-PKEY. You can then choose either 'Connected' (the child bone - the one you selected first - will automatically be moved so that it touches the parent) or 'Keep offset'.
::另外,您可以连接两个现有骨头,选择它们一个接一个,然后按CTRL-PKEY.然后您可以选择"连接" (您首先选择的子骨头将自动移动,使其触摸父骨头) 或"保持偏移". -
You can use SHIFT-DKEY to duplicate a bone
::你可以使用SHIFT-DKEY复制骨 -
Using the WKEY menu, You can subdivide your bone or flip the name of the bone between Left-Right (See Naming convention below).
::使用WKEY菜单,您可以将骨子分为子部分或将骨头名称翻转到左至右 (见下面的命名规则). -
You can delete the bone with XKEY
::你可以用XKEY删除骨头 -
You can select a chain of bones (connected together) using LKEY, when you hover your mouse over a bone.
::通过使用LKEY,当你在骨头上移动鼠标时,你可以选择一连串的骨头 (连接在一起).
The edit panel
::编辑面板
-
Armature Bones Panel
-
OB: this field lets you rename your bone.
::医生:这个字段可以让你重新命名你的骨头. -
"Child of" Dropdown: lets you choose which bone will be the parent of this bone. If a parent is selected, there will be a small button labelled "con", meaning connected. Setting the parent defines the relationship between your bones. When one bone has another as its parent, it will do everything the parent does, such as rotate, move and scale. A dotted line between the parent and child will appear. If you select Connected, the Root of the Children will go stick to the tip of the parent, giving you a chain of bones like the 2 bones in your arm.
::"Child of"下拉列:让你选择哪个骨头将是这个骨头的父.如果选择了父,将会有一个小按标有"con",意思是连接.设置父定义了你的骨头之间的关系.当一个骨头有另一个作为其父,它将做所有父母做,如旋转,移动和规模.父和子之间的点线将出现.如果你选择连接,孩子的根将会粘在父母的尖端,给你一个链条的骨头,像你的手臂中的2个骨头. -
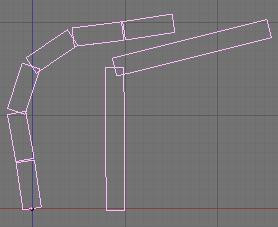
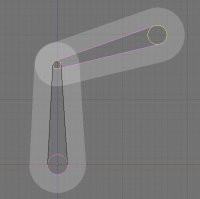
Segm: If you set this value to something greater than 1, it will cut your bone into several little segments and deform them on a bezier curve - referred to as a 'B-Bone'. You need to create a chain of bones to really show off this feature though. In the example below, the image on the right has 1 segment, and the one on the left has 3 segments each (these are shown in Object mode to show the effect more clearly):
::断片:如果您将此值设置为大于1的东西,它将将您的骨头切成几个小断片,并将它们变形成一个更为简单的曲线 - 被称为"B-骨".您需要创建一个链条的骨头来真正展示这个功能.在下面的示例中,右边的图像有1个断片,而左边的图像有3个断片 (这些在对象模式中显示以更清楚地显示效果): -
Dist: This is the area of influence of the bone. It can be visualised using the
Envelope
display mode. We generally don't touch this field as there is an easier and faster way to change this option. Turn Envelope on and select a bone. Then using ALT-S, you can scale the zone of influence. This has the advantage that you can do it on multiple bones simultaneously, and it works in both editmode and posemode:
::Dist:这是骨的影响区域.可以使用封面显示模式来可视化.我们通常不会触摸这个字段,因为有更简单,更快的方法来更改这个选项.打开封面并选择骨.然后使用ALT-S,您可以缩放影响区域.这具有可以同时对多个骨进行的优势,并且它在编辑模式和后置模式中都可用: -
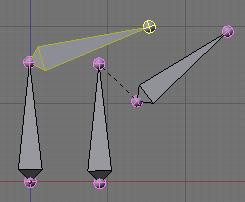
Weight: This specifies how strongly this bone will influence the geometry around it, relative to the other bones. If two bones crossing each other, both with envelope influence, have the same weight (like 1:1) they will influence the surrounding geometry equally. But if you set one to 0.5, the geometry will be affected more significantly by the other one, with weight 1. For example, in this image, 2 bones using envelope influence try to move the same geometry. The 2 on the left have the same weight, you can see the geometry didn't move. On the right, one of the bones has 0.5 so the bone with weight 1 is winning the tug-of-war!:
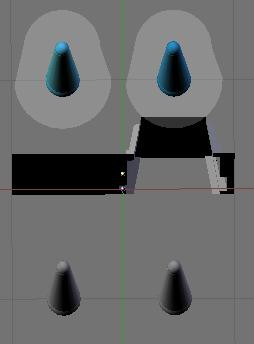
::体重:这说明这个骨头将如何强烈地影响其周围的几何形状,相对于其他骨头.如果两块骨头相互交叉,都具有外影响,具有相同的重量 (如1: 1),它们将同样影响周围的几何形状.但是如果你将一个设置为0.5,几何形状将受到另一块重量1的更显著影响.例如,在这个图中,使用外影响的2个骨头试图移动相同的几何形状.左边的2个骨头具有相同的重量,你可以看到几何形状没有移动.右边,其中一个骨头有0.5,因此重量1的骨头正在赢得拉战!: -
Hinge: This tells the bone to remain motionless in a chain. It doesn't copy the rotation and scale of the parent. Useful for mechanical rig I would say, as you can animate the rotation of the hinge bone without having to correct it because the parent rotated:
::链:它告诉骨头在链中保持不动.它不复制父的旋转和尺度.对于机械设备来说很有用,我会说,因为你可以动画链骨的旋转而不必纠正它,因为父旋转: -
Deform: This lets you say if you want the bone to deform the geometry at all. Switching it off is like setting the weight to 0, except it's faster this way. Useful when using a bone as a target or a controller, i.e. a bone you just want to use to control other bones, but not the geometry itself.
::变形:这让你知道你是否希望骨头对几何形状造成变形.关闭它就像将重量设置为0,但这更快.当使用骨头作为目标或控制器时很有用,即你只想使用骨头来控制其他骨头,但不是几何本身. -
Mult: to deform geometry you can use
vertex group
and/or
Envelope
. The ability to mix both of these methods is handy for using one to tweak the other. For example, you might use envelope everywhere but tweak difficult places manually with vertex group. We'll discuss this in more detail later on.
::模块化:多种:为了变形几何,你可以使用顶点组和/或封面.混合这两种方法的能力很方便,可以使用一个来调整另一个.例如,你可以在任何地方使用封面,但用顶点组手动调整困难的地方.我们稍后会详细讨论这个问题. -
Hide: This option lets you hide the bone. You can use it to hide the less important bones when you want to see what you're doing or for when you come to animate later on. For example, when you animate you don't need to see the entire chain of the leg, just the controllers. The values you select here apply to both Editmode and Posemode.
::隐藏:这个选项可以让你隐藏骨头.你可以用它来隐藏不那么重要的骨头,当你想看到你在做什么或当你来动画后.例如,当你动画你不需要看到整个链条的腿,只是控制器.你在这里选择的值适用于编辑模式和Posemode.
::关节骨面板 OB:这个字段可以让你重新命名你的骨头. "孩子的"下拉列:让你选择哪个骨头将是这个骨头的父母. 如果选择一个父母,将有一个小按标记为"",意思是连接. 设置父母的骨头定义了你的骨头之间的关系. 当一个骨头有另一个作为其父母,它将做所有父母的骨头,如旋转,移动和规模. 一条点线将出现在父母和孩子之间. 如果您选择连接,孩子的根将会粘在父母的尖端,给你一个骨头像你的手臂的2个骨头. 段:如果你设置这个值大于1,它将切割你的骨头成几个小段,并将它们变形在一个曲线 - 称为"骨头". 你需要一个链骨来 -
OB: this field lets you rename your bone.
Naming convention
::命名规范
In many cases, rigs are symmetrical and can be mirrored in half. In these cases, it is helpful to use a left-right naming convention. This is not only useful for your own sake, but it gives Blender a hint that there is a pair of equivalent bones, and enables the use of some very cool tools that will save you some significant work.
::在许多情况下,钻机是对称的,可以在半个半个中反射.在这些情况下,使用左右命名惯例是有帮助的.这不仅对你自己有用,而且它给了Blender一个提示,有一对等价的骨头,并使得使用一些非常酷的工具可以节省一些重要的工作.
-
It's helpful to name your bones with something useful telling you what it's there for, such as leg, arm, finger, back, foot, etc.
::给你的骨头命名有助于你了解它的用途, -
If you get a bone that has a copy on the other side, however, like the arm (you have 2 arms right?), then the convention is to call them arm.Left and arm.Right.
::如果你的骨头另一边有复制品,例如手臂 (你有两个手臂,对吗?),那么我们通常会称它们为左臂和右臂. -
Other alternatives are also possible, like _L, _LEFT, _left, .L, and .Left. Anyway, when you rig try to keep this left-right thing as accurate as possible; it will pay off later on.
::其他选择也可能,如 _L, _LEFT, _left, .L, 和 .Left. 不管怎样,当你钻机时,尽可能保持左右的精度;它会在以后得到回报. -
You can copy a bone named blah.L and flip it over using WKEY --> flip name. So the bone will be blah.L.001 after you copy it, and flipping the name will give you blah.R. Blender handily detects if the .001 version already exists, and increments the number for you.
::你可以复制一个名为blah.L的骨头,然后用WKEY --> flip name翻转.所以在复制后,骨头将是blah.L.001,翻转名称将给你blah.R. Blender便捷地检测到0.001版本是否已经存在,并为你增加数字.
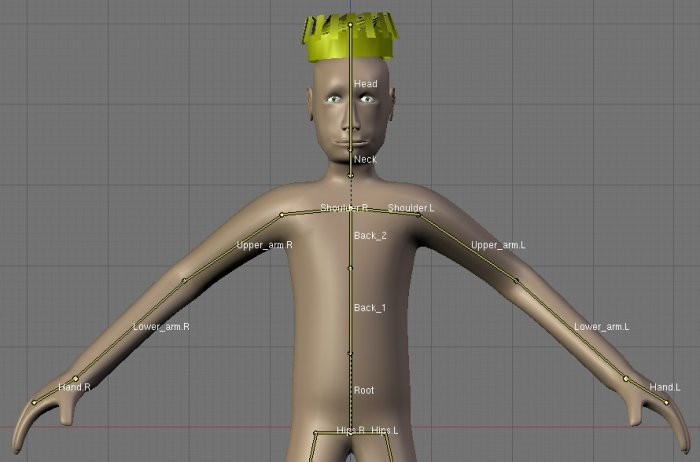
This is an example of naming in a simple rig:
::这是一个简单的命名的例子:
Mirror Editing
::镜像编辑
Now we come to the X-Axis Mirror Edit feature. This handy little number allows you to define only half of your character and tell Blender to automatically repeat the same actions on the other side. It's cool, it's simple and it saves a whole lot of time.
::现在我们来看X轴镜像编辑功能. 这个方便的小数字让你只定义一半的角色,并告诉混合器在另一边自动重复相同的操作. 这很酷,很简单,而且节省了大量时间.
We will create a little guy out of sticks for the occasion -- don't worry about the geometry yet.
::我们将用棍子制作一个小人物--
-
Create a new, empty scene. Since the mirror editing feature mirrors along the X Axis, make sure you've got the front view selected (NUMPAD_1KEY) so that the X Axis runs from left to right. Add a new armature to the scene (SPACE, Add|Armature). Enable 'Draw names' from the 'Display options' section of the Editbutton panel, so we can see what we're doing.
::创建一个新的空景. 由于镜像编辑功能沿X轴反射,请确保您选择了前景 (NUMPAD_1KEY),使X轴从左向右运行. 添加一个新的具到景 (SPACE,Add parasArmature). 启用'绘制名称'从'显示选项'的编辑按面板,这样我们就可以看到我们在做什么. -
Now enable mirror editing by pressing F9 on the buttons window and clicking the
X-Axis Mirror
button in the
Armature
panel under
Editing options
. You'll also need to use the center of the armature (indicated by a purple dot) as the center of your rig, otherwise the symmetry will go wrong when we come to create the mirror image.
::现在通过按F9在按窗口上并点击在编辑选项下的具面板中的X轴镜像按来启用镜像编辑.您还需要使用具的中心 (用紫色点表示) 作为您的具的中心,否则当我们创建镜像时对称性会出错. -
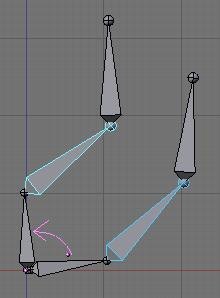
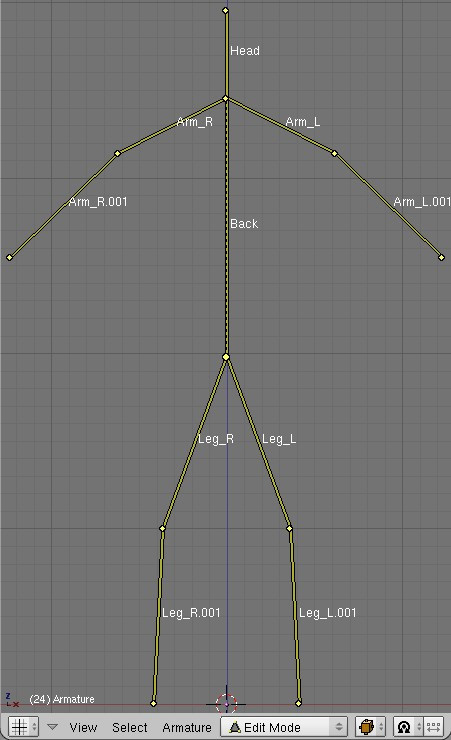
Name the first bone you have "Back". You can scale it to make the entire back of the guy.
::给第一个骨头命名为"背部". 你可以缩小它, -
Select the tip of this and extrude a new bone from it to do the Head. Name it Head.
::选择这个尖端,并从它挤出一个新的骨头做头. 命名它头. -
Select the tip of Back again and do
SHIFT-EKEY
to tell Blender you're starting a
mirrored
chain of bones. Blender will automatically extrude another bone and will create an exact mirror of whatever you do. Take note that the name of both bones are Back_L and Back_R. Blender also tries to keep to the naming convention. Unfortunately, since we extruded from the Back bone, the names aren't quite right anymore.
::选择"回"的尖端,然后执行"SHIFT-EKEY"来告诉Blender你正在启动一个镜像骨链.Blender会自动挤出另一个骨头,并将创建你做的任何事物的精确镜像.请注意,这两个骨头的名字是Back_L和Back_R.Blender也试图遵守命名规则.不幸的是,自从我们从后骨头挤出后,名称不再是完全正确的.
-
To change the names: Start by editing one of the names as Arm. Add the suffix to it (_L or _R). Then hover your mouse over the name field and do CTRL-CKEY. You just copied the name of the bone! Select the other bone, hover you mouse over the name field and do CTRL-VKEY. This will paste the name as-is. But as there is already a bone with the same name, Blender will add .001 after it. No problem; just go into 3Dview and do WKEY --> Flip name. There you have it -- a working mirror again.
::为了更改名称:首先编辑一个名字为Arm. 添加后 (_L或 _R). 然后将鼠标移动到名字字段并执行CTRL-CKEY. 你刚刚复制了骨的名称! 选择另一个骨,将鼠标移动到名字字段并执行CTRL-VKEY. 这将将名字粘贴. 但由于已经有相同名字的骨,Blender将在它之后添加. 001. 没有问题;只需进入3Dview并执行WKEY --> Flip name. 这样你就有了 - 一个工作的镜像. -
Mirror editing works using names. If you move a bone named blah_L and there is a bone named blah_R in the same armature, Blender will mirror the move you do to it, so make sure you follow name convention correctly.
::镜像编辑使用名称.如果你移动一个名为 blah_L 的骨头,并且在同一支中有一个名为 blah_R 的骨头,Blender 将会对你移动的镜像进行,所以请确保你正确地遵循命名规范. -
Then we can continue: extrude an other bone to make the lower part of the arm using EKEY or CTRL-LMB. The new set of bones should be arm_L.001 arm_R.001.
::然后我们可以继续:用EKEY或CTRL-LMB挤出另一块骨头来制造手臂的下部.新的骨头组应该是arm_L.001arm_R.001 -
Then we will add the legs. Up till now we have always worked from the tips of the bone. This is easy as Blender understands you want to create children of the selected bone, but to make the legs you need to extrude from the root of "Back". So go ahead, select the root of "Back" and do SHIFT-EKEY to start a pair of chains. Rename them to "leg"+suffix.
::然后我们将添加脚.到目前为止,我们一直从骨头的尖端工作.这很容易,因为Blender理解你想要创建所选骨头的子女,但要制作脚,你需要从"Back"的根挤出.所以继续,选择"Back"的根并执行SHIFT-EKEY来启动一对链.将它们重命名为"leg"+后. -
Now take note that doing so will not parent or connect the new bones to anything. We don't want it to be connected to the tip of "Back", it would look silly. But we want it to follow the body!
::现在请注意这样做不会使新骨头与任何东西产生或连接. 我们不希望它与"背"的尖端连接,这看起来很愚蠢. 但我们希望它跟随身体! -
The way to go is to parent the two legs we just created to the "Back" bone. The old way (pre 2.40) was to select all bone and select the parent manually in the drop down. In the new version, editmode and posemode have an
active bone
. The active bone is the last bone you selected. In this case we can't work with more than 2 bones selected. Select the child (a leg) then select the parent (Back) and Do CTRL-PKEY. A menu will popup asking
Connected
or
Keep offset
. For now use
Keep offset
. Do this for the other leg as well.
::现在的方法是将我们刚刚创建的两个脚与"Back"骨连接. 旧的方法 (在2.40之前) 是选择所有骨并在下拉窗口中手动选择父. 在新版本中,编辑模式和后置模式有一个活跃的骨. 活跃的骨是您选择的最后一个骨. 在这种情况下,我们不能使用超过2个已选的骨. 选择子 (一条腿),然后选择父 (Back) 并执行CTRL-PKEY. 一个菜单将弹出,要求连接或保持偏移. 目前使用保持偏移. 对另一条腿也这样做. -
it's also possible to remove parent easily. Select any bone you want to remove parent relation from and do ALT-PKEY. A menu will popup asking if you want to clear all or just to unconnect. Of course you don't need to select the parent and/or the child for this to work since any parent relationship will be cleared. So if you do that on a bone which is parent of 5 bones, then immediately all the children will be parentless.
::您也可以轻松删除父关系. 选择任何想要删除父关系的骨头,然后执行ALT-PKEY. 弹出一个菜单,询问您是否要清除所有或仅仅是切断连接. 当然,您不需要选择父和/或子,因为任何父关系都将被清除. 因此,如果您在一个骨头上做这件事,那么所有子都将无父. -
Extrude one more time to get a leg with 2 bones.
::挤出一次,得到一个有两根骨头的腿. -
Turn on the Stick display mode and enjoy your guy made of sticks!
::打开"棒子"显示模式,享受你用棒子做的男人!
-
Now you can go into Posemode and pose your guy as you want.
::现在你可以进入"假装模式", -
You can move the entire guy just by moving the "Back" bone, since this is how we built him. This bone is the highest in the bone hierarchy, "The daddy of all bones", you could say!
::仅仅移动"背"骨头就能移动整个人, 因为我们是这样建造他的. 这骨头是骨头层次中最高的, "所有骨头的父亲", 你也可以说!
FASTER WAY TO NAME YOUR BONES 1) Create one side of the armature complete with correct bone names like the way this tutorial describes. 2) Copy the side of the armature you just created and paste it on the opposite side to form a complete armature. 3) On the side that you just duplicated, your names would have numbers added to them. Now select each bone on 3D View and hit "W" then select "FLIP NAME". MAKE SURE YOUR PARENTING IS THE SAME AS THIS TUTORIAL DESCRIBES!
::快速命名你的骨头 1) 创建一个侧面的装甲完整正确的骨头名称,如这门教程描述的方式. 2) 复制的装甲的侧面,你刚刚创建和粘贴在对面形成一个完整的装甲. 3) 在您刚复制的一侧,你的名字将有数字添加到他们. 现在选择每一个骨头在3D视图,然后按"W"然后选择"翻转名字". 让你的父母是相同的教程描述!