Blender 3D:第四单元:与高级教程起飞
How to tell Blender: "use this armature to deform this mesh"
::如何告诉混合器:"使用这个具去变形这个网格"
The Armature Modifier
::具修饰器
Blender now has a Modifier stack (Editbutton, F9KEY). As such, we should use it over existing methods to pair mesh and armature, as the modifier stack is optimised and simple to use. Note: You don't need to parent the mesh to the Armature anymore. The only case you could need to do this would be animating the Armature object itself. Then the mesh should also follow the armature. In this case select mesh, then armature, and do CTRL-PKEY --> Object.
::混合器现在有一个修改器堆 (编辑按,F9KEY).因此,我们应该使用它在现有的方法对联网格和具,修改器堆是优化和简单的使用. 注意:你不需要父网格到具了.唯一的情况,你可能需要这样做是动画具对象本身.然后网格也应该跟随具.在这种情况下选择网格,然后具,并做CTRL-PKEY --> 对象.
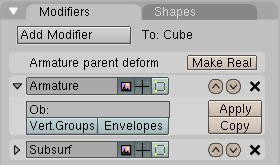
The clean way to do so is to go in the Editbutton window (F9KEY) and press "Add modifier" in the Modifier panel, then select "armature" in the dropdown menu. Then you'll get a new modifier "Armature" like the previous picture. Change the
OB:
field to the name of the armature object that should control the mesh. This step is very important! Without the armature object being defined, Blender won't know how to modify the mesh since there may be multiple armatures within your world. To limit the effect of the modifier, you can enter the name of a vertex group in the
VGroup
: field. This will minimize unwanted distortions in very dense meshes. There are also fields to enable/disable the modifier when rendering, enable/disable when working to only move the armature (could get handy with massive character), and when editing (that's very handy, you can edit the topology while it's deformed). There are also two toggles to tell Blender what it should use to deform: Vertex Groups and/or Envelopes. You may have noticed these options are repeated also in the Editbutton --> Armature panel, but as the tooltip says: these two are used when you use virtual modifier (the old way) to keep compatibility with old files.
::清洁的方式是进入编辑按窗口 (F9KEY) 并按"添加修改器"在修改器面板,然后在下拉菜单中选择"",然后你会得到一个新的修改器"",就像上图一样. 改变OB:字段到应该控制网格的对象的名字. 这一步非常重要! 没有定义对象,Blender 不知道如何修改网格,因为可能有多个在你的世界. 为了限制修改器的效果,你可以输入一个顶点组的名字在VGroup: 字段. 这将最大限度地减少非常密集的网格中不必要的扭曲. 还有字段可以在染时启用/禁用虚拟修改器,在只移动时启用/禁用虚拟修改器
Parenting the mesh to the "armature" will create an old-way link, still visible in the modifier stack, but not very useful. The first entry with the "make real" button is what appends if you do a CTRL-PKEY to "armature". You should not use that kind of connection when you see that. Press "make real" to get a working modifier.
::将网格关联到"armature"将创建一个旧式链接,在修改器堆中仍然可见,但不太有用.如果您在"armature"上执行CTRL-PKEY,则添加"使真实"按的第一个条目.当您看到这种情况时,您不应该使用这种连接.按"使真实"以获得工作修改器.
The Old Way
::旧的方式
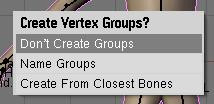
This way is not recommended but can still be useful. When doing CTRL-PKEY to "armature", you will get a menu like this:
::这种方法不推,但仍然可以有用.当 CTRL-PKEY 执行到"armature"时,您将得到这样一个菜单:
-
Don't Create Groups
will just create a virtual modifier so you can deform the mesh (the "make real" button)
::让我们来看看这个问题. -
Name Groups
is almost useless now as blender will create a group for you when you do weight painting.
::现在几乎无用了,因为当你做重量绘画时, 混合器会为你创建一个组. -
Create From Closest Bones
is a function to remember when you want to bake all your envelopes to vertex groups.
::创建从最近的骨头是一个函数, 当你想烤所有的信封到顶点组.
Tip: Bake envelope to vertex groups
::提示:将包裹到顶点组
The workflow is very simple. When you are done with the envelope's tweaking and you have gotten the best out of it, delete the Armature modifier and parent the mesh to the armature. To parent it, go to object mode, first select the mesh and then the armature, then press CTRL-PKEY. Select
Create From Closest Bones
.
::工作流程非常简单.当你完成了封面的调整,并且得到了最好的效果时,删除具修改器并将网格与具进行父式.为了父式,进入对象模式,首先选择网格,然后选择具,然后按Ctrl-PKEY.选择从最近的骨头创建.
Do ALT-PKEY and redo the Armature modifier. Now all the envelope influence are converted to Vertex Groups. This way you can further tweak influence zone using Weight paint. More info in the following pages.
::执行ALT-PKEY并重置具修改器.现在所有封面影响都转换为顶点组.这样您可以使用重量涂料进一步调整影响区域.更多信息在下面的页面.