Blender 3D:第四单元:与高级教程起飞
What is Envelope
::什么是信封
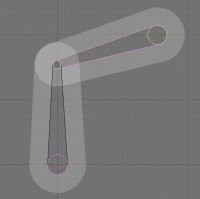
Envelope is a new visual tool to help you rig your characters faster and easier. It can often save you a lot of time. Each bone has a special area around it, allowing you to tell Blender what part of the geometry will follow each bone. This zone is customizable so you can move, scale and blend them together.
::封面是一个新的视觉工具,可以帮助你更快更容易地调整你的角色.它经常可以节省很多时间.每个骨头周围有一个特殊的区域,允许你告诉混合器哪部分的几何将遵循每个骨头.这个区域是可定制的,所以你可以移动,缩放和混合它们在一起.
Edit Envelope
::编辑封面
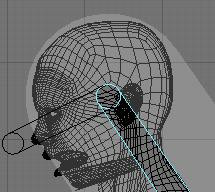
You can edit this white zone in Editmode or posemode by going in Envelope display mode (Buttons Window → Armature → Display Options → Envelope), selecting bones and using SKEY or CTRL-ALT-SKEY.
::您可以在编辑模式或 posemode 中通过进入封面显示模式 (按窗口 → 具 → 显示选项 → 封面) 编辑此白色区域,选择骨并使用 SKEY 或 CTRL-ALT-SKEY.
In Editmode:
you can select the Tip, the Body or the Root and scale using SKEY. This area in the middle will assign a weight of 1 to all vertices contained in here. All vertices with a weight of 1 will completely follow this bone. The white transparent area around the center is a zone of influence which loses power as you go away from the center. This area is scaled when selecting the body of a bone and doing CTRL-ALT-SKEY.
In Posemode:
You can only scale the zone of influence with ALT-SKEY when in Envelope display mode. It's real time, and lets you tweak the influence while you animate. So if you notice there is a vertex not following in the new pose you just did: Just select the bone it should follow, and scale the zone a bit until the vertex goes back with his friends. Example:
::在编辑模式:你可以选择尖端,体或根,并使用SKEY进行缩放.中间的这个区域将赋予所有包含在此中的顶点1的权重.所有权重为1的顶点将完全遵循这个骨头.中心周围的白色透明区域是一个影响区域,当你离开中心时会失去权力.当选择骨头的体并执行CTRL-ALT-SKEY时,这个区域会被缩放.在Posemode:只能在封面显示模式下使用ALT-SKEY进行影响区域的缩放.它是实时的,并且让你在动画时调整影响.所以如果你注意到有一个顶点不符合你刚刚做的新姿势:只需选择骨头,应该跟随它,并缩小区域一点,直到顶点与他的朋友一起回去.

Envelope Options
::封面选择
It's possible to enable/disable the use of Envelope in the Modifier stack using the "Envelope" toggle.
::通过使用"封面"切换, 可以在修改器堆中启用/禁用封面的使用.
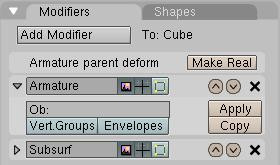
There are also two important buttons in the Armature Bones panel: Deform and Mult.
::装甲骨面板上还有两个重要的按:变形和多重.

Enabling the Deform button will tell Blender to deform geometry with this bone. It's useful because in a more complex rig not all the bones are there to deform, some bones are just there to move other bones.
::启用"变形"按将告诉Blender用这个骨头变形几何.这很有用,因为在一个更复杂的设备中,不是所有的骨头都在那里变形,有些骨头只是为了移动其他骨头.
The Mult option will tell Blender to multiply the weight it gets from envelope (let's say 0.7) with the weight you painted in weight paint (let's say 0.5). The result will be 0.5*0.7=0.35 so in fact you just tweaked the envelope influence to 0.3 when it was at 0.7. If you don't want vertices to be part of the zone, you can always paint it with 0, as 0*(something) will always give 0. This way you can give custom shape to your envelope. More on weight paint on next page.
::选择 Mult 选项将告诉 Blender 将从封面中得到的重量 (比如 0.7) 与你用重量涂料涂的重量 (比如 0.5) 乘以.结果将是 0.5*0.7=0.35,所以实际上你只是在 0.7 时调整了封面影响到 0.3. 如果你不希望顶点是区域的一部分,你可以随时用 0 涂上,因为 0*(something) 总是给出 0. 这样你就可以给封面定制形状. 下一页更多关于重量涂料.
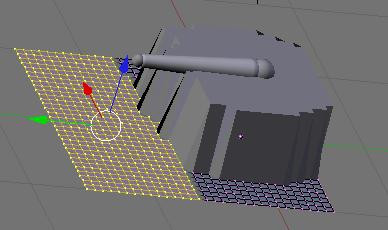
In this example of a formerly flat surface you can see that all the selected vertices are not following the bone when it is moved upwards. This is because I painted a weight of 0 on them. In weight paint you'll see nothing. But just the fact that they are part of the group with a weight of 0 will make that possible. If Mult is off and you have both a vertex group and envelope, Blender will add value.
::在这个以前平面的例子中,你可以看到所有选定的顶点在向上移动时都不跟随骨头.这是因为我在它们上画了0的重量.在重量涂料中你不会看到任何东西.但是仅仅是它们是0重量的组的一部分,这就使得这成为可能.如果Mult关闭,并且你既有顶点组和包裹,Blender将增加价值.