Blender 3D:第四单元:与高级教程起飞
What Are Vertex Groups?
::什么是顶点群?
Vertex groups are very useful. You can use a vertex group to:
::顶点组非常有用.你可以使用顶点组来:
-
Group vertices together while you model (keep a selection and come back to it later).
::在建模时将顶点组合在一起 (保留选择,然后再回来). -
Define which vertices softbody simulation affects.
::定义软体模拟影响的顶点. -
Define which vertices emit particles.
::定义哪些顶点会发射粒子. -
Define which part of a mesh will follow a specific bone.
::定义网格的哪一部分会跟随特定的骨头.
Vertex groups are specific to the Mesh object and can be modified in Editmode.
::顶点组是特定于Mesh对象的,可以在Editmode中修改.
If you have vertices assigned to multiple groups (for example, in a character you may have some vertices in the "upper arm" vertex group that are also in the "lower arm" vertex group), you can assign weights to those vertices to specify how much relative influence the different groups have. A weight can range from 0 to 1 and is assigned when you create the group. Let's take a peek at the GUI of vertex groups in the Editbutton(F9KEY):
::如果您有多个组的顶点 (例如,在一个字符中,您可能在"上臂"顶点组中有一些顶点也在"下臂"顶点组中),您可以为这些顶点赋值,以指定不同组的相对影响力.权重可以在0到1之间,并且在创建组时被赋值.让我们看一下编辑按中的顶点组的GUI:
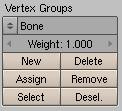
From top down:
::从上到下:
-
The dropdown menu lets you select an existing vertex group or rename the current one.
::让你选择一个现有的顶点组或更名当前的顶点组. -
The weight numfield lets you choose the weight value assigned when you add vertices.
::权重数字段允许您选择在加上顶点时分配的权重值. -
You can add a new group or delete the current one.
::您可以添加一个新组或删除当前的组. -
Assign or remove selected vertices to/from current group.
::将选定的顶点分配或删除到/从当前组. -
Select/deselect all vertices in current group.
::选择/取消当前组中的所有顶点.
Weight Paint
::标记的重量
As mentioned above, you may often find that you have some vertices that are assigned to more than one vertex group. By assigning weights, you can specify the relative influence each of the vertex groups have. You have two options to assign weights: 1) manually selecting each vertex and typing in a weight value, or 2) use weight painting to - you guessed it - paint weights.
::如上所述,你可能经常发现你有一些顶点被分配给多个顶点组.通过赋值,你可以指定每个顶点组的相对影响.你有两个选择来赋值: 1) 手动选择每个顶点并输入一个权重值,或 2) 使用权重绘画来 - 你猜到了 - 绘制权重.
Weight painting lets you paint weight values on the mesh like you were painting on a wall with a can of spray paint. It is a Mode of the 3Dview and is accessible in the 3Dview's header in the dropdown menu with Objectmode, Editmode and such. A hotkey is also available: CTRL-TABKEY.
::权重绘画允许你在网格上绘制权重值,就像你用喷涂油漆涂在墙上一样.它是3Dview的模式,可以在Objectmode,Editmode等下拉菜单中的3Dview的头部访问.还可使用快捷键:CTRL-TABKEY.
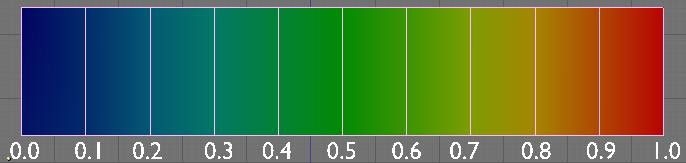
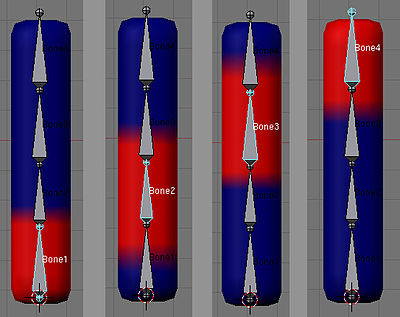
In Weightpaint Mode, the first thing you'll notice is the blue color of the mesh. Blender provides an easy way to quickly visualise the weight value of each vertex. This is the color spectrum used:
::在重量调色模式中,你首先会注意到的是网格的蓝色. 混合器提供了一个简单的方法来快速可视化每个顶点的重量值. 这是使用的颜色谱:
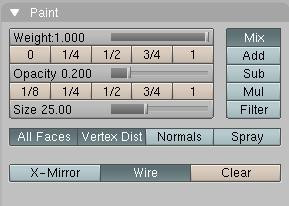
When you are in Weightpaint mode you can paint all over the mesh as if it was a solid object on your desk. The paint only works on vertices so don't try to paint in the middle of an edge or a face, it will never work. To help you in your task there is a new panel in Editbutton:
::当你在重量绘画模式下,你可以在网格上画画,就好像它是桌子上的固体物体. 油漆只能在顶点上工作,所以不要试图在边缘或面部的中间画画,它永远不会工作. 为了帮助你完成任务,在编辑按中有一个新的面板:
-
The weight slider is just the same thing as the weight numfield we saw earlier in the vertex groups button. It's just easier to work with. It's simply the weight you want to apply to the vertices. In painting terms, think of this as the color.
::权重滑块与我们在顶点组按中看到的权重数字段是一样的. 它只是更容易使用. 它只是你想要对顶点应用的权重. 在绘画术语中,把它想象成颜色. -
The buttons from 0 to 1 are shortcuts for weight value, to speed up the workflow.
::0到1的按是重量值的快捷方式, -
The opacity slider (and shortcuts) tell Blender what is the percent of the weight value you want to apply in one shot. If you set opacity and weight to 1 the vertex will turn red instantly. In painting terms, think of this as the pressure.
::度滑块 (和快捷方式) 告诉混合器你想要在一拍中应用的重量值的百分比.如果你将度和重量设置为1,顶点将立即变红.在绘画方面,把这当作压力. -
"All faces" tells Blender if you want to paint on all faces in the mesh or just the visible one.
::"所有面孔"告诉Blender你是否想在网格中的所有面孔上涂上画或只在可见面孔上涂上画. -
"Vertex Dist" tells blender to use vertex distance instead of faces. When active, the painting will only check if the vertex is in the brush, then apply a weight value. If it's off, all vertices part of the faces in the brush will receive weight value. Turning on Vertex Dist can give good results when you have a lot of polys in your mesh.
::"顶点分离"告诉混合器使用顶点距离而不是面.当激活时,画只会检查顶点是否在画笔中,然后应用一个重量值.如果关闭,画笔中的面部的所有顶点都将获得重量值.当您在网格中有很多聚合物时,启动顶点分离可以产生良好的结果. -
"Normals" will apply vertex normals before painting. This means Blender will take consideration of the direction the vertex is pointing when painting: the more it's facing away from view, the less it will receive value.
::"正常"将在绘制前应用顶点的正常值.这意味着Blender将考虑顶点在绘制时的方向:它越远离视线,它就越少获得价值. -
"Spray" really makes it like spraying paint. Without it, a single click will only paint one value. With Spray on, each time you move the mouse a paint shot will be added. To get a good effect, use a small opacity value so the weight will increase slowly.
::"喷涂"真的让它像喷涂油漆.没有它,单击只会绘制一个值. 喷涂,每次你移动鼠标将添加一个油漆. 为了获得良好的效果,使用一个小的不透明度值,所以重量将慢慢增加. -
"X-mirror" will tell Blender to apply the weight paint on the other group if there is one. Like Hand.L --> Hand.R. If you paint the group hand.L and there is a hand.R the paint will be copied over. For this to work your groups must be created, the name of the groups have to follow name's convention (left right) and both side of the mesh need to be identical.
::"X-镜"会告诉混合器如果有其他组,就把重量涂料涂在上面.如Hand.L --> Hand.R.如果你涂上组的hand.L,并且有hand.R,那么涂料将被复制.为了使这个组工作,你必须创建组,组的名称必须遵循名称的规范 (左右),并且网格的两侧都必须相同. -
"Wire toggle" toggles the visibility of wire while painting. Useful to find where the vertices are (activate the edit mode option "Draw all edges" to see even better).
::"线路切换"在绘画时切换线路的可见性. 很有用来找到顶点的位置 (激活编辑模式选项"绘制所有边缘"以更好地看到). -
"Mix"/"Add"/"Sub"/"Mul"/"Filter" is how you want to apply the paint based on what is already there. Mixing will do a mean from brute weight value and current weight value, "Add"/"Sub" will directly add or subtract value, "Mul" will multiply (exponential painting) and "Filter" will paint based on alpha value.
::"混合"/"添加"/"子"/"选"是你想要根据现有颜料来涂抹的颜料.混合将从粗重值和当前重值中得到平均值, "添加"/"子"将直接添加或减去值, "选"将乘以 (指数画) 和"选"将根据α值进行涂装.
Vertex Groups and Armatures
::顶点组和具
So what use are vertex groups in rigging? You can specify what vertices will move when a bone moves. When you want to paint a mesh for an armature, do the following:
::那么,顶点群在具中有什么用呢?你可以指定哪些顶点会在骨头移动时移动.当你想为具涂上网格时,请执行以下操作:
-
Make sure the Mesh has an Armature modifier.
::确保网格有一个装备修改器. -
Select the armature and enable Armature Posemode (CTRL-TABKEY).
::选择具并启用具位置模式 (CTRL-TABKEY). -
Select the mesh and enter Weightpaint mode (CTRL-TABKEY). (
Question: if we're in Pose Mode for the Armature, how are we supposed to select the mesh? Ans: right click on it.
)
::选择网格并进入重量调色模式 (CTRL-TABKEY). (问题:如果我们在具的姿态模式,我们应该如何选择网格?答:右键点击它.) -
Select the bone you want to paint for with RMB.
::选择你想要用人民币来画的骨头. -
Paint the parts you want that bone to affect.
::画出你想要骨头影响的地方.
You'll notice that, if there is no group created when you first paint, Blender will create a group for you, and give it the same name as the selected bone. This is important, because when the "Vert. Groups" toggle is on in the Armature modifier, Blender will try to match bones with Vertex Groups based on the same names.
::您会注意到,如果在第一次涂画时没有组,Blender会为您创建一个组,并给它与所选骨相同的名称.这很重要,因为当"Vert. Groups"切换在Armature修改器中启动时,Blender会尝试将骨与基于相同名称的Vertex Groups匹配.
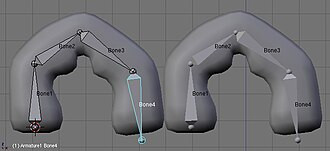
What happens when we try to blend groups together? See this simple example of 2 bones trying to bend a tube:
::试图将两组组合在一起会发生什么?

The Groups are painted so the body of each bone is in red and the zone between the two bones are gradually going from 1 to 0. This will bend nicely. If, for a special reason, you want a side to react differently, you can always move the bone while painting and try the new modification you just did. By the way, having Subsurf on while painting can be very cpu expensive. It's a good idea to turn it off.
::组是这样画的,每个骨的体是红色的,两个骨之间的区域逐渐从1到0变化. 这将很好地曲. 如果,由于特殊原因,你想要一个侧面的反应不同,你可以在画的时候移动骨,并尝试你刚刚做的新修改. 顺便说一下,在画的时候启动Subsurf可能会很昂贵. 关闭它是个好主意.
Using Weight Painting with Armatures
::使用具进行重量绘画
Armatures are used for many purposes, but one common use is to deform a mesh with an armature. This example will demonstrate how weight painting can improve armature-deformed meshes.
::具用于许多用途,但一个常见的用途是用具变形网格.本例将展示重量涂料如何改善具变形网格.
In this example, we have two objects; each has an armature modifier applied. The one on the left is going to be the "before" and the one on the right will be the "after".
::在这个例子中,我们有两个对象,每个对象都应用了具修饰器.左边的对象将是"之前",右边的对象将是"之后".
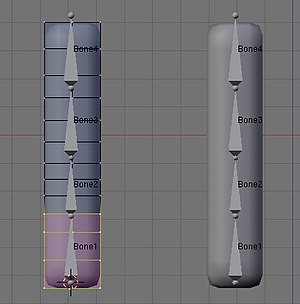
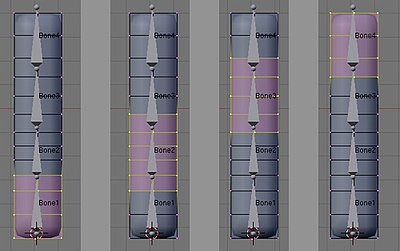
For the object on the left, take a look at the vertex groups as initially assigned (from left to right: Bone1, Bone2, Bone3, and Bone4). These same vertex groups were assigned for the object on the right:
::对于左边的对象,请看最初分配的顶点组 (从左到右: Bone1, Bone2, Bone3和 Bone4).这些相同的顶点组被分配给右边的对象:
Important:
A bone in an armature will only act upon those vertices that are in a vertex group with exactly the same name as the bone.
::重要:一个具中的骨头只会对与骨头完全相同名称的顶点组中的那些顶点产生作用.
-
In Blender 2.37 and previous, this was the ONLY way to get a bone to deform a mesh.
::在Blender 2.37和之前的版本中,这是唯一一种方法让骨头变形为网格. -
In Blender 2.40 and on, selecting the "Envelope" button in the armature modifier will allow bones to deform even if you haven't assigned any vertex groups yet.
::在Blender 2.40及以后,选择"封面"按将允许骨头变形,即使您还没有分配任何顶点组.
If you enter Weight Paint mode (CTRL-TAB with object selected) right after assigning the vertex groups, you can see that the vertex groups as assigned all have a weight of 1.0:
::如果在指定顶点组后进入重量绘制模式 (CTRL-TAB与对象已选),您可以看到所指定的顶点组都有1.0的重量:
OK: both objects have vertex groups assigned and they have armature modifiers. Let's grab a bone (select the Armature, CTRL-TAB to enter Pose Mode, select Bone4, GKEY to grab, and move) to deform the mesh. We haven't made the objects different from each other, so after moving their armatures in the same way . . there's still no difference. That's good.
::好吧:两个对象都有分配的顶点组,它们都有具修饰器.让我们抓住一个骨头 (选择具,CTRL-TAB进入姿势模式,选择 Bone4,GKEY抓住,并移动) 来变形网格.我们没有使对象彼此不同,所以在以同样的方式移动他们的具后......仍然没有区别.这很好.