Blender 3D:第四单元:与高级教程起飞
Shape Key?
::形状的关键?
Shape keys are modifications of the original mesh that you can animate and mix with each other. Previously called Relative Vertex Keys (RVK), one of their major uses is to create facial expressions.
::形状键是原始网格的修改,您可以动画并与其混合.以前称为相对顶点键 (RVK),它们的主要用途之一是创建面部表情.
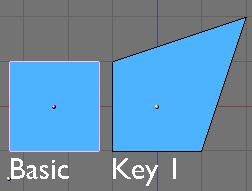
The idea behind Shape keys is simple. The basic, undeformed mesh you start with is the
"Basis"
shape. You can add a variety of different versions of this shape and store each one as a Shape Key for use in an animation (other software sometimes refers to these as "morph targets"). You can't add or delete vertices as Shape Keys only store the positions of vertices and not the creation/deletion of them.
::形状键背后的想法很简单.您开始的基本,未变形的网格是"基础"形状.您可以添加各种不同的版本的这个形状,并将每个作为动画中的形状键存储 (其他软件有时将其称为"形态目标").您不能添加或删除顶点,因为形状键只存储顶点的位置,而不是创建/删除它们.
Ok, to start out, take a plane. I'll add a new shape to it and move a vertex away:
::现在我们来看看一个平面.
When I play with the influence, this key has over the basic shape, the result will be as follows (0.5 in this example):
::结果如下: (在这个例子中为0.5)
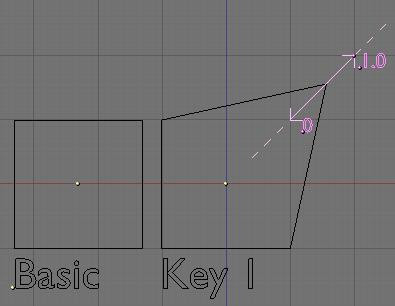
If I play with the slider from 0 to 1, Blender will gradually apply the Key 1 shape with a constantly varying amount of deformation. So from 0 to 1, it will slide from the basis shape to the Key 1 shape. The movement of the vertices is linear from start position to end position and you can even set an influence greater than 1 or lower than 0 and Blender will extrapolate the movements of the vertices relative to the basis shape (marked as a dotted line above). This feature allows you to set general shapes such as a smile and then exaggerate the shape without needing to remake it.
::如果我用滑块从0到1玩,Blender会逐渐应用 Key 1 形状,变形量会不断变化.所以从0到1,它将从基本形状滑向 Key 1 形状.顶点的运动是从开始位置到结束位置的线性,甚至可以设置比1大或低于0的影响,Blender会推断出顶点的运动相对于基本形状 (上面标记为点线).这个功能允许你设置一般形状,如微笑,然后夸大形状而不需要重制.
The GUI
::图形用户界面
Shape Keys step-by-step
::按的形状
Here's a hand-held walk-through of how shape keys are used.
::这里是手持的介绍如何使用形状键.
Start with the default cube or a more interesting mesh of your choice.
::首先使用默认的立方体或更有趣的网格.
1: Select your object in
Object mode
. Go to
F9 Editing
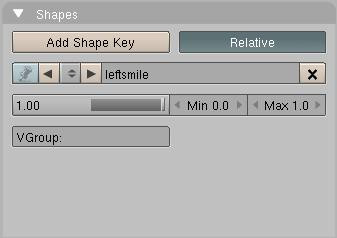
window. Find and select the "
Shapes
" panel. Press the "
Add Shape key
" button. This adds a key called "
Basis
" and this stores the "
basic
" mesh in its undeformed state. Make sure the "
Relative
" button is pressed (should be default).
::1:在对象模式中选择对象.进入F9编辑窗口.找到并选择"形状"面板.按"添加形状键"按.此添加一个称为"基础"的键,并将"基本"网格存储在未变形状态.确保按下"相对"按 (应该是默认的).
2: Press the "
Add Shape key
" button again. It now says "
Key 1
" and you have a slider and some other settings. Go into
Edit Mode
, grab a vertex and move it.
Exit Edit Mode
. The mesh returns to normal but you've just added a real Shape key and Blender has stored it.
::2:再次按"添加形状键"按. 它现在说"键1",你有一个滑块和一些其他设置.进入编辑模式,抓住一个顶点并移动它.退出编辑模式. 网格恢复正常,但你刚刚添加了一个真正的形状键和混合器已经存储了它.
3: Repeat step 2 for as many different shapes as you like. You can rename the keys to whatever you want. Normally you create each new shape by first selecting the "Basis" key but if you select an existing key from the list and immediately press "Add Shape Key" then enter Edit Mode, the mesh will already be deformed. This is useful for making similar but unique keys.
::3:重复第2步,尽可能多的不同形状.您可以将键重命名为您想要的.通常您首先选择"基础"键创建每个新形状,但如果您从列表中选择现有的键并立即按"添加形状键",然后进入编辑模式,网格将已经变形.这对于制作类似但独特的键很有用.
Using Shape Keys
::使用形状键
1: Starting on frame 1, select each key one by one from the pop-up list
(or go to the Action Window, press the sliders button and select the Keys from the list there)
and click on the slider and move the slider forward then back to zero. Sometimes just clicking on the slider at the zero point is enough to set the key.
::1:从1开始,从弹出列表中逐一选择每个键 (或进入"动作窗口",按滑块按并从列表中选择键),然后单击滑块,然后将滑块前进然后回到零.有时只需单击零点上的滑块就足以设置键.
2: Move forward ten frames, select Key 1 from the list and move the slider to 1.00. You'll see your object deform. Move more frames and slide another key. And so on and so on. You can move them forwards and/or backwards as you move through the frames and they'll just add together if they have to. Each time you move the slider, you set a keyframe for that Shape Key.
::2:向前移动10,从列表中选择键1并将滑块移动到1.00.你会看到你的对象变形.移动更多的并移动另一个键.等等.你可以在移动时将它们移动向前和/或向后,如果需要的话,它们就会加在一起.每次移动滑块时,你为该形状键设置一个键.

Setting Shape Keys
::设置形状键
IMPORTANT NOTE:
::重要提示:
You should add shape keys to a finished mesh. Don't work on a mirrored mesh or a partially finished model. Adding geometry (vertices, faces, loops, joining etc...) can result in the loss of the shape keys or to unpredicatable results. Not always, but probably when you least expect it. There are scripts available to make some of these things possible.
::你应该在已成网格中添加形状键.不要在镜像网格或部分完成的模型上工作.添加几何 (顶点,面,循环,连接等等) 可能导致形状键丢失或导致不可预测的结果.不是总是,但可能是你最不期望的时候.有脚本可以实现这些事情.
That's the basics. Note that shapes will constantly transform between keys so if you set a key at frame 1 to zero and at frame 10 you set the slider to 1 then at frame 5 the slider will be at 0.5 - which you may or may not want. If you want it to hold shape for a while before changing
(e.g. staying at zero until frame 7)
, you'll need to set a key at the beginning and end of the time frame you want it to stay the same
(So you would set it a zero at the start, then zero again at frame 7 then to one at frame 10)
. You can also edit the IPO curves
(use Shapes pop-up)
to really mess with the transformations.
::这就是基本原理.请注意,图形在键之间会不断转换,所以如果你在1设置键为零,在10设置滑块为1,那么在5滑块将在0.5 - - 你可能会或可能不想要.如果你想在改变之前保持形状一段时间 (例如,在零保持到7),你需要在时间框架的开始和结束设置键,你希望它保持不变 (所以你会在开始时设置为零,然后在7再次为零,然后在10变为一个).你也可以编辑IPO曲线 (使用Shapes弹出窗口) 来真正搞乱转换.