Blender 3D:第四单元:与高级教程起飞
Lip-Sync with Shape Keys
::使用形状键进行唇同步
Here I will attempt to explain my recent dealings with using Blender Shape Keys to produce convincing lip-sync (Lip-synchronisation, i.e.: "speech") for simple, humanoid characters.
::我将试图解释我最近使用混合器形状键来制作简单的人形角色的令人信服的唇同步 (唇同步,即"语音").
This is aimed at people with an understanding of Blender fundamentals like
vertex loops
,
face loops
,
sequencer
and of course, Blender's new
Shape Key
system. If these terms mean nothing to you, then you may well struggle to keep up. If you're familiar with them then I hope this tutorial will prove to be a breeze and your characters will be speaking so fluently you'll have trouble shutting them up!
::对于那些了解Blender基本原理的人来说,比如顶点循环,面孔循环,序列器,当然还有Blender的新形状键系统.如果这些术语对你来说毫无意义,那么你可能会很难跟上.如果你熟悉它们,那么我希望这门教程会证明是轻松的,你的角色会说得很流利,你会难以让他们闭嘴!
Other Lip-sync tutorials, if you can find them, recommend using other software like Magpie, Papagayo and others, but while I've no doubt they provide a valuable service and maybe make syncing easier, I will be using only Blender for this tutorial. I haven't tried using lip-sync software yet so I can't really say if it's easier or not.
::其他唇同步教程,如果你能找到它们,建议使用其他软件,如Magpie,Papagayo和其他,但我毫不怀疑他们提供了有价值的服务,也许使同步更容易,我将使用只有混合剂为本教程. 我还没有尝试使用唇同步软件,所以我不能真正说它是否更容易.
You will find links to interesting audio files you can use for testing animation and lip-sync near the bottom of the page.
::您可以在页面底部找到有趣的音频文件链接,
The hard work first
::首先是辛苦的工作
Setting up for Lip-Sync
::设置唇同步
First, set up your Blender screen so you have everything you need for this project. You'll need a front 3D Window, an Action Window, the Buttons Window (showing Editing - F9 - panels) and a Timeline Window. If you've got the room, a Side-view 3D Window would be handy too.
::首先,设置您的混合器屏幕,以便您有您对这个项目的所有需求.您需要一个前面的3D窗口,一个动作窗口,按窗口 (显示编辑 - F9 - 面板) 和一个时间表窗口.如果您有空间,一个侧面的3D窗口也很方便.
The basic sound units are called
phonemes
and the mouth shapes we use to represent these phonemes for lip-sync are called
visemes
(or sometimes, phoneme shapes)
and there are many references for these around the web. Legendary animator Preston Blair created one of the
most popular viseme sets
, which is great for cartoon-style characters. Other visemes are aimed at more-realist, humanoid characters. The shapes you choose depend on the style of your model.
(I'll try to provide some useful links later)
::基本的声音单位叫做音符,我们用来表示这些音符的口腔形状叫做视觉符 (或有时是音符形状),网络上有很多参考.传奇动画师普雷斯顿·布莱尔创建了最受欢迎的视觉符集之一,非常适合卡通风格的角色.其他视觉符的目标是更现实的人形人物.您选择的形状取决于您的模型的风格. (我会尝试提供一些有用的链接.
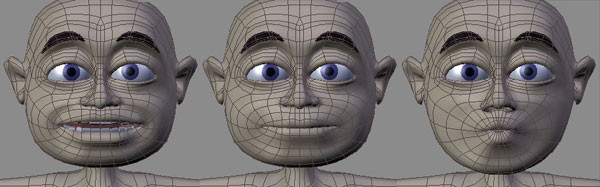
Sample viseme shapes.
::采样一个形状的面孔.
The first and most difficult step in good lip-sync is making the shape keys for these visemes. How well these are made ultimately determines the success of the animation and it is worth spending time getting them right, although they can be modified and tweaked later. So choose your favourite set of visemes
(or even look in a mirror and use your own face as a reference)
and start setting your keys. A model with good
topology
- especially well formed
edge loops
around the mouth area - will be a big help here!
::良好的唇同步的第一步和最困难的步骤是为这些视镜制作形状键.这些是如何做好的最终决定了动画的成功,值得花时间让他们正确,虽然他们可以被修改和调整后.所以选择你最喜欢的视镜 (甚至看镜子,用自己的脸作为参考) 和开始设置你的键.一个模型有良好的拓 - 特别是口腔区域周围形成的边缘环 - 将是一个很大的帮助!
What on Earth are topology and edge loops?!?!
::顶层和边缘循环是什么?
Topology refers to the way your 3D mesh defines the object, in this case your character's head. Edge loops refers to the flow of consecutive edges around the character's major features. Typically, good edge loops flow around the eyes and around the mouth in a somewhat deformed, "circular" manner. Selecting and deforming a single loop of edges and vertices surrounding a facial feature is much quicker than having to individually select a lot of edges that don't flow naturally around that feature. Similarly, deforming a single loop or collection of related, nested loops is much easier and quicker than trying to deform a seemingly random set of edges. You can easily see these loops in the character screenshots above. The series of edges surrounding the mouth simply stretch from wide ellipses to almost circular to create a useful variety of mouth shapes. The faces defined by paired edge loops are referred to as
face loops
. The close-up image below shows selected face loops.
::拓学是指你3D网格定义对象的方式,在这种情况下是你的角色的头.边缘环指的是围绕角色主要特征连续边缘的流动.通常,好的边缘环在眼睛和口周围以某种变形的"圆形"的方式流动.选择和变形围绕面部特征的边缘和顶点的单个环比必须单独选择许多不自然地围绕该特征流动的边缘要快得多.同样,变形一个单一的环或相关的,嵌套的环的集合要容易得多,比试图变形一个看似随机的边缘集要快得多.你可以在上面的截图中轻松地看到这些环.围绕口的边缘系列从宽的圆到几乎圆形的口径延伸到各种各
There are many tutorials on the web about these topics so if you need more information before proceeding then a quick search is probably a good idea.
::网上有很多关于这些主题的教程,
Setting the basic viseme shape keys
::设置基本的视图形状键
First, select your undeformed mesh and create your basis key. Go to
Editing
(F9) window and go to the "
Shapes
" panel. Press the "
Add Shape Key
" button. Enter and exit edit mode to set the basis key. Then create your first key
Key 1
and name it "M". Enter edit mode and if your character's mouth isn't already closed
(some people make them that way)
then close it by carefully selecting the faces and loops around the mouth. You will usually use Size-Z plus a bit of grabbing and shifting to achieve this. Don't forget to include the faces on the inside of the lips or the deformation will be unpleasant. When you're happy with the shape, exit Edit mode and there you have it. Your character can now say
"Mmmmmm"
whenever you like. Test it by moving the Shape Key slider back and forth but make sure to leave it at zero before making more keys.
(If you made your character with a closed mouth then you can just add the new "M" key then enter and exit edit mode to set it.)
::首先,选择您的未变形网格并创建您的基础键.进入编辑 (F9) 窗口,然后进入"形状键"面板.按"添加形状键"按.进入并退出编辑模式以设置基础键.然后创建您的第一个键1并命名为"M".进入编辑模式,如果您的角色的嘴巴还没有关闭 (有些人这样做),然后通过仔细选择嘴巴周围的面孔和循环来关闭它.通常您将使用Size-Z加上一些抓取和移动来实现这一点.不要忘记将嘴唇的内部面孔包括在内,否则变形将令人不快.当您对形状感到满意时,退出编辑模式,就在那里.您现在可以随时说"Mmmmmm"随时随意
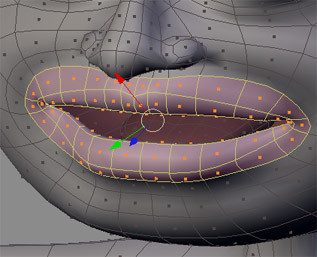
Selecting face loops
::选择面环
For most new keys, you will select the basis key first then press "
Add Shape Key
" then make the required shape from scratch in edit mode. However, some mouth shapes are very similar, like "OH and OOO" or "EE and SS" and it would be easier if you could start with something close to what you want rather than shifting everything from scratch every time. Luckily, Blender allows you to do just this. Once you've made your "EE" key, for example, you can select it and immediately press "
Add Shape Key
" then enter edit mode and the mouth will already be deformed and you only need to make subtle changes to it to make your "S" shape.
::对于大多数新键,你首先选择基础键,然后按"添加形状键",然后在编辑模式中从头开始制作所需的形状.然而,一些口形非常相似,如"OH和OO"或"EE和SS",如果你可以从接近你想要的东西开始,而不是每次从头开始转移,那就更容易了.幸运的是,Blender允许你这样做.例如,一旦你制作了"EE"键,你可以选择它,然后立即按"添加形状键",然后进入编辑模式,口就已经变形了,你只需要微妙地改变它以使它成为你的"S"形状.
Remember that the keys you make are for sounds, not letters.
In general, you'll need shape keys for the following sounds
::记住,你做的键是声音,不是字母.一般来说,你需要形状键的以下声音
-
M, B, P
::没有任何其他 -
EEE
(long "E" sound as in "Sheep")
::电子电气设备 (长"E"音像"羊"中的"E") -
Err
(As in "Earth", "Fur", Long-er" - also covers phonemes like "H" in "Hello")
::错误 (如"地球"",毛皮"",长" - 也包括"H"在"你好"中的音符) -
Eye, Ay
(As in "Fly" and "Stay")
::眼睛, (如"飞"和"留") -
i
(Short "I" as in "it", "Fit")
::i (简称"I"如"it","Fit") -
Oh
(As in "Slow")
:: (像"慢") -
OOO, W
(As in "Moo" and "Went")
::,W (如"Moo"和"Went") -
Y, Ch, J
("You, Chew, Jalopy")
::,, ("你,,") -
F, V
::没有
These can often be used in combination with each other and with jaw bone rotations and tongue actions to also produce other sounds like "S", "R", "T", "Th" and a short "O" as in "Hot" - or these can also be specifically made with their own shapes. This decision depends largely on your character. Start with the essentials and make others if you need them.
::它们通常可以与彼此结合使用,并与骨旋转和舌头动作一起使用,以产生其他声音,如"S","R","T","Th"和短的"O"如"Hot" - - 或者这些也可以专门用自己的形状制作. 这一决定在很大程度上取决于你的性格. 从基本开始,如果需要的话,再做其他声音.
NOTE:
I use one jawbone in my current character and this is also used to control the mouth shapes. It doesn't drive the shapes but it moves the bottom teeth and tongue
(which can also be controlled separately)
and the faces that make up the chin part of the character mesh. For some visemes, I move the jawbone into a logical position before adding the shape key. For example. I open the jaw for the "OH" key and close it for the "M" key. Later, when animating, the jawbone is animated along with the Shapes for a very convincing result.
::注意:我在当前角色中使用一个骨,这也用于控制口腔形状.它不驱动形状,而是移动底部牙和舌头 (也可以单独控制) 以及构成角色网的下巴部分的面部.对于一些视体,在添加形状键之前,我将骨移动到逻辑位置.例如.我为"OH"键打开骨,并关闭它为"M"键.后来,当动画时,骨与形状一起动画,以获得非常令人信服的结果.
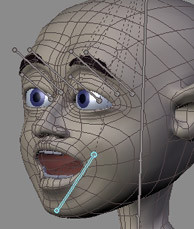
Using jawbone with shapes
::使用形状的骨
Load the audio
::载入音频
Once all your viseme shapes are set the time comes to get your character to speak.
(Normally you would animate the body first and leave the lip-sync till near the end)
.
::一旦你设置了所有形状, 现在是时候让你的角色说话了. (通常你会先动画身体, 让唇同步到接近结束时.
If you haven't already done so, load your audio file into a Blender
Video Sequencer Window
and position it where you want it. Currently, Blender only supports 16 bit wav format audio files so you may need some editing or conversion software to process the file if it isn't in this format. "Audacity" is a good, open-source (free) editor that will suit this purpose and much more.
::如果您还没有这样做,请将您的音频文件加载到Blender视频序列窗口中,并将其放置到您想要的位置.目前,Blender只支持16位 wav格式的音频文件,因此如果您不需要编辑或转换软件来处理该文件,则可能需要一些编辑或转换软件. "Audacity"是一个良好的开源 (免费) 编辑器,适合此目的和更多.
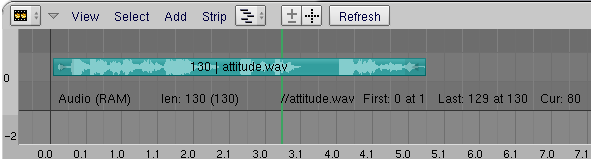
Blender Video Sequence Editor Window showing loaded Audio Strip
::显示已加载的音频带的Blender视频序编辑器窗口
Go to the Scene Window (F10) and press the "Sound block buttons" button --(in the three buttons near the frame counter. It looks like an audio wave)--. Press the "
Sync
" and "
Scrub
" buttons. The "
Sync
" button makes the playback in the 3D window closely match the audio when you press
Alt-A
(it does this by dropping image frames if necessary and it generally provides only a rough guide of how things match-up)
. The "
Scrub
" button is important for lip-sync as it means that whenever you change frames, Blender plays the audio at that point
(Currently in some Blender builds you have to press Alt-A at least once to get this feature to start working)
.
::进入场景窗口 (F10) 并按下"声音屏蔽按"按 - - 在计数器附近的三个按中. 它看起来像一个音频波. - - 按下"同步"和"擦拭"按. 当你按下Alt-A时",同步"按使3D窗口中的播放与音频密切匹配 (它在必要时通过放弃图像来实现这一点,并且通常只提供了对事情匹配的粗略指南). "擦拭"按对于唇部同步很重要,因为这意味着每当你更改时,Blender就会在那一点播放音频 (目前在某些Blender构建中,你必须至少一次按下Alt-A才能开始使用此功能).
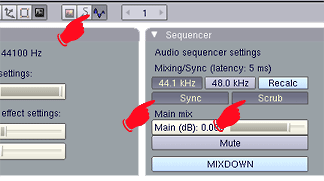
Blender Soundblock Panel
::混合器的声音屏幕
Select your character and your Shape Keys should be listed in the
Action Window
, in the order in which you made them
(I don't think they can be shuffled)
. You will see a small triangle button labelled "
Sliders
" at the top of the list - press it to show the sliders for each shape. If you drag the mouse back and forth in this window, you should hear the audio play as you cross frames. This is how you will identify the main viseme/phoneme key frames.
::选择你的角色,你的形状键应该在动作窗口中列出,按照你制作的顺序 (我认为它们不能被混合).你会看到一个小的三角形按标有"滑块"在列表的顶部 - 按它显示每个形状的滑块.如果你在这个窗口中向前向后拖动鼠标,你应该听到音频播放,当你跨越.这就是你如何识别主要的视觉/音声键.
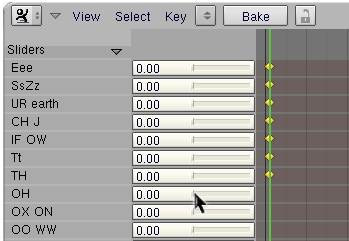
Shape Key Sliders
::形状键滑块
Getting down and dirty
::让下来和脏
Before you begin your lip-sync, you obviously need to know what your character says. It might be worthwhile writing it down and even speaking it over and over, in time with the audio, to get a feeling for the sounds you'll be dealing with. Some sounds are what I'll call "
key sounds
" and others are almost dead, non-descript "in-between" sounds that fill in the gaps between the key sounds. Obvious key sounds are those where the lips close and those where they are tightly pursed or wide and round, other key sounds can differ with every piece of audio. Don't make assumptions about the shapes you'll use based on the words you know are there. What you are animating are the actual sounds - not letters or words (
Keith Lango has much to say about this on his website and I recommend reading it
)
::在开始唇同步之前,你显然需要知道你的角色说的是什么. 写下来,甚至说一遍又一遍,与音频一起,有可能是值得的,以便你能感受到你将要处理的声音. 有些声音是我称之为"关键声音",而另一些声音则是几乎死亡的,无形容的"中间"声音,填补关键声音之间的空白. 显而易见的关键声音是嘴唇闭合的地方和紧紧合的地方或宽而圆的关键声音,其他关键声音可能与每一段音频不同. 不要根据你知道的单词对你将要使用的形状做假设. 你在动画的是实际的声音 - - 而不是字母或文字 (Keith Lango 在他的网站上有很多关于这个声音的说法,我建议你阅读它)
The Timeline Window
::时间表窗口
Go to the
Timeline Window
. This window seems to have been largely overlooked in previous documentation yet it provides the basics for timed animation plus a few other goodies to make your animation life a little easier. Here you can turn auto-keying on and off at will
(you'd normally go to the hidden
User Preferences
window which is a pain and easy to forget)
, navigate frames, play and pause the animation in the 3D window, turn Audio Sync on and off, set the start and end frames for the animation and
set frame markers
. This last feature is the key to our project.
::进入时间表窗口. 这一窗口似乎在以前的文档中被忽视了,但它提供了定时动画的基础知识以及其他一些好东西,使您的动画生活变得更容易. 在这里,您可以随意打开和关闭自动键 (通常您会进入隐藏的用户偏好窗口,这是一个痛苦和容易忘记的),导航,在3D窗口中播放和暂停动画,打开和关闭音频同步,设置动画的开始和结束和设置标记. 这最后一个功能是我们项目的关键.
In recent Blender releases,the audio "Scrub" feature works in most windows. As you scrub through the audio, listen for where the key sounds occur. As you hit a key sound, scrub back and forth to find where that sound commences. In the Timeline Window, press "
M
" to set a frame marker at this frame. The marker can be labelled by pressing CTRL-M in the Timeline Window while the marker is selected
(yellow)
. Enter a sensible name for the marker that indicates what the marker is for (
like the phoneme sound and/or which word it starts or ends
). Markers are selectable and moveable and can be deleted just like other Blender items.
::在最近的Blender版本中,音频"Scrub"功能在大多数窗口中都可用.当你在音频中擦拭时,听听关键声音的发生位置.当你击中关键声音时,往前擦拭,以找到该声音的开始位置.在时间表窗口中,按"M"设置该的标记.在时间表窗口中按CTRL-M时,标记可以被标记 (黄色).为标记输入一个明智的名称,说明标记是什么 (例如音名声音和/或开始或结束的单词).标记是可选的和可移动的,可以像其他Blender项目一样删除.标记是指标的标记,它可以被移动到其他标记.标记是指标的标记,它可以被移动到其他
NOTE:
Depending on the speed of your system, you may find you get more pleasing audio scrubbing and better 3D window playback if you turn off subsurf for your model and hide any unimportant parts of the scene on different layers. The fewer things Blender has to calculate as you scrub or play-back, the faster it can draw the frames to maintain sync with the audio.
::提示:根据系统的速度,如果您关闭模型的下面,并将场景的任何不重要的部分隐藏在不同的层上,您可能会发现您获得更令人愉快的音频擦洗和更好的3D窗口播放.当您擦洗或播放时,Blender必须计算的东西越少,它就越快地绘制以保持与音频同步.
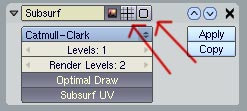
Turn off these buttons to disable subsurf setting in 3D window
::关闭这些按以禁用在3D窗口的下面的设置

Blender Timeline Window
::混合器时间表窗口
Scrub through the whole audio - or sections of it in a long piece - marking and labelling all the key sounds.
::通过整个音频或长段的部分, 标记和标记所有关键声音.
Setting the keys
::设置键
Now you have everything you need for your first lip-sync pass. Start at the first frame and click once on all your
Shape Key sliders
in the Action Window to
set them all to zero
. Move through the frames from start to finish setting shape keys where you marked the key sounds in the Timeline Window. If your character has a jaw bone and tongue bone(s), you will need to set these where required as you go.
::现在你有了你第一次口吻同步所需要的一切.从第一开始,在动作窗口中单击所有Shape Key滑块,将它们全部设置为零.从开始到结束,在时间表窗口中设置你标记关键声音的形状键.如果你的角色有下巴骨和舌头骨 (),你需要在需要的时候设置这些.
Trouble in paradise? A quick lesson in handling Shape Keys
::问题在天堂? 快速教训在使用形状键
If you haven't set shape keys before you might notice one interesting dilemma - they have great memories! Once you set a slider to any value, it stays at that value until you set another value somewhere. The shapes change in a linear fashion between keys. At first, this appears to be a problem if you want to key "MOO" because after you set the "M" key slider to 1 (one), it will stay there, making it impossible to get your character to say "OO" while his lips are trying to stay shut. So, you have to set the "M" slider on the "M" sound, then as the audio goes into the "OO" sound, you must set the "M" slider back to zero and then set the "OO" slider to its full value.
::如果你以前没有设置过形状键,你可能会注意到一个有趣的困境 - - 它们有很好的记忆!一旦你将滑块设置为任何值,它就会保持在该值,直到你在某处设置另一个值.在键之间,形状会以线性方式改变.一开始,这似乎是一个问题,如果你想键入"MOO",因为你将"M"键滑块设置为1 (一),它将留在那里,使得你的人物无法在他的嘴唇试图保持闭合时说"OO".所以,你必须在"M"声音上设置"M"滑块,然后当音频进入"OO"声音时,你必须将"M"滑块重新设置为零,然后将"OO"滑块设置为其全部值.
This introduces another problem. After you set the "OO" key, your "M" sound is messed up because the mouth is now also being affected by the "OO" shape that follows it. So, you must make sure the "OO" sound is set to zero when you want the lips closed in the "M" position.
::这又引发了一个问题.在设置"OO"键之后,你的"M"音响会变得混乱,因为嘴巴也会受到"OO"形状的影响.所以,当你想要嘴唇在"M"位置关闭时,你必须确保"OO"音响设置为零.
In general, you'll find yourself setting each shape 3 times
::总的来说,你会发现自己设置每一个形状3次
-
once to determine where you want the mouth to begin moving to this shape
(slider set to zero)
::一次确定你想要的嘴开始移动到这个形状 (滑块设置为零) -
once to set the slider at the desired level for this phoneme
::一次设置滑块在所需的水平为这个音符 -
and once more to end this shape and move into the next one
(slider set to zero)
::并且再次结束这个形状,并进入下一个 (滑块设置为零)
The same principle applies to the jaw bone and tongue - 3 keys to each move.
::对于下巴骨和舌头也适用同样的原理 - - 每次动作有3个键.

Setting multiple shape keys
::设置多个形状键
As you get more comfortable with this procedure, you'll find you can leave some shapes set longer or adjust them to different levels as they can provide some interesting mouth shapes when combined with other shapes.
::随着你对这种方法的了解, 你会发现你可以让一些形状设置更长时间, 或调整它们到不同的水平, 因为它们可以与其他形状结合时提供一些有趣的嘴巴形状.
Setting the in-between sounds
::设置中间声音
Once the key sounds are properly set, you should be able to scrub slowly through the Action Window and watch your character speak in time with the audio. It won't be perfect but it's a start. To fix his speech impediment, you now have to fill in the sounds between the key sounds. Mostly these will be dull vowel sounds
("err, uh, ah")
and silence. These shapes are set in exactly the same way but here you'll have to really watch the 3D view as you set the sliders. Try combinations of sliders like "EE" and "OH" to get the perfect shape for each individual sound. You have to be guided by your character. Does he look like he's saying the sound you're hearing?
(Remember that exactly what's being said is not important - it's only the sound that matters)
. Test each sound as you set it by scrubbing a few frames over and over and watching your character mouth the sounds.
::一旦关键声音被正确设置,你应该能够慢慢地通过动作窗口,并观看你的角色与音频同时说话.这不会是完美的,但这是一个开始.为了修复他的语音障碍,你现在必须填写关键声音之间的声音.大多这些将是无聊的母音 ("err, uh, ah") 和沉默.这些形状是以完全相同的方式设置,但在这里你必须真正看3D视图,你设置滑块.尝试滑块的组合,如"EE"和"OH"以获得每个单独的声音的完美形状.你必须由你的角色指导.他看起来像他说你听到的声音吗? (记住,正确的说法并不重要 - - 它只是声音的重要).每个声音测试,你设置它通过擦几和
All that's left, hopefully, is some polishing and tweaking. If it's not perfect then don't despair. Like other areas of animation, it can take a while to get a feeling for lip-sync and as the tools and workflow become more familiar you can pay more attention to the important work.
::现在只剩下一些磨练和调整. 如果它不完美,那就不要绝望. 像其他动画领域一样, 需要一段时间才能感受到唇同步, 随着工具和工作流程变得更加熟悉, 你可以更加关注重要的工作.
Putting it all together
::让所有这些东西在一起
When you're reasonably happy, it's time to combine the audio and video and watch the result. Since Blender can't do muxing (combined audio/video) you'll need to composite it with the editing software of your choice (OSX users can use recent versions of iMovie, virtualDub is often recommended for Windows users and Avidemux2 is often recommended for Linux users.).
::当你相当满意时,是时候将音频和视频结合起来,看看结果了.由于Blender不能做 muxing (组合音频/视频),你需要用你选择的编辑软件来编译它 (OSX用户可以使用最新版本的 iMovie,Windows用户通常会推 virtualDub,Linux用户通常会推 Avidemux2).
What Blender can do is provide a
fully synced
version of the audio file the same length as the animation - even adding silence at the start and end if need be to maintain the synchronisation. To make this synced audio file, go back to the "Sound block buttons" panel and press "
MIXDOWN
". This saves a .wav file using the filename and location you entered in your output box
(you did didn't you?)
plus a frame count
(something like 'speech.avi0001_0400.wav')
. Then save your animation by pressing the "
ANIM
" button.
::混合器可以提供与动画相同长度的音频文件的完全同步版本 - 如果需要,甚至在开始和结束时添加静音以保持同步. 要创建这个同步的音频文件,请回到"音频块按"面板并按"MIXDOWN". 这将保存一个.wav文件,使用您在输出框中输入的文件名和位置 (您是不是?),加上数 (类似于'speech.0001avi_0400.wav'). 然后通过按"ANIM"按保存动画.
Combine the audio and video in your video editor and export a muxed file. You may find when you play it back that the mouth seems to be just slightly out of sync. This may be for two reasons: You're syncing per frame, the sound doesn't start exactly at a frame. The second reason is the way the brain processes faces and expressions and mixes it with sounds heard to comprehend speech. This comprehension phenomenon is barely understood and is a common challenge in animation, and some physiologists think our brains read lips and facial expression as a way of setting up to understand the context of sounds received and comprehending the meaning behind language. To solve it, you can go back into Blender, select the audio in the Sequencer Window and move it one or two frames later, then press "MIXDOWN" again to create a new .wav file with a split second of silence at the start. Remix this with your video and watch the results.
::您可以将视频编辑器中的音频和视频结合起来,并导出一个 muxed 文件. 您可能会发现,当您播放它时,嘴巴似乎略有失调. 这可能是由于两个原因:您在同步每,声音并没有完全在一个开始. 第二个原因是大脑处理面部和表情的方式,并将其与听到的声音混合起来以理解语音. 这种理解现象几乎不被理解,是动画中的一个常见挑战,一些生理学家认为我们的大脑读唇和面部表情是了解接收声音的上下文和理解语言背后意义的设置方法. 为了解决这个问题,您可以回到 Blender,在序列窗口中选择音频并将其移动一两个后,然后再次按"MIXDOWN"创
From here on its all a matter of testing and tweaking until you're happy!
::现在,一切都只是测试和调整, 直到你满意!
Using Blender to render Audio AND Video TOGETHER.
::通过使用Blender来将音频和视频一起染.
Ever since Blender 2.3, it has been possible to render video with the audio attached. Once you have your animation done, and are ready to render: In the buttons window, click scene (F10). In the format tab, choose FFMpeg. There will now be three tabs. Click on Audio. Click Multiplex, and choose your audio codec. Click Video. Choose your video codec (including AVI). Now, in another section of the window, there will be an Anim tab. Click Do Sequence. And click ANIM. When you watch the video, you'll notice that it has sound.
::自从Blender 2.3开始,就有可能将视频与附加的音频进行染.一旦你完成了动画,并准备染:在按窗口中,点击场景 (F10).在格式选项卡中,选择FFMpeg.现在将有三个选项卡.点击音频.点击多重,并选择你的音频编解码器.点击视频.选择你的视频编解码器 (包括AVI).现在,在窗口的另一个部分,将有一个动画选项卡.点击执行序列.然后点击ANIM.当你观看视频时,你会注意到它有声音.
Note: The mac version of blender doesn't have the FFMpeg codec in blender by default.
::注意:Mac版本的混器默认没有FFMpeg编解码器.
Audio Files
::音频文件
You can find some interesting audio files selected for animators at
[1]
animationmeat. These files come complete with a pre-marked phoneme sheet.
::您可以在 [1]animationmeat 找到一些有趣的音频文件,这些文件附带了预先标记的音频表.
Note
::标记
One final note. Watch how the pros do this. When actors are doing voice overs for major releases their actions are recorded and even integrated into the final animation. If you have a digital camera, you may also try recording your own mouth performing your dialogue and approximating its positions to your animation. This can give you a great visual reference, possibly frames for frames if your frame rates match, and save you time.
::最后一点. 看看专业人士是如何做到的. 当演员在主要的发行中进行代言时,他们的行为被记录下来,甚至被整合到最终的动画中. 如果你有数码相机,你也可以尝试录制自己的口中执行对话并将其位置与动画相近. 这可以给你一个很好的视觉参考,如果你的率匹配,可能是对,并节省你的时间.