Blender 3D:第四单元:与高级教程起飞
If you think you already know what a
rig
is, then you probably need to read the definition of
"rig"
and
"rigging"
before we get started. It's important to note that an armature is not a rig, but a rig can be an armature. Assigning a mesh to be deformed by an armature is not rigging.
::如果您认为您已经知道什么是钻机,那么您可能需要阅读"钻机"和"造"的定义,然后我们就开始了. 重要的是要注意的是,具不是具,但具可以是具. 分配网格被具变形并不是造.
A
rig
should always be designed for the types of animations your character is going to be performing. Only make your rig as complex as it needs to be to allow for the types of actions you need.
::机器应该适合你角色要表演的动画类型. 只要让你的机器尽可能复杂,以允许你需要的动作类型.
To make everything with the armature easy to deal with, we're going to make our character in the crucifix pose. If he's not, you will have headaches trying to deal with bone roll angles. Once Blender can easily allow the user to roll the bone to align with a roll target, then I'll edit this tutorial for that. But in the meantime, we will use vertical legs and horizontal arms. We will build the legs from the side view and arms from the top view.
::为了让所有关于具的东西都更容易处理,我们将把角色放在十字架姿势中.如果他没有,你会因为处理骨滚转角度而头疼.一旦Blender可以轻松地让用户滚动骨以对齐滚转目标,那么我会为此编辑这个教程.但与此同时,我们将使用垂直的腿和水平的手臂.我们将从侧面视图构建腿,从顶部视图构建手臂.
Center the cursor (shift+c) and add an armature. In
Object Mode
, press alt+r to clear the rotation. You have to have a bone for the hip, and it needs to stick out of his front or his back, so take your pick, because they both look bad. Don't point the bone upward at some odd angle, we need to be able to roll the hips easily, and to that end, we will place the bone horizontally.
::转动的位置是:指向前方的位置. 转动的位置是:指向前方的位置. 转动的位置是:指向后方的位置. 转动的位置是:指向前方的位置. 转动的位置是:指向后方的位置. 转动的位置是:指向前方的位置. 转动的位置是:指向后方的位置. 转动的位置是:指向前方的位置. 转动的位置是:指向后方的位置. 转动的位置是:指向前方的位置. 转动的位置是:指向后方的位置. 转动的位置是:指向前方的位置. 转动的位置是:指向后方的位置. 转动的位置是:指向前方的位置. 转
In front view, place the cursor and add a bone.
IMAGE
::在前景中,放置光标并添加一个骨头.
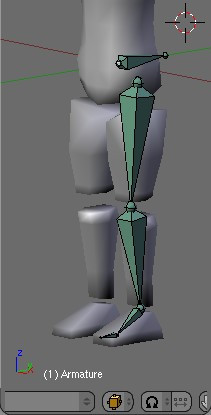
In side view, move points and extrude them until your chain looks like this. Note the slight bend in the knee. This is very important!
IMAGE
::侧面看,移动点并挤出它们,直到你的链子看起来像这样. 注意膝盖的轻微曲. 这非常重要!
Snap your cursor to the root of this chain (shift+s) and add a bone. Now select the points at the hip joint and the ankle joint, and snap the cursor to the selection.
IMAGE
::现在选择关节和脚关节的点,并将光标点击到选择.
Select the tip of the newest bone and snap it to the cursor.
IMAGE
::选择最新的骨头的尖端,并把它按到光标.
Now give these bones some names. It's a good idea to use the same names I do to avoid confusion, since I will refer to the bones by name. Select upperleg.l and then shift+select leg.l, and press ctrl+p to make upperleg.l the child of leg.l. Do this again, but make leg.l the child of hip.
IMAGE
::现在给这些骨头一些名字. 为了避免混,使用我给的相同名字是个好主意,因为我会用名字来指代骨头. 选择 upperleg.l 然后shift+select leg.l,然后按ctrl+p使upperleg.l成为leg.l的子. 再做一次,但让leg.l成为hip的子.
In front view, center your cursor and select
::在前景中,将光标放在中心,然后选择