Blender 3D:第四单元:与高级教程起飞
In order to simulate a laser beam which is cutting through a steel plate, we have in Blender (at least) two possibilities:
::为了模拟一个穿过钢板的激光束, 在Blender中我们有 (至少) 两个可能性:
-
an animated Mesh with many Shapekeys
::一个带有许多Shapekeys的动画网 -
an animated texture
::动画质感
The latter method is considerably easier to implement and the result is nevertheless convincing enough. We will proceed as follows:
::后一种方法的实施要容易得多,但结果却足够令人信服.我们将如下进行:
-
You need an animated alpha mask for the points at which the metal is changed. For this use a text object as a path. A cube follows the path and emits a particle system. The results are rendered as animation and the images stored.
::对于金属的变换点,你需要一个动画的alpha面具.为此,使用一个文本对象作为路径.一个立方体遵循路径并发射一个粒子系统.结果被染为动画和存储的图像. -
Then load these pictures and use them as an animated texture on a plane.
::然后将这些图片加载到飞机上, -
With a second particle system the sparks are simulated.
::通过第二个粒子系统, 模拟火花. -
With a third particle system we simulate the annealing of the weld. Again, this sequence is used as an animated texture.
::通过第三个粒子系统,我们模拟了接的化. -
Smoke is created with a fourth particle system.
::烟雾是通过第四颗粒子系统产生的.
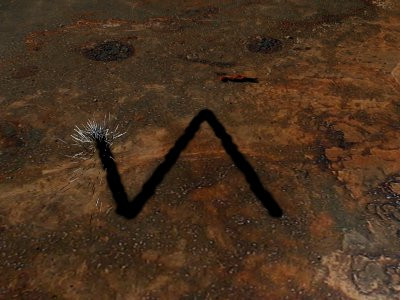
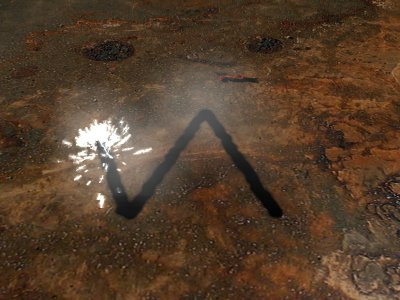
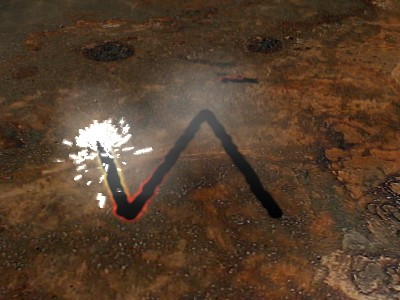
The result is shown in
Fig. 1
.
::结果如图1所示.
This guide is based on the well-known tutorial
Cutting Through Steel
, but remade with the current Blender particle system and with constraints. You need to have basic knowledge of Blender.
::这本指南是基于众所周知的"切割钢铁"教程,但使用当前的Blender粒子系统和限制重新制作.您需要对Blender有基本的知识.
Creating the Alpha-Map
::创建阿尔法地图
-
Start Blender. Save your file. Delete the cube.
::启动混合器,保存文件,删除立方体.
We should save the file right at the beginning, because we will save the animated textures in subdirectorys to the current directory. Particle caches are also created as subdirectorys.
::我们应该在开始时保存文件, 因为我们将在子目录中保存动画纹理到当前目录. 粒子缓存也被创建为子目录.
-
Set the
End
value to 150 in the
Anim
panel of the
Render
buttons. This allows you to specify the total length of the animation.
::在染按的动画面板中设置 End 值为 150. 这允许您指定动画的总长度. -
In the
Output
panel use "//AlphaMap/" as output directory. When we render the animation the images are than saved in the subdirectory "AlphaMap" to the current directory.
::在输出面板中使用"//AlphaMap/"作为输出目录.当我们染动画时,图像将被保存到当前目录的子目录"AlphaMap".
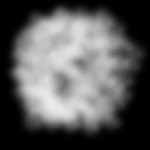
The animated alpha map consists of gray-scale images whose luminance information is used to calculate the mask. Bright pixels produce transparency, dark pixels remain opaque.
::动画的α地图由灰度图像组成,其亮度信息用于计算面罩.明亮的像素产生透明度,暗色的像素保持不透明.
-
Use
PNG
as output format. This avoids compression artifacts wich occur with the JPEG format.
::使用 PNG作为输出格式. 这样可以避免JPEG格式出现的压缩缺陷.
I've left the resolution at 800x600, but you need to set your desired resolution here.
::我已经把分辨率设置为800x600, 但你需要在此处设置你想要的分辨率.
-
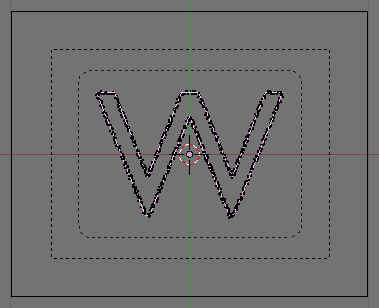
Create the shape you want to cut out as Curve object, or use a text object and convert this to a curve. I've done the latter, I've used a text-object (a "W"), and converted this to a Curve object (
Object-> Convert Object Type ...-> Curve
).
::创建你想要切出的形状作为曲线对象,或使用文本对象并将其转换为曲线. 我已经做了后者,我使用了文本对象 (一个"W"),并将其转换为曲线对象 (对象->转换对象类型...->曲线). -
With the function
Center
in the
Curve and Surface
panel I've brought the object in the middle of the 3D-coordinate space.
::我将物体置于3D坐标空间的中间. -
The filling of the object is not needed here, therefore activate the option
3D
for the curve object, even though the object should remain two-dimensional.
::填充对象在这里是不必要的,因此激活3D选项的曲线对象,即使对象应该保持二维.
Now we need again a cube. The cube will follow the curve. It's particle system will create a glowing trail, that is later used as alpha map.
::现在我们需要一个立方体. 它的粒子系统将会产生一个发光的痕迹,
-
Insert a cube.
::插入一个立方体. -
Scale the cube as small as the track of the laser beam (the welder) shall become.
::缩小立方体,使得激光束的轨迹变得小. -
Select the cube, than also select the curve object with
Shift-RMB
.
::选择立方体,然后使用Shift-RMB选择曲线对象. -
Ctrl-P
->
Path Constraint
creates a
Follow Path
constraint.
::创建一个"跟踪路径"的约束. -
Select only the cube and activate the option
CurveFollow
in the
Constraints
panel in the
Object
buttons.
::选择只有立方体,并激活在Object按中的CurveFollow选项.
If you press
Alt-A
now and let run the animation, the cube will follow the shape of the curve object, but not necessarily in the desired direction and not from the desired location. So some work needs to be done:
::如果现在按下Alt-A,然后让动画运行,立方体将遵循曲线对象的形状,但不一定是向所需的方向,也不是从所需位置.所以需要做一些工作:
-
Change to the
Edit
mode of the curve object.
::转换为曲线对象的编辑模式. -
Curve->Toggle Cyclic
opens the curve object, by adding (
Subdivide
) of one or more control points you achieve the desired movement.
W
->
Switch Direction
reverses the direction of the motion of the cube.
::曲线->转换循环打开曲线对象,通过添加 (分类) 一个或多个控制点,您可以实现所需的运动. W->切换方向反转立方体运动的方向.
By adding a
Time
Ipocurve to the curve you could set the duration and speed of the animation, but I've left the preset duration of 100 Frames. The last 50 Frames the path will glow a bit and the smoke will vanish.
::通过添加一个时间低曲线,你可以设置动画的持续时间和速度,但我已经留下了100的预设持续时间.最后50的路径会发光一点,烟雾会消失.
-
Add a particle system to the cube, call this
Alpha
.
::加入一个粒子系统,称之为阿尔法. -
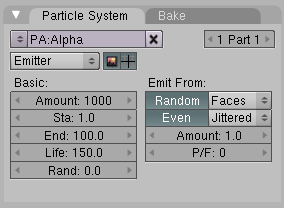
Set the particle lifetime to 150 (or higher) (
Fig. 2b
). The particles will live the entire length of the animation.
::设置粒子寿命为150 (或更高) (图2b). 粒子将在动画的整个长度内存活. -
Bake
the particle animation.
::让我们做个粒子动画.
-
The cube gets a material:
-
Halo
::哈洛 -
RGB 1/1/1, that is completely white
::完全是白色的 -
XAlpha
::没有 -
HaloSize:
0.03
::体大小: 0.03 -
Hardness:
40
::硬度: 40
::立方体得到一个材料:Halo RGB 1/1/1,这是完全白色的XAlpha HaloSize:0.03 硬度:40 -
Halo
I want to achieve with these settings, that we will get a grayscale image, that is completely white where the material shall become transparent. We don't need partial transparency, since a relatively sharp cutting edge shall be created. Slight irregularities in the periphery are wanted.
::通过这些设置,我们将得到一个灰度图像,它是完全白色的,材料将变得透明. 我们不需要部分透明,因为将会产生相对利的切削边缘. 需要在外围的微小不规则.
To render the animation, the camera is centered directly over the object.
::为了呈现动画, 摄像头的中心正是对象.
-
View->Top
::查看->上方 -
Strg-Alt-Num0
sets the camera to the current view. Select the camera.
::设置相机到当前视图. 选择相机. -
With the
Transform Properties
panel in the 3D-window (
Object->Transform Properties
) set the coordinates of the camera exactly vertically above the center of the 3D window (X/Y=0).
::在3D窗口中的"转换属性"面板 (Object->转换属性) 中,设置相机的坐标,在3D窗口的中心上方 (X/Y=0) 垂直地. -
In the
Editing
buttons of the camera set the option
Orthographic
in the
Camera
panel. Scale the size of the animation with the
Scale
value.
::在相机的编辑按中,在Camera面板中设置正写选项.使用Scale值缩放动画的大小. -
The world color to black in the
World
buttons.
::在世界按中将世界颜色变为黑色. -
Render the animation.
::提供动画.
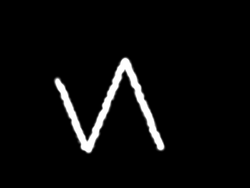
Blender now generates an image sequence from 1 to 150 in the subfolder
AlphaMap
(
Fig. 2c
).
::现在Blender将在AlphaMap子文件 (图2c) 中生成1到150的图像序列.
Welding sparks
::接火花
Now we'll create a new scene, in which the different effects are joined.
::现在我们将创建一个新的场景,
-
Rename your current scene to
AlphaMap
.
::现在的场景改名为AlphaMap. -
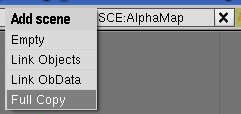
Create a new scene as
FullCopy
(
Img. 3a
). Name this new scene
Cutter
.
::创建一个全副本 (图3a) 的新场景. 命名这个新的场景切割.
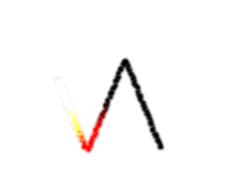
The welding sparks are created using a particle system.
::接火花是使用粒子系统创建的.
-
Add a
UVSphere
with 16 segments and 16 rings.
::增加一个UVSphere 16个段和16个环. -
Delete the lower half of the sphere in Edit Mode and scale it to approximately the same size as the cube.
::在编辑模式下删除球的下半部分,并将其缩小到与立方体大小相同. -
Switch to Object Mode.
::切换到对象模式. -
Select the cube in addition to the sphere. Copy the
Follow-Path
-Constraint from the cube to the sphere.
::选择除球外的立方体. 将跟踪路径约束从立方体复制到球.
Note that you copy attributes from the active to the selected objects. The active object is the one you've selected last
::注意,您将从活动对象的属性复制到已选对象. 活动对象是您最后选择的对象
Noob Note:
Using Blender 2.65, the easiest way I found to do this was to use the '3D View: Copy Attributes Menu' addon. (To enable the addon press Ctrl+Alt+U to bring up User Preferences, click the 'Addons' tab, type 'copy' into the search box, located at the top left of the tab, and put a check in the box to the right of the addon that's found, '3D View: Copy Attributes Menu'.) First RMB click the sphere, then Shift+RMB click the cube, the one with the follow path constraint. With the 2 selected press Ctrl+C and choose 'copy object constraints' from the popup menu. If the sphere gets offset in the process, just move it manually to the position of the cube or the first waypoint on the path.
::笔记:使用Blender 2.65,我发现最简单的方法是使用'3D View: Copy Attributes Menu'附加组件. (为了使附加组件按Ctrl+Alt+U引出用户偏好,点击'Addons'标签,在标签的左上方的搜索框中输入'复制',并在找到的附加组件的右边的框中放置一个选号,'3D View: Copy Attributes Menu'.) 首先点击RMB球,然后点击Shift+RMB立方体,即带有跟踪路径约束的立方体. 按Ctrl+C选中的2个选项,并从弹出的菜单中选择'复制对象约束'. 如果在进程中得到的立方体被复制,请手动将其移动到

-
Create a particle system for the sphere.
-
Name
Sparks
::名称: 斯帕克 -
Amount:
4200
::额度: 4200 -
Life:
5
::生命: 5 -
Emit From:
Random/Verts
::发出来自:随机/绿色 -
Normal:
0.757
::正常: 0.757 -
Random:
0.397
::随机: 0.397 -
Rotation Random:
0.116
::随机转换:0.116 -
AccZ:
-1.37
::: -1.37 在
::创建球体的粒子系统. 名称 闪电量:4200 生命:5 发射:随机/ 垂直 正常: 0.757 随机: 0.397 旋转 随机: 0.116 电流: -1.37 -
Name
Sparks
Except for the lifetime the values are relatively arbitrary, I have just experimented with the values until I was halfway satisfied with the results. The sparks have a slight acceleration in negative Z direction to sink down.
::只有在生命周期的值是相对任意的,我只是试验了这些值,直到我对结果感到满意.火花在负Z方向有轻微的加速下沉.
-
Visualization:
-
Line
(which corresponds as much as possible to the setting
Vect
in the particle system before 2.46)
::线 (尽可能与2.46之前的粒子系统中的设置向量相对应) -
Speed
::速度 -
Back:
0.04
::背部:0.04 -
Front:
0.0
::前部:0.0
::图像化:直线 (尽可能与2.46之前粒子系统中的设置向量相对应) 速度:后方:0.04 前方:0.0 -
Line
(which corresponds as much as possible to the setting
Vect
in the particle system before 2.46)
You achieve a long spark with these settings.
::通过这些设置,
-
Bake
the particles. Change to the
Bake
panel and click on the
Bake
button. The particle animation is now permanently saved.
::烤颗粒. 转到烤面板,点击烤按. 颗粒动画现在永久保存.
The
Bake
end value is also the final value for the normal particle animation, even if you don't bake. If you need more than 250 frames, you need to increase this value.
::结尾值也是正常粒子动画的最终值, 即使你不. 如果你需要超过250, 你需要增加这个值.
Using the alpha map on an object
::在对象上使用alpha地图
The alpha map is now used as texture on a plane. Therefore we have to position the texture exactly like the previously rendered animation, so that the sparks run in sync with the blending out of the plane.
::现在的alpha地图被用作平面上的纹理. 因此我们必须把纹理定位得与之前染的动画完全相同,
-
Add a new plane to your scene (
Add->Mesh->Plane
).
::添加一个新的平面到你的场景 (Add->Mesh->Plane). -
Scale the plane at about twice it's size - as big as you need it for the final shot.
::飞机的尺寸大约是它的两倍 - - 足以完成最后一张镜头.
The main problem is now to fit the texture exactly to the plane. We will give the plane UV coordinates, than fit the plane to the ratio of the texture and finally adjust the position in the 3D window with UV coordinates.
::现在主要的问题是要把纹理完全贴合到平面上. 我们将给平面UV坐标,然后把平面贴合到纹理的比例上,最后用UV坐标调整3D窗口中的位置.
-
Switch to
Draw Type Textured
(
Fig. 4a
).
::切换到纹理的绘图类型 (图4a). -
Split the 3D window, and open in one part the
UV/Image Editor
.
::打开一个部分的UV/图像编辑器. -
Switch to edit mode of the plane.
::切换到飞机的编辑模式. -
Unwrap the plane ((
Mesh->UV Unwrap
).
::拆开飞机 (Mesh->UV拆开). -
Load an image of the alpha map in the image editor (not the first one, so you can see the course of the map).
::在图像编辑器中加载阿尔法地图的图像 (不是第一个,这样你就可以看到地图的路径).
Normally the texture is not orientated the way I would like it to be.
::它们的表面质感通常不像我希望的那样.
-
Click the padlock icon in the toolbar of the
UV/Image Editor
(
Update other windows in real time
).
::单击UV/图像编辑器工具中的挂锁图标 (实时更新其他窗口). -
Rotate the UV vertices in the
UV/Image Editor
until the texture fits (e.g., while holding the
Ctrl
key)
::在UV/图像编辑器中旋转UV顶点,直到纹理合适 (例如,按住Ctrl键时) -
Switch to object mode.
::切换到对象模式.

-
Add a new material to the plane and name it
Rust
.
::增加一个新的材料飞机, 并命名为. -
Select the fifth texture slot and add a new texture. Name it
AlphaMap
with the parameters:
-
Map Input:
UV
::图表输入:紫外线 -
Map To:
-
Alpha
::艾尔法 -
Spec
::具体情况 -
Nor
::也没有 -
NoRGB
::没有RGB -
DVar: 0
::没有
::图到:阿尔法规格 没有RGB DVar: 0 -
Alpha
::选择第五个纹理槽并添加一个新的纹理. 命名为AlphaMap,参数: 地图输入: 紫外线地图到: Alpha Spec Nor NoRGB DVar: 0 -
Map Input:
UV
With these (
Fig. 4b
) settings we achieve, that the white pixels in the texture set the Alpha and the Spec value to zero (
DVar
). Because the texture delivers RGB colors we have to activate
NoRGB
, because we need intensity values. We don't need
RayTransp
, because the world background is black anyway. We can't use
ZTransp
, because Halos are not rendered in front of materials with
ZTransp
(probably a bug in Version 2.48a). With
Nor
we get a 3D effect.
::通过这些 (图4b) 设置,我们可以实现,纹理中的白色像素将Alpha和Spec值设置为零 (DVar). 因为纹理提供RGB颜色,我们必须激活NoRGB,因为我们需要强度值. 我们不需要RayTransp,因为世界背景是黑色的. 我们不能使用ZTransp,因为Halos不会在ZTransp的材料前染 (可能是2.48a版本中的一个错误). 通过Nor,我们得到3D效果.

-
Switch to the
Texture
buttons.
::切换到"纹理"按. -
Type: Image Texture
::类型: 图像质地 -
Load the first image of the alpha map sequence.
-
Image:
Sequence
::图片: 序列 -
Frames:
150
::框架: 150 个 -
Map Image:
Extend
(
Fig. 4c
)
::地图图像:扩展 (图4c)
::载入阿尔法图序列的第一个图像.图像:序列: 150 图像:扩展 (图4c) -
Image:
Sequence
Now we adjust the UV coordinates.
::现在我们调整紫外线坐标.
-
Object->Transform->Scale to Image Aspect Ratio
. This scales the ratio of the plane automatically to the aspect ratio of the image texture.
::图像的尺寸比. 这自动将平面的比例与图像纹理的尺寸比进行缩放. -
Change to a frame where you can judge the particle animation and it's fitting to the texture.
::换成一个可以判断粒子动画和质感的合的. -
Switch to edit mode. Scale the UV coordinates in the UV editor until the texture fits to the particles.
::切换到编辑模式. 在UV编辑器中缩放紫外线坐标,直到纹理适合粒子. -
Switch back to object mode.
::切换回对象模式.
Material for the plane
::飞机的材料
We will now give the plane a better material. To judge the material we will first re-focus the camera, give it a texture and make some material settings. If you already have a good metal material, you can use this of course directly and use the Alpha texture from above on your existing material.
::现在我们将给飞机一个更好的材料. 为了判断材料我们将首先重新聚焦相机,给它一个质地,并做一些材料设置. 如果你已经有一个好的金属材料,你可以当然直接使用它,并使用阿尔法质地从上面在现有材料.
-
Select the camera.
::选择相机. -
Turn
Orthographic
in the
Camera
buttons off.
::关闭摄像头中的正写按. -
Position the camera as desired.
::按您的要求放置相机. -
Select the plane.
-
I've used the rust texture that is linked at the bottom of the page as image texture.
-
Map Input:
Orco
,
SizeX/Y
each 0.5. The size change is to use a larger part of the texture on the final image. But this depends on the size of the camera and the texture.
::图像输入:Orco,SizeX/Y各0.5. 尺寸变化是为了在最终图像上使用更大的纹理. 但这取决于相机的大小和纹理. -
Map To:
Col/Nor
::地图到:科尔诺
::我使用了页面底部链接的纹作为图像纹理. 地图输入:Orco,SizeX/Y每0.5. 尺寸变化是使用更大的部分的纹理在最终的图像. 但这取决于相机的大小和纹理. 地图到:Col/Nor -
Map Input:
Orco
,
SizeX/Y
each 0.5. The size change is to use a larger part of the texture on the final image. But this depends on the size of the camera and the texture.
-
In the second texture slot I've mapped a
Stucci
texture to
Spec
.
-
This abridged sentence means: select the texture slot. Set
Map To
to
Spec
. Deselect
Col
. Change to the
Texture
buttons. Select
Texture type
Stucci
.
::这句话的意思是:选择纹理槽.将Map To设置为Spec.取消选择Col.转换为纹理按.选择纹理类型Stucci.
::在第二个纹理槽中,我将一个Stucci纹理映射到Spec. 这个缩短的句子意味着:选择纹理槽. 将Map To设置为Spec. 取消选择Col. 切换到纹理按. 选择纹理类型Stucci. -
This abridged sentence means: select the texture slot. Set
Map To
to
Spec
. Deselect
Col
. Change to the
Texture
buttons. Select
Texture type
Stucci
.
-
The
Specularity
is thus determined by a texture. The spec value is increased by the texture (
DVar=1
). Therefore you have to set the
Specularity
in the
Shaders
panel to the smallest value the material shall have (e.g. 0.08).
::因此,光谱度由质地决定. 规格值由质地增加 (DVar=1). 因此,您必须将影像板中的光谱度设置为材料应具有的最小值 (例如0.08).
::选择平面. 我使用了页面底部链接的纹作为图像纹理. 地图输入:Orco,SizeX/Y每0.5. 尺寸变化是使用更大的部分的纹理在最终的图像. 但这取决于相机的大小和纹理. 地图到:Col/Nor 在第二个纹理槽,我已经映射一个Stucci纹理到Spec. 这简短的句子意味着:选择纹理槽. 地图设置为Spec. 选择Col. 改变纹理按. 选择纹理类型Stucci. 标光度由纹理决定. 标光度值由纹理增加 (DVar=1). 因此,你必须在遮光板中设置标光度为材料应具有的最小值 (例如0.08). -
I've used the rust texture that is linked at the bottom of the page as image texture.
If you have done a test render, you'll see that the particle track of the cube is still there.
::如果您做了测试, 您会看到立方体的粒子轨迹仍然存在.
-
We don't need the cube anymore, you may delete it. In the
Scene
Cutter
we use the already generated AlphaMap.
::我们不再需要立方体,你可以删除它. 在场景剪切器中,我们使用已经生成的AlphaMap.
Texture with OSA (
Antialiasing
) are somewhat blurred, for our purpose we use
CatRom
instead of the default
Gauss
method.
::纹理与OSA (Antialiasing) 有点模糊,为我们的目的,我们使用CatRom而不是默认的高斯方法.
-
Set in the
Render
panel
CatRom
as
AntiAliasing
filter.
::在染面板中设置CatRom作为反位过器.
We need a new output directory for the animation, to not overwrite the AlphaMap we've created earlier.
::我们需要一个新的输出目录,
-
Set the output directory to "//Render/" in the
Output
panel.
::在输出面板中将输出目录设置为"//Render/".
Lighting the torch
::点燃火
The torch itself shall cast light, therefore we parent a Lamp to the
Sphere
and animate the energy of the lamp.
::灯火本身将发光, 因此我们将灯与球体相连,
-
Change to frame 1.
::换成第一. -
Select the
Sphere
.
::选择一个球体. -
Place the 3D cursor on the
Sphere
.
Object->Snap->Cursor to Selection
::放置3D光标在球体上. 目标->快照->光标到选择 -
Add->Lamp->Lamp
::添加->灯->灯 -
Select the lamp in addition to the
Sphere
.
::选择灯除了球. -
Object->Parent->Make Parent->OK
::目标-> 亲子-> 让亲子-> 好 -
Select the lamp and move it a bit up (i.e. in positive z-direction). The lighting shall emit from the sparks, not from the hole.
::选择灯,然后稍微向上移动 (即正z方向). 照明应来自火花,而不是来自孔.
I find it cumbersome to animate the energy of the lamp by setting ipo-keys in the lamp buttons. Instead I do it directly in the 3D window.
::我发现通过在灯按中设置 ipo-key 来激活灯的能量是很麻烦的.
-
Change to the
Ipo Curve Editor
in one of the open windows.
::在一个开放的窗口中切换到Ipo曲线编辑器. -
Change the ipo type to
Lamp
.
::改变IPO类型为Lamp. -
Activate the
Energy
channel with
LMB
click in the ipo window.
::在IPO窗口中点击LMB激活能量通道. -
By holding
Ctrl
key pressed, you create by left-clicking in the ipo window the points of the ipo curve.
::通过按住Ctrl键, 在IPO窗口中左键创建IPO曲线的点.
These values may be larger than 1. However, the last maximum value should be reached in frame 100, and decrease significantly to frame 105. The sparks are only issued up to frame 100, and live up to the 105th frame. After that the metal is glowing a bit.
::这些值可能大于1.然而,最后的最大值应在100中达到,并显著降低到105.火花只发出到100,并活到第105.此后,金属发出了点亮.
Your result may look somewhat like mine in
Fig. 6
. If the amplitude of the curve is not large enough, you can scale the ipo curve at the y-axis.
::如果曲线的幅度不够大,你可以在y轴上缩小 ipo 曲线.
More realistic sparks
::更多的现实性火花
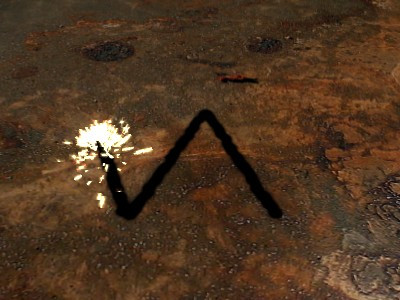
You may animate the material for
Line
visualization during the lifetime of each individual particle if you use
Halo
for the material, so you could change the sparks color from white to red.
::如果你使用Halo来实现线形象, 你可以在每个粒子的生命周期内动画线形象, 这样就可以将火花的颜色从白色改为红色.
We will show this in the next step, but confine ourselves here to make a better, not animated material (
Fig. 7
).
::我们将在下一步展示这一点,但我们只能在这里做一个更好的,而不是动画的材料 (图7).
-
Add a material to the
Sphere
, name it
Sparks
.
::加入一个物质到球体, 命名它火花. -
Activate
Halo
in the
Links and Pipelines
panel.
::在链接和管道面板激活Halo. -
Set the RGB color for
Halo
to white.
::设置Halo的RGB颜色为白色. -
Activate
Lines/X Alpha/Shaded
in the
Shaders
panel.
::在"影子"面板上激活"线路/X Alpha/影子". -
Halo Size:
0.1
::环形大小:0.1 -
Add:
0.8
::增加:0.8
Smoke
::烟雾
Now were going to create an individual material animation for every particle during its own lifetime.
::现在我们要为每个粒子在其生命周期中创建一个单独的材料动画.
We will use particles with a simple texture and animate the alpha value of the material. We're going to duplicate the
Sphere
and give it a new particle system.
::我们将使用简单质感的粒子, 动画材料的α值. 我们将复制球体并给它一个新的粒子系统.
-
Duplicate the
Sphere
with
Object->Duplicate
. The new sphere already bears the
Path
constraint.
::使用Object->Duplicate重复球体. 新球体已经具有Path约束. -
Remove the
Sparks
system from the new
Sphere
.
::删除新的球体的火花系统. -
Create a new particle system. Name it
Smoke
.
::创造一个新的粒子系统, 命名为"烟雾". -
Amount:
300
::额度: 300 -
Emit from:
Random/Verts
::从:随机/绿色发射 -
Initial velocity:
-
Object:
0.02
::目的: 0.02 -
Normal:
0.1
::正常: 0. 1 -
Random:
0.01
::随机:0.01
::开始速度:物体:0.02 正常:0.1 随机:0.01 -
Object:
0.02
-
AccZ:
0.05
::其他: -
Bake this particle system.
::烤这个粒子系统.
-
Change to the
Material
buttons.
::切换到"材料"按. -
Create a new material and call it
Smoke
.
::创造一种新材料,并称之为"烟雾". -
Alpha:
0.034. This is the basic visibility for the smoke texture.
::,这是烟雾的基本可见度. -
Add an ipo key for
Alpha
in frame 1.
::在1中添加阿尔法的IPO键. -
Change to frame 100.
::换成100的时间. -
Set
Alpha
to 0.0 and add the second ipo key.
::设置阿尔法为0.0并添加第二个IPO键.
Now the smoke will disappear within the lifetime of each particle, independently of the lifetime of the particle.
::烟雾会在每颗粒子的生命周期内消失,
-
Halo
-
Halo Size:
0.224
::环形大小:0.224 -
Hard:
12
::硬度: 12 -
Add:
0.014
::增加:0.014 -
Halo Tex
This is the crucial setting to use a texture for the shape of the halo.
::光 Tex 这是一个关键设置,用于光的形状的纹理. -
X Alpha
::艾克斯阿尔法
::光光大小:0.224 硬度:12 添加:0.014 光光 光光 光 光 硬度:0.224 硬度:12 添加:0.014 光光 光 光 光 硬度:0.224 硬度:0.224 硬度:0.014 硬度:0.014 硬度:0.014 硬度:0.014 硬度:0.014 硬度:0.014 硬度:0.014 硬度:0.014 硬度:0.014 硬度:0.014 硬度:0.014 硬度:0.014 硬度:0.014 硬度:0.014 硬度:0.0 -
Halo Size:
0.224
-
Create a new texture, you may also call it
Smoke
.
::创建一个新的纹理,也可以称之为"烟雾". -
Texture Type:
Image
::图像的质地类型 -
Load an image with random, smoke-like structures, like that from
Fig. 8b
.
::随机加载像烟雾般的图像,
If the fading goes to quickly, or the texture is to transparent / opaque, change the animation of the
Alpha
value.
::如果色变得快,或纹理变为透明/不透明, 改变Alpha值的动画.
You see, even though we use only a few objects and materials, it is extremely helpful if we designate meaningful names to the objects, materials, textures etc.
::虽然我们只使用了一些物品和材料, 但如果我们给这些物品,材料,纹理等有意义的名字,
After Glow
::之后的光
Now at last we will create another animated texture, that shall simulate the annealing of the steel plate after it is being cut through.
::现在我们终于要创建另一个动画纹理,
-
Change to the scene
AlphaMap
.
::转到AlphaMap的场景. -
Add a new scene again as a
Full Copy
.
::添加一个新的场景作为一个完整的副本. -
Name this scene
Glow
.
::这场景叫做"光". -
Enter the output directory "//Glow/" in the
Output
-Panel of the
Render
buttons.
::在染按的输出面板中输入输出目录"//Glow/".
The texture shall have nice semi transparencies.
::质地必须具有漂亮的半透明度.
-
Therefore we select a different output format in the
Format
panel, namely
RGBA
(RGB with Alpha).
::因此我们在格式面板中选择不同的输出格式,即RGBA (RGB与Alpha). -
Selecting
Premul
in the
Render
panel the world background will become fully transparent, and the particle trace semi transparent.
::在染面板中选择Premul, 世界背景将变得完全透明,
We use the existing particle system, but change it's material settings.
::我们使用现有的粒子系统,
-
Call the material of the cube
Glow
.
::称之为立方体的材料光. -
Increase the
HaloSize
to 0.04. Our new texture has to be larger than the cutout of the plane, else it will not be visible.
::增加HaloSize到0.04 我们的新纹理必须大于平面的切片,否则它将无法看到.
Now we're going to animate the material of the halos. Again this works only because we have
Point
visualization of the particles.
::现在我们将动画光环的材料. 这也只能因为我们有点可视化粒子.
-
Change to frame 1.
::换成第一. -
Set an IPO key for the RGB color (here white).
::设置一个IPO键为RGB颜色 (这里是白色). -
Go to 3rd Frame.
::进入第三. -
Change the Halo color to 1/1/0.42 (light yellow). Set the next IPO key.
::将Halo颜色更改为1/1/0.42 (浅黄色). 设置下一个IPO键. -
Go to 6th Frame. Change the Halo color to 1/0/0 (red). Set the next IPO key.
::进入第6,将光环颜色改为1/0/0 (红色), 设置下一个IPO键. -
Go to 11th Frame. Change the Halo color to 0/0/0 (black). Set the next IPO key.
::进入第11,将光环颜色改为0/0/0 (黑色),设置下一个IPO键.
The particle trace will fade out during 11 frames.
::粒子的痕迹将在11个中消失.
-
Render the animation.
::提供动画.
-
Go back to the scene
Cutter
.
::回到现场,卡特. -
Select the plane.
::选择飞机. -
Load the newly created texture in the third texture slot as an animated image texture.
-
Add New
. Name the texture
Glow
.
::添加新. 命名质地发光. -
Map Input:
UV
::图表输入:紫外线 -
Map To:
Col/Emit
::图表: 电话/发射
::将新创建的纹理加载到第三个纹理槽中作为动画图像纹理. 添加新. 命名纹理光. 地图输入:UV 地图到:Col/Emit -
Add New
. Name the texture
Glow
.
We need the alpha values in the image for changing the emit value. Also the alpha blends the glow texture nicely with the plane texture.
::我们需要图像中的α值来改变发射值. 此外,α值将光纹理与平面纹理精美融合.
-
Texture Type:
Image
-
Select the first image from the subdirectory
Glow
.
::从子目录中选择第一个图像. -
Activate
Sequence
.
::激活序列. -
Frames:
150
::框架: 150 个 -
Extend
::扩展
::纹理类型:图像 从子目录中选择第一个图像 亮出. 激活序列. : 150 扩展 -
Select the first image from the subdirectory
Glow
.
The settings for the texture are identical with those of the texture
AlphaMap
('
Fig. 4c
), except of course for the directory in which the images reside.
::图像的结构设置与AlphaMap图形 (4c) 的结构设置相同,当然除了图像所在的目录.
In
Fig. 9b
, see a finished frame of the animation. For the video in
Fig. 1
I've changed the animation a bit, scaled the emitter objects a bit smaller, changed the sparks Color and used a different camera perspective.
::图9b中,看到动画的成片. 图1中的视频,我稍微改变了动画,放出物体的尺寸稍微小一些,改变了火花颜色,并使用不同的摄像头视角.
Suggestions, critics and approval please write on the commentary page of this article. If you find some obvious mistakes you may correct the article directly of course.
::建议,批评和赞同请在本文的评论页面写下.如果您发现一些明显的错误,您可以直接纠正这篇文章.
-
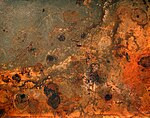
Rust Texture
::质感