Blender 3D:第四单元:与高级教程起飞
In this tutorial, we will be making a Title Screen and a Main Menu Screen to come from that Title Screen. While most people hardly pay attention to these areas on a real video game, they do make the game seem much better to play, and gives the player a certain choice of what they can do before they play the game. Before beginning this, make sure you familiarize yourself with several logic sensors and actuators, such as "Scene" and "Property", as they will heavily be relied upon. It is also best if you have several Pictures ready to use for your game or are ready for additional functions with certain programs (a Word Processor Program and Image Editing Program [that has a transparency setting] can help move along your game.)
::在本教程中,我们将从标题屏幕制作一个标题屏幕和一个主菜单屏幕.虽然大多数人几乎不注意这些区域在一个真正的视频游戏,他们确实让游戏看起来更好玩,并给玩家在玩游戏之前可以做什么的某种选择.在开始之前,请确保你熟悉几个逻辑传感器和执行器,如"场景"和"属性",因为它们将被严重依赖.如果你有几个图片准备好用于你的游戏或准备好使用某些程序的额外功能 (一个文字处理程序和图像编辑程序[具有透明度设置]可以帮助你的游戏进行).
Making An Easy Title Menu
::简单的标题菜单
The Title Screen will be very simple -- it will be the "Press Enter to Continue" kind. This will lead to a more interactive kind of Main Menu, in which you can use either key commands or the mouse pointer. This tutorial will not be the most visually pleasing, but then again, you can always add whatever graphics you would like. Again, it would be wise to have handy a word-processing program and a program like Microsoft Paint. "Print Screen" will be a useful function to use while following this tutorial -- the corresponding button is generally located to the right of the F12 key in the row of function keys on your keyboard.
::标题屏幕将非常简单 - - 它将是"按键进入继续"的类型. 这将导致更具交互性的主菜单,您可以使用键命令或鼠标指针. 这教程不会是最令人愉快的视觉,但反过来,您可以随时添加任何您想要的图形. 再次,明智的是要有方便的文字处理程序和像微软画这样的程序. "打印屏幕"将是一个有用的功能,在遵循这个教程时使用 - - 相应的按通常位于键盘上的功能键列中的F12键的右边.
If you have never used different scenes before, you're about to get a crash course. Also, Blender hotkeys and actions will not be explained with (A-key) or (numpad-6); it is assumed you have already learned at least how to perform basic Blender functions.
::如果你以前从未使用过不同的场景,你将会得到一个快速课程.此外,Blender的快速键和动作不会用 (A键) 或 (numpad-6) 解释;假设你已经至少学会了如何执行基本的Blender功能.
Making the Menu
::制作菜单
First, start up Blender and delete everything in the scene. Then, move to top orthographic view (press numpad 7, or if you have not a numpad, go to the hidden top menu and in the System & OpenGL section select "emulate numpad").
::首先,启动Blender并删除场景中的所有内容. 然后,移动到顶部的正写视图 (按numpad 7,或者如果您没有numpad,请进入隐藏的顶部菜单,并在系统和OpenGL部分选择"模仿numpad").
![]()
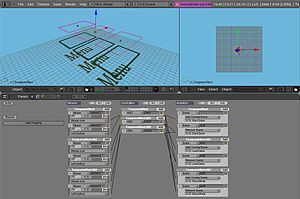
The first thing you should do is add a new scene. In the Information view panel at the top, click the SCE: drop-down menu and click on ADD NEW. Label this new scene something like "Main Menu". Now go back to your original scene and name it something like "Title Menu". These names will be important when it comes to changing the scenes around. So, on your "Title Menu" Scene, begin by adding a Camera. Move this Camera in the Z direction about a point, just to get it above the grid. Now, set the camera view to Orthographic. Now switch to Camera View. Add a plane that is scaled to cover the entire surface of the Camera's view-bounds. Move that plane just a little bit in the -Z direction. Then, add another plane, but scale this plane to be a thin rectangle about 2/3rds down the Y-length of the Camera, centered in X-direction.
::首先,你应该添加一个新场景. 在顶部的信息视图面板中,点击SCE:下拉菜单,然后点击ADD NEW. 标记这个新场景,像是"主菜单". 现在回到原始场景,并命名它,像是"标题菜单". 这些名称将是重要的,当它改变场景周围. 所以,在你的"标题菜单"场景,开始添加一个摄像头. 移动这个摄像头在Z方向大约一个点,只是让它在网格上方. 现在,设置摄像头视图为正方形. 现在切换到摄像头视图. 添加一个平面,以覆盖整个表面的摄像头的视图. 将该平面稍微移动到-Z方向. 然后,添加另
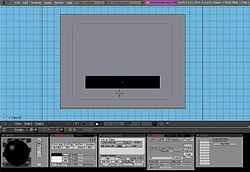
(Image Shown with Materials for visual purposes, DON'T ADD MATERIALS)
:图片与材料显示为视觉目的,不要添加材料)
Now this next step isn't necessary, but if you want a good-looking game you will probably need this step.
::现在下一步是不必要的, 但如果你想要一个好看的游戏你可能需要这个步骤.
Let's add some UV textures. Open a good photo/image-editing program like Photoshop, GIMP, or Microsoft Photo Editor; something that preferably supports Transparency. Type some text appropriate for your game such as, "Press any key to continue." What I do is add lots of extra space and add additional text that I will use in the main menu too, such as "New Game", "Continue", "Story Mode", etc. so it is all in one image for multiple UV textures. If your editor supports it, set the background color to transparent. If not, set it to black so it will register as 0 on the alpha channel in Blender. Save the image (GIF or PNG are reasonable choices for use with transparency). Now, in Blender, split the 3D screen into 2 screens, and change one screen over to UV face select. Select your small rectangle, and switch to Edit Mode and Unwrap the face in the 3D window, then open your saved image in the UV face window. Scale your face in the UV window so it holds only the "Press Any Key to Continue" graphic. If you wish, also add a starting Image on the larger rectangle.
::让我们添加一些UV纹理. 打开一个好的照片/图像编辑程序,比如Photoshop,GIMP或微软照片编辑器; 首选支持透明度的东西. 输入适合您的游戏的文本,比如"按任何键继续". 我所做的就是添加大量额外的空间,并添加额外的文本,我也会在主菜单中使用,比如"新游戏"",继续","故事模式"等,所以它都是一个图像中的多种UV纹理. 如果您的编辑器支持它,将背景颜色设置为透明. 如果不支持,将其设置为黑色,这样它将在Blender中的α频道上注册为0. 保存图像 (GIF或PNG是使用透明度的合理选择). 现在,在Blender
Setting Up The Actions
::设置行动
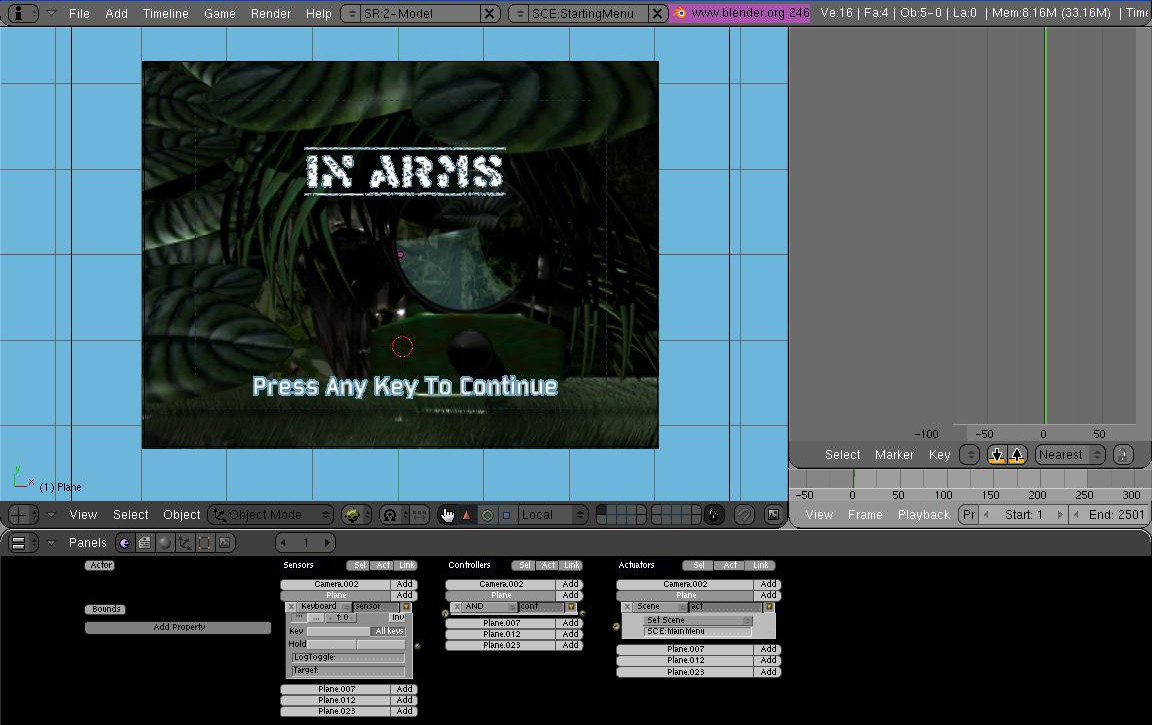
Now this step is necessary. Select the large background rectangle, in the Buttons Window at the bottom switch it to the Logic Tab. This will be very simple. Add one Sensor, one Actuator, and one Controller. Make the sensor a Keyboard Sensor, depress the "True Pulse" button, and in the key area depress the "All Keys" button. Make the Controller an "AND" controller. Make the Actuator a Scene Actuator. Select the Drop-Down box and make it "Set Scene" wit "SCE:Main Menu".
Before you test the game, make sure to save and add a Camera to the "Main Menu" Scene. Otherwise the game WILL crash.
::现在这个步骤是必要的.选择大背景矩形,在下方的按窗口切换到逻辑选项卡.这将是非常简单的.添加一个传感器,一个执行器,和一个控制器.使传感器一个键盘传感器,按下"真脉冲"按,在键区按下"所有键"按.使控制器一个"AND"控制器.使执行器一个场景执行器.选择下拉框,使其"设置场景"和"SCE:主菜单".在测试游戏之前,确保保存并添加摄像机到"主菜单"场景.否则游戏将崩.
If you want the option of returning to this scene, instead of one Actuator make two. Make both of them Scene, but make one "Suspend Scene" with "SCE:Title Menu" and make the other Actuator "Add Overlay Scene" with "SCE:Main Menu". Also, that means in the Main Menu Scene later you'll have to add some key to hit or some action to "Remove Scene" "SCE:Main Menu" and "Resume Scene" "SCE:Title Menu".
::如果你想选择回到这个场景,而不是一个执行器,做两个.让他们两个场景,但让一个"暂停场景"与"SCE:标题菜单"和另一个执行器"添加叠加场景"与"SCE:主菜单".也,这意味着在主菜单场景后,你必须添加一些键击或一些行动"删除场景" "SCE:主菜单"和"恢复场景" "SCE:标题菜单".
Author's Starting Menu Example
::作者的开始菜单示例
The following contains actual in-progress work by the original Author of this page. The work and ideas are heavily copyrighted and it is highly encouraged (begged) that you do not rip this content off--the author has submitted this work generously to help less advanced users more efficiently.
::以下内容包含本页原作者正在进行的实际工作. 作品和想法受到版权保护,我们强烈建议 (求) 您不要撕掉此内容 - 作者慷慨地提交了此作品,以帮助不太高级的用户更有效地使用.
The following is my work on a game I am making, and I hope it helps you too.
::我希望这能帮助您.
This will get you to the next menu, which will be on the next section.
::这将带您到下一个菜单,
A Main Menu
::一个主菜单
This menu will be more difficult,using a mouse-python function to use and make the mouse appear when you play your game and a maze of sensors and actuators entangled.
::游戏中使用鼠标和引擎, 让鼠标在游戏中出现,
Here is the first thing you need: a python script to make the Mouse show ---
::首先需要的是一个python脚本来制作鼠标的显示--
*This code is attributed to the author of the chapter "Blender Game Engine/A Simple Mouse Pointer" and this is not my own code.
::这不是我自己的代码.
import Rasterizer as r

r.showMouse(1)
Put this in the text editor, and save the text as something simple like "Mouse". Now, on your Main Menu scene, select the camera and add 1 sensor, 2 controllers, 1 actuator, and 1 property. Name the property "Switch" "Int" Type, and set it to 0. Set up your logic as follows:
::现在,在主菜单场景中,选择相机,添加1个传感器,2个控制器,1个执行器和1个属性. 给属性命名"Switch" "Int" Type,并将其设置为0. 设置逻辑如下:

A change will need to be made in order to make yours work. The python controller should be Script:Mouse, not Script:showpointer. If you can't see the connections:
::要使你的操作能够正常运行,需要做出更改. python 控制器应该是脚本:鼠标,而不是脚本:showpointer. 如果您看不到连接:
-
Connect the Sensor to the 2 controllers
::连接传感器到两个控制器 -
Connect the AND controller to the actuator
::连接控制器和执行器 -
Leave the Python controller open-ended
::让 Python 控制器保持开放式
If you play the game, you will see the mouse then! Now, back to the Menu, there are multiple kinds of Menus you can make when it comes to Menus popping up. The one I believe works best is a 3-layered button. To explain what this means, I'll run you through the steps of making one. Let's start with the layers themselves. (For this to work best, make the background of any images you use have transparency, so you can make invisible-yet-clickable faces.) Create a rectangle facing the camera where you want your first menu option to be. Copy the object until you have 3 rectangles, and make each one very slightly in front of the last. Now, Select the back rectangle, and on this one apply the UV face of the option's words. The second rectangle is the UV face for a graphic outline around the words if the option is selected in the game. It's not necessary but then again, it helps the player with selecting options and it looks nice. The top rectangle will be the selectable one--make the UV face applied only over a completely transparent area. Now, for the logic.
::现在,回到菜单,有多种菜单可以在菜单弹出时创建. 我认为最有效的菜单是三层按. 为了解释这意味着什么,我将带你走过制作一个的步骤. 让我们从层本身开始. (为了让这最好地工作,让你使用的任何图像的背景具有透明度,这样你就可以让隐形但可点击的面孔.) 创建一个面向相机的矩形,你希望你的第一个菜单选项. 复制对象,直到你有3个矩形,并使每一个非常轻微的前面的最后一个. 现在,选择背面的矩形,在这个应用的选择的UV面字. 第二个矩形是面对UV的图形轮,如果选项是选择在游戏中. 它不是,但它是必要
Text-Rectangle:
-No Logic Needed
::文本矩形: - 没有逻辑需要
Outline-Rectangle:
-Give it a Property named "Selected", Int Type, starting at 0.
-Make a Property Sensor, True Pulse, "Selected" Property is Equal to 1, Connected to an AND controller, Connected to a Visibility Actuator at "Visible"
-Make a Property Sensor, True Pulse, "Selected" Property is Equal to 0, Connected to an AND controller, Connected to a Visibility Actuator at "Invisible"
-Make a Property Actuator, "Selected" Property is Assigned Amount 1 -Make a Property Actuator, "Selected" Property is Assigned Amount 0 -Create AND Controller and connect both Mouse Sensors. Make this AND Controller connect to the Outline-Rectangle's Property Actuator "Selected" Assign=1.
::轮-矩形:-给它一个名为"Selected"的属性,Int类型,从0开始. - 制造一个属性传感器,真脉冲, "选择"属性等于1,连接到一个AND控制器,连接到一个可见度执行器在"可见" - 制造一个属性传感器,真脉冲, "选择"属性等于0,连接到一个AND控制器,连接到一个可见度执行器在"隐形" - 制造一个属性执行器, "选择"属性被分配数量1 - 制造一个属性执行器, "选择"属性被分配数量0 - 创建一个AND控制器并连接两个鼠标传感器. 制造这个AND控制器连接到轮-矩形的属性执行器"
Transparent-Rectangle:
-2 Mouse sensors: "Mouse Over" and "Left Button". Set them to "True Pulse".
::透明矩形:-2 鼠标传感器: "鼠标转移"和"左键". 将它们设置为"真脉冲".
(Click Image to Enlarge)
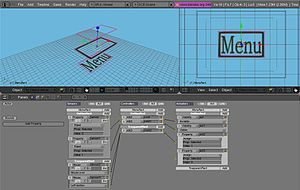
:点击图片放大)
Now here is the trickier part to explain. To make things a little more simple, name that last Outline-Rectangle's AND controller connected to the 2 mouse sensors. Select all 3 layers, and duplicate them 3 times. Make each one (in camera view) below the last, making sure to keep them parallel on the Z axis. Now, to make only one selected at a time, take the named controller of the first, and connect it to the Outline-Rectangle's Property Actuator "Selected" Assign=0 of second and third button. Do the same from the second button to the first and third one, and same with the third to the first and second. It should look like the picture:
::现在这里是解释更棘手的部分.为了让事情更简单,命名最后的轮-矩形的AND控制器连接到2个鼠标传感器.选择所有3层,并复制它们3次.让每一个 (在摄像头视图中) 在最后一个下面,确保保持它们平行在Z轴上.现在,为了让一次只选择一个,取第一个的命名控制器,并将其连接到轮-矩形的属性执行器"选择"Assign=0的第二个和第三个按.从第二个按到第一个和第三个按做同样的事情,第三个按到第一个和第二个.它应该看起来像图片:
Click Image to Enlarge
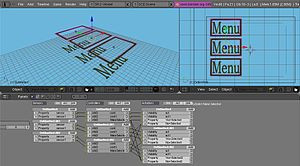
::点击图片放大
This logic arraignment should yield (when the game is played) options in which if you click one it will light up, and if you click another, that one will go down and the other will light up.
::游戏中,如果单击一个,它会亮起,如果单击另一个,那个会下降,另一个会亮起.
Now this looks nice aesthetically, but the use of it is now all you have to do is make some Scene Actuators. Add 2 more actuators to each of the Transparent Planes. Use the same method as you did with the Properties, but instead of "Property Assign 1/0" make 1 AND controller, 1 Scene Overlay and 1 Scene Remove for each transparent button. Now make 3 additional Scenes, and either make an entirely new menu for each, or to be easier just make colored rectangles on the scene, different colors for each scene -- either way, make sure that, if the scenes overlay, the additional scene won't cover up the buttons of the Main Menu Scene. So, now connect the 2 Mouse Sensors to the corresponding AND Controller, and connect that to the Corresponding "Overlay Scene" Actuator and 2 Opposing "Remove Scene" Actuators. Do this with the other 2 Transparent Rectangles. Make sure your new scenes also have cameras and that they are scaled properly.
::现在看起来很美,但使用它现在所有你需要做的就是做一些场景执行器. 添加2个更多的执行器每一个透明平面. 使用相同的方法,你做了与属性,但不是"属性赋予1/0"做1个AND控制器,1场景覆盖和1场景删除每个透明按. 现在做3个额外的场景,或者做一个全新的菜单,或者要更容易只是在场景上有色的矩形,每个场景的不同颜色 - 无论如何,确保,如果场景覆盖,额外的场景不会覆盖主菜单场景的按. 所以,现在连接2个鼠标传感器到相应的AND控制器,并连接到相应的"场景上"和2个"删除场景"执行器. 这
Click Image to Enlarge
::点击图片放大
You can use this technique to make Menus and Sub-Menus Galore! It's fairly simple to make multiple sublevels of this and get back to the original scene with this method.
::很容易把它变成多个子层,然后用这种方法回到原始场景.
I hope this helped you make your menus work well.
::希望这能帮助您的菜单工作得更好.