Blender 3D:第四单元:与高级教程起飞
In this section, you are going to learn a variety of ways to make menus with motions. These menus can be used in more ways than the simple pop-Up menus, such as in-game if you need to select something you can use this to bring up a menu smoothly. In this section there is heavy use of Properties, "Property" Logic Blocks, and especially IPO usage. When you do it once, it will be very much easier to do it again.
::在本节中,你将学习各种各样的方法来制作带动的菜单.这些菜单可以用更多的方式比简单的弹出菜单,如在游戏中,如果你需要选择一些东西,你可以使用它来顺利地显示菜单.在本节中,大量使用属性",属性"逻辑块,特别是IPO的使用.当你做一次,它将会很容易再次做.
Making Moving Selectors
::如何制作移动选择器
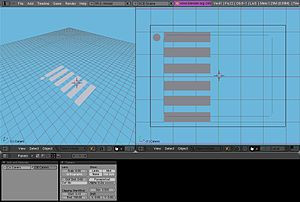
To kick this tutorial off, let's just do a simple icon that will be next to the selected menu item. There will be 6 possible menu items, which can be controlled with both the arrow keys and the mouse. Let's begin by booting up Blender, and deleting everything--then adding a camera.
![]()
Set this camera to orthographic. Now I like making things look nice, but here are the basics of what you will need for this tutorial:
::为了启动这个教程,让我们做一个简单的图标,它将在选定的菜单项旁边.将有6个可能的菜单项,可以通过箭头键和鼠标来控制.让我们开始启动Blender,删除一切 - 然后添加一个相机.将这个相机设置为正写.现在我喜欢让事情看起来很漂亮,但这里是你需要这个教程的基础:
-
Make 6 Planes, all different objects, and put them in a vertical list.
::制作6个飞机,所有不同的物体, 并将它们放在一个垂直列表中. -
Make a circle next to the first plane. This will act as the Selector.
::让我们在第一层旁边做一个圆圈.
So after you've made you objects, it should look similar to this:
::您的物体应该看起来像这样:
For me, I made mine look more like this, a little more detailed:
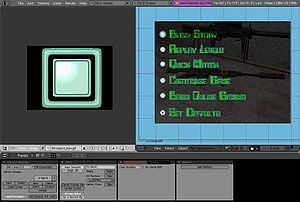
::我把自己的作品做得更像这样,
So now that we have our menu set up, it's time to set up the properties that will tell the selector how to move. Select the selector that will be moving and give it a property name "Selection". Make it "Int" type, and start it out at "1". To get this selector to move the way we want it, we have to set up its movements. Make sure you are on frame 1, and put the cursor on the first menu item, then Insert Keyframe for "Loc". Next, move to frame 2, and put the cursor on the second menu item, then insert "Loc" Keyframe, and continue in this fashion for all your menu items. To get this applied in the Game Engine, in the logic bricks, add an "Always" Sensor (True Pulse Enabled), connected to an "AND" connector, and connected to a "IPO" Actuator, set to "Property" with Prop:Selection. Now we can do 3 things with this selector to have it move like a selector in a video game:
::现在我们已经设置了菜单,是时候设置将告诉选择器如何移动的属性了. 选择将移动的选择器并给它一个属性名"选择". 让它"Int"类型,并从"1"开始. 要让这个选择器按照我们想要的方式移动,我们必须设置它的移动. 确保你在1,并把光标放在第一个菜单项上,然后插入"位置"的键框. 接下来,移动到2,并把光标放在第二个菜单项上,然后插入"位置"的键框,并继续以这种方式对所有菜单项进行移动. 要在游戏引擎中应用这个,在逻辑块中,添加一个"总是"传感器 (True Pulseble Enable),连接到"AND"连接器,连
Up/Down Arrow Keys
To make the up and down arrow keys work properly, Select the Selector and add four sensors, controllers, and actuators. Make two sensors keyboard, with one set to "Uparrow" and one set to "Downarrow" (do not activate pulse triggering). Make the other two sensors Property Sensors, with True Pulse. For the first, make it "Equal", Prop:Selection, Value:0. For the other, make it "Equal", Prop:Selection, Value:7. For the Actuators, make all four "Property" sensors. For two of them, make them "Add", Prop:Selection, and make the first "Value:-1" and the second "Value:1". The other two should be "Assign", Prop:Selection, with the first at "Value:1" and the next as "Value:6". Now connect them as follows:
Click To Enlarge Image
![]()
"Keyboard:Uparrow"--"AND"--"Prop:Selection/Add/Value:-1"
"Keyboard:Downarrow"--"AND"--"Prop:Selection/Add/Value:1"
"Prop:Selection/Equal/7"--"AND"--"Prop:Selection/Assign/Value:1"
"Prop:Selection/Equal/0"--"AND"--"Prop:Selection/Assign/Value:6"
::上/下箭头键 为了使上下箭头键正常工作,选择选择器并添加四个传感器,控制器和执行器. 设置两个传感器键盘,一个设置为"上箭头"和一个设置为"下箭头" (不要激活脉冲触发). 设置其他两个传感器属性传感器,使用真脉冲. 对于第一个,设置"等", Prop:Selection, Value:0. 对于另一个,设置"等", Prop:Selection, Value:7. 对于执行器,设置所有四个"属性"传感器. 对于其中两个,设置"添加", Prop:Selection,并设置第一个"Value:-1"和第二个"Value:1". 另外两个应该是"SAND:Selection
Now you can play your game, and the arrow keys should work just fine!
::现在你可以玩你的游戏,
HotKeys
If you don't know what a HotKey, it's a way to access menu items or action by pressing a specified letter, instead of just clicking or arrow keys. This method will require a different step when you make your UV text textures, as you will need to somehow change one letter (either the color or possibly underline) to let people know that that is a HotKey action.
The HotKey system is easy to set up right alongside the IPO/Selection property. In each menu item, highlight or make special one unique letter in each menu item. Then, with the selector selected, set up 6 keyboard logic sensors, each one for a different letter. Add 6 controllers, and 6 actuators as well. Make all the actuators "Property", "Assign, Prop:Selection, starting with Value:1 progressing to Value:6"
::热键如果您不知道热键是什么,它是一种通过按一下指定字母来访问菜单项或动作的方式,而不是仅仅点击或箭头键.当您制作UV文本纹理时,此方法需要不同的步骤,因为您需要以某种方式更改一个字母 (颜色或可能是下划线) 让人们知道这是一个热键动作.热键系统很容易在IPO/选择属性旁边设置.在每个菜单项中,突出或制作每个菜单项中的一个独特字母.然后,在选择器中选择,设置6个键盘逻辑传感器,每个为不同的字母.添加6个控制器和6个执行器.同时,制作所有执行器"属性", "属性,属性:选择,从值:1开始到值:6"
Mouse Selection
Our final selection method we can add is the mouse scroll over. Set up the Mouse Sensor to Scroll Over for all 6 invisible selection planes. Then, make the AND Controllers and connect to your original set of "Set Property" Actuators. that matches the Object's IPO property number. It's fairly simple.
::鼠标选择 我们最后的选择方法是鼠标滚动. 设置鼠标传感器滚动所有6个隐形选择平面. 然后,做AND控制器并连接到您的原始"设置属性"执行器. 匹配对象的IPO属性号码. 这相当简单.
Make the Selection
The final thing to do is, once the selections are set up, make another 8 sensors, 7 controllers, 6 and actuators. Now make the 7th one a keyboard sensor for the ENTER key, as most people usually think they can start a game by pressing ENTER. The 8th Sensor is for another Mouse Sensor for "Left Click" so that if any of them is highlighted and you Left-Click the mouse, then it will be equivalent to pressing the ENTER key. That may be confusing as, unless you set up the dozen extra sensors, controllers, and actuators, you don't need to scroll over the selection to pick it, so that 8th sensor is your choice whether you want to add it. Connect the 7th and 8th sensor to the 7th controller. If you have the 8th sensor, make it an OR controller; otherwise, make the controller AND. As for the first 6 sensors, they should be Property Sensors for "Prop:Selection" "Value:[1-6]". Connect each to their own separate controller. Now connect the 7th controller to all 6 Actuators, and the first 6 controllers connect to their own Actuator alongside the 7th. The Actuators can be whatever you want them to: whatever the selection causes to happen when you select the item selection.
::选择最后要做的是,一旦选择设置,再做8个传感器,7个控制器,6个执行器.现在让第7个成为键盘传感器,用于ENTER键,因为大多数人通常认为他们可以通过按ENTER开始游戏.第8个传感器是另一个鼠标传感器,用于"左键",因此如果其中任何一个被突出显示,您左键鼠标,那么它将等同于按ENTER键.这可能会令人困惑,因为除非您设置了十多个额外的传感器,控制器和执行器,否则您不需要滚动选择,因此第8个传感器是您选择是否要添加它.将第7个传感器和第8个传感器连接到第7个控制器.如果您有第8个传感器,则选择 AND
Make the Menu Move
::让菜单移动
So we created a selection-based moving icon on a menu, but what might happen if you select that item and need a sub-menu in-game? You can't very well pause the game every time (unless it's a pause menu). This is where making the menu itself move comes in very handy. In this section, you will make an object clickable, and once clicked it will give out a submenu, which in itself will be able to give out a submenu.
::所以我们在菜单上创建了一个基于选择的移动图标,但是如果您选择了该项并需要在游戏中设置子菜单,会发生什么?您不能每次都暂停游戏 (除非它是暂停菜单).这就是让菜单本身移动非常方便的地方.在这个部分,您将使一个对象可点击,一旦点击它将会产生一个子菜单,它本身将能够产生一个子菜单.