OpenSCAD教程
Creating repeating patterns of parts/models - For loops
::部分/模型的重复模式的创建 - 循环
In the previous chapter you used if statements to control whether some part of your design should be created or not. In this chapter you are going to find out how you can create multiple parts or objects when they form a specific pattern.
::在上一章中,你使用 if 语句来控制设计的某些部分是否应该被创建. 在本章中,你将了解如何在它们形成特定模式时创建多个部分或对象.
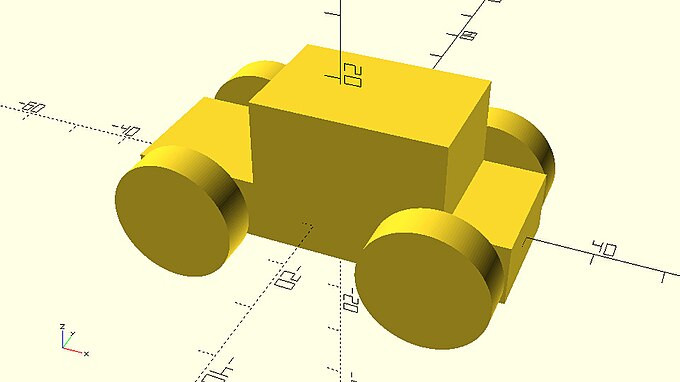
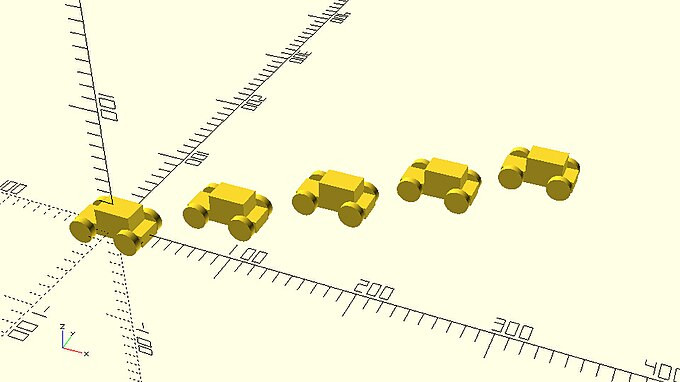
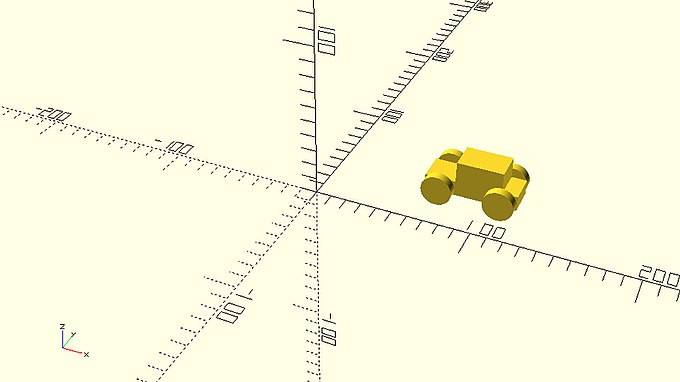
Given the following car model as an example you are going to learn how to create such patterns.
::让我们以下面的车型为例,
|
single_car.scad
use <vehicle_parts.scad>
$fa=1;
$fs=0.4;

// Variables
track = 30;
wheelbase=40;
// Body
body();
// Front left wheel
translate([-wheelbase/2,-track/2,0])
    rotate([0,0,0])
    simple_wheel();
 // Front right wheel
translate([-wheelbase/2,track/2,0])
    rotate([0,0,0])
    simple_wheel();
// Rear left wheel
translate([wheelbase/2,-track/2,0])
    rotate([0,0,0])
    simple_wheel();
// Rear right wheel
translate([wheelbase/2,track/2,0])
    rotate([0,0,0])
    simple_wheel();
// Front axle
translate([-wheelbase/2,0,0])
    axle(track=track);
// Rear axle
translate([wheelbase/2,0,0])
    axle(track=track);
|
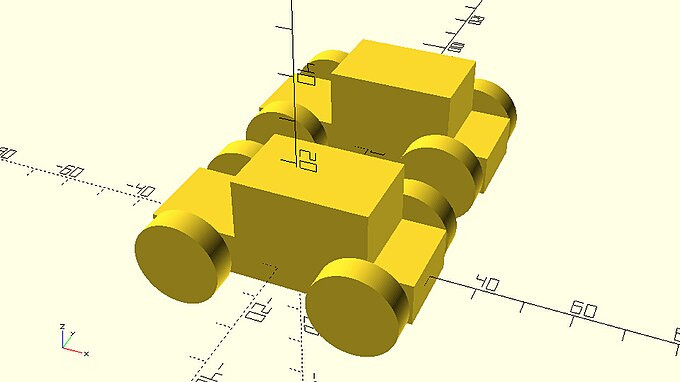
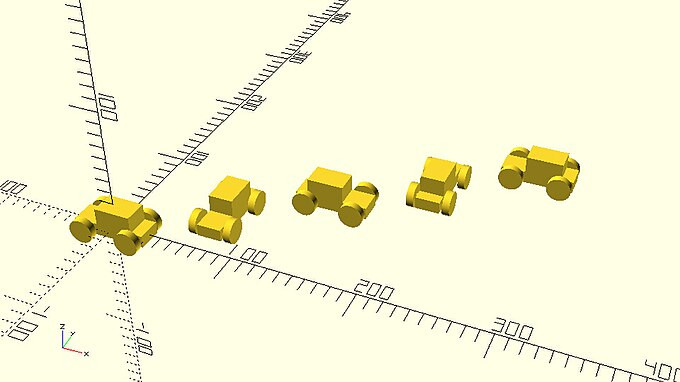
| Take the above car example and modify it in order to create another car. To avoid duplicating the code that creates the car you should create a car module. The module should have two input parameters, the track and the wheelbase of the car. The default value of the track and the wheelbase should be 30 and 40 units respectively. The first car should be positioned at the origin as the example above, the second car should be translated along the positive direction of the Y axis by 50 units. |
|
two_cars.scad
use <vehicle_parts.scad>
$fa=1;
$fs=0.4;

module car(track=30, wheelbase=40) {
    // Body
    body();
    // Front left wheel
    translate([-wheelbase/2,-track/2,0])
        rotate([0,0,0])
        simple_wheel();
    // Front right wheel
    translate([-wheelbase/2,track/2,0])
        rotate([0,0,0])
        simple_wheel();
    // Rear left wheel
    translate([wheelbase/2,-track/2,0])
        rotate([0,0,0])
        simple_wheel();
    // Rear right wheel
    translate([wheelbase/2,track/2,0])
        rotate([0,0,0])
        simple_wheel();
    // Front axle
    translate([-wheelbase/2,0,0])
        axle(track=track);
    // Rear axle
    translate([wheelbase/2,0,0])
        axle(track=track);
}

car();
translate([0,50,0])
    car();
|
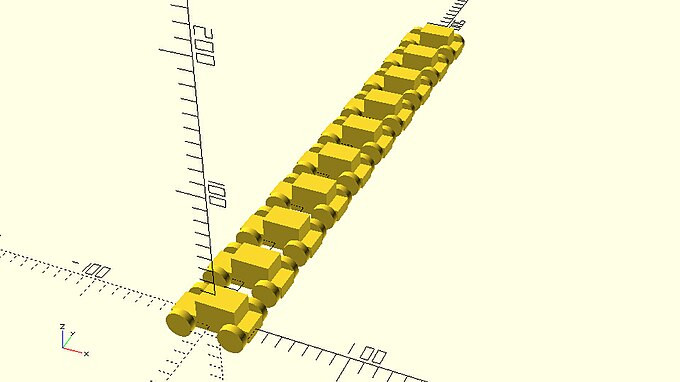
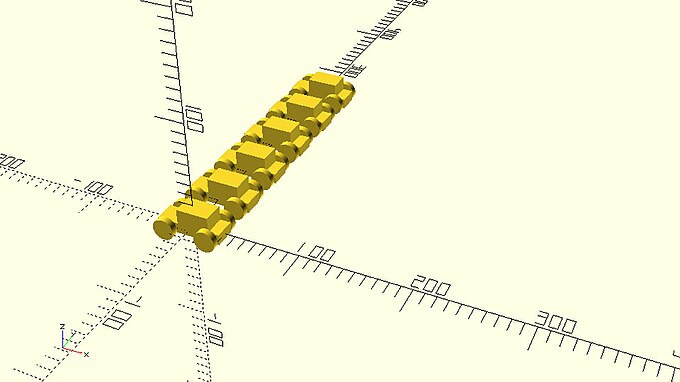
| Create eight additional cars along the positive direction of the Y axis so that you have ten cars in total. Every next car should be translated 50 units along the positive direction of the Y axis in comparison to the previous car. |
|
row_of_ten_cars_along_y_axis.scad
…
car();
translate([0,50,0])
    car();
translate([0,100,0])
    car();
translate([0,150,0])
    car();
translate([0,200,0])
    car();
translate([0,250,0])
    car();
translate([0,300,0])
    car();
translate([0,350,0])
    car();
translate([0,400,0])
    car();
translate([0,450,0])
    car();
…
|

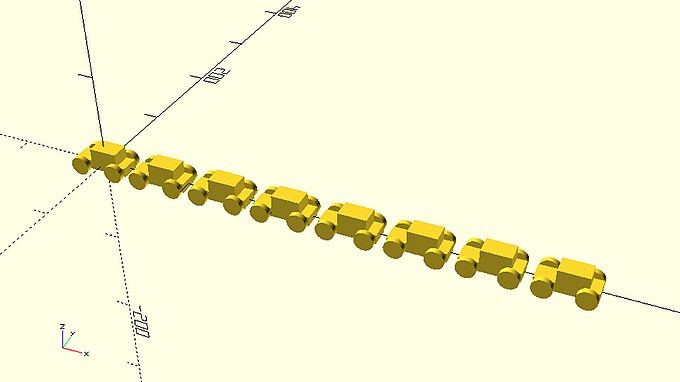
After the previous exercise, you have probably realized that creating a pattern of cars in this manner is not very efficient; a new statement has to be written for every car, and this results in a lot of code duplication in your script. Typically, you can use a for loop to achieve the same results a lot easier. The for loop provides a way to repeat the same set of statements a certain number of times, with small, predictable changes applied each time. Take a look at the following example.
::在上一练习之后,你可能已经意识到,以这种方式创建汽车模式不是很有效;必须为每个汽车写一个新的语句,这导致脚本中的代码重复.通常,你可以使用for循环来更容易地实现相同的结果.for循环提供了一种方法来重复相同的语句组数次,每次都会进行小的,可预测的更改.请看下面的例子.
|
row_of_ten_cars_along_y_axis_with_for_loop.scad
…
for (dy=[0:50:450]) {
    translate([0,dy,0])
        car();
}
…
|
There are a few things you should notice about the syntax of the for loop. First the keyword for is typed out followed by a pair of parentheses. Inside the parentheses the variable of the for loop is defined. It’s advisable to give a descriptive name to the for loop variables when applicable. In this case the variable is named dy because it represents the number of units that each car needs to be translated along the Y axis. The definition of the variable indicates that its first value will be 0 units and all following values will be incremented by 50 units each until the value 450 is reached. This means that the variable dy will take ten different values in total throughout the execution of the for loop repetitions. These values are 0, 50, 100, 150, 200, 250, 300, 350, 400 and 450. These values form a vector, which in contrast to a single value is a sequence of values. In the first repetition the variable will take the first value of the vector, which is 0. In the second repetition the second value, which is 50. And so forth. The different consecutive values that the for loop variable takes throughout the repetitions of the for loop is the key concept which makes the for loop suitable for creating patterns of multiple parts or models. Finally, after the closing parenthesis follows a pair of curly brackets. Inside the curly brackets exist the statements that will be executed repeatedly as many times as the number of values of the for loop variable. In this case the single statement inside the curly brackets will be executed 10 times which is the number of values that the dy variable will take. To avoid creating 10 cars that are completely overlapping the amount of translation along the Y axis on each repetition of the for loop is parameterized using the dy variable. The dy variable has a different value on each repetition of the for loop thus creating the desired pattern.
::对于for循环的语法,你应该注意一些事情.首先键词for被输入,然后用一个括号对.括号内定义了for循环的变量.在这种情况下,建议给for循环变量一个描述性名称.在这种情况下,变量被命名为dy,因为它代表了每个车需要沿Y轴翻译的单位数量.变量的定义表明它的第一个值将是0个单位,所有后来的值将每一个增加50个单位,直到值达到450个.这意味着变量dy将在整个循环执行过程中总共采取十个不同的值.这些值是0,50,100,150,200,250,300,350,400和450.这些值形成一个向量,而与单个循环执行过程中是一个单一的数量.在第一个循环执行过程中,每个变量将
| Use a for loop to create a pattern of cars. The first car should be centered at the origin. Every next car should be placed behind the previous car. Specifically, every next car should be translated 70 units along the positive direction of the X axis in comparison to the previous car. The pattern should be consisted out of 8 cars in total. The for loop variable should be named dx. |
|
row_of_eight_cars_along_x_axis.scad
…
for (dx=[0:70:490]) {
    translate([dx,0,0])
        car();
}
…
|
Creating more complex patterns
::创造更复杂的模式
In the previous examples the for loop variable dy was used directly to modify some aspect of each individual model that composes the pattern. The only aspect that was modified was the translation of each model along the Y or X axis. On each repetition the value of the dy variable was equal to the desired translation on each model.
::在前面的例子中,for循环变量dy被直接用于修改构成模式的每个单个模型的某些方面.唯一被修改的方面是沿Y或X轴的每个模型的转换.在每个重复时,dy变量的值等于每个模型的所需转换.
When more than one aspect of the model needs to be modified it’s a better practice for the for loop variable to take integer values 0, 1, 2, 3 etc. The required values for modifying different aspects of the model (ex. translation along some axis, scaling of some part) are then produced from those integer values that the for loop variable takes. In the following example this concept is used to simultaneously translate each car 50 and 70 units along the positive direction of the Y and X axis.
::当需要修改模型的多个方面时,最好是for loop变量取整数值0,1,2,3等.修改模型的不同方面所需的值 (例如沿某个轴转换,某个部分缩放) 然后从for loop变量所取的整数值中生成.在下面的示例中,这个概念被用于同时将每个车辆50和70单位沿Y和X轴的正方向转换.
|
diagonal_row_of_five_cars.scad
…
for (i=[0:1:4]) {
    translate([i*70,i*50,0])
        car();
}
…
|
There are a few things you should notice. The for loop variable is now named i. When the for loop variable is used in this way it’s usually called index and given the name i. Since the for loop variable takes integer values you need to multiply it by a proper number to produce the desired amount of translation along each axis. Specifically, the desired amount of translation along the Y axis is produced by multiplying the for loop variable by 50. Similarly the desired amount of translation along the X axis is produced by multiplying the for loop variable by 70.
::对于循环变量,你应该注意一些事情. 循环变量现在被命名为i. 当循环变量以这种方式使用时,它通常被称为指数,并被命名为i. 由于循环变量取整数值,你需要将其乘以一个适当的数量来产生每个轴上的所需转换量. 具体来说,沿Y轴的所需转换量是通过乘以循环变量50产生的. 同样,沿X轴的所需转换量是通过乘以循环变量70产生的.
| Add a rotation transformation to the previous example in order to turn the car around the Z axis. The first car shouldn’t be turned at all. Each next car should be turned by 90 degrees around the positive direction of rotation of the Z axis in comparison to the previous car. The positive direction of rotation of the Z axis is the one that would rotate the X axis towards the Y axis. Does the rotation transformation need to be applied before or after the translation transformation in order to keep the cars in the same position? |
|
diagonal_row_of_five_twisted_cars.scad
…
for (i=[0:1:4]) {
    translate([i*70,i*50,0])
        rotate([0,0,i*90])
        car();
}
…
|
The patterns you are creating are already becoming cooler, here is an interesting one.
::您正在创建的模式已经变得更加酷,
|
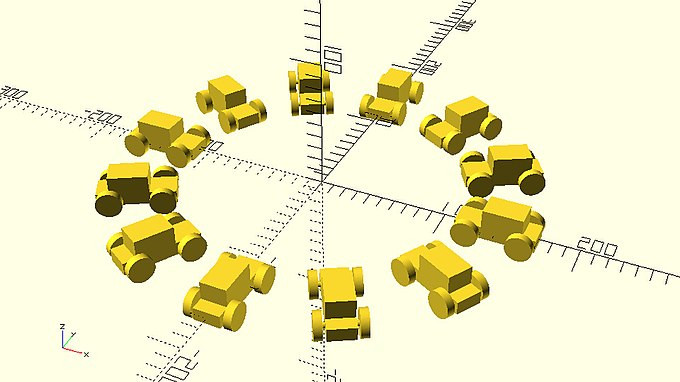
circular_pattern_of_ten_cars.scad
…
r = 200;
for (i=[0:36:359]) {
    translate([r*cos(i),r*sin(i),0])
        car();
}
…
|
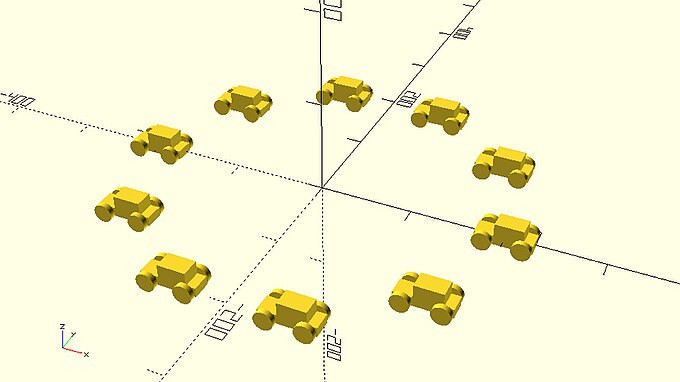
In the above pattern the cars have been placed at equally spaced points at the circumference of a perfect circle that has a radius of 200 units. There are a few important points you should pay attention to if you wish to create such patterns.
::上面的图案中,汽车被放置在一个半径为200个单位的完美圆周的等距离点上.如果你想创建这样的图案,你应该注意一些重要点.
The first is that in order to create a circular pattern you need to use polar coordinates. Depending on your background you may have noticed the use of polar coordinates just by glancing at the code or you may have no idea what it is. In the latter case, the only thing that you need to know is that polar coordinates are a way to produce the X and Y coordinates of a given point of a circle when you know the radius of the circle and the angle that corresponds to that point. The angle 0 corresponds to the point of the circle that belongs to the positive direction X axis. The positive counting direction of the angle is from the X to the Y axis. This means the positive Y axis corresponds to 90 degrees, the negative X axis to 180 degrees, the negative Y axis to 270 degrees and if you complete the circle the positive X axis to 360 degrees. According to the polar coordinates the X coordinate can be calculated by multiplying the radius of the circle by the cosine of the angle, while the Y coordinate can be calculated by multiplying the radius of the circle by the sine of the angle. This is how the desired amount of translation along the X and Y axis is produced.
::首先,为了创建一个圆形图案,你需要使用极坐标.根据你的背景,你可能已经注意到极坐标的使用,只是了一眼代码,或者你可能不知道它是什么.在后一种情况下,你需要知道的唯一一件事是,极坐标是计算圆的 X 和 Y 坐标的方法,当你知道圆的半径和与该点相对应的角度. 角度 0 相当于属于正方向 X 轴的圆点. 角度的正数计数方向是从 X 到 Y 轴. 这意味着正 Y 轴相对应 90 度,负 X 轴相对应 180 度,负 Y 轴相对应 270 度,如果你完成圆 X 轴的正数,则可以计算 360 度. 根据极坐标, X 坐标可以通过圆的半径乘以
The second thing you should notice is what values the for loop variable i takes. The variable i starts from 0 and is incremented by 36 on each repetition in order to position 10 equally spaced cars on the circle (360/10 = 36). The first car that is created at 0 angle and the car that correspond to 360 degrees would be exactly overlapping. In order to avoid this, you need to instruct the for loop variable to stop incrementing before it reaches 360. If you are lazy calculating 360 - 36 = 324, you can just put the limit at 359. This will work fine because the for loop variable will only take the values 0, 36, 72, 108 144, 180, 216, 252, 288 and 324, since incrementing by another 36 units would result in 360 which exceeds 359.
::第二个值得注意的是for循环变量i的值.变量i从0开始,每次重复时都会增加36个值,以便在圆上放置10辆均等距离的汽车 (360/10 = 36).第一个在0角度创建的汽车和与360度相对应的汽车将完全重叠.为了避免这种情况,您需要指示for循环变量在达到360之前停止增加.如果您惰地计算360 - 36 = 324,您可以将极限设置为359.这将很好,因为for循环变量只会取0,36,72,1084,180,216,252,288和324的值,因为增加36个单位会导致360超过359.
By using additional variables and naming them properly you can make your scripts more descriptive and usable so that it’s easier for anyone (or even you at a later point in time) to understand what they are doing and how to use them. For example, the previous script can take the following form.
::通过使用额外的变量并给它们适当的命名,您可以使脚本更具描述性和可用性,以便任何人都 (甚至您在以后的时间点) 更容易理解它们在做什么以及如何使用它们.例如,以前的脚本可以采取以下形式.
…
r = 200; // pattern radius
n = 10; // number of cars
step = 360/n;
for (i=[0:step:359]) {
    angle = i;
    dx = r*cos(angle);
    dy = r*sin(angle);
    translate([dx,dy,0])
        car();
}
…
|
On the above script it is self-explanatory that the for loop variable i corresponds to the angle. It is also clearer what the amount of translation along each axis is. In addition, it is easy to customize this pattern by changing the radius and/or the number of cars.
::在上述脚本中,for loop变量i与角度相对应是自明的.每个轴上的转换量也更清楚.此外,通过改变半径和/或汽车数量,很容易自定义这个模式.
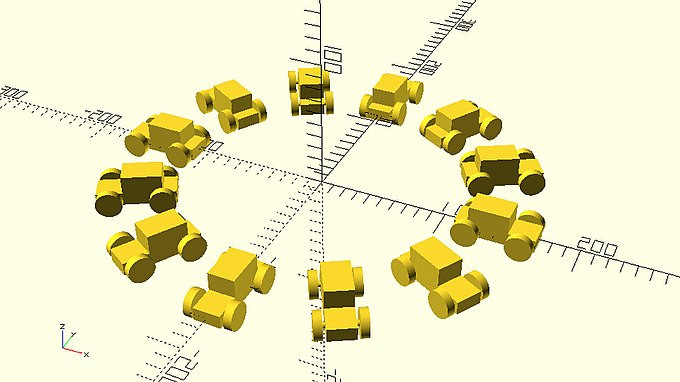
| Modify the appropriate values on the above script in order to create a pattern of 14 equally spaced cars on the circumference of circle with radius of 160 units. |
|
parametric_circular_pattern_of_fourteen_cars.scad
…
r = 160; // pattern radius
n = 14; // number of cars
step = 360/n;
for (i=[0:step:359]) {
    angle = i;
    dx = r*cos(angle);
    dy = r*sin(angle);
    translate([dx,dy,0])
        car();
}
…
|
| If you are not familiar with polar coordinates play around with the following script. Try assigning different values to the radius and the angle variables and see what the resulting position of the car is. |
|
car_positioned_with_polar_coordinates.scad
…
radius = 100;
angle = 30; // degrees
dx = radius*cos(angle);
dy = radius*sin(angle);
translate([dx,dy,0])
    car();
…
|
Challenge
::挑战
|
parametric_circular_pattern_of_fourteen_cars.scad
…
r = 160; // pattern radius
n = 14; // number of cars
step = 360/n;
for (i=[0:step:359]) {
    angle = i;
    dx = r*cos(angle);
    dy = r*sin(angle);
    translate([dx,dy,0])
        car();
}
…
|
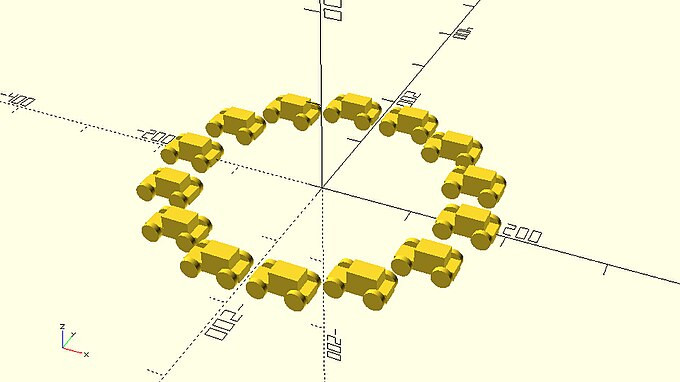
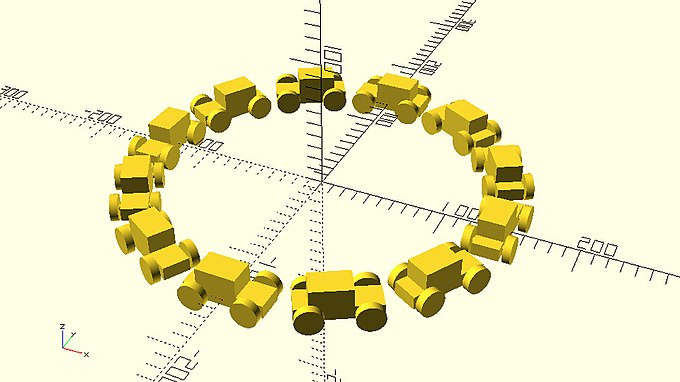
| The above script was used to create a circular pattern of cars. Modify the above script by adding a rotation transformation in order to make all car face the origin. Use your modified script to create a pattern that has 12 cars and a radius of 140 units. |
|
cars_facing_at_the_origin.scad
…
r = 140; // pattern radius
n = 12; // number of cars
step = 360/n;
for (i=[0:step:359]) {
    angle = i;
    dx = r*cos(angle);
    dy = r*sin(angle);
    translate([dx,dy,0])
        rotate([0,0,angle])
        car();
}
…
|
| Make appropriate changes to the above script to create: i) one pattern where all cars are facing away from the origin ii) one pattern where all cars are oriented tangentially as if driving counter clockwise around a circle iii) and one as if driving clockwise around a circle. |
-
facing away from the origin
::面向远离源头的
|
cars_facing_away_from_the_origin.scad
…
translate([dx,dy,0])
    rotate([0,0,angle - 180])
    car();
…
|
-
driving counterclockwise
::逆时针方向行驶
|
cars_driving_counter_clockwise.scad
…
translate([dx,dy,0])
    rotate([0,0,angle - 90])
    car();
…
|
-
driving clockwise
::顺时针方向行驶
|
cars_driving_clockwise.scad
…
translate([dx,dy,0])
    rotate([0,0,angle - 270])
    car();
…
|

Now that you are getting a hold of using for loops to create patterns it’s time to put you new skills in the development of a more sophisticated wheel design!
::现在你已经掌握了使用循环来创建模式, 现在是时候让你在开发更复杂的轮子设计中获得新的技能了!
| If you feel confident with your OpenSCAD skills or if you would like to experiment a bit more, try to build a new module named spoked_wheel that creates the following wheel design. If you would like some more guidance with creating this module go through the following exercises instead. |
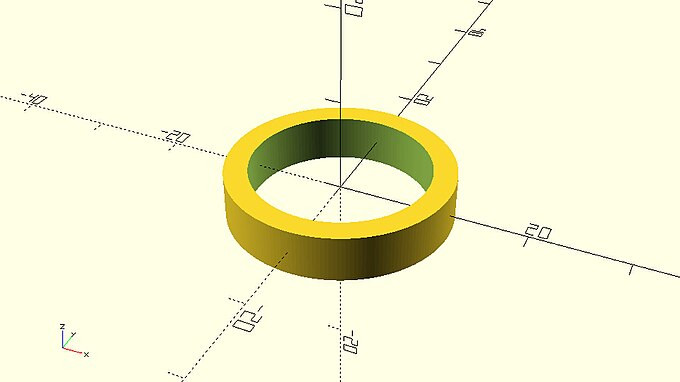
| If you feel more comfortable with some additional guidance that’s fine. Create a new module named spoked_wheel that has 5 input parameters. The input parameters should be named radius, width, thickness, number_of_spokes and spoke_radius. Give these variables the default values of 12, 5, 5, 7 and 1.5 respectively. Use the cylinder and difference commands to create the ring of the wheel by subtracting a small cylinder from a bigger one. The model that you need to create can be seen on the following image. For this step you are only going to use the radius, width and thickness variables. Remember that when you are subtracting one object from another it needs to clear the face of the other object to avoid any errors. Keep this in mind when defining the height of the small cylinder. You will also need to calculate the radius of the small cylinder from the radius and thickness variables. You can use a variable named inner_radius to store the result of the appropriate calculation and then use it to define the radius of the smaller cylinder. |
|
ring_of_spoked_wheel.scad
…
module spoked_wheel(radius=12, width=5, thickness=5, number_of_spokes=7, spoke_radius=1.5) {

    // Ring
    inner_radius = radius - thickness/2;
    difference() {
        cylinder(h=width,r=radius,center=true);
        cylinder(h=width + 1,r=inner_radius,center=true);
    }
}
spoked_wheel();
…
|
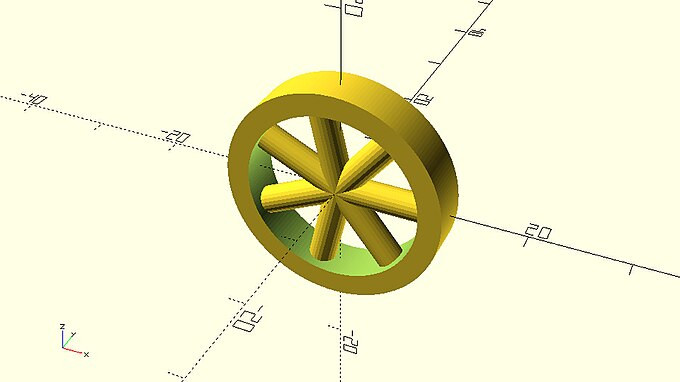
| Extend the previous module to additionally create the spokes of the wheel as seen on the following image. The spokes of the wheel need to be cylindrical. The length of the spokes needs to be appropriate so that each spoke spans from the center of the ring to its half thickness. You will have to use a for loop to create the spokes as a pattern. Feel free to review previous for loop example that can help you with this. |
|
spoked_wheel_horizontal.scad
…
module spoked_wheel(radius=12, width=5, thickness=5, number_of_spokes=7, spoke_radius=1.5) {

    // Ring
    inner_radius = radius - thickness/2;
    difference() {
        cylinder(h=width,r=radius,center=true);
        cylinder(h=width + 1,r=inner_radius,center=true);
    }

    // Spokes
    spoke_length = radius - thickness/4;
    step = 360/number_of_spokes;
    for (i=[0:step:359]) {
        angle = i;
        rotate([0,90,angle])
            cylinder(h=spoke_length,r=spoke_radius);
    }
}
spoked_wheel();
…
|
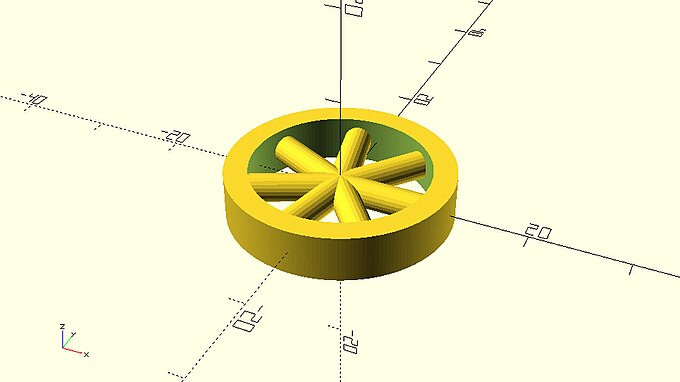
| For the new wheel design to be compatible with the existing wheel designs and modules that you have created throughout the tutorial, it needs to be rotated to stand straight as in the following image. Add an appropriate rotation transformation to do so. |

|
spoked_wheel.scad
…
module spoked_wheel(radius=12, width=5, thickness=5, number_of_spokes=7, spoke_radius=1.5) {

    rotate([90,0,0]) {
        // Ring
        inner_radius = radius - thickness/2;
        difference() {
            cylinder(h=width,r=radius,center=true);
            cylinder(h=width + 1,r=inner_radius,center=true);
        }

        // Spokes
        spoke_length = radius - thickness/4;
        step = 360/number_of_spokes;
        for (i=[0:step:359]) {
            angle = i;
            rotate([0,90,angle])
                cylinder(h=spoke_length,r=spoke_radius);
        }
    }
}
…
spoked_wheel();
…
|
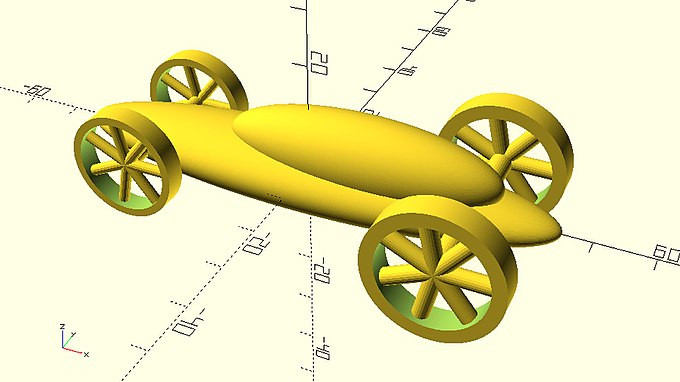
| Add the spoked_wheel module on the vehicle_parts.scad script. Use the new wheel design in one of your car models. If you don’t have any ideas you can try replicating the following model. |
|
car_with_spoked_wheels.scad
use <vehicle_parts.scad>

$fa = 1;
$fs = 0.4;

front_track = 24;
rear_track = 34;
wheelbase = 60;

front_wheels_radius = 10;
front_wheels_width = 4;
front_wheels_thickness = 3;
front_spoke_radius = 1;

front_axle_radius = 1.5;

// Round car body
resize([90,20,12])
    sphere(r=10);
translate([10,0,5])
    resize([50,15,15])sphere(r=10);

// Wheels
translate([-wheelbase/2,-front_track/2,0])
    spoked_wheel(radius=front_wheels_radius, width=front_wheels_width, thickness=front_wheels_thickness, spoke_radius=front_spoke_radius);
translate([-wheelbase/2,front_track/2,0])
    spoked_wheel(radius=front_wheels_radius, width=front_wheels_width, thickness=front_wheels_thickness, spoke_radius=front_spoke_radius);
translate([wheelbase/2,-rear_track/2,0])
    spoked_wheel();
translate([wheelbase/2,rear_track/2,0])
    spoked_wheel();

// Axles
translate([-wheelbase/2,0,0])
    axle(track=front_track, radius=front_axle_radius);
translate([wheelbase/2,0,0])
    axle(track=rear_track);
|
Creating patterns of patterns - Nested for loops
::创建模式的模式 - 嵌套的循环
The following script creates a row of cars along the Y axis.
::接下来的脚本将沿Y轴创建一排汽车.
|
row_of_six_cars_along_y_axis.scad
…
n = 6; // number of cars
y_spacing = 50;
for (dy=[0:y_spacing:n*y_spacing-1]) {
    translate([0,dy,0])
        car();
}
…
|
| Modify the above script to create 4 additional rows of cars. Each row should be translated by 70 units along the positive direction of the X axis in comparison to the previous row. |
|
five_rows_of_six_cars.scad
…
n = 6; // number of cars
y_spacing = 50;
for (dy=[0:y_spacing:n*y_spacing-1]) {
    translate([0,dy,0])
        car();
}
for (dy=[0:y_spacing:n*y_spacing-1]) {
    translate([70,dy,0])
        car();
}
for (dy=[0:y_spacing:n*y_spacing-1]) {
    translate([140,dy,0])
        car();
}
for (dy=[0:y_spacing:n*y_spacing-1]) {
    translate([210,dy,0])
        car();
}
for (dy=[0:y_spacing:n*y_spacing-1]) {
    translate([280,dy,0])
        car();
}
…
|
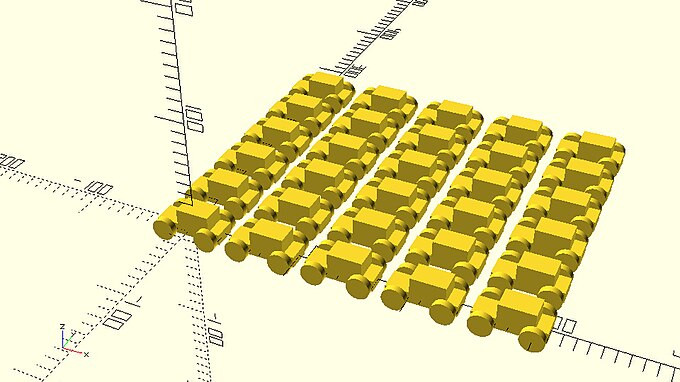
If you have been paying close attention to the tutorial so far, you may have noticed that the script above is not very efficient. It has a lot of code duplication and the number of rows can’t be easily modified. You faced a similar situation in the beginning of this chapter when you wanted to create a row of cars. To solve that problem, you wrapped the statement that creates a piece of the pattern (a single car) inside a for loop. This generated the whole pattern (a row of cars) without having to type out a statement for each individual car. The same principle can be applied here. In this case, the repeating pattern will be the row of cars, which itself is a repeating pattern of individual cars. Following the same process as before, the statements that create a row of cars will be placed inside a for loop in order to create the pattern of rows of cars. The result is that a for loop is placed inside of another for loop. For loops that are used in this way are called nested for loops. The following example demonstrates this concept.
::如果你一直在密切关注教程,你可能已经注意到上面的脚本不是很有效. 它有很多代码重复,行数不能很容易地修改. 你在本章的开始面临类似的情况,当你想创建一排汽车. 为了解决这个问题,你在for循环中包裹了创建模式 (单一汽车) 的语句. 这生成了整个模式 (一排汽车) 而无需为每个单独的汽车输入语句. 同样的原理可以在这里应用. 在这种情况下,重复的模式将是汽车的行,这本身就是个别汽车的重复模式. 按照前面的过程,创建一排汽车的语句将被放置在for循环中,以创建汽车的行. 结果是,一个循环被放置在另一个循环中.
|
five_rows_of_six_cars_with_nested_for_loops.scad
…
n_cars = 6;
y_spacing = 50;
n_rows = 5;
x_spacing = 70;
for (dx=[0:x_spacing:n_rows*x_spacing-1]) {
    for (dy=[0:y_spacing:n_cars*y_spacing-1]) {
        translate([dx,dy,0])
            car();
    }
}
…
|

You should notice the following concept. During the first repetition of the outer for loop, all iterations of the inner for loop are executed, thus creating the first row of cars. During the second repetition of the outer for loop all repetitions of the inner for loop are executed, thus creating the second row of cars. And so forth. Each row is positioned by the dx variable, which holds the parameterized translation along the X axis. During each iteration of the outer loop, a new value of dx is used. This value then holds steady while the inner loop executes and modifies the dy value. In this way, a row of cars is generated at each value of dx.
::您应该注意以下概念. 在外 for 循环的第一个重复过程中,内 for 循环的所有代执行,从而创建第一个车列. 在外 for 循环的第二次重复过程中,内 for 循环的所有代执行,从而创建第二个车列. 如此一来. 每一行由 dx 变量定位,该变量保持 X 轴上的参数化转换. 在外 for 循环的每一个代过程中,使用一个新的 dx 值. 然后,当内 for 循环执行并修改 dy 值时,该值保持稳定. 这样,在 dx 的每一个值上生成一行车.
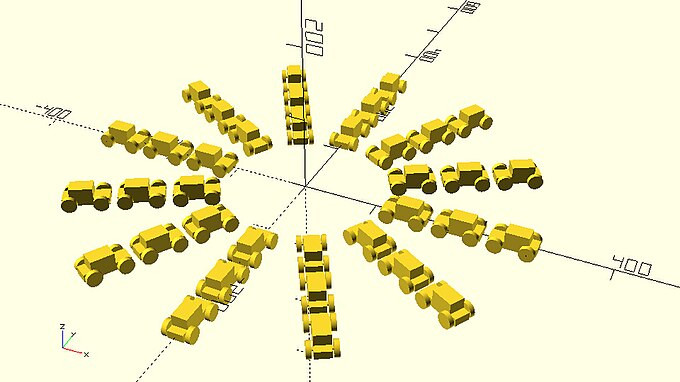
| Use nested for loops to create three circular patterns of cars similar to the image below. The for loop variable of the outer loop should be used to parameterize the radius of each pattern. The radius of the circular patterns should be 140, 210 and 280 units respectively. Each pattern should be consisted of 12 cars. |
|
three_circular_patterns.scad
…
n = 12; // number of cars
step = 360/n;
for (r=[140:70:280]) {
    for (angle=[0:step:359]) {
        dx = r*cos(angle);
        dy = r*sin(angle);
        translate([dx,dy,0])
            rotate(angle)
            car();
    }
}
…
|
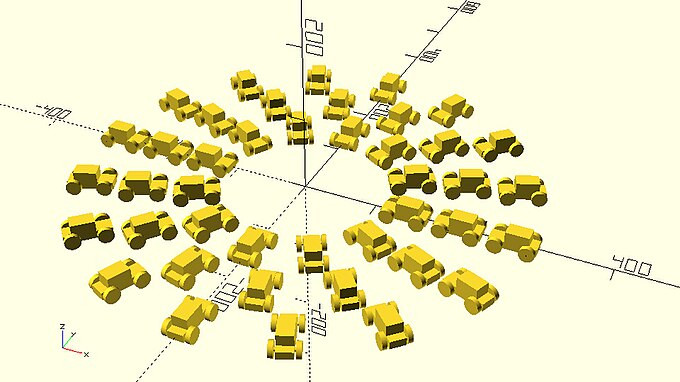
| Modify the script of the previous exercise so that not only the radius but also the number of cars is different for each pattern. To do so use an index variable i as the variable of the outer loop instead of the variable r that corresponds to the radius. The variable r should be calculated at each repetition of the outer for loop according to the formula r = 70 + i*70. Additionally, on each repetition of the outer for loop the n variable should take different values according to the formula n = 12 + i*2. The step variable also needs to be updated on each repetition of the outer for loop. The i variable should take the values 1, 2 and 3. |
|
three_circular_patterns_with_increasing_number_of_cars.scad
…
for (i=[1:1:3]) {
    r = 70 + i*70;
    n = 12 + i*2;
    step = 360/n;
    for (angle=[0:step:359]) {
        dx = r*cos(angle);
        dy = r*sin(angle);
        translate([dx,dy,0])
            rotate(angle)
            car();
    }
}
…
|