Inkscape指南
All shapes have control handles that can be dragged to manipulate various aspects. Sometimes it's better to use the shape's resize handles, instead of the Selector's generic resize abilities. While the Selector resizes relative to
the document
, the shape tools will resize relative to
the object
. Experiment with both to see which works best for you. (Use
Ctrl
+
Z
to undo any changes you don't want to keep.) To restrain the resize handles,
Ctrl
+
Drag
them. This limits movement to 15-degree steps. To change the step size, go to
‣File ‣‣Preferences ‣‣‣Behavior
and choose <Steps>.
::所有的形状都有可拖动的控制柄,可以操纵各种方面.有时使用形状的调整尺寸柄,而不是选择器的通用调整尺寸的能力,会更好.当选择器相对于文档进行调整尺寸时,形状工具将相对于对象进行调整尺寸.尝试两者,看看哪一个对你最适合. (使用Ctrl+Z取消任何你不想保存的更改.) 为了限制调整尺寸柄,Ctrl+Drag它们.此运动限制在15度的步骤. 要更改步骤大小,请进入 文件 偏好 行为,然后选择 <步骤>.
Rectangles

::长方形
Keyboard Shortcut:
R
or
F4
::键盘快捷方式:R或F4
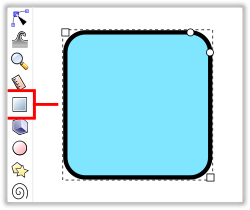
The
Rectangles and Squares tool
has a total of four shape handles. The two square handles (☐) control the size (width/height) and the two round handles (⭘) control corner rounding (Rx/Ry).
::矩形和方形工具共有四个形状手柄.两个方形手柄 (☐) 控制尺寸 (宽度/高度),两个圆形手柄 () 控制角的圆度 (Rx/Ry).
Hold ctrl while dragging one of the square handles (☐)
Ctrl
+
Drag
to create a width to height integer-ratio square or rectangle (e.g. 1:1 square or 3:1 rectangle). Hold shift while dragging a square handle (☐)
⇧ Shift
+
Drag
to draw a square/rectangle from the center out. Hold both ctrl and shift while dragging a square handle (☐)
Ctrl
+
⇧ Shift
+
Drag
to draw a integer-ratio square or rectangle from its center.
::拖拉一个方形柄 (☐) 时按下ctrl+Drag,创建一个宽高整数比的方形或矩形 (例如1:1方形或3:1矩形).拖拉一个方形柄时按下shift (☐) 时按下shift+Drag,从中心画出一个方形/矩形.拖拉一个方形柄时按下ctrl和shift (☐) 时按下ctrl+ 时画出一个整数比的方形或矩形从中心画出一个整数比.
To make the corner rounding the same (even)
Ctrl
+
Drag
one of the rounding handles (⭘), as the handle is moved from the corner the other rounding handle will move at the same ratio. Another option for rounding is to use the Rx and Ry numeric-value boxes on the Rectangle's Tool Controls bar. To reset the corner rounding use the Rectangle's Tool Controls bar, and click the 'make corners sharp' button, last item on the Tool Controls bar.
::为了使角圆相同 (均),Ctrl+Drag一个圆柄 (),当把柄从角移动时,另一个圆柄将以相同的比例移动.另一个圆的选项是使用矩形的工具控制上的Rx和Ry数值框.为了重置角圆,使用矩形的工具控制,并点击工具控制上的最后一个项"使角尖"按.
For help with the Rectangle and Circle's Tool Controls bar features, mouse-over 🖰 a button or numeric-value box for a pop-up message. You can also
Right-Click
a numeric-value box for a pop-up menu of pre-set values.
::为了帮助使用矩形和圆的工具控制功能,请鼠标移动按或数字值框以显示弹出消息.您也可以右键单击数字值框以显示预设值的弹出菜单.

Command keys (Ctrl, Shift and Alt) based
Tool-Tip
messages can be read at the bottom center of the user interface in the Statusbar. The tool tips are dynamic and will change based on (1) current edit being performed (2) mouse-over 🖰 of one the shape handles (3) press and hold one of the three command keys (Ctrl, Shift and Alt) will update with the associated tool tip, i.e., while in the Rectangles and Squares tool hold the Ctrl key and the tool-tip message will update.
::基于命令键 (Ctrl,Shift和Alt) 的工具提示消息可以在状态的用户界面的底部中部阅读.工具提示是动态的,并将根据 (1) 当前编辑的执行 (2) 鼠标转移的形状处理 (3) 按住三个命令键 (Ctrl,Shift和Alt) 之一的相关工具提示更新,即在矩形和方形工具中按住Ctrl键和工具提示消息将更新.
3D Boxes

::立体盒子
Keyboard Shortcut:
X
or
⇧ Shift
+
F4
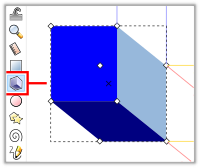
The 3D Box tool is an easy way to create a nearly 3-dimensional shape. Inkscape is a two dimensionial x/y vector editor, there is no 'z' axis within Inkscape.
::键盘快捷键:X或Shift+F4 3D Box工具是一个简单的方法来创建一个近3维的形状.Inkscape是一个二维的x/y向量编辑器,Inkscape中没有'z'轴.
Each dimension can lie on either parallel or converging edit lines. These edit lines are shown in different colors, so that users can distinguish one line from another:
::每个维度都可以位于平行或收的编辑线上.这些编辑线以不同的颜色显示,以便用户可以区分一行和另一行:
-
red lines reflect the X direction (width);
::红色线反映X方向 (宽度); -
blue lines reflect the Y direction (height);
::蓝色线反映Y方向 (高度); -
yellow lines reflect the Z direction (depth).
::黄色线反映了Z方向 (深度).
To select only one side of a 3D box,
Ctrl
+
Click
it.
::选择一个3D框的只有一个侧面, Ctrl+点击它.
Ellipses

::圆
Keyboard shortcut:
E
or
F5
::键盘快捷方式:E或F5
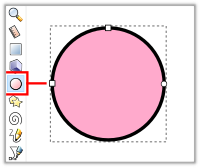
To draw an ellipse, circle, or an arc select the Ellipse Tool, and drag from the top left to the bottom right. The ellipse tool has a total of four handles: two square handles control the size and aspect ratio; two circle handles control the angle of the arc. Mouse-over 🖰 your cursor on one of the square or circle handles and the Statusbar (bottom center) message will update and display the handle's available edits and any
Ctrl
,
⇧ Shift
, and
Alt
key edits (if available).
::为了绘制圆,圆或弧,选择圆工具,从左上拉到右下.圆工具共有四个手柄:两个方形手柄控制尺寸和面积比;两个圆手柄控制弧的角度.鼠标转移 您的光标在一个方形或圆手柄上,状态 (下方中心) 消息将更新并显示手柄的可用编辑以及任何Ctrl, 转移和Alt键编辑 (如果可用).
Dragging the circle handles
outside
the ellipse makes a segment (pie chart); dragging them
inside
creates an arc.
Alt
+
Click
one of the circle handles to completely close the ellipse.
::拖动圆圈的柄外的圆形成一个段 (饼图);拖动它们的内部创建一个弧.Alt+Click一个圆圈的柄完全关闭圆.
Stars and Polygons

::星星和多边形
Keyboard Shortcut:
*
or
⇧ Shift
+
F9
::键盘快捷键: * 或 转换+F9
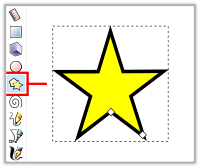
To switch between creating a Star and Polygon, click either the star-shaped or polygon-shaped icon in the
Tool Controls bar
of the Star/Polygon tool.
::在"星星/多边形"工具的工具控制中,点击星星或多边形图标.
The
Star Tool
has two shape handles, one
tip
( ⃟ )
handle
for tip adjustment, and one
base
( ⃟ )
handle
for base radius editing.
Ctrl
+
Drag
the tip handle in order to stretch the star without rotating, and
Ctrl
+
Drag
the base handle to change the ratio of the two handles without skewing.
::星工具有两个形状手柄,一个尖端 () 手柄用于尖端调整,一个底座 () 手柄用于底座半径编辑. Ctrl+Drag 拉尖手柄以伸展星星而不旋转,Ctrl+Drag 拉底座手柄以改变两个手柄的比例而不会扭曲.
The
Polygon Tool
only has one shape handle, the single
tip
( ⃟ )
handle
can be used to lock the tip radius (rotation).
Ctrl
+
Drag
the tip handle in order to resize the polygon without rotating it.
⇧ Shift
+
Drag
edits the rounding of the tip handle, while
Alt
+
Drag
will randomize the tip handle.
::多边形工具只有一个形状柄,单一的尖端 () 柄可用于锁定尖端半径 (旋转). Ctrl+Drag 柄可用于调整多边形的尺寸而不需要旋转. Shift+Drag 则编辑尖端柄的圆形,而 Alt+Drag 将尖端柄随机选择.
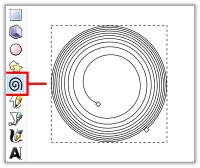
Spirals

::螺旋
Keyboard shortcut:
I
or
F9
::键盘快捷方式:I或F9
The Spiral Tool has two shape handles an outer (◇) handle and an inner (◇) handle. Dragging the handles lengthens and shortens the spiral.
::螺旋工具有两个形状的手柄,一个外 (◇) 手柄和一个内 (◇) 手柄.拖拉手柄会使螺旋变长或变短.
The outer handle can edit the roll/unroll of the spiral, can snap angle, scale, rotate and lock the outer radius. Here are the combination of keys to support the
outer handle
edits:
::外接手可以编辑螺旋的滚动/解滚动,可以切断角度,缩放,旋转和锁定外半径. 以下是支持外接手编辑的键组合:
-
-
-
Ctrl
+
Drag
the outer handle to roll/unroll spiral and snap angle.
::通过Ctrl+Drag,将外柄拖动到滚动/解滚旋和断开角度. -
⇧ Shift
+
Drag
the outer handle to scale and rotate the spiral.
:: 移动+拖动外柄以缩放并旋转螺旋. -
Alt
+
Drag
the outer handle to lock the outer radius.
::拉出外以锁定外半径.
-
Ctrl
+
Drag
the outer handle to roll/unroll spiral and snap angle.
-
Divergence
::差异
Alt
+
Drag
the
inner handle
to change the divergence (distance between the rolls). To make the distance really big, hold
Alt
and move the inner handle first towards the center, and then further in the same direction beyond the center.
::Alt+Drag 拉动内柄以改变分歧 (卷之间距离). 要使距离变得非常大,请按住 Alt 键,先将内柄向中心移动,然后再向中心之外的方向移动.
Spirals with a
divergence
less than 1 are denser towards the edges; ones with divergence greater than 1 are denser towards the center. To reset divergence,
Alt
+
Click
the handle.
⇧ Shift
+
Click
the handle to return it to the center.
::偏差小于 1 的螺旋在边缘较密;偏差大于 1 的螺旋在中心较密. 为了重置偏差,请 Alt+Click 按. Shift+Click 按将其返回中心.
Experiment with the handles and the
⇧ Shift
and
Alt
keys to get a grip on the tool.
::试试使用手柄和 开关和Alt键来掌握工具.
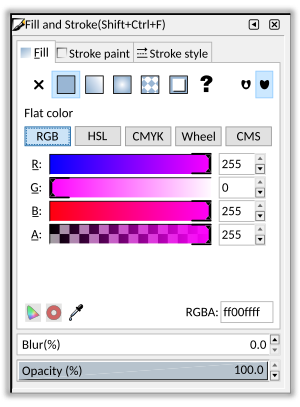
Fill and Stroke

::填充和冲动
Keyboard shortcut:
Ctrl
+
⇧ Shift
+
F
::键盘快捷键:Ctrl+ 转换+F
All objects (shapes, paths and text) have a fill and stroke styles. The stroke is the outline of the object, and fill is the area inside the object.
::所有对象 (形状,路径和文本) 都有填充和冲刺风格.冲刺是对象的轮,填充是对象内部的区域.
To set fill and stroke styles,
Select
the object and go to
‣
O
bject ‣‣
F
ill and Stroke...
or press
Ctrl
+
Shift
+
F
. The Fill and Stroke dialog has three tabs labelled Fill, Stroke paint and Stroke style.
::设置填充和冲击风格,选择对象并进入"对象"填充和冲击...或按Ctrl +Shift +F.填充和冲击对话框有三个标签填充,冲击涂料和冲击风格的选项卡.
An objects fill can be set to empty, flat color, linear or radial gradient, pattern, swatch,
unset
,
self-intersections
and
solid
.
::填充对象可以设置为空,平面色,线性或辐射梯度,图案,样本,未设置,自我交叉和固体.
The Stroke style edits include:
::创作风格的编辑包括:
-
Width with unit of measure (i.e, pix, pt, cm, inch...)
::宽度与测量单位 (即像素,分数,厘米,英寸...) -
Join (corners); Miter, Round, Bevel
-
Miter maximum length of the Miter join
::测量器连接的最大长度
::接头 (角); 形,圆形,形 形 形的最大长度 -
Miter maximum length of the Miter join
-
Caps (end points) Butt, Round, Square
::顶部 (末端) 股,圆形,方形 -
Dashes (stroke patterns) and Offset
::线条 (冲动图案) 和 偏移 -
Markers for
Start
,
Mid
and
End
(nodes). Text objects only have the stroke's "Width with unit of measure" edit available.
::标记为开始,中和结束 (节点). 文本对象只具有 stroke 的"宽度与单位"编辑可用.
Color models provided by Inkscape (v0.91) include RGB, HSL, CMYK, Wheel and CMS. When working with the Filter
s
menu, if you come across a filter that seems to have no impact on the object. First remove the filter from the object, ‣Filter
s
‣‣
R
emove Filters (
Alt
+
S
,
R
. Open the Fill and Stroke Menu and use the HSL (hue, saturation, and lightness (or luminosity)) model tab, then under the lightness (L) setting try middle 128 to high 255 values. Some of the filters are dependent upon an object's lightness and when an object is too dark the filters seems to not work correctly.
::墨镜 (v0.91) 提供的颜色模型包括RGB,HSL,CMYK,轮和CMS.在使用过器菜单时,如果遇到过器似乎对对象没有影响.首先从对象中移除过器, 过器 移除过器 (Alt+S,R.打开填充和冲动菜单并使用HSL (色调,和和亮度 (或亮度)) 模型选项卡,然后在亮度 (L) 设置下尝试128到高255的值.一些过器取决于对象的亮度,当对象太暗时,过器似乎无法正确工作.
Contrasting (opposite) colors are very easy to select when using the Color Wheel. The color wheel has two edit icons, one lies on the outer wheel and is a straight line, the other edit icon is a circle that lies within the inner triangle. The triangle has 3 main color edit corners, the corners are full white, full black and full color (no white/black). The inner triangle circle edit (position) sets the color's darkness, lightness or neutrality (middle of triangle).
::使用色轮时,对比 (相反) 的颜色非常容易选择.色轮有两个编辑图标,一个位于外轮上,是直线,另一个编辑图标是位于内三角形内的圆.三角形有3个主要的色彩编辑角,角形是全白,全黑和全色 (没有白/黑).内三角形圆编辑 (位置) 设置颜色的黑暗,亮度或中性 (三角形的中间).
Blur
and Opacity, posted at the bottom of the fill and Stroke dialogue are two often overlooked edits, these two color edits impact both the fill and the stroke. The Blur % edit provides 0.0 based increments from 0.0 to 100.0, with a default of 0.0. When working with blurs it is a good idea to set the Zoom to 100% (
1
). The Opacity (transparency) setting is similar to the color models "Alpha" setting, the difference is that the Opacity is applied to the entire (fill/stroke) object. A setting of 0% and the color is completely gone. One of the most used 0% settings is in the default creation of gradients, one gradient stop at Opacity 100% (full color) and the other stop set to no color (Opacity 0%).
::模糊和不透明,在填充和冲击对话框底部发布的两个经常被忽视的编辑,这两个颜色编辑影响填充和冲击.模糊%编辑提供0.0基于从0.0到100.0,默认为0.0.在处理模糊时,将缩放设置为100%是个好主意 (1).不透明 (透明度) 设置与颜色模型"Alpha"设置类似,区别在于不透明度应用于整个 (填充/冲击) 对象.设置为0%和颜色完全消失.最常用的0%设置之一是默认创建渐变,一个渐变停止在不透明度 (全色100%) 而另一个停止设置为无色 (不透明度0%).
Having trouble with an objects coloring? Open this dialogue and look at three edits Blur, Opacity the Alpha settings. The alpha setting is common among all of the color models (i.e., RGB, HSL, CMS, etc...). During some, not all, of the thousands of color edits a given object's fill and or stroke will have a alpha value or opacity % of 0 assigned. Going to this menu allows one to see both the alpha (fill or stroke) opacity (fill and stroke) settings under one dialogue and set them to 255 (alpha) and 100% (opacity).
::遇到对象的彩色问题?打开这个对话框,看看三个编辑 模糊,不透明的阿尔法设置.阿尔法设置在所有颜色模型中都是常见的 (即RGB,HSL,CMS等).在某些,但不是所有的,成千上万的颜色编辑中,给定对象的填充和/或冲刺将具有0的阿尔法值或不透明度%.进入这个菜单可以在一个对话框下看到阿尔法 (填充或冲刺) 不透明度 (填充和冲刺) 设置,并将它们设置为255 (阿尔法) 和100% (不透明度).