LaTeX
用于撰写语言学论文的 LaTeX 包
有许多 LaTeX 包可用于撰写语言学论文。为编号示例、句法树、OT 表格、特征矩阵、IPA 字体以及其他许多应用创建了各种包。某些包,如 tipa 包,在该领域内已成为标准,而其他包则根据作者偏好有所不同。
一些推荐的包:[1]
-
术语注释:
gb4e或Covington -
IPA 符号:
tipa -
OT 表格:
OTtablx -
句法树:
qtree+tree-dvips(用于绘制箭头)-
或者,
xyling非常强大,但不像qtree那样易用 -
xy包本身的学习曲线较陡,但它提供了很多控制选项;对于最简单的树形结构,可以使用xymatrix功能和箭头 -
tikz-qtree与qtree具有相同的语法,但使用 PGF/TikZ,这使得绘制箭头等操作有更多选项
-
-
依赖树和气泡解析:
TikZ-dependency包提供了一个高层次、便捷的接口来绘制依赖图。它基于 PGF/TikZ,但不需要事先了解 TikZ,即可高效使用。 -
属性值矩阵(AVMs):
avm -
John Frampton 的 expex:
expex
编号示例
有几个常用的包用于创建语言学出版物中使用的编号示例。
gb4e 包
gb4e 包[2] 最后更新于 2010 年,使用方法为:
\usepackage{gb4e}
重要: 如果使用 gb4e 包,请确保它是文档导言部分中的最后一个 \usepackage 调用。否则,可能会出现参数堆栈大小溢出的错误。
该包的示例放在 exe 环境中,每个示例以 \ex 命令开始。
\begin{exe}
	\ex This is an example.
\end{exe}
多个示例的包含
可以在环境中包含多个示例,每个示例都有自己的编号。
\begin{exe}
	\ex This is the first example.
	\ex This is the second example.
	\ex This is the third.
\end{exe}
创建嵌套示例列表
要创建嵌套的示例列表,使用 xlist 环境。
\begin{exe}
    \ex \begin{xlist}
        \ex This is a sub-example.
        \ex This is a second sub-example.
        \ex \begin{xlist}
            \ex This is a sub-sub-example.
            \ex This is a second sub-sub-example.
        \end{xlist}
    \end{xlist}
\end{exe}
标注可接受性判断
对于可接受性判断, \ex 命令可以接受一个可选参数。包括判断标记时,相关的句子必须用大括号括起来。
\begin{exe}
	\ex This sentence is grammatical English.
	\ex[*] {This sentence English in ungrammatical is.}
\end{exe}
文本中引用示例
在文本中引用示例的方法与普通 LaTeX 文档中的引用相同。有关更多细节,请参阅标注和交叉引用部分。
\begin{exe}
	\ex\label{ex1} Godzilla destroyed the city.
	\ex\label{ex2} Godzilla roared.
\end{exe}
Sentence (\ref{ex1}) contains two arguments, but (\ref{ex2}) contains only one.
进一步的细节可以在完整文档中找到,可以在此处获取。
ling-macros 包
由 Emma Pease 创建并在 2016 年最后更新的 ling-macros 包[3],是另一种示例编号的方法。该包使用两个主要命令:\enumsentence 和 \eenumsentence。前者用于单个示例,后者用于嵌套示例。
\enumsentence{This is an example.}

\enumsentence{This is the first example.}
\enumsentence{This is the second example.}
\enumsentence{This is the third.}
多层嵌套示例
多层嵌套示例使用普通的 LaTeX 列表环境。
\eenumsentence{\item This is a sub-example.
		\item This is a second sub-example.
		\item \begin{enumerate}
			\item This is sub-sub-example.
			\item This is a second sub-sub-example.
			\end{enumerate}
}
完整的文档可以在此处找到。
句法树
语言学家常常需要说明一个句子的句法结构。一种方法是通过句法树来实现这一点。不幸的是,不同的语法形式在句法树的表现上差异很大,因此不同的 LaTeX 包适用于不同的语法形式。
成分树
虽然 LaTeX 有多个包可用来绘制句法树,但本文重点介绍 qtree 和 xyling 包。
qtree 包
使用 qtree 绘制树形图相对简单。首先,需要在文档的导言部分包含 qtree 包,该包最后更新于 2006 年:
\usepackage{qtree}
新树的开始使用 \Tree 命令,每个(子)树由括号 [ ] 指示。树的根节点总是前面加上一个点 .,叶子节点则仅通过其标签表示。请注意,闭合括号之前的空格是必须的。
\Tree [.S [.NP LaTeX ] [.VP [.V is ] [.NP fun ] ] ]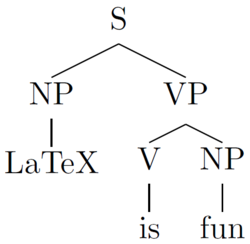
默认情况下,qtree 会将句法树居中显示在页面上。可以通过在加载包时指定来关闭这种行为:
\usepackage[nocenter]{qtree} % 不居中树
或者通过以下命令:
\qtreecenterfalse % 从此以后不居中树
如果要恢复居中,可以使用以下命令:
\qtreecentertrue % 从此以后居中树
重要提示: 如果你使用 gb4e 包,请确保它是文档导言部分中的最后一个 \usepackage 调用,否则可能会出现参数堆栈大小溢出的错误。
tikz-qtree
使用与 qtree 相同的语法,tikz-qtree(最后更新于 2009 年)是另一个易于使用的句法树绘制替代方案。
对于简单的树,tikz-qtree 与 qtree 完全可以互换。然而,qtree的一些高级功能在tikz-qtree 中以不同方式实现,或者完全没有实现。另一方面,tikz-qtree` 提供了其他功能,例如控制树的生长方向(自上而下、自左而右等)或为边缘设置不同的样式。
要使用 tikz-qtree 包绘制树形图,请在文档的导言部分加入以下内容:
\usepackage{tikz}
\usepackage{tikz-qtree}
tikz-qtree 的语法与绘制简单树时 qtree 相同,效果也是一样的。
\Tree [.S [.NP LaTeX ] [.VP [.V is ] [.NP fun ] ] ]
与 qtree 不同,tikz-qtree 默认不将树居中。要使其居中,可以将其放入一个居中环境中:
\begin{center}
\Tree [.S [.NP LaTeX ] [.VP [.V is ] [.NP fun ] ] ]
\end{center}
\Tree [.S [.NP LaTeX ] [.VP [.V is ] [.NP fun ] ] ]
\end{center}
对于设置树的样式,tikz-qtree 提供了 \tikzset 命令。例如,要让树从左到右生长而不是从上到下,可以使用以下代码:
\tikzset{grow'=right} % 使树从左到右生长
\tikzset{every tree node/.style={anchor=base west}} % 将树的节点对齐到左侧(西)
\Tree [.S [.NP LaTeX ] [.VP [.V is ] [.NP fun ] ] ]
上面的代码改变了所有树的默认方向,这些树在 \tikzset 命令之后定义。要仅改变单个树的方向,需要将其放入 \tikzpicture 环境中:
\begin{tikzpicture} % 所有更改仅影响该环境中的树
\tikzset{grow'=right} % 使树从左到右生长
\tikzset{every tree node/.style={anchor=base west}} % 将树的节点对齐到左侧(西)
\Tree [.S [.NP LaTeX ] [.VP [.V is ] [.NP fun ] ] ]
\end{tikzpicture}
依赖树
依赖树可以采用多种视觉形式。通常,它们非常类似于短语结构树。或者,它们也可以通过在文本上方画括号来捕获。
二维依赖树
这些可以通过相当通用的绘图包 tikz 或 xyling 包来实现,后者最后更新于 2006 年:
在导言部分:
\usepackage{tikz}
在文档部分:
\begin{tikzpicture}
	\node (is-root) {is}
		[sibling distance=3cm]
		child { node {this} }
		child {
			node {tree}
				[sibling distance=1.5cm]
				child { node {an} }
				child { node {example} }
				child { node {.} }
				child[missing]
		};
	\path (is-root) +(0,-2.5\tikzleveldistance)
		node {\textit{This is an example tree.}};
\end{tikzpicture}
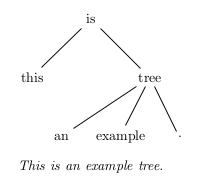
使用 TikZ 创建的依赖树
TikZ 的优势在于,它允许直接从 LaTeX 源生成 PDF,而无需通过 latex 编译为 DVI,然后可能通过 PS 转换为 PDF,使用像 dvips 和 ps2pdf 这样的工具。
tikz 的替代方案是 xyling 包,该包本身是基于 xy 包的。
在导言部分:
\usepackage{xyling}
在文档部分:
\Tree{	& \K{is}\B{dl}\B{drr} \\
        \K{this} &&& \K{tree}\B{dll}\B{dl}\B{dr} \\
        & \K{an} & \K{example} && \K{.} }
\medskip
\textit{这是一个示例树。}
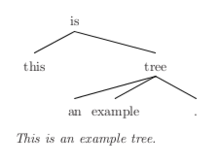
使用 xyling 创建的依赖树
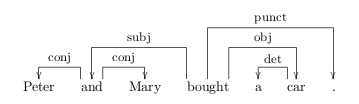
一种在运行文本上方排版依赖括号的方法是使用 xytree 包。它提供了相当好的控制方式来排版这些括号,但需要将 LaTeX 代码编译为 DVI(可能需要稍后通过工具如 dvips 和 ps2pdf 转换为 PDF)。
在导言部分:
\usepackage{xytree}
在文档中:
\xytext{
  \xybarnode{Peter} &~~~&
  \xybarnode{and}
    \xybarconnect(UL,U){-2}"_{\small conj}"
    \xybarconnect(UR,U){2}"^{\small conj}"
    &~~~&
  \xybarnode{Mary} &~~~&
  \xybarnode{bought}
    \xybarconnect[8](UL,U){-4}"_{\small subj}"
    \xybarconnect[13]{6}"^{\small punct}"
    \xybarconnect[8](UR,U){4}"^{\small obj}"
    &~~~&
  \xybarnode{a} &~~~&
  \xybarnode{car}
    \xybarconnect(UL,U){-2}"_{\small det}"
    &~~~&
  \xybarnode{.}
}
使用 xytree 创建的文本上方的依赖树
使用 tikz-dependency 包绘制依赖树
tikz-dependency 包(最后更新于 2012 年)提供了高级命令来设计和样式化依赖图。要绘制图形,只需要创建一个依赖环境,将句子的文本写入 deptext 环境,并使用 \depedge 命令绘制边缘。可以使用全局和局部可选参数来样式化和微调图形的外观,如下所示的示例:
在导言部分:
\usepackage{tikz-dependency}
在文档中:
\begin{dependency}[theme = simple]
   \begin{deptext}[column sep=1em]
      A \& hearing \& is \& scheduled \& on \& the \& issue \& today \& . \\
   \end{deptext}
   \deproot{3}{ROOT}
   \depedge{2}{1}{ATT}
   \depedge[edge start x offset=-6pt]{2}{5}{ATT}
   \depedge{3}{2}{SBJ}
   \depedge{3}{9}{PU}
   \depedge{3}{4}{VC}
   \depedge{4}{8}{TMP}
   \depedge{5}{7}{PC}
   \depedge[arc angle=50]{7}{6}{ATT}
\end{dependency}
使用 TikZ-dependency 绘制的依赖树

欲了解更多细节,请参阅 TikZ-dependency 的文档。
术语注释(Glosses)
以下是使用不同包创建术语注释示例的方法。
使用 gb4e
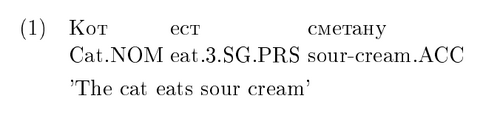
要使用 gb4e 创建术语注释示例(最后更新于 2010 年),可以使用普通的 exe 环境。但在 \ex 标签之后,使用 \gll 引入示例及其注释,之后用 \trans 标签进行翻译。
\begin{exe}
\ex
\gll Кот ест сметану\\
cat.NOM eat.3.SG.PRS sour-cream.ACC\\
\trans `The cat eats sour cream'
\end{exe}
垂直对齐的术语注释
垂直对齐的术语注释通过空格分隔,因此,如果需要在部分注释中包含空格,只需将连接部分括在大括号内。
\begin{exe}
\ex
\gll Pekka pel\"astyi karhusta.\\
     Pekka {became afraid} bear.ELA\\
\trans `Pekka became afraid because of the/a bear.'
\end{exe}
使用 ling-macros 包
ling-macros 包(最后更新于 2016 年)使用 \shortex 命令在 \enumsentence 和 \eenumsentence 命令中引入带有注释的示例。该命令有四个参数,并基于常规的 tabular 环境构建。第一个参数指定注释的列数,第二个和第三个参数分别给出文本及其注释,每列中的项由通常的 & 分隔符分隔。第四个参数是翻译。
\enumsentence{\shortex{3}
		{Pekka & pel\"astyi & karhu-sta.}
		{Pekka & became afraid & bear.ELA}
		{`Pekka became afraid because of the/a bear.'}
		}
IPA 字符
tipa 包(最后更新于 2004 年)是 LaTeX 中用于国际音标符号的标准包,在 Unicode 广泛应用之前。如今,可以直接在 LaTeX 中结合 XeLaTeX 和 LuaLaTeX 使用 Unicode 中的 IPA 符号,从而大大提高了可读性。
在导言部分:
\usepackage{tipa}
有两种方法将 IPA 符号插入到文档中。第一种方法是使用 IPA 环境:
\begin{IPA}
text in IPA format here
\end{IPA}
这种方法适用于需要以 IPA 格式表示的长文本。另一种方法是使用 \textipa 命令,它会将参数中的文本格式化为 IPA。这种命令与其他字体排版命令类似。
\textipa{text in IPA format here}
基本符号
IPA 格式通过将 ASCII 字符转换为相应的 IPA 符号来工作。小写字母按通常的方式呈现,
\textipa{abcdefghijklmnopqrstuvwxyz}
但是大写字母的呈现方式不同:
\textipa{ABCDEFGHIJKLMNOPQRSTUVWXYZ}
在 LaTeX 中通常使用的标点符号也会在 IPA 环境中忠实地呈现。
\textipa{! * + = ? . , / [ ] ( ) ` ' | ||}
数字和 @ 在 IPA 环境中也有变体。
\textipa{1234567890 @}
此外,还有许多特殊宏用于表示没有其他关联的符号,下面列出了一些。有关完整列表,请参阅官方 TIPA 手册[4]。
\; 宏前置大写字母时,产生小型大写版本的字母:
\textipa{\;A \;B \;E \;G \;H \;I \;L \;R \;Y}
\: 宏产生卷舌符号:
\textipa{\:d \:l \:n \:r \:s \:t \:z}
\! 宏产生爆破符号和双唇点击符号:
\textipa{\!b \!d \!g \!j \!G \!o}
XeLaTeX
现代的输入 IPA 符号的方式是使用 XeTeX 作为编译器,直接插入符号,使用字符映射或 IPA 键盘[5]。
您可以直接输入 [fəˈnɛtɪk] 符号。
音位规则
使用 phonrule 包(最后更新于 2017 年)可以排版音位规则[6]。
以下是您可以使用该包实现的示例:
\phonb{\phonfeat{+stop \\ +consonant \\ +alveolar} }{[ɾ]}{\phonfeat{+vowel \\ +stressed} }{\phonfeat{+vowel \\ +stressed} }
参考文献
[1] LaTeX for Linguists 演示
[2] gb4e 包在 CTAN 上的页面
[3] ling-macros 包在 CTAN 上的页面
TIPA 手册
有关 IPA 键盘的更多信息,请参见 SIL [4]。
[5] CTAN 上的包
[6] 音位规则包在 CTAN 上的页面
外部链接
-
LaTeX for Linguists
-
qtree包用于绘制句法树 -
gb4e包页面在 CTAN 上