Python 机器学习
简介
随机森林是一种监督学习算法,既可用于分类,也可用于回归。但主要用于分类问题。众所周知,森林由树木组成,树木越多意味着森林越健壮。类似地,随机森林算法在数据样本上创建决策树,然后从每个决策树中获得预测,最后通过投票选择最佳解决方案。它是一种集成方法,优于单个决策树,因为它通过平均结果减少了过拟合。
随机森林算法的工作原理
我们可以通过以下步骤理解随机森林算法的工作原理:
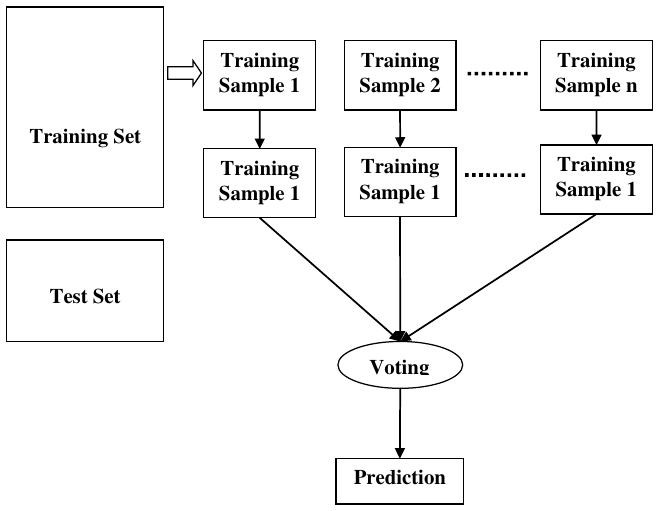
步骤 1:首先,从给定数据集中选择随机样本。
步骤 2:接下来,该算法将为每个样本构建一个决策树。然后它将从每个决策树中获得预测结果。
步骤 3:在此步骤中,将对每个预测结果进行投票。
步骤 4:最后,选择投票最多的预测结果作为最终预测结果。
以下图表将说明其工作原理:
训练集
- 训练样本 1 -> 决策树 -> 预测
- 训练样本 2 -> 决策树 -> 预测
- ...
- 训练样本 n -> 决策树 -> 预测
测试集 -> 投票 -> 最终预测
在 Python 中实现
首先,导入必要的 Python 包:
import numpy as np
import matplotlib.pyplot as plt
import pandas as pd
接下来,从其网页链接下载鸢尾花数据集,如下所示:
接下来,我们需要为数据集分配列名,如下所示:
headernames = ['sepal-length', 'sepal-width', 'petal-length', 'petal-width', 'Class']
现在,我们需要将数据集读取到 pandas 数据框中,如下所示:
dataset = pd.read_csv(path, names=headernames)
dataset.head()
输出:
   sepal-length  sepal-width  petal-length  petal-width        Class
0           5.1          3.5           1.4          0.2  Iris-setosa
1           4.9          3.0           1.4          0.2  Iris-setosa
2           4.7          3.2           1.3          0.2  Iris-setosa
3           4.6          3.1           1.5          0.2  Iris-setosa
4           5.0          3.6           1.4          0.2  Iris-setosa
数据预处理将通过以下脚本行完成:
X = dataset.iloc[:, :-1].values # 获取所有行和除了最后一列的所有列作为特征
y = dataset.iloc[:, 4].values   # 获取所有行和最后一列作为目标变量
接下来,我们将数据划分为训练集和测试集。以下代码将把数据集分割为 70% 的训练数据和 30% 的测试数据:
from sklearn.model_selection import train_test_split
X_train, X_test, y_train, y_test = train_test_split(X, y, test_size=0.30)
接下来,借助 sklearn 的 RandomForestClassifier 类训练模型,如下所示:
from sklearn.ensemble import RandomForestClassifier
classifier = RandomForestClassifier(n_estimators=50, random_state=42) # 添加 random_state 以确保结果可复现
classifier.fit(X_train, y_train)
最后,我们需要进行预测。这可以通过以下脚本完成:
y_pred = classifier.predict(X_test)
接下来,打印结果,如下所示:
from sklearn.metrics import classification_report, confusion_matrix, accuracy_score

result = confusion_matrix(y_test, y_pred)
print("Confusion Matrix:")
print(result)

result1 = classification_report(y_test, y_pred)
print("Classification Report:")
print(result1)

result2 = accuracy_score(y_test, y_pred)
print("Accuracy:", result2)
输出:
Confusion Matrix:
[[14  0  0]
 [ 0 18  1]
 [ 0  0 12]]

Classification Report:
                 precision    recall  f1-score   support

    Iris-setosa       1.00      1.00      1.00        14
Iris-versicolor       1.00      0.95      0.97        19
 Iris-virginica       0.92      1.00      0.96        12

       accuracy                           0.98        45
      macro avg       0.97      0.98      0.98        45
   weighted avg       0.98      0.98      0.98        45

Accuracy: 0.9777777777777777
随机森林的优缺点
优点
以下是随机森林算法的优点:
- 它通过平均或结合不同决策树的结果来克服过拟合问题。
- 随机森林对大量数据项的处理能力优于单个决策树。
- 随机森林的方差小于单个决策树。
- 随机森林非常灵活,并且具有非常高的准确性。
- 随机森林算法不需要对数据进行缩放。即使提供未缩放的数据,它也能保持良好的准确性。
- 即使丢失了大部分数据,随机森林算法也能保持良好的准确性。
缺点
以下是随机森林算法的缺点:
- 复杂性是随机森林算法的主要缺点。
- 随机森林的构建比决策树更困难,更耗时。
- 实现随机森林算法需要更多的计算资源。
- 当决策树数量很大时,它不像其他算法那样直观。
- 与其他算法相比,使用随机森林的预测过程非常耗时。
14. Classification Algorithms – Machine
Random
Learning Forest
with Python
Introduction
Random forest is a supervised learning algorithm which is used for both classification as
well as regression. But however, it is mainly used for classification problems. As we know
that a forest is made up of trees and more trees means more robust forest. Similarly,
random forest algorithm creates decision trees on data samples and then gets the
prediction from each of them and finally selects the best solution by means of voting. It is
an ensemble method which is better than a single decision tree because it reduces the
over-fitting by averaging the result.
Working of Random Forest Algorithm
We can understand the working of Random Forest algorithm with the help of following
steps:
Step1: First, start with the selection of random samples from a given dataset.
Step2: Next, this algorithm will construct a decision tree for every sample. Then it will get
the prediction result from every decision tree.
Step3: In this step, voting will be performed for every predicted result.
Step4: At last, select the most voted prediction result as the final prediction result.
90
The following diagram will illustrate its working:
Machine Learning with Python
Training Set
Training
Sample 1
Training
Sample 2
Training
Sample 1
Training
Sample 1
Training
Sample n
Training
Sample 1
Test Set
Voting
Prediction
Implementation in Python
First, start with importing necessary Python packages:
import numpy as np
import matplotlib.pyplot as plt
import pandas as pd
Next, download the iris dataset from its weblink as follows:
path = "https://archive.ics.uci.edu/ml/machine-learning-
databases/iris/iris.data"
Next, we need to assign column names to the dataset as follows:
headernames = ['sepal-length', 'sepal-width', 'petal-length', 'petal-width',
'Class']
Now, we need to read dataset to pandas dataframe as follows:
dataset = pd.read_csv(path, names=headernames)
dataset.head()
91
Machine Learning with Python
sepal-
sepal-
petal-
petal-width
Class
length
width
length
0
5.1
3.5
1.4
0.2
Iris-setosa
1
4.9
3.0
1.4
0.2
Iris-setosa
2
4.7
3.2
1.3
0.2
Iris-setosa
3
4.6
3.1
1.5
0.2
Iris-setosa
4
5.0
3.6
1.4
0.2
Iris-setosa
Data Preprocessing will be done with the help of following script lines:
X = dataset.iloc[:, :-1].values
y = dataset.iloc[:, 4].values
Next, we will divide the data into train and test split. The following code will split the
dataset into 70% training data and 30% of testing data:
from sklearn.model_selection import train_test_split
X_train, X_test, y_train, y_test = train_test_split(X, y, test_size=0.30)
Next, train the model with the help of RandomForestClassifier class of sklearn as
follows:
from sklearn.ensemble import RandomForestClassifier
classifier = RandomForestClassifier(n_estimators=50)
classifier.fit(X_train, y_train)
At last, we need to make prediction. It can be done with the help of following script:
y_pred = classifier.predict(X_test)
Next, print the results as follows:
from sklearn.metrics import classification_report, confusion_matrix,
accuracy_score
result = confusion_matrix(y_test, y_pred)
print("Confusion Matrix:")
print(result)
result1 = classification_report(y_test, y_pred)
print("Classification Report:",)
print (result1)
result2 = accuracy_score(y_test,y_pred)
print("Accuracy:",result2)
92
Machine Learning with Python
Output
Confusion Matrix:
[[14
0
0]
[ 0 18
1]
[ 0
0 12]]
Classification Report:
precision
recall
f1-score
support
Iris-setosa
1.00
1.00
1.00
14
Iris-versicolor
1.00
0.95
0.97
19
Iris-virginica
0.92
1.00
0.96
12
micro avg
0.98
0.98
0.98
45
macro avg
0.97
0.98
0.98
45
weighted avg
0.98
0.98
0.98
45
Accuracy: 0.9777777777777777
Pros and Cons of Random Forest
Pros
The following are the advantages of Random Forest algorithm:
It overcomes the problem of overfitting by averaging or combining the results of
different decision trees.
Random forests work well for a large range of data items than a single decision
tree does.
Random forest has less variance then single decision tree.
Random forests are very flexible and possess very high accuracy.
Scaling of data does not require in random forest algorithm. It maintains good
accuracy even after providing data without scaling.
Random Forest algorithms maintains good accuracy even a large proportion of the
data is missing.
Cons
The following are the disadvantages of Random Forest algorithm:
93
Machine Learning with Python
Complexity is the main disadvantage of Random forest algorithms.
Construction of Random forests are much harder and time-consuming than decision
trees.
More computational resources are required to implement Random Forest algorithm.
It is less intuitive in case when we have a large collection of decision trees.
The prediction process using random forests is very time-consuming in comparison
with other algorithms.