Python 机器学习
简介
K-最近邻 (KNN) 算法是一种监督机器学习算法,可用于分类和回归预测问题。然而,在工业中它主要用于分类预测问题。以下两个属性将很好地定义 KNN:
- 惰性学习算法:KNN 是一种惰性学习算法,因为它没有专门的训练阶段,并在分类时使用所有数据进行训练。
- 非参数学习算法:KNN 也是一种非参数学习算法,因为它不对底层数据做任何假设。
KNN 算法的工作原理
K-最近邻 (KNN) 算法使用“特征相似性”来预测新数据点的值,这意味着新数据点的值将根据其与训练集中点的匹配程度进行分配。我们可以借助以下步骤理解其工作原理:
步骤 1:为了实现任何算法,我们需要数据集。因此,在 KNN 的第一步中,我们必须加载训练数据和测试数据。
步骤 2:接下来,我们需要选择 K 的值,即最近数据点的数量。K 可以是任何整数。
步骤 3:对于测试数据中的每个点,执行以下操作:
3.1:借助任何方法(即:欧几里得、曼哈顿或汉明距离)计算测试数据与训练数据每行之间的距离。最常用的距离计算方法是欧几里得距离。
3.2:现在,根据距离值,将它们按升序排序。
3.3:接下来,它将从排序后的数组中选择前 K 行。
3.4:现在,它将根据这些行中最常见的类别将一个类别分配给测试点。
步骤 4:结束
示例
以下是理解 K 概念和 KNN 算法工作原理的示例:
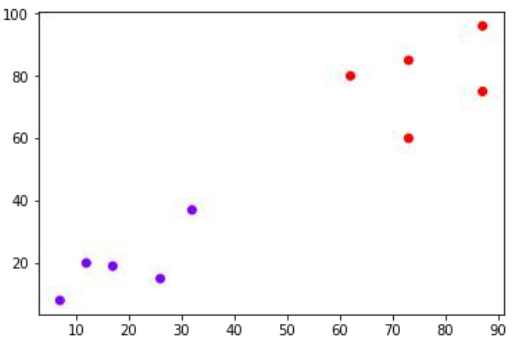
假设我们有一个可以绘制如下的数据集:
现在,我们需要将带有黑点的新数据点(在点 60,60 处)分类到蓝色或红色类别中。我们假设 K = 3,即它将找到三个最近的数据点。如下图所示:
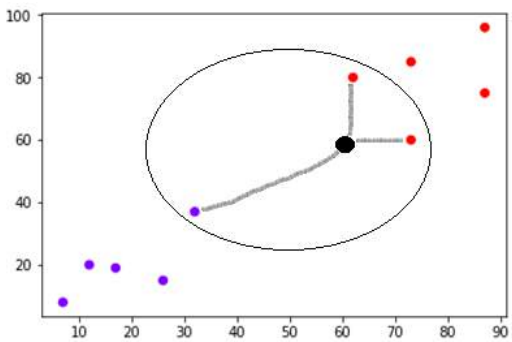
我们可以在上图中看到带有黑点的数据点的三个最近邻居。在这三个中,其中两个属于红色类别,因此黑点也将被分配到红色类别。
在 Python 中实现
我们知道 K-最近邻 (KNN) 算法可用于分类和回归。以下是 Python 中将 KNN 用作分类器和回归器的实现方法:
KNN 作为分类器 (KNN as Classifier)
首先,从导入必要的 Python 包开始:
import numpy as np
import matplotlib.pyplot as plt
import pandas as pd
接下来,从其网页链接下载鸢尾花数据集,如下所示:
接下来,我们需要为数据集分配列名,如下所示:
headernames = ['sepal-length', 'sepal-width', 'petal-length', 'petal-width', 'Class']
现在,我们需要将数据集读取到 pandas 数据框中,如下所示:
dataset = pd.read_csv(path, names=headernames)
dataset.head()
输出:
   sepal-length  sepal-width  petal-length  petal-width        Class
0           5.1          3.5           1.4          0.2  Iris-setosa
1           4.9          3.0           1.4          0.2  Iris-setosa
2           4.7          3.2           1.3          0.2  Iris-setosa
3           4.6          3.1           1.5          0.2  Iris-setosa
4           5.0          3.6           1.4          0.2  Iris-setosa
数据预处理将通过以下脚本行完成:
X = dataset.iloc[:, :-1].values # 特征
y = dataset.iloc[:, 4].values   # 目标类别
接下来,我们将数据划分为训练集和测试集。以下代码将把数据集分割为 60% 的训练数据和 40% 的测试数据:
from sklearn.model_selection import train_test_split
X_train, X_test, y_train, y_test = train_test_split(X, y, test_size=0.40, random_state=42) # 添加 random_state
接下来,将进行数据缩放,如下所示:
from sklearn.preprocessing import StandardScaler
scaler = StandardScaler()
scaler.fit(X_train) # 仅在训练数据上拟合 StandardScaler
X_train = scaler.transform(X_train)
X_test = scaler.transform(X_test)
接下来,借助 sklearn 的 KNeighborsClassifier 类训练模型,如下所示:
from sklearn.neighbors import KNeighborsClassifier
classifier = KNeighborsClassifier(n_neighbors=8) # 选择 K=8
classifier.fit(X_train, y_train)
最后,我们需要进行预测。这可以通过以下脚本完成:
y_pred = classifier.predict(X_test)
接下来,打印结果,如下所示:
from sklearn.metrics import classification_report, confusion_matrix, accuracy_score

result = confusion_matrix(y_test, y_pred)
print("Confusion Matrix:")
print(result)

result1 = classification_report(y_test, y_pred)
print("Classification Report:")
print(result1)

result2 = accuracy_score(y_test,y_pred)
print("Accuracy:",result2)
输出:
Confusion Matrix:
[[21  0  0]
 [ 0 16  0]
 [ 0  7 16]]
Classification Report:
                 precision    recall  f1-score   support

    Iris-setosa       1.00      1.00      1.00        21
Iris-versicolor       0.70      1.00      0.82        16
 Iris-virginica       1.00      0.70      0.82        23

       accuracy                           0.88        60
      macro avg       0.90      0.90      0.88        60
   weighted avg       0.92      0.88      0.88        60

Accuracy: 0.8833333333333333
KNN 作为回归器 (KNN as Regressor)
首先,从导入必要的 Python 包开始:
import numpy as np
import pandas as pd
接下来,从其网页链接下载鸢尾花数据集,如下所示:
接下来,我们需要为数据集分配列名,如下所示:
headernames = ['sepal-length', 'sepal-width', 'petal-length', 'petal-width', 'Class']
现在,我们需要将数据集读取到 pandas 数据框中,如下所示:
data = pd.read_csv(path, names=headernames) # 修正 url 为 path
array = data.values
X = array[:,:2] # 使用前两列作为特征
Y = array[:,2]  # 使用第三列 (petal-length) 作为目标变量
print("data.shape:", data.shape)
输出:
data.shape: (150, 5)
接下来,从 sklearn 导入 KNeighborsRegressor 来拟合模型:
from sklearn.neighbors import KNeighborsRegressor
knnr = KNeighborsRegressor(n_neighbors=10) # 选择 K=10
knnr.fit(X, Y) # 使用 X 和 Y 训练
最后,我们可以找到 MSE,如下所示:
print ("The MSE is:",format(np.power(Y - knnr.predict(X), 2).mean())) # 修正 Y 和 X
输出:
The MSE is: 0.12226666666666669
KNN 的优缺点 (Pros and Cons of KNN)
优点 (Pros)
- 它是非常简单的算法,易于理解和解释。
- 它对非线性数据非常有用,因为该算法不对数据做任何假设。
- 它是一种多功能算法,既可用于分类,也可用于回归。
- 它具有相对较高的准确率,但有比 KNN 更好的监督学习模型。
缺点 (Cons)
- 它在计算上是一个有点昂贵的算法,因为它存储所有训练数据。
- 与其他监督学习算法相比,需要高内存存储。
- 对于大的 N,预测速度较慢。
- 它对数据尺度和不相关特征非常敏感。
KNN 的应用 (Applications of KNN)
以下是一些可以成功应用 KNN 的领域:
- 银行系统:KNN 可用于银行系统,以预测个人是否适合贷款审批?该个人是否具有与违约者相似的特征?
- 计算信用评级:KNN 算法可用于通过与具有相似特征的人进行比较来查找个人的信用评级。
- 政治:借助 KNN 算法,我们可以将潜在选民分为各种类别,例如“将投票”、“不会投票”、“将投票给‘国大党’”、“将投票给‘印度人民党’”。
KNN 算法还可以用于语音识别、手写识别、图像识别和视频识别等其他领域。
21. KNN Algorithm – Finding Nearest
Machine Learning Neighbors
with Python
Introduction
K-nearest neighbors (KNN) algorithm is a type of supervised ML algorithm which can be
used for both classification as well as regression predictive problems. However, it is mainly
used for classification predictive problems in industry. The following two properties would
define KNN well:
Lazy learning algorithm: KNN is a lazy learning algorithm because it does not
have a specialized training phase and uses all the data for training while
classification.
Non-parametric learning algorithm: KNN is also a non-parametric learning
algorithm because it doesn’t assume anything about the underlying data.
Working of KNN Algorithm
K-nearest neighbors (KNN) algorithm uses ‘feature similarity’ to predict the values of new
datapoints which further means that the new data point will be assigned a value based on
how closely it matches the points in the training set. We can understand its working with
the help of following steps:
Step1: For implementing any algorithm, we need dataset. So during the first step of KNN,
we must load the training as well as test data.
Step2: Next, we need to choose the value of K i.e. the nearest data points. K can be any
integer.
Step3: For each point in the test data do the following:
3.1: Calculate the distance between test data and each row of training data with the help
of any of the method namely: Euclidean, Manhattan or Hamming distance. The most
commonly used method to calculate distance is Euclidean.
3.2: Now, based on the distance value, sort them in ascending order.
3.3: Next, it will choose the top K rows from the sorted array.
3.4: Now, it will assign a class to the test point based on most frequent class of these
rows.
Step4: End
Example
The following is an example to understand the concept of K and working of KNN algorithm:
Suppose we have a dataset which can be plotted as follows:
131
Machine Learning with Python
Now, we need to classify new data point with black dot (at point 60,60) into blue or red
class. We are assuming K = 3 i.e. it would find three nearest data points. It is shown in
the next diagram:
We can see in the above diagram the three nearest neighbors of the data point with black
dot. Among those three, two of them lies in Red class hence the black dot will also be
assigned in red class.
Implementation in Python
As we know K-nearest neighbors (KNN) algorithm can be used for both classification as
well as regression. The following are the recipes in Python to use KNN as classifier as well
as regressor:
132
Machine Learning with Python
KNN as Classifier
First, start with importing necessary python packages:
import numpy as np
import matplotlib.pyplot as plt
import pandas as pd
Next, download the iris dataset from its weblink as follows:
path = "https://archive.ics.uci.edu/ml/machine-learning-
databases/iris/iris.data"
Next, we need to assign column names to the dataset as follows:
headernames = ['sepal-length', 'sepal-width', 'petal-length', 'petal-width',
'Class']
Now, we need to read dataset to pandas dataframe as follows:
dataset = pd.read_csv(path, names=headernames)
dataset.head()
sepal-length
sepal-width
petal-length
petal-width
Class
0
5.1
3.5
1.4
0.2
Iris-setosa
1
4.9
3.0
1.4
0.2
Iris-setosa
2
4.7
3.2
1.3
0.2
Iris-setosa
3
4.6
3.1
1.5
0.2
Iris-setosa
4
5.0
3.6
1.4
0.2
Iris-setosa
Data Preprocessing will be done with the help of following script lines:
X = dataset.iloc[:, :-1].values
y = dataset.iloc[:, 4].values
Next, we will divide the data into train and test split. Following code will split the dataset
into 60% training data and 40% of testing data:
from sklearn.model_selection import train_test_split
X_train, X_test, y_train, y_test = train_test_split(X, y, test_size=0.40)
Next, data scaling will be done as follows:
from sklearn.preprocessing import StandardScaler
scaler = StandardScaler()
scaler.fit(X_train)
X_train = scaler.transform(X_train)
133
Machine Learning with Python
X_test = scaler.transform(X_test)
Next, train the model with the help of KNeighborsClassifier class of sklearn as follows:
from sklearn.neighbors import KNeighborsClassifier
classifier = KNeighborsClassifier(n_neighbors=8)
classifier.fit(X_train, y_train)
At last we need to make prediction. It can be done with the help of following script:
y_pred = classifier.predict(X_test)
Next, print the results as follows:
from sklearn.metrics import classification_report, confusion_matrix,
accuracy_score
result = confusion_matrix(y_test, y_pred)
print("Confusion Matrix:")
print(result)
result1 = classification_report(y_test, y_pred)
print("Classification Report:",)
print (result1)
result2 = accuracy_score(y_test,y_pred)
print("Accuracy:",result2)
Output
Confusion Matrix:
[[21
0
0]
[ 0 16
0]
[ 0
7 16]]
Classification Report:
precision
recall
f1-score
support
Iris-setosa
1.00
1.00
1.00
21
Iris-versicolor
0.70
1.00
0.82
16
Iris-virginica
1.00
0.70
0.82
23
micro avg
0.88
0.88
0.88
60
macro avg
0.90
0.90
0.88
60
weighted avg
0.92
0.88
0.88
60
134
Machine Learning with Python
Accuracy: 0.8833333333333333
KNN as Regressor
First, start with importing necessary Python packages:
import numpy as np
import pandas as pd
Next, download the iris dataset from its weblink as follows:
path = "https://archive.ics.uci.edu/ml/machine-learning-
databases/iris/iris.data"
Next, we need to assign column names to the dataset as follows:
headernames = ['sepal-length', 'sepal-width', 'petal-length', 'petal-width',
'Class']
Now, we need to read dataset to pandas dataframe as follows:
data = pd.read_csv(url, names=headernames)
array = data.values
X = array[:,:2]
Y = array[:,2]
data.shape
output150, 5)
Next, import KNeighborsRegressor from sklearn to fit the model:
from sklearn.neighbors import KNeighborsRegressor
knnr = KNeighborsRegressor(n_neighbors=10)
knnr.fit(X, y)
At last, we can find the MSE as follows:
print ("The MSE is:",format(np.power(y-knnr.predict(X),2).mean()))
Output
The MSE is: 0.12226666666666669
135
Machine Learning with Python
Pros and Cons of KNN
Pros
It is very simple algorithm to understand and interpret.
It is very useful for nonlinear data because there is no assumption about data in
this algorithm.
It is a versatile algorithm as we can use it for classification as well as regression.
It has relatively high accuracy but there are much better supervised learning
models than KNN.
Cons
It is computationally a bit expensive algorithm because it stores all the training
data.
High memory storage required as compared to other supervised learning
algorithms.
Prediction is slow in case of big N.
It is very sensitive to the scale of data as well as irrelevant features.
Applications of KNN
The following are some of the areas in which KNN can be applied successfully:
Banking System
KNN can be used in banking system to predict weather an individual is fit for loan approval?
Does that individual have the characteristics similar to the defaulters one?
Calculating Credit Ratings
KNN algorithms can be used to find an individual’s credit rating by comparing with the
persons having similar traits.
Politics
With the help of KNN algorithms, we can classify a potential voter into various classes like
“Will Vote”, “Will not Vote”, “Will Vote to Party ‘Congress’, “Will Vote to Party ‘BJP’.
Other areas in which KNN algorithm can be used are Speech Recognition, Handwriting
Detection, Image Recognition and Video Recognition.