建模姜饼人
章节大纲
-
In this tutorial you will learn how to make a simple gingerbread man. In a later tutorial you will be able to make an animation with this gingerbread man.
::在本教程中,你将学习如何制作一个简单的饼人. 在后面的教程中,你将能够制作一个动画与这个饼人.In this tutorial we will tie together everything we've talked about up to this point, including extruding, subdividing and rendering, and throw in basic lighting.
::在本教程中,我们将把我们到目前为止所讨论的一切联系在一起,包括挤出,分类和染,并加入基本的照明.Modeling
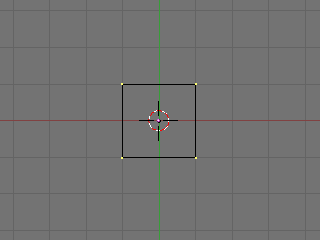
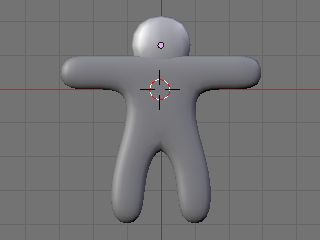
::模拟First, start Blender. You should see the usual top view of a cube in the 3D window, surrounded by a grid 'floor'.
::首先启动Blender. 在3D窗口中,你应该看到平常的立方体顶部图, 周围是网格"地板".- Review— Zoom in or out with SCROLL or CTRL+MMB . Pan with SHIFT+SCROLL and CTRL+SCROLL . Make sure you are in orthographic view. Press NUM5 to toggle between orthographic view and perspective view. You can tell you're looking at an orthographic view while looking down from the top ( NUM7 ) of the cube: wherever you pan the window, you never see any part of the cube except the top.
-
Display editing controls in the buttons window by clicking on the Editing context button
 or by pressing
F9
.
or by pressing
F9
.
::在按窗口中显示编辑控件, 单击编辑上下文按或按F9.
Adding Vertices
::增加顶点-
Select the cube by clicking
RMB
on it. (It may already be selected.) Remember, selected objects are outlined in pink.
::选择立方体,点击人民币. (可能已经选择了.) 请记住,选择的对象是粉红色的. -
Switch from object mode to edit mode by pressing
TAB
, which toggles between object and edit modes. In edit mode, at first, you'll see colored dots at the vertices of the cube. Selected vertices are highlighted in yellow. Unselected vertices are pink. (You'll see the dots when editing in vertex select mode. In edge select or face select mode, you'll see colored edges and faces instead.)
::通过按下TAB,从对象模式切换到编辑模式.在编辑模式中,首先,您将在立方体的顶点看到彩色点.选定的顶点以黄色亮点.未选的顶点是粉红色的. (在顶点选择模式中编辑时,您将看到点.在边缘选择或面部选择模式中,您将看到彩色边缘和面部.) -
Select all vertices of the cube. Press
AKEY
once. If the vertices are yellow, you've selected all of them. If they are pink, you've deselected all of them. If necessary, press
AKEY
again so that all vertices are selected/yellow.
::选择立方体的所有顶点. 按一下 AKEY. 如果顶点是黄色的,则您已经选择了它们. 如果它们是粉红色的,则您已经取消了它们的所有选择. 如果需要,请再次按 AKEY,以便所有顶点被选择/黄色.
-
Subdivide the faces of the cube, using any of the following methods. (All vertices of the cube should still be selected.)
-
Click the Subdivide button in the Mesh Tools panel in the buttons window.
::在按窗口的网格工具面板中点击分为组的按. -
With the mouse pointer in the 3D window –
-
Press
WKEY
to display the Specials menu, then choose Subdivide.
::按WKEY显示"特殊菜单",然后选择"分类". -
Press
SPACE
to display the toolbox, then choose Edit → Edges → Subdivide.
::按空格显示工具箱,然后选择编辑 → 边缘 → 分区.
::在3D窗口中按鼠标指针按WKEY显示"特殊"菜单,然后选择"分区".按SPACE显示"工具箱",然后选择"编辑" →"边缘" →"分区". -
Press
WKEY
to display the Specials menu, then choose Subdivide.
-
Click the 3D window's Mesh menu, and choose Edges → Subdivide.
::单击3D窗口的"网格"菜单,然后选择"边缘" → "分区".
::使用以下方法中的任何一种,将立方体的面部划分. (立方体的所有顶点仍然应被选择.) 在按窗口的网格工具面板中,单击"划分"按. 在3D窗口中,使用鼠标指针按WKEY显示"特殊"菜单,然后选择"划分".按SPACE显示"工具箱,然后选择"编辑" →"边缘" →"划分".单击3D窗口的"网格"菜单,然后选择"边缘" →"划分".按"分"按,然后选择"边缘" →"划分".按"分"按,然后选择"边缘" →"划分".按"分"按,然后选择"分"按,然后选择"分"按. -
Click the Subdivide button in the Mesh Tools panel in the buttons window.
-
Your cube now has more vertices.
Subdividing
edges adds vertices so you can create more complex shapes.
::立方体现在有更多的顶点. 边缘的分化增加了顶点,

Selecting a Subset of Vertices
::选择一个顶点子集We'll select six vertices on the upper half of one side of our cube, where we'll extrude an arm.
::我们将在立方体的一侧上半部分选择六个顶点,-
Deselect all vertices by pressing
AKEY
.
::通过按键删除所有顶点. -
View the cube from the front (
NUM1
).
::从前方 (NUM1) 看到立方体. -
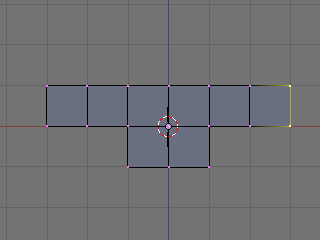
Select the six vertices on the top half of the left side of the cube (see below) using one of the following methods.
-
Press
BKEY
and drag a rectangle around the top left and middle left vertices (viewing from the front).
::按下 BKEY 键,然后在左上和中间的左顶点 (从前方看) 周围拖动一个矩形. -
Press
CKEY
to see a circle around your mouse pointer.
SCROLL
to change the size of the circle. Position the circle around the top left and middle left vertices, together or one at a time, and click
LMB
. Click
RMB
to finish.
::按CKEY以看到鼠标指针周围的圆. 滚动以更改圆的尺寸. 将圆放在左上和中间的左顶点周围,同时或一次一个,然后单击LMB. 单击RMB完成.
::使用以下方法之一选择立方体左侧上半部分的六个顶点 (见下文).按下 BKEY,在左上和中间的左顶点 (从前方查看) 周围拖动一个矩形.按下 CKEY,在鼠标指针周围看到一个圆.SCROLL 改变圆的尺寸.将圆放在左上和中间的左顶点周围,一起或一次,然后单击 LMB.单击 RMB 完成. -
Press
BKEY
and drag a rectangle around the top left and middle left vertices (viewing from the front).
-
Take a closer look at the selected vertices by viewing the model from a different angle (drag with
MMB
).
::通过从不同的角度观察模型 (使用MMB拖动) 来更仔细地观察所选的顶点. -
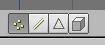
If you find that you have only selected two vertices and not six, make sure the "Occlude Background Geometry" button is off. That button is the right-most of the selection mode buttons, below. (It's called "Limit selection to visible" in Blender 2.45 and earlier. It doesn't appear if Blender is drawing in wireframe style.) Try selecting the vertices again.
::如果您发现您只选择了两个顶点而不是六个,请确保"遮住背景几何"按已关闭.该按是下面的选择模式按中最右边的. (在Blender 2.45及更早版本中称为"将选择限制在可见的位置".如果Blender在使用线框图形时,它不会显示).请再次尝试选择顶点.
-
If you still selected just two vertices, change to a wireframe drawing by pressing
ZKEY
, which toggles between wireframe and solid drawing types. Try selecting again.
::如果您仍然只选择了两个顶点,请按ZKEY,切换到线框图,该键可以在线框和实体图类型之间切换. 尝试再次选择. -
Yet another way to select the six vertices is to select the two faces they define. Click the Face Select button from the selection mode buttons (above), or press
CTRL+TAB
to display a Select Mode menu and choose Faces. Rotate the cube to view the left side and click
RMB
in the center of one of the two upper faces. Hold
SHIFT
and click
RMB
in the center of the other upper face.
::另一个选择六个顶点的方法是选择它们定义的两个面.点击选择模式按中的面选择按 (上),或按Ctrl+Tab显示选择模式菜单并选择面.旋转立方体以查看左侧,在两个上面中的一个的中间点击人民币.按住SHIFT,在另一顶面的中间点击人民币.
Extruding Arms
::挤出臂-
View from the front by pressing
NUM1
.
::从前方看,按下NUM1. -
Extrude the selected vertices/faces by pressing
EKEY
to display an Extrude menu, then choosing Region. Hold
CTRL
to snap your position to the grid, then move your mouse left to put the new vertices on the adjacent gray line of the grid one unit to the left. Click
LMB
.
::通过按 EKEY 显示一个 挤出菜单,然后选择区域. 按住 CTRL 将您的位置快速移到网格中,然后将鼠标移到左边,将新顶点放在左边一单位的网格的邻近灰色线上. 点击 LMB. -
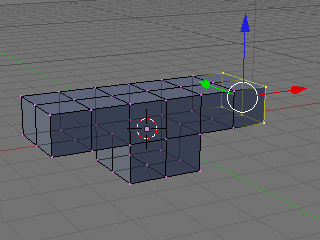
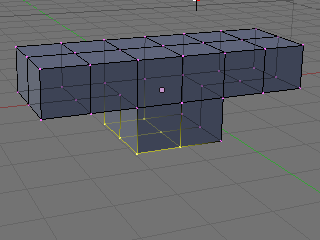
Repeat so that your model looks like below (from front view,
NUM1
).
::重复这样做,使你的模型看起来像下面 (从前方,NUM1).
-
Deselect all vertices/faces with
AKEY
.
::使用AKEY取消所有顶点/面. -
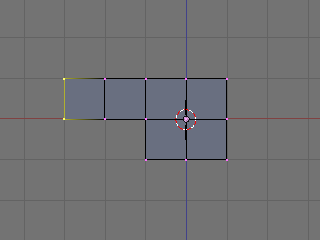
Perform the same extrusion on the right side of the cube, selecting six vertices and extruding twice as explained above.
::在立方体的右侧进行相同的挤出,选择六个顶点并按上述说明进行两次挤出. -
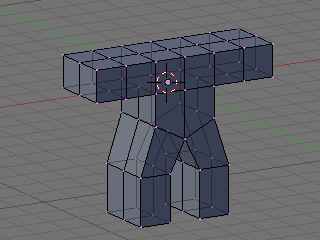
The gingerbread man's arms are in place, as in the illustrations below.
::饼男的手臂已经摆在位,

Extruding Legs
::挤出脚-
Make sure all vertices are unselected, using
AKEY
once or twice.
::确保所有顶点都没有被选中,使用AKEY一次或两次. -
View from the front (
NUM1
).
::从前方的景观 (NUM1). -
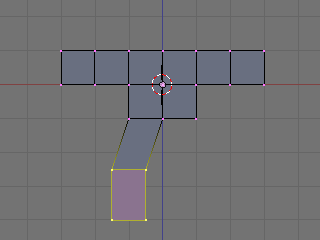
Select the six vertices on the left half of the cube's bottom. Extrude them downward to a point in between the first and second heavier gray lines beneath the cube. (The gray lines in the grid represent Blender units.) Holding down
CTRL
, the extruded region may snap to the heavier gray lines—hold down
CTRL+SHIFT
and the region will snap to tenths of Blender units. Click
LMB
to finish.
::选择立方体底部左半部分的六个顶点.将它们向下挤压到立方体下面的第一和第二个较重的灰色线之间的点. (网格中的灰色线代表了混合器单位.) 按住Ctrl,挤压区域可能会快速到较重的灰色线按住Ctrl+SHIFT,该区域将快速到混合器单位的十分之一. 点击LMB完成. -
An alternative to positioning the extrusion with the mouse is simply typing the distance. Enter 1.5 to extrude 1 1/2 units out. On a Mac, enter the number 1, press fn with the key that is right under
LKEY
and
MKEY
on Azerty (the one with /:,), and press the number 5.
::选择鼠标排挤位置,只需输入距离.输入1.5以挤出1 1/2单位.在Mac上,输入数字1,按下Azerty上LKEY和MKEY下方的键 (带有/:的键),然后按下数字5.
-
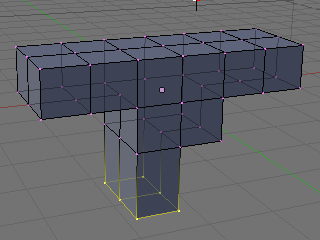
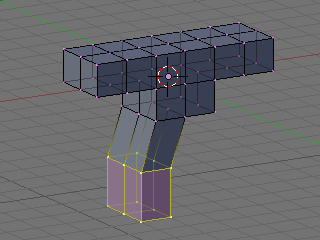
Extrude the same region again, to the third gray line (1.5 again). It should look like this:
::再一次挤出同一个区域,到第三条灰色线 (1.5 再次).应该看起来像这样:
-
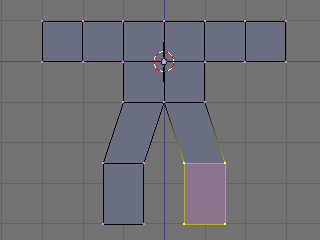
Shift the lower leg to the outside as follows.
-
Select the bottom 12 vertices of the leg (which look like 4 from front view), using
BKEY
.
::使用BKEY选择脚的下面12个顶点 (从前方看起来像4个). -
Grab the selection with
GKEY
. Press
XKEY
to limit movement to the x axis. Move the vertices to the left by half a square, holding
CTRL
or
CTRL+SHIFT
to snap to the grid, and click
LMB
.
::使用GKEY抓取选项.按XKEY限制移动到x轴.将顶点移动到左边半个方形,按住CTRL或CTRL+SHIFT将其快速移到网格,然后点击LMB.
::按下面的方法将下腿部向外移动.使用BKEY选择下12个腿部顶点 (从前方看起来像4个).用GKEY抓取选择.按XKEY限制运动到x轴.将顶点向左移动半个方形,按住CTRL或CTRL+SHIFT将其快速移到网格,然后点击LMB. -
Select the bottom 12 vertices of the leg (which look like 4 from front view), using
BKEY
.
-
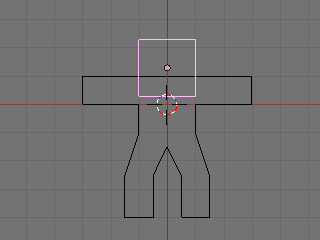
Create a second leg on the right side, in the same fashion.
::在右侧创建第二条腿,以同样的方式.
Dropping the Groin
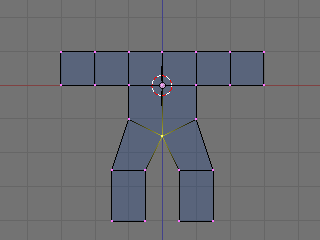
::让下腰部的部位下降Lengthen the groin (where the two legs join):
::延长部 (两条腿相交的地方):-
Deselect all vertices by pressing
AKEY
.
::通过按键删除所有顶点. -
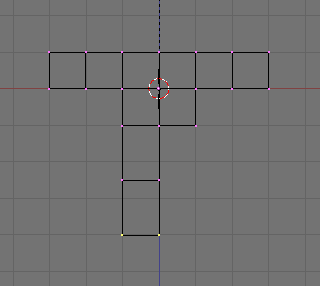
Select the 3 vertices at the groin (which look like 1 from front view), using
BKEY
.
::使用BKEY选择沟上的3个顶点 (从前方看起来像1个). -
Grab the vertices by pressing
GKEY
. Press
ZKEY
to limit movement to the z axis. Move the vertices down 1/2 of a square, or type -0.5 to specify the distance. (Older versions of Blender require
NKEY
before typing -0.5.)
::通过按 GKEY 抓取顶点.按 ZKEY 将移动限制在 z 轴上.将顶点移动到正方形的1/2,或输入 -0.5 来指定距离. (旧版本的 Blender 需要 NKEY 才能输入 -0.5.)
Adding a Head
::增加一个头部-
Switch the 3D window from Edit mode back to Object mode by pressing
TAB
.
::通过按TAB将3D窗口从编辑模式转换回对象模式.
Noob Note: I found it easier to remain in edit mode while creating the cube as this makes the cube part of the original mesh. This allows you to add the subsurf to all parts at once.
::创建立方体时保持编辑模式更容易,因为这使立方体成为原始网格的一部分. 这允许您一次性添加子表面到所有部分.-
Click
RMB
on the object to select it then press
SHIFT + SKEY
and select
Cursor → Selection
. This will make sure the cube you'll add next will be near where you want it.
::按一下 RMB 选择该对象,然后按 SHIFT + SKEY,选择 Cursor → Selection. 这样可以确保您接下来添加的立方体将接近您想要的位置.
-
Press
SPACE
and put your mouse on the mesh option and select cube. In others versions, you can also hit
SPACE
and , in the menu that comes up, choose
Add → Mesh → Cube
.
::在其他版本中,您还可以按空间,并在出现的菜单中选择添加 → 网格 → 立方体.
-
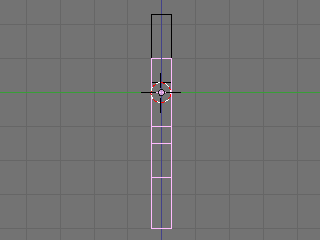
Press
GKEY
and put your new cube about 1/3 of the way down the neck (to achieve this, you can press
GKEY
and
ZKEY
: enter 1.33).
::按下GKEY,然后把你的新立方体放到子的1/3左右 (为了实现这一点,你可以按下GKEY和ZKEY:输入1.33).
Now we will make it look more like a ginger bread man by making it thinner.
::现在我们将使它看起来更像是生面包的人,-
Select all with
AKEY
.
::使用AKEY选择所有.
-
Go to side view with
NUM3
.
::通过NUM3进行侧视.
-
Press
SKEY
for scale and press
YKEY
for Y-axis and then move your mouse to the middle until it is about 0.3 (use
CTRL
for fixed values).
::按下 SKEY 按下尺度,按下 YKEY 按下 Y 轴,然后将鼠标移到中间,直到它大约为 0.3 (使用 CTRL 确定值).
-
Remember X-axis is the Red arrow/line, Y-axis is the Green one, and Z-axis is Blue (like RGB video mode).
::记住X轴是红色的箭头/线,Y轴是绿色的,Z轴是蓝色的 (就像RGB视频模式).
-
Use the
MMB
to spin the view around and examine your handiwork.
::通过MMB, 转动视图, 检查自己的作品.
At this point, it doesn't look entirely like a gingerbread man, does it? It's a bit too ... chunky. For the last bit, we'll smooth it out.
::现在看起来不像饼人, 太粗了.-
Make sure you've selected the body in object mode.
::确保您已选择"物体模式"的身体.
-
Select the editing panel in the buttons window (or hit
F9
).
::在按窗口中选择编辑面板 (或按F9).
-
In the Modifiers tab, Add a "Subsurf" modifier.
::在修改器选项卡中,添加一个"潜水"修改器.
-
Set the level of the subdivisions to 2, and the number of render levels to 3.
::设置分区的级别为2,染级别的数量为3.
Noob question: When I add the cube for the head, it stops me from being able to edit the body - it will only select the head to apply subsurf to, even if the body looks like it's selected!
::只有选择头部才能应用subsurf, 即使身体看起来已经被选择了!Answer: When you created the cube you made a second object. To select a different object, press tab to enter Object mode. Select the body. Then enter edit mode again if you want to edit the body.
::答案:当你创建立方体时,你创建了一个第二个对象. 要选择一个不同的对象,按标签进入对象模式. 选择体. 然后再次进入编辑模式,如果您想编辑体.-
You can press the
ZKEY
to switch back and forth between wire-frame view and solid view.
::您可以按下ZKEY键来在线框视图和实体视图之间来回切换.
-
(Noob Note: Easiest way to really get a feel for what is going on in the 3d world is to split into four screens and setting each one to
NUM7
,
NUM3
,
NUM1
, and
NUM0
to see all angles and what it will look like at render.)
::让我们看看它在染时的样子. 现在我们可以看到它在染时的样子.
Noob Question: How?
::如何做到?Answer: To split an area move the cursor to an area between two current areas (e.g. between the 3D view and the buttons), when you see the double ended arrow (used to move the divide) click RMB and select Split Area , you will then see a line appear dividing the area in two. Move this to where you want the divide and click LMB.
::答:要将一个区域分成两部分,请将光标移到两个当前区域之间的区域 (例如3D视图和按之间),当您看到双端箭头 (用于移动分区) 时,请单击人民币并选择分区,然后您将看到一条线将区域分成两部分. 将其移到您想要分区的地方,然后单击LMB.-
In the 'Link and Materials' section, select 'Set Smooth'.
::在"链接和材料"部分,选择"设置光滑".
Noob question: Where? Assuming this refers to the 'Materials' section on the 'Properties' window, there is no 'Smooth' setting.
::假设这指的是"属性"窗口的"材料"部分, 没有"光滑"设置.(Note that here I had the same problem as before, with superposed vertices. Select all vertices, then press WKEY and select Remove Doubles to clean your model. You will see that it will look much better after removing the extra vertices with Remove Doubles)
:请注意,我在这里遇到的问题与之前相同,与叠加的顶点.选择所有顶点,然后按WKEY,选择删除双重来清除你的模型.你会看到它将看起来更好了,删除额外的顶点与删除双重)
-
Press the
ZKEY
to return to wire-frame view.
::按下ZKEY以返回线框视图.
-
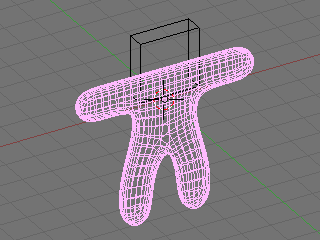
Now repeat the process above to smooth the head.
::现在重复上述过程,
Looks a lot more like a gingerbread man now, doesn't it?
::现在看起来更像是个饼人,不是吗?Camera Positioning and Rendering
::摄像头定位和染This guide will show you how to intuitively get the best frame of your 3D scene with no effort!
::这本指南将告诉你如何直观地获得最好的 3D 场景的,-
Press
TAB
for Object view mode.
::按TAB以进入对象视图模式. -
Press
NUM0
to get the Camera View.
::按NUM0以获得摄像头视图. -
Select the camera by clicking
RMB
on the outermost rectangle.
::选择相机,点击最外的矩形上的人民币. -
Press
GKEY
and move your mouse to adjust the position of the camera (
XKEY
,
YKEY
,
ZKEY
and
CTRL
may be useful here).
::按下GKEY,然后移动鼠标来调整相机的位置 (XKEY,YKEY,ZKEY和CTRL在这里可能很有用). -
In addition, you can press
NUM7
to get the Top View and press
RKEY
to rotate the camera to the best angle.
::按下RKEY将摄像机旋转到最佳角度. -
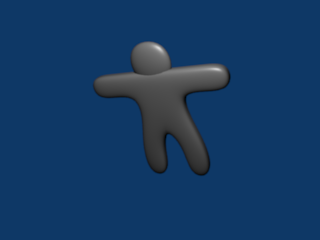
After you are happy with the position, press
F12
to render it.
::按F12进行染.
If your render comes out a little dark, try moving the lamp closer to the gingerbread man.
::如果你的染效果有点暗,Noob note: Another way to move around the camera is pressing SHIFT + FKEY after pressing NUM0 to enter Fly mode. The keys for fly mode appear in the header of the 3D view pane.
::其他方法是按下SHIFT+FKEY,然后按下NUM0进入飞行模式.飞行模式的键出现在3D视图面板的头部.Noob note: Ctrl+Alt+NUM0 "teleports" the camera to your 3d view.
::让我们来看看它.
Noob Note: By pressing X, Y or Z twice you will use a local base of the space, with those it's much easier. For example if you are facing the Z axis from 45 degrees, and you want to go left 1 unit, using the global base, you will have to go 1.72 (around sqrt(2)) along X and the same along Y, instead moving by 1 in the local frame of reference.
::笔记:按 X,Y 或 Z 两次,你将使用空间的局部基点,用这些更容易.例如,如果你面对 45 度的 Z 轴,你想向左移动 1 个单位,使用全局基点,你将不得不沿 X 移动 1.72 (约 sqrt ((2)) 和沿 Y 移动 1,而不是在局部参考框架中移动 1.Applying Textures
::应用纹理
This builds on the previous guide: Modeling a Volcano .
Note: It seems that textures can only be applied to one object at a time, so this must be done twice (i.e. The head and body are two separate objects.) The settings that were chosen can successfully be applied to each object for a consistent result. Some settings can not be applied equally for consistent results.
::这是在前面的指南: 建模火山. 注意: 似乎纹理只能一次应用于一个对象,所以必须两次 (即头部和身体是两个独立的对象). 选择的设置可以成功地应用于每个对象以获得一致的结果. 有些设置不能同等地应用于一致的结果.N00b Note: if you join the 2 objects before applying the textures you do not have to do the process 2 times, just select the 2 objects, CTRL+J and the accept
::需要在应用纹理之前连接两个对象, 您不需要重复这个过程, 只需选择两个对象, CTRL+J 和接受-
In "Object Mode," select the body (or the head.)
::在"对象模式"中,选择身体 (或头部). -
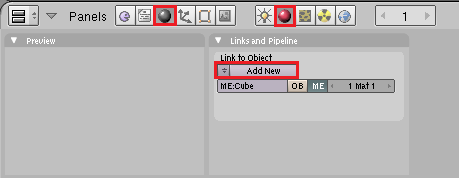
Press
F5
to open the shading panel or use the shading panel button.
::按F5打开遮阳面板或使用遮阳面板按. -
In the "Links and Pipeline" panel, under "Link to Object," click "Add New."
::在"链接和管道"面板中,在"链接到对象"下,点击"添加新".
-
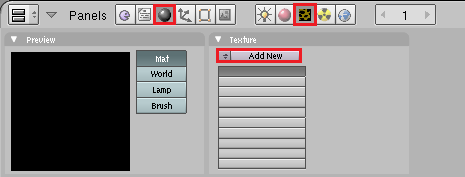
Press
F6
to open the "Texture Buttons" panel or use the textures button.
::按F6打开"纹理按"面板或使用纹理按. -
In the "Texture" panel, click "Add New."
::在"文本"面板中,点击"添加新".
-
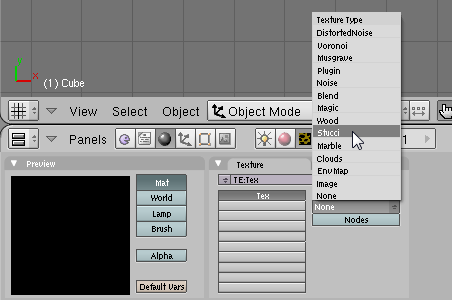
Change the "Texture Type" to "Stucci."
::改变"纹理类型"为"Stucci".
-
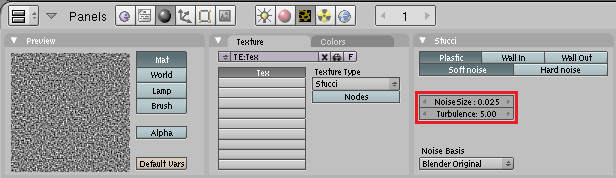
In the new "Stucci" panel, change "Noise Size" to something near 0.025 and leave the "Turbulence" at 5.00.
::在新的"Stucci"面板中,将"噪声大小"改为0.025附近的东西,并将"流"置于5.00.
Note: When finished with this section of the guide, come back to this panel and try different combinations of "Plastic," "Wall In," "Wall Out," and "Soft Noise" / "Hard Noise." Press F12 to render after each change to see the effect.
::按F12在每次更改后进行染, 查看效果. 按F12在每次更改后进行染, 查看效果.-
Press
F5
again or use the "Material" button directly on the left of the "Texture" button. Then look for the "Map To" panel.
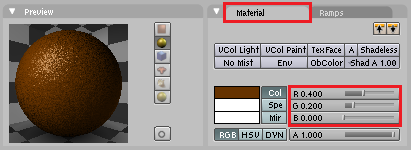
::然后使用"图像"按的左侧的"材料"按. 然后寻找"地图到"面板.

-
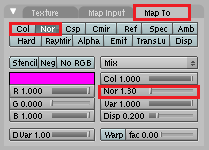
In the "Map To" panel, deselect "Col
[or]
" and select "Nor
[mal]
." and change the "Nor" Value to approximately 1.30.
::在"地图到"面板中,取消选择"颜色",选择"正常",并将"Nor"值更改为约1.30. -
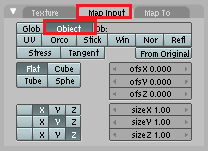
In the "Map Input" panel, change the texture coordinates to "Object" by clicking the corresponding button.
::在"地图输入"面板中,通过点击相应按将纹理坐标更改为"对象". -
In the "Material" panel, change the "R
[ed]
" slider to approximately 0.400 and the "G
[reen]
" slider to approximately half that, about 0.200. Blue can be set at 0.00.
::在"材料"面板中,将"R[ed]"滑块变为大约0.400,而"G[reen]"滑块变为大约0.200. 蓝色可设置为0.00.
Note: While it is true that textures can only be applied to one object at a time, textures as well as materials can be shared between objects. In this case it is best to let both the head and the body share the same material.
::注意:虽然纹理只能一次应用于一个物体,但物体之间可以共享纹理和材料.在这种情况下,最好让头部和身体共享相同的材料.-
To do this, simply select the object without the materials(head or body).
::选择一个没有头部或身体的物体. -
Press
F5
to open the shading panel or use the shading panel button.
::按F5打开遮阳面板或使用遮阳面板按. -
In the "Links and Pipeline" panel, under "Link to Object," click the arrow next to(left of) the "Add New" button.
::在"链接和管道"面板中,在"链接到对象"下,点击"新增"按旁边的箭头. -
Select the brown material.
::选择棕色的材料.
The steps in this section give a nicely textured, brown surface to the "Gingerbread."
::这部分的步骤给"饼"一个有质感的棕色表面.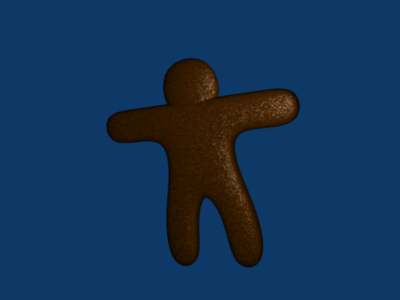
Now all you need to do is add eyes and gumdrop buttons!
::现在你只需要添加眼睛和糖果!