使用Meta Balls建模
章节大纲
-
Getting started
::开始To begin, open a new scene in Blender. Let's clean up the scene a little by selecting the lamp and camera in the scene, press M to move them to a different layer and click on the fifth layer from the left to place the objects. Go back to layer 1 and delete anything else. You may also want to get rid of the grid by opening the View Properties and turning off the Grid Floor and X & Y axes.
::首先,在Blender中打开一个新场景. 让我们稍微清理场景,选择场景中的灯和摄像头,按M将它们移动到不同的层,然后点击左侧的第五层放置对象. 回到第1层并删除其他任何东西. 您也可以通过打开视图属性并关闭网格地板和X和Y轴来消除网格.To block out our character, we're going to use an object type that is probably the least used and useful of any known to mankind. Let's hear it for... Metaballs!
::为了阻止我们的角色, 我们将使用一种对象类型,Sculpting With "Lumps of Clay"
::用"泥块"雕刻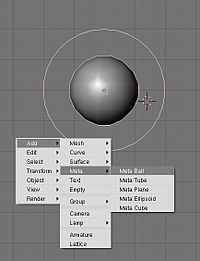
Go into the top view (important), press Space and add a metaball. Metaballs are a nifty, ancient piece of 3D technology that is useful for creating blobs. (Similar to lumps of clay, eh?) You create simple primitive shapes and scale and rotate them to block out your character's shape. When the primitives come close to one another, they "bleed into one another" in much the same way that water droplets merge when they touch. Cool.
::进入顶部视图 (重要),按空格并添加一个metaball.metaballs是一个很棒的,古老的3D技术,它是有用的创建斑点. (类似于粘土块,?) 你创建简单的原始形状和规模,并旋转它们来阻止你的角色的形状.当原始人接近彼此,他们"流血到彼此"的方式与水滴合并当他们碰.酷.If you're using an earlier version of Blender that jumps out of Object mode into Edit mode when you create an object, then press Tab to switch back to Object mode, as you won't be able to scale your Meta primitive non-proportionally in Edit mode.
::如果您使用的是早期版本的Blender,在创建对象时将其从对象模式跳转到编辑模式,请按Tab转回对象模式,因为您无法在编辑模式中非比例地缩放您的Meta原始.In Object mode, you can change these options for the entire Meta object, while tabbing into Edit mode gives you more options for the selected meta primitive, such as changing the type from Ball to Tube, Plane, Cube, ;;etc.; (You can also make "Negative metaballs.")
::在Object模式下,你可以为整个Meta对象更改这些选项,而在Edit模式下,你可以为所选的元原始类别提供更多选项,例如从Ball更改为Tube,Plane,Cube等. (你也可以制作"负元球").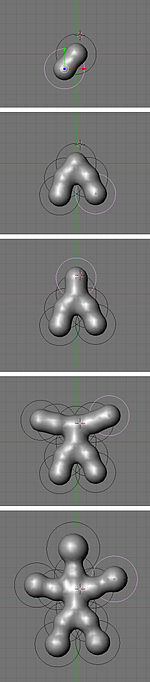
Press Shift+D to duplicate the Metaball, and place it where you like. Continue blocking out your character, building enough blobs to represent the limbs or forms you will need to sculpt your masterpiece.
::按Shift+D复制Metaball,然后将其放置在您喜欢的地方.继续阻止您的角色,建立足够的斑块来代表您需要雕塑杰作的四肢或形状.The balls at the end of the limbs, were scaled SKEY larger, and then moved GKEY out a bit more.
::脚的球被缩小了,然后把GKEY移出了.Don't get carried away and put in too much detail at this stage: use as few shapes as you need. (This is supposed to be quick and fun, after all...)
::现在不要太过详细,只要需要,就尽量少用形状. (毕竟,这应该是快速而有趣的...)Meta-mess!
::没有任何东西!You should still be in object mode.
::你应该仍然在对象模式.Now that you've got something that resembles what you're after, select all the Metaballs and ( be in object mode) type ALT+C -> "delete original", to convert it to polygons so you can actually do something with your blob.
::选择所有元球,然后 (在对象模式下) 键入ALT+C -> "删除原始", 将其转换为多边形,Noob note: if you pick "keep original" you will still have the meta balls present, plus have a mesh version of the metaballs sharing exactly the same space. When you select "delete original", the meta balls are turned into the mesh, and the circles that the metaballs were originally in hang around, but are empty.
::笔记:如果选择"保留原始",你仍然会有元球,还有一个共享完全相同空间的元球的网格版本.当您选择"删除原始"时,元球会变成网格,而元球原来在的圆圈会悬挂,但空.

Still in object mode!
::仍然在对象模式!Delete any of those black rings left over from the metas and select your new polygon mesh.
::删除任何从超人剩下的黑色环, 选择你的新多边形网.If you Tab into Edit mode you will see terrifying ugliness instead of nicely gridded mesh. "Surely we can't be expected to create anything useful out of this!" you shriek. Take it easy, my friend. It's time to add a Decimate modifier (make sure you're in object mode when doing this to see changes).
::如果你在"编辑"模式下,你会看到可怕的丑,而不是精美的网格. "我们不能期待从中创造出任何有用的东西!"你尖叫. 放心吧,我的朋友. 现在是时候添加一个 Decimate 修改器了 (确保在做这个时你处于对象模式以查看更改).Switch back to object mode!
::切换回对象模式!The Decimate modifier (you will only see things change if you're in object mode) will do two things for us. Its primary job is to reduce the poly count of a mesh. A pleasant side-effect for our purposes is that it will begin to rearrange the topology into a more manageable heap of triangles and quads. Keep reducing the Ratio slider below 0.5 until it becomes as coarse as you can stand. You want the lowest polygon base you can have that still maintains enough detail in the limbs and shapes you made with the Metaball phase.
::十进制修改器 (只在对象模式下才会看到变化) 将为我们做两件事.它的主要任务是减少网格的多元数.一个令人愉快的副作用是它将开始重新排列拓,使其成为一个更容易管理的三角形和四角形堆.一直将比例滑块降低到0.5以下,直到它变得尽可能粗.你想要你能拥有的最低的多边形底部,仍然保持足够的细节在Metaball阶段所做的四边形和形状中.One thing to watch for is that this process sometimes creates holes as it does its best to simplify the mesh. I find that usually you can slightly change the Ratio to fix the problem, but if you're still finding holes, check out the "Tips & Tricks" section at the end.
::需要注意的一点是,这个过程有时会产生洞,因为它尽其最大努力简化网格.我发现通常你可以稍微改变比例来解决这个问题,但如果你仍然发现洞,请查看最后的"提示和技巧"部分.As you can see, this step greatly reduces the Face Count, which will be good later. Next we need to get rid of as many of those triangles as possible. Click Apply (in the modifier panel)
::现在我们需要尽可能多的三角形. 单击应用 (在修改器面板中)Switch to Edit mode!
::切换到编辑模式!Press A until all of the vertices are selected (turn yellow) and hit Alt-J to convert the faces from triangles to quads, which will subdivide better. Now you should have something you can work with.
::按A,直到所有的顶点被选中 (变成黄色),然后按Alt-J,将面从三角形转换为四角形,这将更好地分为部分.现在你应该有可以使用的东西.Beginning to sculpt
::开始雕塑Right next to the Modifiers panel is the Multires panel. (Note: In recent versions of Blender this is not its own panel---it is a Modifier.) A multires object has the options to add numerous levels of smooth subdivision to a mesh. While you can use the sculpt tools on any polygon or nurbs mesh, the great strength of sculpting with Multires is the ability to jump back and forth to different levels, quickly sketching out the gross form at lower levels, and adding finer detail at the higher levels. Add the Multires and Add a level; we're ready to sculpt!
::修改器面板旁边是多层面面板. (注意:在最近的版本中,Blender不是自己的面板,它是一个修改器.) 多层面对象有选择为网格添加多个平滑的分级.虽然你可以在任何多边形或nurbs网格上使用雕塑工具,但多层面雕塑的强大优势是能够跳向不同层面,快速绘制低层的粗体形式,并在高层添加更细致的细节.添加多层面和添加一个层面;我们准备好雕塑!- Noob note: If nothing seems to be happening while you're trying to sculpt your mesh, it's because you haven't applied your Decimate. it must be locked down and applied before you're actually allowed to do anything to your mesh.
- Noob note: Only apply multires once, doing it a few times will quickly increase the polygon count to amounts that will really slow blender down
In case you haven't noticed, Blender's different modes offer different tool sets and options. To make the sculpting tools available you need to be in Sculpt mode, accessible through the Mode drop-down in any 3D window header. You'll see two new tabs next to the multires panel, Sculpt and Brush. Sculpt has most of the options you'll need to begin shaping your mesh. Note that most of the different brushes in this panel have hot-keys which will save a lot of time( G =Grab, D =Draw, S =Smooth, etc. ). Most important here is changing the brush size and intensity. Pressing F and dragging the mouse will resize the brush, while Shift-F will allow you to adjust the Brush Intensity. You can also turn on Symmetry to paint, for instance, both sides of a face at one time. This can speed up tasks tremendously, as long as your mesh is aligned to the axis properly.
::对于使用者来说,Blender 的不同模式提供了不同的工具集和选项. 要使雕塑工具可用,您需要在 Sculpt 模式中,可以通过任何 3D 窗口标题中的 Mode 下拉窗口访问. 您将在多层面面板旁边看到两个新选项标签,Sculpt 和 Brush. Sculpt 具有您开始塑造网格所需的大部分选项. 请注意,这个面板中的大多数不同刷具有热键,这将节省大量时间 (Grab=Grab, D=Draw, S=Smooth 等). 最重要的是改变刷子的大小和强度. 按 F 拖动鼠标将调整刷子的大小,而 Shift-F 将允许您调整刷子强度. 您还可以在 Symmetry 上同时转动,例如