3D平铺背景的Web
章节大纲
-
Overview
::概述This tutorial will guide you through the process of making 3D tiling backgrounds for use with web pages, your desktop, or anything else for that matter. We will be using Blender and a graphic editing program such as Adobe Photoshop or GIMP. I will provide detailed explanation to cator to beginners, however more experienced Blenderists can probably get away with just following the picture diagrams provided. You may also find the diagrams useful if English is not your native language, or if you hate reading instructions.
::本教程将引导您通过制作3D背景的过程,用于网页,桌面或其他任何东西.我们将使用Blender和图形编辑程序,如Adobe Photoshop或GIMP.我将为初学者提供详细的解释,但是更有经验的Blenderists可能只需遵循提供的图片图表就可以得到.如果英语不是您的母语,或者您不喜欢阅读说明,则图表也可能很有用.
Create The Object You Wish To Tile
::创建您想要的对象Start up Blender and look at your lonely cube. We will use this cube as a starting point for the sake of demonstration, but feel free to use any shape you like. Press " Tab " to enter Edit Mode . Press the " E " key on your keyboard and the Extrude menu will appear. Select " Individual Faces ". As you then drag your mouse cursor you will see some numbers move in the bottom left in the window and text saying "Shrink/Fatten". I recommend setting it to 1.0000 to keep it simple. Hold down the " Ctrl " key while dragging to do so in set increments.
::启动Blender,看看你的孤独立方体.我们将使用这个立方体作为一个起点,为了演示,但随意使用任何你喜欢的形状.按"Tab"进入编辑模式.按键盘上的"E"键,将会出现"挤出"菜单.选择"个体面孔".然后,当你拖动鼠标光标时,你会看到窗口左下方的一些数字移动,以及文字说"缩小/注意".我建议将其设置为1.0000以保持简单.在拖动时按住"Ctrl"键,以设置增量.Next, with the six faces of the cube still selected, press the " S " key to scale those faces. I recommend scaling to 0.8000.
::接下来,在立方体的六个面仍然被选择,按下"S"键来缩放这些面. 我建议缩放到0.8000.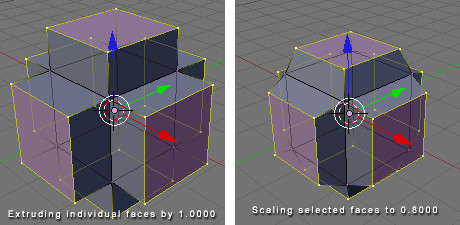
Good. Now that we have created our object we will prepare to tile it.
::好了. 现在我们已经创建了我们的对象, 我们将准备它.
Specify Your Tiling Area
::指定您的区" Tab " back into Object Mode and press " NumPad 7 " to go to the Top View, or manually click " View " at the bottom of the window and select " Top ".
::按下"NumPad 7"进入顶部视图, 或手动点击窗口底部的"View"并选择"Top".Press " spacebar " and from the menu that appears select " Add " > " Mesh " > " Plane ". The plane has appeared, but is obstructed by our cube object, so press " S " to scale the plane to 5.0000.
::按"空格条"从显示的菜单中选择"添加">"网格">"平面".平面已经出现,但被我们的立方体物体阻碍,所以按"S"将平面缩放到5.0000.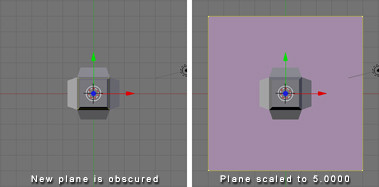
You'll notice that I've colored my plane black. This is only to make it easier for you to see. You need not bother with this as we will be deleting the face of this plane shortly.
::您会注意到我把飞机涂成黑色. 这只是为了让您更容易看到. 您不需要用这个来烦,因为我们将很快删除飞机的面部.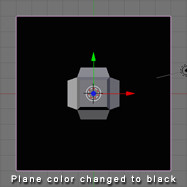
We now have an easily visible boundary representing the area which will be tiled. If at any point we decide we no longer need or want this we can move it to another layer by pressing " M " and selecting a layer to move it to.
::现在我们有一个很容易看到的边界代表的区域将被.如果在任何时候我们决定我们不再需要或想要这个我们可以将其移动到另一个层按"M"并选择一个层移动到.
Tile Away!
::没有!Now the fun part begins. If you have created 2D tiling backgrounds before, this concept will be very familiar to you.
::现在开始了有趣的部分. 如果你以前创建过二维背景,While in Object Mode , select your cube object. At this point you have a couple of options. One is to make duplicates of the cube object. Another is to make linked duplicates of the cube object. I recommend making linked duplicates because you can later edit the mesh of one object in order to change the mesh of all the duplicated objects. This can be especially useful if you later plan to animate your tiling background (careful not to distract from the foreground) . It is also useful if you want to experiment with new designs easily without having to re-place all your objects.
::在对象模式中,选择你的立方体对象.此时你有几个选项.一个是对立方体对象进行重复.另一个是对立方体对象进行链接重复.我建议做链接重复,因为你可以稍后编辑一个对象的网格,以更改所有重复对象的网格.这可能特别有用,如果您稍后计划动画您的背景 (小心不要从前景分心).如果您想轻松地尝试新的设计而不必重新放置所有对象,这也很有用.
With your cube object still selected, press " Alt+D " to make a linked duplicate. (Non-linked duplication is done with "Shift+D") Now hold down " Ctrl " to move in set increments and move the object to one of the corners of our plane. Make sure the center of the object (represented by a pink dot) is aligned with the very corner of the plane. At this point you may notice it's somewhat difficult to tell whether the center of the object is exactly on the corner of the plane, and that's why we are going to press " NumPad 5 " or click " View " and select " Orthographic ". For all practical purposes we can spend the rest of the time we are building the tiling pattern in Orthographic View because this view is essential for tiling.
::现在按下"Ctrl"按,以设定增量移动,并将对象移动到平面的角落之一. 确保对象的中心 (用粉红色点表示) 与平面的角落对齐. 在此时,您可能会注意到对象的中心是否正确地位于平面的角落,这就是为什么我们要按"NumPad 5"或点击"View"并选择"Orthographic". 为了所有实际目的,我们可以在Orthographic View中花费剩余的时间来构建板模式,因为这个视图对于板至关重要.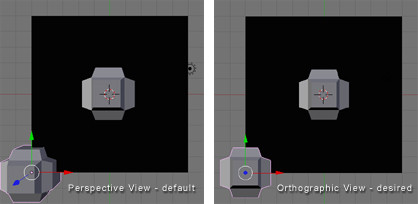
Now with your duplicate object still selected, scale it (" S " key) so that is somewhat smaller than the first. Then rotate it using the " R " key. While rotating you can constrain to a particular axis by typing " X ", " Y ", or " Z " respectively.
::现在,当您的重复对象仍然被选择时,请缩小它 (S键),使其比第一个小一些.然后使用"R"键旋转它.在旋转时,您可以通过分别输入"X"",Y"或"Z"来限制特定的轴.We will now make linked duplicates ( Alt+D ) of our rotated and scaled cube object and place one in each corner exactly on the grid (remember to hold " Ctrl " while dragging). If you place an object in one corner, you must place it in all four corners because corners touch both the X axis and the Y axis.
::现在我们将对旋转和缩放的立方体对象做出连接的复制 (Alt+D),并将一个在每个角落正确地放置在网格上 (记住在拖动时按住"Ctrl").如果您将对象放置在一个角落,您必须将其放置在所有四个角落,因为角落触及X轴和Y轴.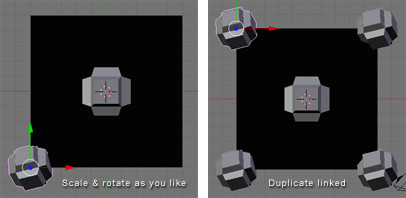
Now as you will notice in the following diagram, I made an object that is crossing over the edge of our plane. This is good. This is how to make natural tiling backgrounds. However! Whenever we do this we must be absolutely certain to do the same on the opposite side, or else our backgrounds will not tile properly.
::现在,正如你在下面的图中看到的,我做了一个物体,它穿过我们平面的边缘. 这很好. 这就是如何做自然的背景. 然而! 每当我们这样做我们必须绝对确定在相反的侧面做同样的事情,否则我们的背景不会正确地.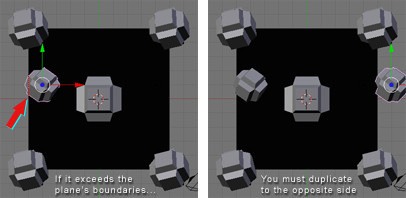
So now we've created a few objects of different sizes and orientations, however they have all been along the same spot on the Z axis. So let's give our pattern some depth - after all, that is the joy of working in 3D!
::现在我们已经创建了几种不同大小和方向的物体, 但它们都沿着Z轴的相同点. 让我们给我们的模式一些深度 - - 毕竟,这就是3D工作的乐趣!Before we do this, we'll want to get our guide plane out of the way. So right click on the plane to select it, then " Tab " into Edit Mode . Press " X " and from the Erase menu choose " Only Faces ". Now " Tab " back into Object Mode . There! We now have only the segments of the plane as our guide.
::在我们做之前,我们需要把导航平面从路上移除.所以右键点击平面来选择它,然后"Tab"进入编辑模式.按"X"从删除菜单选择"只需面孔".现在"Tab"回到对象模式.就这样!我们现在只有平面的部分作为我们的导航.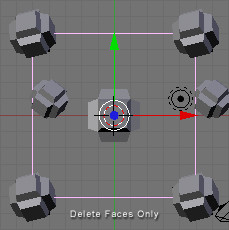
Hold down the middle mouse button while dragging the mouse to see what our design looks like in three dimensions. Now right click one of the cube objects, duplicate a linked copy ( Alt+D ), and press " Z " to constrain movement to the Z axis.
::按住鼠标中键,同时拖动鼠标,以查看我们的设计在三维中是什么样子. 现在右键单击一个立方体对象,复制一个链接的副本 (Alt+D),并按"Z"来限制移动到Z轴.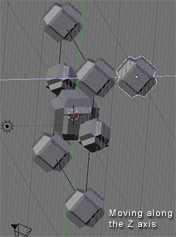
Navigate in this way along the X and Y axis as well and once you've found a good spot, scale and rotate . Remember to make a duplicate on the opposite side whenever you cross the outline of the plane guide. You can go on like this and populate your tiling pattern with as many objects as you wish. The grid is your friend during this process, so you should always have your finger on " Ctrl " while moving the duplicate of an object that crosses a border of the guide plane. Also, any object that will "tile" across the border must be at the same point on the Z axis as its counterpart on the other side of the seam. Press " NumPad 7 " periodically to see where you are from a 2D standpoint. This is the view from which we will eventually render the image, so this perspective is the one that counts. Beginners, remember that mouse wheel zooms in and out, and " Shift+middle mouse button " allows you to "drag" your way around.
::沿着X和Y轴这样导航,一旦找到一个好的位置,缩放和旋转.每次越过平面导图的轮时,请记住在对面做一个重复.你可以这样继续,并随心所欲填充你的形图案.在这个过程中,网格是你的朋友,所以你应该在移动一个穿过导图平面边界的对象的重复时,总是把手指放在"Ctrl"上.此外,任何将""跨越边界的对象必须在Z轴上的同一个点与其对应在接的另一边.定期按"NumPad 7"以查看你在哪里从2D角度.这是我们最终将视角染的视图,所以这是重要的视图.初学者,请记住鼠标轮放大和缩小,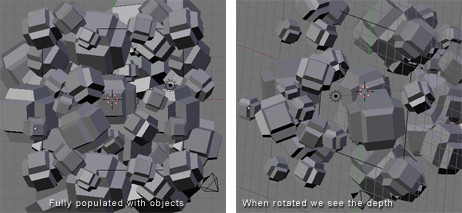
Keep in mind that in Orthographic View we do not perceive the depth of objects. Those far away and those near by appear to be at the same distance. This is what allows us to make a tiled image, but it also limits the apparent depth of the scene. We can compensate for this by scaling down the objects we want to appear further away. Or, as in this example, we can just make each object a different size and place some in front of others.
::记住,在正写视图中,我们看不到物体的深度.远处的物体和附近的物体看起来在相同的距离.这使我们能够制作形象,但也限制了场景的表面深度.我们可以通过缩小我们想要更远的地方出现的物体来弥补这一点.或者,像本例一样,我们可以让每个物体的尺寸不同,并将一些放在其他物体前面.
Camera Settings
::摄像机设置We will now position the camera directly over our cluster of objects. Press " NumPad 7 ", center the view on the cluster using " Shift+middle mouse button ", and zoom out a couple notches with the mouse wheel . From the 3D View Window' s menu, click " View " > " Align View " > " Align Active Camera to View ". Now you may be wondering why everything appears to be distorted. This is because when we changed to the camera's perspective, the view automatically reverted to Perspective View because by default the camera is set to that view. But just as we changed to Orthographic View in the 3D View Window, we can change the view of the camera as well. While in Object Mode , swivel the view until you see the camera. It is represented by a pyramidal wireframe with a black triangle atop the opening. Right click to select it. Now press " F9 " or click the Editing button (it's icon is four vertices joined in a square). Now in the Camera panel you will see a button labelled " Orthographic ". Press it. Above the button is a value labelled Scale . Set it to around 20. (See figure below)
::现在我们将把相机直接放置在对象集群上.按"NumPad 7",使用"Shift+中鼠标按"将视图放在集群的中心,并用鼠标轮缩小几.从3D视图窗口的菜单中,单击"View">"Align View">"Align Active Camera to View".现在你可能想知道为什么一切似乎被扭曲了.这是因为当我们更改到相机的视角时,视图自动返回视角视图,因为默认情况下相机设置为该视图.但正如我们在3D视图窗口中更改为正写视图,我们也可以更改相机的视图.在项目模式中,旋转视图按直到看到相机.它是由一个带有黑色三角形的金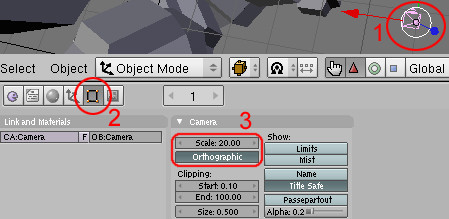
Lighting & Materials
::照明与材料Place some lights in your scene, and add some materials to your objects. Lighting and materials are subjects which demand their own tutorials, so if you don't know how to do these things yet, please consult the Wiki.
::照明和材料是需要自己教程的科目,所以如果你还不知道如何做这些事情,请咨询维基.Note: I advise lighting your scene pretty evenly in order to make the tiling seem contiguous.
::建议您照明场景的光线均, 以使看起来连续.Note: You could also only use Sun lamp, so the light is clean all over the mesh!
::需要注意的是, 您也可以使用太阳灯, 如此一来, 整个网格的光线都很清洁!
Rendering
::染Now that you've presumably got your lighting and materials as you want them, it's time to render the scene. Under User Preferences click " Render " > " Render Settings " or just press " F10 ". In the Format tab you can choose the dimensions of your rendered image, the file format you prefer, and the quality. I'm going with 800x600 at 100% quality.
::现在你可能已经得到了你想要的照明和材料,现在是时候染场景了. 在用户偏好下单击"染">"染设置"或只需按"F10". 在格式选项卡中,你可以选择染图像的尺寸,你喜欢的文件格式和质量. 我使用800x600的100%质量.
'Shopping
::购物And it's time to begin post-production. Open your rendered image in your preferred image editor. I will be using Photoshop in this example. Now find and mark the four corners of your tile (on a new layer of course). Just eyeball it.
::现在是开始后期制作的时候了. 在您喜欢的图像编辑器中打开您的染图像. 在这个例子中,我将使用Photoshop. 现在找到并标记您的的四个角 (当然在一个新的层上). 只是眼球它.
We will use guides to mark the tile boundaries. In Photoshop guides can be inserted by selecting " View " > " New Guide... ". Guides can be positioned with the Move Tool . You can zoom in and make sure your guides are accurately positioned by holding " Ctrl " while typing " + " or " - ". You can now hide or delete the layer with the markers, as that was only to help us get accurate guides.
::我们将使用指南来标记边界. 在Photoshop中,可以通过选择"查看">"新指南"...来插入指南. 通过移动工具可以定位指南. 您可以放大缩放,并通过按住"Ctrl"键键在键入"+"或"-"中确保您的指南的位置准确. 您现在可以隐藏或删除带有标记的层,因为这只是为了帮助我们获得准确的指南.Should you decide to make an animated tiling background I recommend layering all your frames on top of one another in your image editor before editing in order to keep the position uniform. You can then animate them using Adobe ImageReady (comes with Photoshop) or find decent low-budget and occasionally free GIF animation programs online.
::如果您决定制作动画的背景,我建议在编辑之前将所有相叠加在图像编辑器中,以保持位置均. 然后您可以使用Adobe ImageReady (附带Photoshop) 动画它们,或者在网上找到不错的低预算,偶尔免费的GIF动画程序.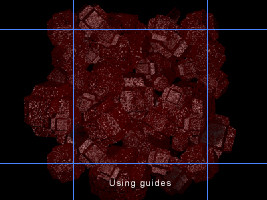
Now select an area just outside of the guides with the Marquee Tool . Make sure " Feather " is set to 0px and that the marquee is rectangular and Style is set to Normal (meaning no Fixed Aspect Ratio or Fixed Size). Also, it will help you to have Snap enabled, so go to " View " and make sure it is enabled for guides.
::现在使用标志工具选择指南外面的区域. 确保"羽毛"设置为0px,标志是矩形,样式设置为正常 (意味着没有固定比例或固定大小). 此外,它将帮助您启用Snap,所以去"查看"并确保它是启用指南.Once you have selected the area, copy ( Ctrl+C ) and paste ( Ctrl+V ). Then drag to the right using the Move Tool and that piece should snap to the inside of the rightmost vertical guide.
::选择了该区域, 复制 (Ctrl+C) 和粘贴 (Ctrl+V). 然后使用移动工具向右拖动,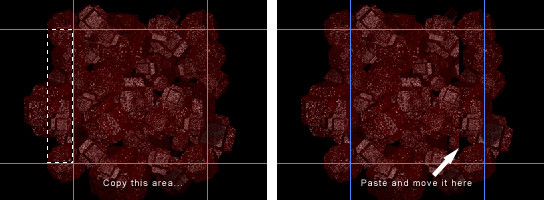
Select the Eraser Tool and choose a brush size. I'm going with a diameter of 65. You'll want to use a soft gradient-like brush for this. Now erase the left edge of the newly pasted selection so that it blends into the picture. Don't erase any of the right edge.
::选择"消光工具"并选择刷子大小. 我使用直径为 65. 您需要使用软的渐变式刷子来完成此操作. 现在,请擦除新粘贴的选择的左边缘,以便它融入图片中. 不要擦除任何右边缘.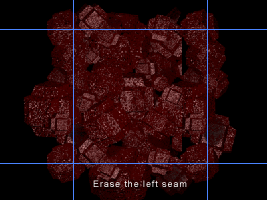
Press " Ctrl+E " or alternatively, select " Layer " > " Merge Down ".
::按下"Ctrl+E"或选择"层">"合并".Alright, so that procedure you just performed copying from left to right - now do it bottom to top. Once again, erase the edge. Do a Save As .
::现在从下到上, 再一次, 擦掉边缘. 执行"保存为".Finally, select the square center area that will become your tile and do " Image " > " Crop ".
::选择一个正方形的中心区域, 选择"图像">"剪切".Now scale your new tiling background to a web-friendly size. Save As a JPEG, GIF, or PNG. You're done!
::现在将您的新背景缩小到一个网络友好的尺寸. 保存为JPEG,GIF或PNG. 完成了!Note:If your pattern still isn't tiling quite perfectly, load the version with the guides again and repeat the copy-paste-erase process. Remember to merge down your layers each time or the corners may not tile correctly. If still no joy, try tiling the background in a web browser, taking a screenshot, pasting that into your graphics editor, and touching up from there.
::注意:如果您的图案仍然不完全,请重新加载版本的指南并重复复制-粘贴-删除过程.请记住每次将您的层合并,否则角落可能不会正确地.如果仍然没有快乐,请尝试在Web浏览器中背景,截取屏幕截图,将其粘贴到图形编辑器中,然后从那里进行触摸.Here is the final result:
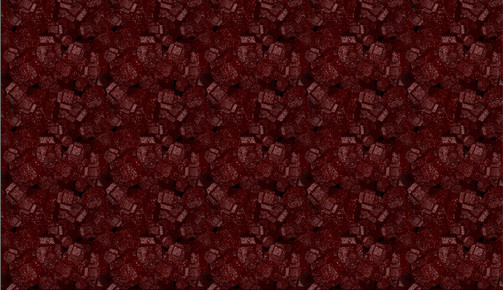
::结果如下: