雾气-使物体不透明
章节大纲
-
How Blender's Mist works
::混合剂雾如何工作If you render Objects within Blender's Mist, they mix up with the Background-Color,
because Blender decreases their Alpha-Value by increasing Mist-Intensity and distance from the Camera.
::如果您将物体染在混合器的雾中,它们会与背景颜色混合, 因为混合器通过增加雾强度和距离相机而降低它们的α值.The Problem
::问题This does a well job if your scene has a constantly-colored Background, but
in case of a real Background or World-Texture it looks not convincing.
All objects are looking like ghosts.
::如果你的场景有一个不断的色彩背景,这很好,但如果是真实的背景或世界纹理,它看起来不令人信服.所有物体看起来像鬼魂.The Solution explained briefly
::解决方案简要解释This page will show you two ways to get rid of that Problem.
The major thought is to mix Objects with an opaque color, instead of making them transparent.
The more Transparency, the more of the opaque color will be added.
::这页将向您展示两种方法来解决这个问题.主要的想法是将对象与不透明的颜色混合在一起,而不是使它们透明.
Because Blender delivers a (dynamic) Alpha-Value with Mist enabled,
we can use this value as a factor for increase or decrease of mixing the objects
with a certain color (or even to enhance or lower the contrast of materials, etc.)
::由于Blender提供了 (动态) 值,我们可以将这个值作为增加或减少混合物体某种颜色的因素 (甚至可以提高或降低材料的对比度等).

Here's a render result with mist and the "Mixing-Technique". You see, that you don't see shining the Background through. The first solution goes with the help of an external compositing program
and won't be explained in depth as we want to focus on how to solve
this issue within blender since it is open source.
::首先是使用外部编译程序,我们不会详细解释,因为我们只想在混合器中解决这个问题,因为它是开源的.Solution 1: Make use of an external composite software.
::解决方案1:使用外部复合软件.Just render your Background and your Objects separately with Alpha-Channels.
Then you import these files into a composite program on two layers.
(One for the Objects and one for the Background).
Between these layers you set a new "Color-Layer" with a solid greyish-blue color
(because this fits the color of the atmosphere) and create a clipping mask.
A "clipping mask" means that the "Color-Layer" is only visible where the objects of the top layer are.
And where there's no object you can see the Background.
As the object is partially transparent (because of Blender's Mist),
you will see the greyish-blue color shining through.
The more the object is away, the more transparent it is,
and the more the color-Layer will shine through the Objects.
::仅仅是用Alpha-Channels单独染你的背景和对象. 然后你将这些文件导入一个由两层组成的复合程序. 一层是对象,一层是背景. 在这些层之间,你设置一个新的"颜色层"以固体灰蓝色 (因为这与大气的颜色相匹配),并创建一个剪切面具. "剪切面具"意味着"颜色层"只能在顶层对象所在的地方可见. 而没有对象的地方,你可以看到背景. 由于对象是部分透明的 (由于混合器的雾),你会看到灰蓝色的颜色闪过. 越远的对象,越透明,颜色层会越多地闪过对象.Solution 2: Make use of Blender's Composite-Nodes.
::解决方案2:使用混合器的复合节点.Since Solution 1 seems not to be a big deal as we cannot afford expensive packages, we are also able
to achieve this "Mix-Technique" by Blender's built-in Composite-Nodes.
::由于解决方案1似乎不太重要,因为我们无法负担昂贵的包装,我们也可以通过Blender内置的复合节点实现这种"混合技术".To continue reading it would be good, if you know a little about Blender's Compositing-Nodes.
::如果您了解Blender的组合节点,Now, here's the interesting part of the tutorial, the Graph of the Nodes in the Node-Editor:
::现在,教程的有趣部分是节点编辑器中的节点图:
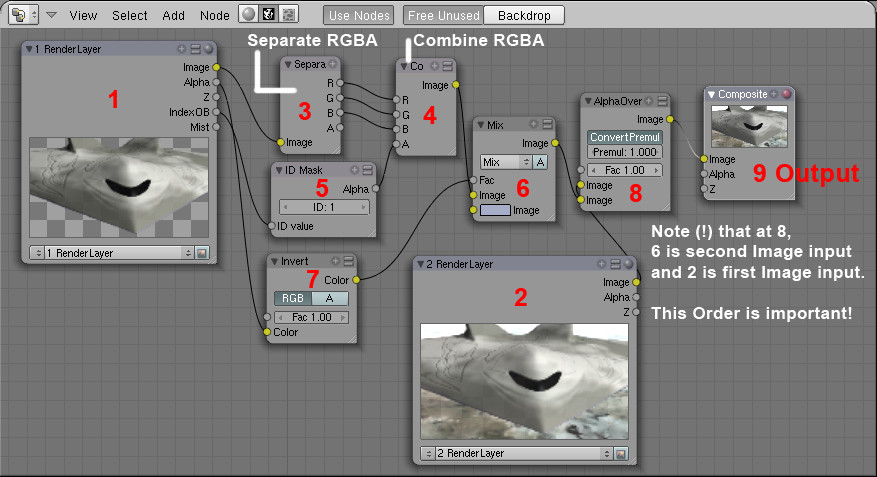
Description:
::描述:Step 1 Render Layer1
::步骤 1 染层1In the Render Settings Tab you assign the Objects which you don't want to be transparent to Render Layer1.
::在染设置选项卡中, 您将不希望透明的对象分配到染层1.See http://wiki.blender.org/index.php/Doc:Manual/Render/Layers for how to deal with RenderLayers.
::关于如何处理RenderLayers的方法,请参阅http://wiki.blender.org/index.php/Doc:Manual/Render/Layers.
It is important that you turn off "Sky" and that you turn on "IndexPass". (The Option "Mist" delivers the same Value as the Alpha-Output in the Node RenderLayer1)
"IndexPass" will be explained in Step 5.
::关闭"Sky"并启动"IndexPass"非常重要. (选项"Mist"提供与Node RenderLayer1中的Alpha输出相同的值) "IndexPass"将在第5步中解释.Step 2 Render Layer2
::步骤 2 染层2This Layer renders only the Background, the Sky. In my case I had to enable other elements also, because otherwise the groundplane won't render.
I don' t know why, but this doesn't matter in our case.
::只有在我的情况下,我必须启用其他元素,因为否则地面平面不会染. 我不知道为什么,但这在我们的情况下并不重要.Step 3 Separating RGB+Alpha
::步骤3 分离RGB+AlphaThe "Image output" of the Node RenderLayer1 delivers RGB+A, that's a little distracting,
because you can see an Alpha-Output also. Select "Add" -> "Color" -> "Separate RGBA" in the Node-Editor Window.
::节点染层1的"图像输出"提供RGB+A,这有点分散注意力,因为你也可以看到Alpha输出. 在节点编辑器窗口中选择"添加" -> "颜色" -> "分离RGBA".Step 4 Combining RGBA
::第4步 结合RGBANow the Separated RGB gets combined again to RGB, but this time with a new Alpha of Step 5.
::现在,分离的RGB又被组合到RGB, 但这次是第5步的新Alpha.Step 5 Making the transparent Objects opaque
::步骤5 让透明的物体变得不透明The good thing is, that Blender's Object-ID Alpha Value does ignore mist.
So we can add an ID-Mask Node to get the Alpha of the Object into the new Image.
Here you must set the ID of the Object to the same number as in the ID-Mask Node.
Select the Object and set its ID Pass-Index!
Beside is a screenshot where you set the Object ID.
::好消息是,Blender的对象ID Alpha值确实忽略了mist.所以我们可以添加一个ID-Mask节点来将对象的Alpha输入新的图像.在这里,您必须将对象的ID设置为与ID-Mask节点相同的数字.选择对象并设置其ID Pass-Index!旁边是一个您设置对象ID的截图.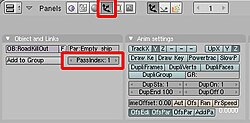
In the red marked section of the buttons window, you can set the ID of the object
Step 6 Mixing the Object with a Color
::第6步:将物体与颜色混合Here you add a Mix-Node to mix the Object with a "Horizon-Color".
The Color should be set to a bright greyish-blue as this is the color of the air inner the atmosphere.
Any color is possible, you may think of a dark red in a fire-hollow or of black if somewhere out in space.
::颜色应该设置为明亮的灰蓝色,因为这是大气内部的颜色.任何颜色都是可能的,你可能会想到火洞中的深红色或在太空中的黑色.Step 7 Setting the Factor of how much of the color should be added
::步骤7 设置颜色的添加量Blender delivers an Alpha-Value to the Objects due to the Mist.
If an object is far away or if the Mist-Intensity is very high,
the Alpha-Value of the Object decreases, which means the Alpha-Value becomes more black.
And if the Object is close, it has accordingly high Alpha, which means getting white.
Black means a Value of R-G-B 0-0-0 and White a Value of R-G-B 1-1-1.
::由于雾,混凝土将对象提供阿尔法值.如果一个物体远离或雾强度非常高,则对象的阿尔法值会下降,这意味着阿尔法值变得更黑.如果物体靠近,则相应地具有高阿尔法值,这意味着变白.黑色意味着R-G-B 0-0-0的值,白色意味着R-G-B 1-1-1的值.Since we want to use these values as a factor of how much to blend the Object
with our "Horizon-Color", we need to invert this Value.
::需要将这个值反转. 为了使这些值成为与"地平线颜色"的混合的因素,(Close Objects = High Alpha = Factor almost 1 - but we need Blend Factor close to 0, because we want low mist as the Object is close)
:近距离的物体=高阿尔法=几乎1的因子 - - 但我们需要接近0的混合因子,因为我们希望低雾,因为物体是近距离的)
So let's add an "Invert-Color-Node".
Get the Settings of the Node-Graph for this Node.
This Node inverts Black to white, dark-grey to bright grey, etc.
We now use this inverted alpha-value (or Mist-value)
as a factor for mixing the Horizon-Color with the Object.
::让我们添加一个"反转-颜色-节点". 获取这个节点的节点图的设置. 这个节点将黑色反转为白色,深灰色反转为明亮灰色等等. 我们现在将这个反转的alpha值 (或Mist值) 作为混合地平线颜色与对象的因素.Step 8 Layering the colored Objects over the Sky-Background
::步骤8 层次的彩色对象在天空背景Now you add an Alpha-Over-Node which will layer our Objects over the Sky-Background.
Be aware to use the settings shown in the screenshot and that the order of the two Image-Inputs
of the Alpha-Over-Node is very important.
The second Input always gets over the first Input.
::现在你添加一个Alpha-Over-Node,它将我们的Objects在天空背景上叠加.请注意使用屏幕截图中显示的设置,并且Alpha-Over-Node的两个图像-信息的顺序非常重要.第二个输入总是超过第一个输入.Step 9 Add an Output-Node
::步骤 9 添加一个输出节点Finally you need an Output-Node and to enable "Do Composite" in the RenderSettings.
::需要一个输出节点, 并在染设置中启用"Do Composite".Step 10 Example
::第十步示例Here an Example, of how it worked out in my project:
::让我们来看看我的项目是如何实现的:-
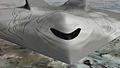 Close Distance - Almost no Mist
::距离近 - - 几乎没有雾 -
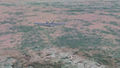
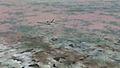 Far Distance - Low Mist or atmospheric opacity
::远距离 - 低雾或大气不透明 -
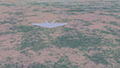
 Further Distance - (!)The Object is even scaled
::进一步的距离 - - 目标的尺寸是均的 -
 Farthermost Distance - In original size the Object would be so small that it isn't visible -only to make the Logic clear
::远距离 - 在原始尺寸的物体将是如此之小,它是不可见的 - 只是为了使逻辑清楚
Summary
::简要介绍Be sure, you got every step right - then all will work out properly.
What is almost of more importance, that you understood the logic behind this,
so that you learn about Blender's Compositing-Nodes and the 01-Logic ;)
::确保你每一步都做得对 - - 然后一切都会正常运行.Since "Mist" means something like "Bullsh**" in German I did not believe that it really
is like that in Blender - and it isn't! Blender is a quite nice and powerful tool.
And I hope that it'll ever be Open-Source.
::由于"Mist"在德语中意味着"Bullsh**",我不相信Blender真的会这样 - - 而事实并非如此! Blender是一个非常好而强大的工具.
-