Blender 3D:零基础到专业级-第1单元:背景
The Blender user interface may appear daunting at first, but don't despair. This book explores the interface one step at a time.
::这本书将逐步探讨这个界面.
In this module, you'll learn about Blender windows:
::在本模块中,您将学习关于Blender的窗口:
-
recognizing windows and their headers,
::识别窗口及其头部, -
the different types of windows,
::不同类型的窗户, -
how to activate and resize windows,
::如何激活和调整窗口的大小, -
how to split and join windows.
::如何分开和连接窗口.
You'll also practice launching and leaving Blender.
::你还会练习发射和离开混合器.
An Interface Divided
Blender's user interface is divided into rectangular areas called windows (or sometimes, areas). The overall arrangement of windows is called a workspace.
::Blender的用户界面被分为称为窗口 (或有时称为区域) 的矩形区域.窗口的整体布局称为工作空间.
If you haven't already launched Blender, go ahead and do so. You should soon see something that resembles the following.
::如果您还没有启动Blender,请继续这样做. 您应该很快看到类似于以下的东西.
Blender has had some major changes to its user interface (UI) since version 2.4x. Some of these changes include moving buttons and changing the space bar hot key from the “add menu” to the “search menu” ( SHIFT + A is now the "add menu” hot key). This is important to know when trying to follow tutorials.
::自2.4x版本以来,Blender对其用户界面 (UI) 进行了一些重大变化.其中一些变化包括移动按和将空格热键从"添加菜单"更改为"搜索菜单" (SHIFT + A现在是"添加菜单"热键).当尝试遵循教程时,了解这一点很重要.
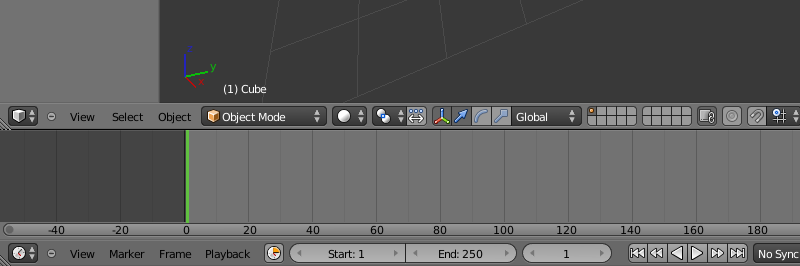
Other changes include the addition of the tool bar and window splitting widget. The shelf widget (indicated by a plus sign) opens hidden tool shelves. The object tool shelf can be toggled on and off by pressing T . The properties tool shelf can be toggled on and off by pressing the N . The split window widget allows you to split and join windows. Blender 2.69 is shown below.
::其他变化包括添加工具和窗口分割小程序.架小程序 (用加号表示) 打开隐藏的工具架.对象工具架可以通过按T来开启和关闭.属性工具架可以通过按N来开启和关闭.分割窗口小程序允许您分割和连接窗口.Blender 2.69如下所示.
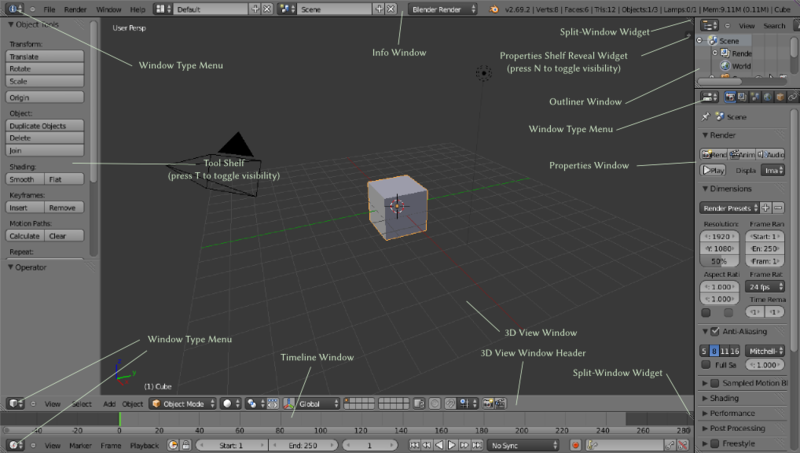
Window Headers
Did you find all five headers?
::你找到所有五个标题吗?
Every Blender window has a header. A header can appear at the top of the window, at the bottom of the window, or it can be hidden. Let's take a closer look at the headers.
::每个Blender窗口都有一个标题.一个标题可以出现在窗口的顶部,窗口的底部,或者它可以被隐藏.让我们仔细看看这些标题.
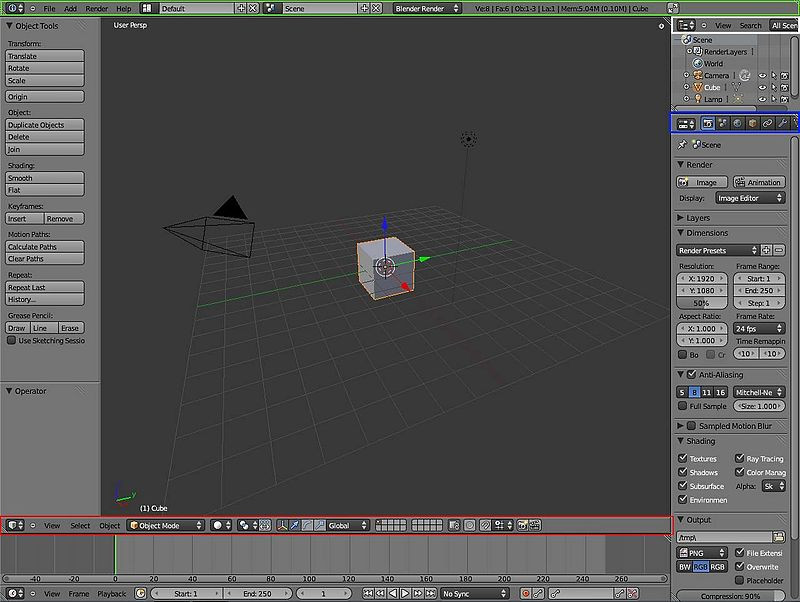
The header of the 3D View window is outlined in red. Note that it runs along the bottom of the 3D View window, not the top.
The header of the Properties window is outlined in blue.
The header of the Outliner window is outlined in white.
The header of the Timeline window is the one on the bottom (not outlined)
If you click with RMB on the header, a menu pops up which lets you move the header (to the top if it’s at the bottom, or vice versa), or maximize the window to fill the entire workspace:
::如果您在头部点击人民币, 便会弹出一个菜单, 让您移动头部 (如果在底部,则移动到顶部,
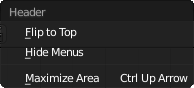
To hide the header completely, move the mouse to the edge of the header furthest from the edge of the window (i.e. the top edge of the header if it is at the bottom of the window, or vice versa); it will change into a vertical double-headed arrow. Now click with LMB and drag towards the window edge, and the header will disappear. In its place, you will see the following symbol appear at the corner of the window:
![]() . Click this with LMB to bring the header back.
. Click this with LMB to bring the header back.
::要完全隐藏标题,请将鼠标移动到最远的标题边缘 (即标题的顶端,如果它位于窗口底部,反之亦然);它将变成一个垂直的双向箭头.现在点击 LMB 并向窗口边缘拖动,标题将消失. 取而代之的是,您将看到以下符号出现在窗口的角落: . 点击此与 LMB 带回标题.
Window Types
Blender has many types of windows (there are 16 of them in Blender 2.69) and a Console for the Python programming language. You've just encountered the Info, 3D View, Properties, and Outliner windows. The rest will be introduced as needed in later modules.
::Blender有很多类型的窗口 (在混合剂2.69中有16个窗口) 和一个用于Python编程语言的控制台.您刚刚遇到了Info,3D View,Properties和Outliner窗口.其余的将在后面的模块中根据需要进行介绍.
Every window header in Blender has an icon at the left end to indicate the window type. For instance:
::在Blender中的每个窗口头部都在左端有一个图标来指示窗口类型.例如:
-
 = Info
::= 信息 -
 = User Preferences
::= 用户偏好 -
 = 3D View
::= 3D 视图 -
 = Outliner
::= 概要 -
 = Properties
::= 属性
If you LMB on the icon, a menu will pop up. (If you don't know what LMB means, please review the
Keystrokes, Buttons, and Menus Notation
module.)
::如果您在图标上设置了 LMB,则会弹出一个菜单. (如果您不知道 LMB 是什么意思,请查看键盘键盘,按和菜单标记模块.
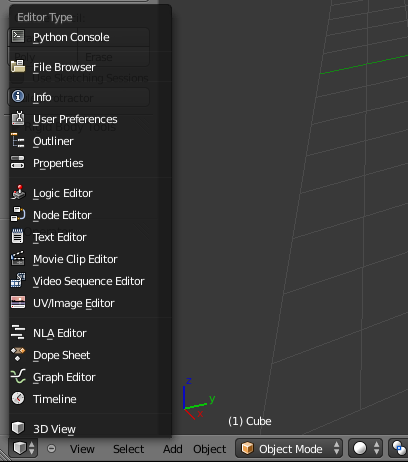
The menu can be used to alter a window's type. In this screenshot, the user is about to change the window into a Properties window.
|
|
Any window can be changed to any type. Blender doesn't mind if there are multiple windows of the same type.
|
|
|
The workspace layout is saved along with the document. Anybody subsequently opening the document will see the last-saved layout.
|
If you've changed any window's type, please change it back (or reload the factory settings with
File → Defaults →
Load Factory Settings
) before continuing with this tutorial.
::如果您已更改任何窗口的类型,请在继续本教程之前将其更改回原样 (或重新加载工厂设置以文件 → 默认 → 加载工厂设置).
The Active Window
The
active window
is the one that will respond if you press a key. Only one Blender window is active at any given time.
::只有一个Blender窗口在任何给定的时间内是活跃的.
The active window is usually the one containing the mouse pointer. (Blender uses a "focus follows mouse" user interface model. When a hotkey fails to work as expected, it is often because the mouse pointer has strayed into a neighboring window.) To change the active window, simply move the mouse pointer into the window you wish to activate.
::活跃窗口通常是包含鼠标指针的窗口. (Blender使用"关注跟随鼠标"的用户界面模型.当热键无法按预期工作时,通常是因为鼠标指针偏离到邻近的窗口. 要更改活跃窗口,只需将鼠标指针移动到您想要激活的窗口.
Practice changing the active window by moving your mouse between the 3D View and the Timeline windows. The Timeline window is directly below the 3D View header. At this point, it's worth mentioning that the header for the 3D View window and Timeline window is at the BOTTOM of its own window instead of the top as the name "header" implies.
::练习改变活跃窗口,通过鼠标移动在3D视图和时间轴窗口之间.时间轴窗口直接位于3D视图标题下方.在这一点上,值得一提的是,3D视图窗口和时间轴窗口的标题位于其自己的窗口的底部,而不是"标题"名称所暗示的顶部.
|
|
When a window becomes active, its header gets brighter.
|
Resizing Windows
Resizing windows is easy.
::改变窗口的大小很容易.
Dragging on a Border
::拖延在一个边界
Drag with the mouse to move the border up and down.
When the border is where you want it, release LMB .
Whenever you increase the size of one window, you decrease the size of another. That's because Blender has a non-overlapping window interface: unlike many other programs, it does not permit windows to overlap. Neither does it move windows; it just resizes them. If you find that you cannot increase the size of a window (e.g. the Info window) any further although there seems to be enough space to do so, it may be because you decreased the size of another window (e.g., the Outline window) to its minimum size (i.e, just the heading).
::每当你增加一个窗口的大小,你就会减少另一个窗口的大小.这是因为Blender有一个不重叠的窗口接口:与许多其他程序不同,它不允许窗口重叠.它也不会移动窗口;它只是调整它们的大小.如果你发现你不能进一步增加一个窗口的大小 (例如信息窗口),尽管似乎有足够的空间这样做,这可能是因为你将另一个窗口 (例如轮窗口) 的大小降低到最小大小 (即仅仅是标题).
Maximizing a Window
::尽可能多地使用窗口
Another way to resize a window is to maximize it. When Blender maximizes a window, it makes the window as large as possible. The previous window configuration is saved.
::另一个调整窗口大小的方法是最大化它.当Blender最大化窗口时,它会使窗口尽可能大.以前的窗口配置被保存.
-
To maximize the active window, press Ctrl + UpArrow , Ctrl + DownArrow or Shift + Space . On a Mac, if “Spaces” is enabled, you may have to use Ctrl + Alt + UpArrow .
::要最大化活跃窗口,请按Ctrl + UpArrow,Ctrl + DownArrow或Shift + Space. 在Mac上,如果启用了"空间",您可能需要使用Ctrl + Alt + UpArrow. -
When a window is maximized, use Ctrl + UpArrow , Ctrl + DownArrow or Shift + Space to restore the previous (unmaximized) window configuration.
::当一个窗口被最大化时,使用Ctrl + UpArrow,Ctrl + DownArrow或Shift + Space来恢复以前的 (未被最大化) 窗口配置.
Practice maximizing and un-maximizing the 3D View and Timeline windows.
::练习最大化和最大化3D视图和时间轴窗口.
|
|
If you are running a version of Blender before 2.57, you cannot maximize a User Preferences window.
|
Shelves
You will notice that the 3D View
![]() window (the largest window in the screenshots above) has several buttons down the left side. This rectangular portion is called the
Tool Shelf
. This is like a window within a window - you can drag the boundary between it and the main part of the 3D View to resize.
window (the largest window in the screenshots above) has several buttons down the left side. This rectangular portion is called the
Tool Shelf
. This is like a window within a window - you can drag the boundary between it and the main part of the 3D View to resize.
::您会注意到3D视图窗口 (上图截图中的最大窗口) 在左侧有几个按. 这一矩形部分称为工具架. 这就像窗口中的窗口 - 您可以拖动它和3D视图主部分之间的边界来调整大小.
If you drag all the way to the window boundary, the shelf will disappear. In its place, the following symbol will appear:
![]() . Click it to bring the shelf back.
. Click it to bring the shelf back.
::如果拖到窗口边界,该架将消失. 取而代之的是以下符号: . 点击它来恢复架.
Too Much To Fit
If a window or shelf contains too much information to fit within its display area, scrollbars will appear along the bottom or right edge. You can scroll the contents by dragging these with LMB ; alternatively you can drag with MMB directly within the contents.
::如果窗口或架子包含太多的信息,无法适应其显示区域,则在底部或右边缘将出现滚动.您可以通过使用LMB拖动这些内容来滚动内容; 或者您可以直接在内容中使用MMB拖动内容.
A window header may also contain more than fits within its displayable area. There is no explicit visual clue for this (though some of the widgets at the right edge might not be visible), but if that happens, you can drag sideways within the header with MMB to scroll its contents.
::窗口标题可能包含在可显示区域内不适合的内容.没有明确的视觉线索 (尽管右边的一些小部件可能看不到),但如果发生这种情况,您可以用MMB向侧拖动标题以滚动其内容.
Splitting And Joining Windows
At the top right and bottom left of every window, you will see something like this:
![]() . If you move the mouse over the icon, you will see the pointer turn into a cross. At that point, you can do one of the following by clicking and dragging with LMB :
. If you move the mouse over the icon, you will see the pointer turn into a cross. At that point, you can do one of the following by clicking and dragging with LMB :
::在每个窗口的右上方和左下方,你会看到这样的东西: . 如果您将鼠标移动到图标上,你会看到指针变成一个十字. 在那个点,你可以通过点击和拖动LMB来执行以下操作之一:
-
Split the window into two copies horizontally by dragging horizontally away from the edge.
::通过向边向外拉动,将窗口水平分成两份. -
Split the window into two copies vertically by dragging vertically away from the edge.
::通过从边缘垂直拉开窗口,将窗口垂直分成两个副本. -
Join the window to the adjacent one horizontally (getting rid of it and taking over its space) by dragging towards it.
::通过向窗户拖动,将窗户与相邻的窗户水平连接 (摆脱窗户并占用窗户的空间). -
Join the window to the adjacent one vertically (getting rid of it and taking over its space) by dragging towards it.
::通过向窗口拖动,将窗口垂直连接到相邻的窗口 (摆脱窗口并占用窗口的空间).
Of course, the last two are only possible if there
is
in fact another window in that direction. Note: you can only join windows horizontally that are the same height, and windows vertically that are the same width.
::当然,最后两个只能在实际上有另一个窗口在该方向. 注意:你只能连接窗口水平相同的高度,和窗口垂直相同的宽度.
The Default Workspace
If you look at the above screenshot of the default workspace, you will see the following window types:
::您可以看到以下窗口类型:
-
The menu bar at the top (outlined in green) is actually a window, called Info
 . In previous versions of Blender, you could resize this to reveal the User Preferences, but in 2.5
x
they have been moved to their own window type. Instead, all you can see here if you enlarge the window are some debug messages, which may be removed in a future version of Blender. As of 2.70, the debug messages are still present in this menu.
. In previous versions of Blender, you could resize this to reveal the User Preferences, but in 2.5
x
they have been moved to their own window type. Instead, all you can see here if you enlarge the window are some debug messages, which may be removed in a future version of Blender. As of 2.70, the debug messages are still present in this menu.
::顶部的菜单 (用绿色勾勒出来) 实际上是一个叫做Info的窗口.在以前的Blender版本中,你可以调整尺寸以显示用户偏好,但在2.5x中它们已经被移到自己的窗口类型中.相反,如果你放大窗口,你只能看到一些调试消息,这些消息可能会在未来的Blender版本中被删除.截至2.70,调试消息仍然存在于这个菜单中. -
The largest window on the screen is the 3D View
 . This is where you work on your model.
::屏幕上最大的窗口是3D视图. 这是你在模型上工作的地方. -
The Properties
 window is the tall area on the right; this is where most of the functions are located for performing operations on models, materials etc. In previous versions of Blender this was called the Buttons window. Over time, it evolved into a disorganized area that made it difficult to find things. It has been cleaned up significantly in 2.5
x
. Note that it defaults to a vertical layout, rather than the horizontal one of previous versions. The new design prefers a vertical layout, which better suits today’s widescreen monitors.
window is the tall area on the right; this is where most of the functions are located for performing operations on models, materials etc. In previous versions of Blender this was called the Buttons window. Over time, it evolved into a disorganized area that made it difficult to find things. It has been cleaned up significantly in 2.5
x
. Note that it defaults to a vertical layout, rather than the horizontal one of previous versions. The new design prefers a vertical layout, which better suits today’s widescreen monitors.
::属性窗口是右边的高区域;这是执行模型,材料等操作的大部分功能所在的位置.在以前的版本中,它被称为按窗口.随着时间的推移,它演变成了一个混乱的区域,使得很难找到东西.它已经在2.5x中得到了显著的清理.请注意,它默认是垂直布局,而不是以前的水平布局.新的设计更喜欢垂直布局,更适合今天的宽屏显示器. -
The Outliner
 (at the top right) gives you an overview of the objects in your document. As your models get more complex, you will start to appreciate the ability to quickly find things here.
::随着模型的复杂化,您将开始欣赏在此处快速找到事物的能力. -
The Timeline
 (across the bottom) becomes important when you’re doing animation.
::时间线 (在下方) 变得很重要, 当你做动画.
The default layout may not be optimal. For example, if you’re doing a static model or scene, not an animation, you can get rid of the Timeline. If you’re doing heavy script development, you’ll probably want the Console available to try things out. And so on.
::默认的布局可能不理想.例如,如果你正在做静态模型或场景,而不是动画,你可以摆脱时间线.如果你正在做繁重的脚本开发,你可能想要控制台可用于尝试.等等.
Workspace Presets
In the Info window/titlebar, you will see a menu with an icon like this
![]() . Clicking on it with LMB will show the following menu:
. Clicking on it with LMB will show the following menu:
::在信息窗口/标题中,您将看到一个带有这样图标的菜单. 通过LMB点击它将显示以下菜单:
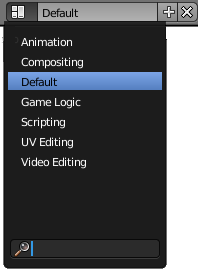
Selecting from this menu lets you quickly switch between various predefined workspace layouts, tailored to various workflows. Try it and see. You can return to the default layout by selecting “Default” (but note that any changes you make to the layout are immediately associated with the name being displayed here). The menu has a search box at the bottom. Typing text here will restrict the menu to showing items containing only that text. It might not appear to have much use, but in a complicated project that needs dozens of different layouts, the search function could become very useful indeed!
::从这个菜单中选择可以让你快速切换各种预定义的工作空间布局,以适应各种工作流程.试试看.你可以通过选择"默认" (但请注意,你对布局的任何更改都会立即与这里显示的名称相关联) 来返回默认布局.菜单的底部有一个搜索框.在这里键入文本将限制菜单显示仅包含该文本的项目.它可能看起来没有太多用途,但在需要数十个不同的布局的复杂项目中,搜索功能确实可以变得非常有用!
The name of the currently selected item appears to the right of the menu icon. In the illustration above, this is "Default". Blender allows you to rename the current menu item by clicking on it with the LMB and typing a new name, so take care not to do so unless you actually want to rename the menu item. For example, if you replace the name "Default" with "MyDefaults", you will subsequently see that "MyDefaults" appears in the list of menu items.
::当前选择的项目的名称出现在菜单图标的右边. 在上面的插图中,这是"默认". 混合器允许您通过点击它与LMB并输入一个新的名称来重命名当前菜单项,所以请注意不要这样做,除非你实际上想要重命名菜单项. 例如,如果你用"我的默认"取代"默认"的名字,你会随后看到"我的默认"出现在菜单项列表中.
Note also the “+” and “X” icons to the right of the menu; clicking “+” creates a new entry which is a duplicate of the last-selected entry, while clicking “X” gets rid of the currently-selected entry. You will see these conventions appear consistently in menus elsewhere in Blender’s new, revamped interface.
::另外,在菜单右侧的 + 和 X 图标;点击 + 会创建一个新的条目,它是最后一个选择的条目的重复,而点击 X 会删除当前选择的条目.您将看到这些规范在 Blender 的新改版界面的其他地方的菜单中始终出现.
One Document At A Time
Blender can only work with one open document at a time (this does not apply to blender 2.79, which allows multiple instances of blender to run concurrently). To save changes to the current document, select one of the Save options from the File menu (or press Ctrl + S to save under the last-saved name). To open a new document (actually load a copy of your last-saved user preferences), select “New” from the File menu (or press Ctrl + N ), and select “Reload Start-Up File” from the popup that appears, but be aware
this will not automatically save any changes to the previous document
.
::混合器只能同时使用一个开放的文档 (这不适用于混合器2.79 ,允许多个混合器实例同时运行). 为了保存当前文档的更改,请选择"文件"菜单中的"保存"选项之一 (或按Ctrl + S以保存最后保存的名称). 打开新文档 (实际上是加载您最后保存的用户偏好副本),请从"文件"菜单中选择"新" (或按Ctrl + N),并从弹出窗口中选择"加载启动文件",但请注意,这不会自动保存任何对上文档的更改.
Scenes
A
scene
is like a separate Blender-document within-a-document. Different scenes within the same document can easily share objects, materials etc. You can define them once and make different renderings and animations from them. You create, delete and switch scenes using the scene
![]() menu in the info header. A new document starts by default with just one scene, called “Scene”.
menu in the info header. A new document starts by default with just one scene, called “Scene”.
::场景就像一个单独的Blender-文档中的文档.同一文档中的不同场景可以轻松共享对象,材料等.您可以将它们定义一次,并从中创建不同的染和动画.您可以使用信息头部的场景菜单创建,删除和切换场景.一个新的文档默认只以一个场景开始,称为"场景".
Leaving Blender
To exit Blender:
::退出混合器:
-
If there's a tool active, press Esc to exit the tool.
::如果有活跃的工具,请按 Esc 退出工具. -
Press Ctrl + Q . This brings up an
OK?
menu.
::按Ctrl+Q. 这会打开一个OK?菜单. -
Confirm
Quit Blender
by clicking LMB or pressing Enter .
::通过点击LMB或按Enter确认退出混合器 .
|
|
In versions before 2.79, Blender will not prompt you to save your work. However, you can easily pick up where you left off by using
File → Recover Last Session
.
|
Additional Resources
-
YouTube video on Splitting and Joining Windows in 2.49 at
http://www.youtube.com/watch?v=uYb1j8X-ulc
::在2.49分开和连接Windows的YouTube视频在 -
YouTube video on Splitting and Joining Windows in 2.59 at
http://www.youtube.com/watch?v=mGK1gwFhx9M
::在2.59分开和连接Windows的YouTube视频在
-
the
Blender Manual
page on "window types" at
http://wiki.blender.org/index.php/Doc:Manual/Interface/Window_types
::在"窗口类型"的Blender手册页面 http://wiki.blender.org/index.php/Doc:Manual/Interface/Window_types -
the
Blender Manual
page on "changing window frames" at
system/Arranging frames http://wiki.blender.org/index.php/Doc:Manual/Interface/Window system/Arranging frames
::在"更改窗框"的Blender手册页面上,在系统/安排框架 http://wiki.blender.org/index.php/Doc:Manual/Interface/Window system/安排框架