Blender 3D:零基础到专业级-第1单元:背景
3D View
![]() windows are used to visualize 3D scenes. You’ll do a lot of work in these windows, so you will need to learn your way around.
windows are used to visualize 3D scenes. You’ll do a lot of work in these windows, so you will need to learn your way around.
::您将在这些窗口中做很多工作,因此您需要学习周围的方法.
|
|
The 3D view only shows an
approximation
of the final appearance of the scene. The overall geometry should be correct, but don’t expect accurate rendition of materials, textures, lighting etc, since that can be very time consuming. The 3D view is designed to respond to your actions at interactive speeds. There are additional view options (wireframe, hiding etc) that make it easier to see which parts of the model you’re working on, have no effect on the final render. You can change your viewpoint at any time (which will be essential while working on your model/scene), while the viewpoint of the render is controlled by the camera position.
|
In this module, you'll learn:
::在本模块中,您将学习:
-
to recognize 10 things commonly seen in viewports
::识别在视窗中常见的10个东西 -
to tell which mode Blender is in
::告诉混器在哪个模式 -
how to change viewport options and viewpoints
::如何更改视窗选项和视角 -
how to position the 3D cursor
::如何定位3D光标
You'll also learn the fundamentals of:
::您还将学习以下基本知识:
-
visibility layers
::可见度层
The Viewport and its Contents
视口及其内容
Aside from its header, the remainder of a 3D View window is its viewport. You use viewports any time you need an up-to-date view of the scene you're working on.
::除了头部,剩下的3D视图窗口是视图窗口. 您可以在任何时候使用视图窗口,您需要对正在处理的场景进行最新的视图.
Viewports are busy places. Go on a scavenger hunt and see what you can find in a simple viewport.
::观景台是繁忙的地方. 找寻宝藏,看看你能在简单的观景台里找到什么.
-
Launch Blender.
::启动混合器 -
Just so we're all looking at the same scene, load the factory settings using
File → Defaults -> Load Factory Settings
.
::通过"文件" -> "默认" -> "加载工厂设置"来加载工厂设置. -
Confirm the “Load Factory Settings” popup with LMB (or Enter ).
::确认"加载工厂设置"弹出窗口的LMB (或Enter). -
If the NumLock indicator on your keyboard is unlit, press NumLock so that numpad hotkeys will work properly.
::如果键盘上的NumLock指示灯不亮,请按NumLock,
(If you're unsure what LMB means, please review
the Keystroke, Button, and Menu Notation module
.)
:如果您不确定LMB的意思,请查看键盘,按和菜单标记模块.
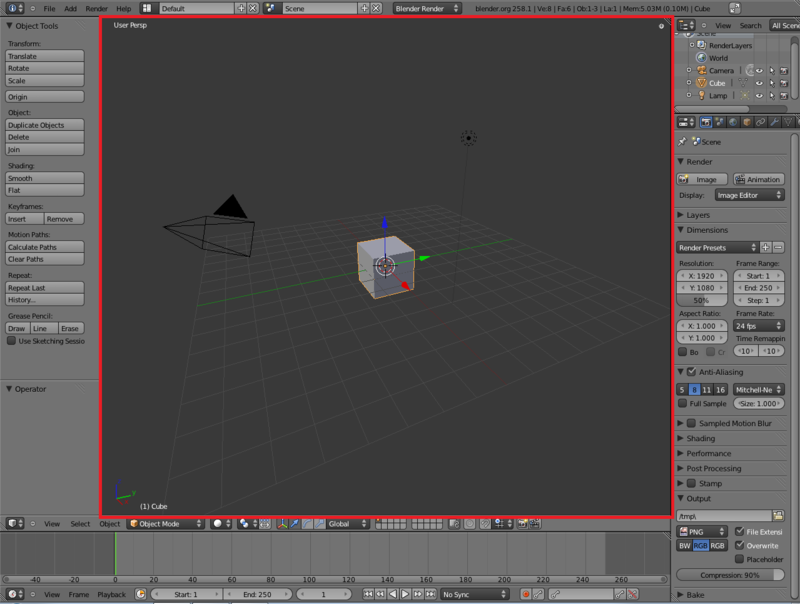
You should see something like this:
::你应该看到这样的东西:
A Virtual Scavenger Hunt
::虚拟的搜寻
Look at the default scene and find the following eight items:
::查看默认场景,并找到以下八个项目:
- In the Center
1.
 a solid gray cube with orange edges.
::1. 一个色边缘的固体灰色立方体.
-
-
This is the default cube, your first Blender object!
::这是默认的立方体,你的第一个混合器物!
-
This is the default cube, your first Blender object!
2.
 Three arrows, one red, one green and one blue, their tails joined to a white circle
::2. 三个箭头,一个红色,一个绿色和一个蓝色,它们的尾巴连接到一个白色的圆圈
-
-
This is not an object (part of your model/scene), but part of Blender’s user interface for manipulating objects. It is the manipulator, also known as the 3D transform widget.
::这不是一个对象 (你的模型/场景的一部分),而是Blender操作对象的用户界面的一部分.它是操纵器,也称为3D转换小程序. -
The arrows represent the directions of the X, Y and Z axes of the currently chosen transform orientation coordinate system. Initially this is the global coordinate system.
::箭头表示当前选择的转换方向坐标系的 X,Y 和 Z 轴的方向.最初这是全球坐标系. -
The circle represents the center of the selected object (the cube).
::圆圈代表选定的物体 (立方体) 的中心. -
If you don't know what the "global coordinate system" is, please review
the module on Coordinate Spaces in Blender
.
::如果您不知道"全球坐标系统"是什么,请查看"Blender坐标空间"模块.
-
This is not an object (part of your model/scene), but part of Blender’s user interface for manipulating objects. It is the manipulator, also known as the 3D transform widget.
3.
![]() A red-and-white striped circle with black cross-hairs
A red-and-white striped circle with black cross-hairs
::3. 一个红白条纹圆圈,黑色的十字线
-
-
This is not an object. It is the
3D Cursor
, which indicates where newly-created objects will appear in the scene.
::这不是一个对象. 它是3D 标签, 指示新创建的对象将出现在场景中的位置. -
The cursor is similar to the insertion point in a text editor, which indicates where new text will be inserted in a document.
::标针类似于文本编辑器中的插入点,它表示文件中的新文本将在哪里插入.
-
This is not an object. It is the
3D Cursor
, which indicates where newly-created objects will appear in the scene.
- In the Lower Left Corner
4.

-
-
This is not an object. It is the
mini axis
, and its orientation matches that of the global coordinate system, with the usual conventions: red for X, green for Y and blue for Z. Think of it as a little compass, reminding you which way is left/right, front/back and up/down.
::这不是一个物体. 它是小轴, 它的方向与全球坐标系的方向相匹配, 按照常规规:红色表示X,绿色表示Y,蓝色表示Z.
-
This is not an object. It is the
mini axis
, and its orientation matches that of the global coordinate system, with the usual conventions: red for X, green for Y and blue for Z. Think of it as a little compass, reminding you which way is left/right, front/back and up/down.
5. The notation "(1) Cube"
::5. 标记"1) 立方体"
-
This is not an object. It is object info, indicating that:
-
You're viewing the first frame of an animation.
::您正在观看动画的第一.
- and
-
The current or most recently selected object is named "Cube".
::当前或最近选择的对象名为"立方体".
-
You're viewing the first frame of an animation.
- In the Upper Left Corner
6. The notation “User Persp”
::6. 标记"用户观点"
- This is not an object. This tells you which mode the viewport is in. The first word will change if you select one of the perfect views or the camera view (see below), otherwise it just says “User”, and the second word is “Persp” or “Ortho” to indicate whether this is a perspective or orthographic view.
- To the Right of Center
7.
![]() A black round thing that resembles a sun symbol
A black round thing that resembles a sun symbol
::7. 一个黑色圆形的东西, 类似于太阳象征
-
- This represents a lamp , a light source for the scene. (It is an object.)
8.
![]() A pyramidal wireframe item
A pyramidal wireframe item
::8. 一个金字塔式的电线框架
-
- This represents a camera , a viewpoint that can be used for rendering. (It too, is an object.) The camera is looking at the base of the pyramid. The solid triangle attached to one side of the base is to remind you which way is up in the image that the camera takes.
- On a small display, the camera might initially lie outside of the viewport and thus be invisible. In that case, SCROLL to zoom out until it becomes visible.
- Throughout
9. A dark gray background, divided into squares by lighter lines. This is the grid floor, which you can (but don’t have to) use as a ground plane for positioning your models.
::9. 暗灰色背景,由浅线划分为方形.这是网格地板,您可以 (但不必) 作为地面平面来定位模型.
-
- Each grid square is one blender unit (or BU ) on a side. A BU can be whatever you wish, e.g. an inch, a centimeter, a mile, or a cubit. Blender lets you choose your scene scale in the Scene tab of the Properties Panel.
10. Three mutually perpendicular coloured lines associated with the grid floor: the red and green ones lying horizontally in the floor and the blue one running vertically. These are the global coordinate axes for orienting your scene. Red is the X-axis, green the Y-axis, and blue the Z-axis.
::10. 三条与网格地板相关的相互垂直的彩色线:红色和绿色的线横向地板,蓝色的线垂直.这些是定向场景的全球坐标轴.红色是X轴,绿色是Y轴,蓝色是Z轴.
-
In Blender 2.67a, you can't see the blue line for Z-axis here, but you
can
see it in Front or Side view.
::在Blender 2.67a中,你不能看到Z轴的蓝色线,但你可以在前方或侧面视图中看到它.
Modes
模式
Blender has many
modes
, i.e. settings that affect its behavior, and this is especially true of the 3D View window.
::混器有很多模式,即影响其行为的设置,这尤其适用于3D视图窗口.
Sometimes it's not obvious which mode is active. This leads to
mode errors
where Blender will do something you didn't expect because you thought it was in one mode and it was actually in another.
::常常会出现模式错误, 混器会做出你没想到的事情, 因为你以为它处于一种模式, 而实际上处于另一种模式.
The function performed by a hotkey or mouse button can depend on:
::快键或鼠标按所执行的功能可以取决于:
-
what mode the user interface is in,
::用户界面的模式, -
whether the keyboard is in NumLock mode,
::键盘是否处于NumLock模式, -
which window is active,
::哪个窗口是活跃的 -
the mode the active window is in,
::活动窗口的模式, -
which item or items are selected,
::选择哪个项目或项目 -
whether you've initiated a hotkey sequence.
::您是否启动了一个热键序列.
It helps to recognize the common modes and how to get out of them.
::帮助我们识别常见的模式,
Object Mode vs. Edit Mode
::对象模式与编辑模式
The 3D View windows are normally in Object Mode. In this mode:
::图像窗口通常处于对象模式. 在该模式中:
-
-
The mouse pointer is the default arrow normally used on other programs.
::鼠标指针是其他程序通常使用的默认箭头. -
RMB is used to select objects in the scene.
::选择场景中的物体时使用人民币. -
In versions 2.8 and above Use LMB to select objects in the scene
::在版本 2.8 和以上使用 LMB 选择场景中的对象
::鼠标指针是其他程序通常使用的默认箭头. RMB用于选择场景中的对象. 在2.8及以上版本中使用LMB来选择场景中的对象 -
The mouse pointer is the default arrow normally used on other programs.
If there are objects in the scene, you can get into five other modes:
::如果场景中有物体, 你可以进入其他五种模式:
-
Edit Mode: used to edit the shapes of objects
-
The mouse pointer is a thin inverse-video cross.
::鼠标指针是一个薄的反向视频交叉. -
RMB is used to select vertices, faces or edges of the current object.
::选择当前对象的顶点,面或边缘. -
Press Tab to enter/exit this mode.
::按TAB进入/退出此模式.
::编辑模式:用于编辑对象的形状.鼠标指针是一个薄的反向视频交叉.RMB用于选择当前对象的顶点,面或边缘.按进入/退出此模式. -
The mouse pointer is a thin inverse-video cross.
-
Sculpt Mode/Vertex Paint/Texture Paint/Weight Paint
-
The mouse pointer is now a thin, orange (white in Texture Paint) circle.
::鼠标指针现在是一个薄的色圆圈 (在纹理油漆中是白色的).
::现在鼠标指针是一个薄的色圆圈 (在纹理画中是白色). -
The mouse pointer is now a thin, orange (white in Texture Paint) circle.
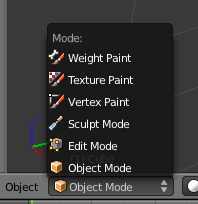
These modes are also indicated by a menu in the 3D View header. You can use this menu to change modes.
::这些模式也通过3D视图标题中的菜单来表示.您可以使用该菜单来更改模式.
These modes are a setting shared by all 3D View windows. In other words, when you change the mode in one window, any other 3D View windows change mode also.
::这些模式是所有3D视图窗口共享的设置.换句话说,当你在一个窗口中更改模式时,任何其他3D视图窗口也会改变模式.
Viewport Options
|
|
The options in this section only affect 3D View viewports. They do not affect renders.
|
Solid vs. Wireframe
::固体与电线框架
By default, the 3D View window draws objects using the Solid drawtype, in which surfaces are opaque. To toggle between Solid and Wireframe drawtype (edges only, no faces) for a particular viewport:
::默认情况下,3D视图窗口使用 Solid drawtype绘制对象,其中表面是不透明的. 为了在特定视图端之间切换 Solid 和 Wireframe drawtype (仅边缘,没有面):
-
Activate the 3D View window
::激活3D视图窗口
-
Press Z .
::按下Z.
Alternatively, you can choose these and other drawtypes from the "Viewport shading" menu in the 3D View window header.
::另外,您可以从3D视图窗口头部的"视图窗口遮"菜单中选择这些和其他绘图类型.
Orthographic vs. Perspective
::字体与视角
By default, viewports draw orthographic views. To toggle a viewport between orthographic and perspective views:
::默认情况下,视窗画正写视图. 为了在正写和透视视图之间切换视窗:
-
Activate the 3D View window.
::启动3D视图窗口. -
Press Num5 .
::按下Num5的键.
(If you're unsure what the difference is, please review
the "Orthographic Views" module
and
the "Perspective Views" module
.)
:如果您不确定区别是什么,请查看"正写视图"模块和"视角视图"模块.
Note this perspective versus orthographic setting for the 3D viewport is completely separate from the similar setting in the camera properties. The former takes effect while you’re working on the model, the latter when you render.
::注意这对立视角和3D视窗的正写设置与相似的摄像机属性设置完全不同.前者在您在模型上工作时生效,后者在染时生效.
So why have a separate setting for the 3D view? Because certain aspects of modelling are easier in one view than another. If the final render will be using perspective, then showing perspective in the 3D view naturally gives you a better idea of how the final render will look. But perspective foreshortening can sometimes make it hard to ensure the model has the proper shape, which is why there is the option to switch to orthographic view.
::那么为什么要为3D视图设置一个单独的设置呢?因为某种角度的建模在某种角度比其他角度更容易.如果最终的染将使用视角,那么在3D视图中显示视角自然会让你更好地了解最终的染将如何看起来.但是视角缩短有时会使得确保模型具有正确的形状变得困难,这就是为什么有选择切换到正写视图的原因.
Changing Your Viewpoint, Part One
改变你的视点,第一部分
Each viewport has a
viewpoint
, which takes into account:
::每个视窗都有一个视角,其中考虑:
-
the location of the viewer in the 3D scene (There doesn't need to be an object at that location.)
::在3D场景中观众的位置 (不需要在该位置上有对象). -
the direction the viewer is looking
::观众所看的方向 -
the magnification (or zoom factor) used
::使用的放大 (或变焦)
Changing your viewpoint allows you to navigate your way through a 3D scene.
::改变视角可以让你在3D场景中找到自己的方向.
We'll start with three very basic techniques:
::我们将从三个基本技术开始:
-
Zooming
::放大 -
Orbiting/View Rotation
::轨道/视图旋转 -
Perfect Views.
::完美的景色.
Additional techniques will be covered later in this module.
::其他技术将在本模块的后面讨论.
Zooming
::放大
Blender offers several ways to zoom in and out:
::混合器提供了几种方法来放大和缩小:
-
Use SCROLL
::使用SCROLL -
Click and drag vertically with Ctrl + MMB .
::点击并用Ctrl+MMB垂直拖动 -
Use Num+ and NUM− to zoom in and out in small increments.
::使用Num+和NUM−以小小的增量放大和缩小.
Note the following limitations of Blender's zoom feature:
::注意Blender的变焦功能有以下限制:
-
If the viewport is in orthographic mode, Blender zooms as if looking through a telescope. You can increase the magnification, but the viewpoint's location doesn't change. For this reason, you cannot zoom into or through objects in orthographic mode.
::如果视窗处于正写模式,Blender 将视图放大,就像通过望远镜一样.你可以增加放大,但视角的位置不会改变.因此,你不能在正写模式中放大或通过对象. -
If the viewport is in perspective mode, Blender zooms to the center of the viewport. The viewpoint can pass through objects, but can't pass beyond this point, no matter what you do. Zooming only gets slower and slower and slower. If the center of the viewport is somewhere you don't expect, zooming may appear to be broken.
::如果视窗处于透视模式,Blender 将视窗放大到视窗的中心.视窗可以通过物体,但不能超越这个点,无论你做什么.放大只会变得越来越慢.如果视窗的中心处于你不期望的地方,则放大可能会被打破.
Orbiting and View Rotation
::轨道和视图旋转
Let's fly around the default cube, viewing it from different angles. In this way you'll see that it really is a cube, centered on the origin, half above the X-Y plane and half below it.
::让我们绕过这个立方体,从不同的角度看它. 这样你就会看到它真的是一个立方体,以原点为中心,一半在X-Y平面上方,一半在它的下方.
-
Activate the 3D View window by placing the mouse pointer inside it.
::通过将鼠标指针放置在3D视图窗口中来激活. -
Now you can:
-
Click and drag with MMB to orbit freely around the center of the view.
::通过MMB点击和拖动, 让它在视图中心自由旋转. -
Use Shift + Alt + SCROLL to rotate the viewpoint vertically around the center of the view.
::使用Shift + Alt + SCROLL将视点垂直旋转到视图的中心. -
Use Num2 and Num8 to rotate the viewpoint vertically around the center of the view in 15-degree increments.
::使用Num2和Num8将视角垂直旋转到视图中心, -
Use Ctrl + Alt + SCROLL to rotate the viewpoint around the Z axis.
::使用Ctrl+Alt+SCROLL旋转视角绕Z轴. -
Use Num4 and Num6 to rotate the viewpoint around the Z axis in 15-degree increments.
::使用Num4和Num6旋转视角绕Z轴15度的增量.
::现在您可以:点击和拖动 MMB 绕视图中心自由旋转.使用Shift + Alt + SCROLL 旋转视图中心的视图中心.使用Num2 和 Num8 旋转视图中心的视图中心的视图中心的视图中心.使用Ctrl + Alt + SCROLL 旋转视图中心的视图轴.使用Num4 和 Num6 旋转视图点的视图轴. -
Click and drag with MMB to orbit freely around the center of the view.
If this is all very confusing for you, don't worry! You'll learn as you get more experience.
::如果这一切对你很困惑,别担心!你会学到更多的经验.
When you are finished flying around the cube, you can restore the original view by reloading the factory settings with
File → Load Factory Settings
.
::通过使用"文件"→"加载工厂设置"重载原始视图.
|
|
The center of the viewport is not marked, i.e. it's difficult to tell where it is. This can cause unexpected behavior during rotation. |
Perfect Views
::完美的观点
It's often useful to get a
perfect view
of a scene, i.e. to view it along one of the main axes, with the other two main axes oriented up-down and left-right.
::为了获得完美的场景视图,通常是有用的,即沿着一个主要轴观看,其他的两个主要轴是向上-向下和左-向右.
| Hotkey | View | Axis Pointing Right | Axis Pointing Up |
|---|---|---|---|
| Num7 | "top" | +X | +Y |
| Ctrl + Num7 | "bottom" | +X | -Y |
| Num1 | "front" | +X | +Z |
| Ctrl + Num1 | "rear" | -X | +Z |
| Num3 | "right side" | +Y | +Z |
| Ctrl + Num3 | "left side" | -Y | +Z |
The following screenshot shows all three perfect views plus camera perspective for the Suzanne primitive:
::下面的截图显示了苏珊娜原始的三种完美视图加上相机视角:
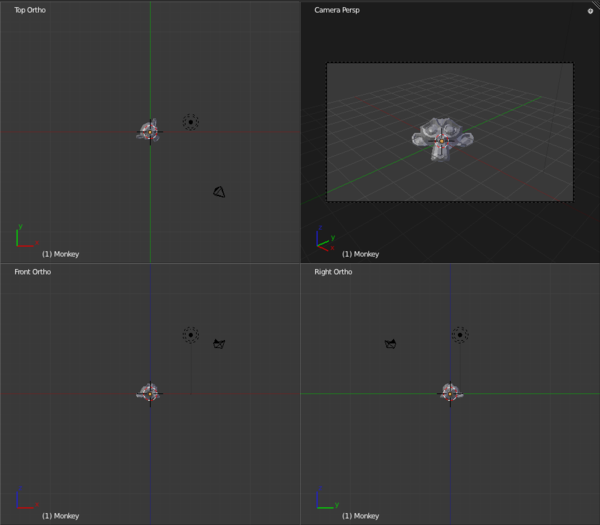
This layout is used so often, it has a keyboard shortcut: ( CTRL + ALT + Q ).
::这种布局经常被使用, 它有一个键盘快捷键: (CTRL + ALT + Q).
Positioning the 3D Cursor
定位3D光标
Positioning the 3D cursor is a very basic operation, yet one that many beginners find challenging. It touches on an issue common to all 3D graphics software: "How do you specify points in a 3D scene when we can only see two dimensions at a time?"
::定位3D光标是一个非常基本的操作,但许多初学者发现它具有挑战性.它涉及到所有3D图形软件的共同问题:"当我们只能同时看到两个维度时,如何指定3D场景中的点?"
Basic Technique
::基本技术
-
Go into either Object Mode or Edit Mode.
::进入对象模式或编辑模式. -
Move the mouse pointer to the desired position (in any viewport).
::将鼠标指针移动到所需位置 (在任何视窗中). -
Click SHIFT + RMB .
::点击"转换"加上人民币.
|
|
This technique will fail if the 3D manipulation widget is enabled and your desired position is too close to it. Clicking LMB on or near the widget (the white circle with the colored arrows) will initiate a transform operation; the object's outline will turn white and the mouse pointer will begin dragging the object around. If this happens, press Esc to cancel the transform operation.
|
|
|
Clicking LMB in a viewport can only reposition the cursor in two out of three dimensions. (The cursor's projected distance along the central line-of-sight remains unchanged.) For this reason, any time you reposition the cursor this way you should immediately verify its position using a different viewpoint.
|
Two Challenges
::面临的两个挑战
Challenge #1.
Using only tools presented thus far, try positioning the 3D cursor on the virtual camera.
::挑战1. 尝试在虚拟摄像头上定位3D光标,
Try it!
::试试看看!
When you're done, check your work by orbiting the camera.
::完成后,通过绕着摄像头旋转, 检查你的工作.
Perhaps you thought you were done when you clicked on the camera. But the moment you changed your viewpoint, you probably found that the 3D cursor was actually behind (or in front of) the camera.
::你可能以为你点击相机时已经完成了, 但当你改变视角时, 你可能会发现3D光标实际上是在相机的后面 (或前面).
Hints:
::提示:
-
Try positioning the cursor in two different perfect views.
::试着将光标定位在两个不同的完美视图中. -
Use orthographic, not perspective, view.
::写字是为了写字,而不是看视角.
Challenge #2.
Using only tools presented thus far, try repositioning the 3D cursor at the origin (that is, at the center of the cube).
::挑战2. 仅使用迄今为止所介绍的工具,尝试将3D光标重新定位到原点 (即立方体的中心).
As before, check your work by orbiting the cube. Don't spend too much time on this.
::像之前一样,通过绕着立方体运行来检查你的工作.
More Ways to Position the Cursor
::更多的定位指针方式
Here's an easy way to position the cursor at the center of an object:
::如何将光标定位在物体的中心:
-
Make sure Blender is in Object Mode, with the object selected.
::确保Blender处于对象模式, 并且对象已选. -
Move the mouse pointer to any 3D View window.
::移动鼠标指针到任何一个3D视图窗口. -
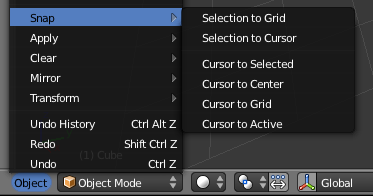
Snap the cursor to the selected object using either:
-
Shift + S →
Cursor to Selected
::转移+S → 选择的光标
- or
-
Object → Snap → Cursor to Selected
::目标 → 快速 → 选择的光标
::通过使用: 移动+S → 选择的光标或对象 → 快速 → 选择的光标 -
Shift + S →
Cursor to Selected
Here's 2 easy ways to relocate the cursor to the scene's origin (0, 0, 0):
::通过以下两种简单的方法, 移动光标到场景的原点 (0, 0, 0):
-
Move the mouse pointer to any 3D View window.
::移动鼠标指针到任何一个3D视图窗口. -
Press Shift + C to reset the cursor to the origin.
-
Note that this also changes the view location, meaning that when you zoom in, you won't zoom in to the scene origin.
::这也改变了视图位置, 这意味着当你放大时, 你不会放大到场景的原点.
::按Shift+C将光标重置到原始位置.请注意,这也会改变视图位置,这意味着当你放大时,你不会放大到场景原始位置. -
Note that this also changes the view location, meaning that when you zoom in, you won't zoom in to the scene origin.
-
A better way is to click
Object → Snap → Cursor to Center
-
You can also do this by Shift + S →
Cursor to Center
.
::您也可以通过Shift+S→Cursor to Center来完成.
::通过单击Object → Snap → 标签到中心也可以做到这一点. -
You can also do this by Shift + S →
Cursor to Center
.
Changing Your Viewpoint, Part Two
改变你的观点,第二部分
Now you'll learn some additional techniques for obtaining the view you want:
::现在你将学习一些额外的技术来获得你想要的视图:
-
Panning
::制 -
Centering
::集中 -
Jumping to the camera's viewpoint
::跳到相机的视角 -
Zooming in on a selected area
::放大一个选定的区域
Panning
::制
When you orbited the cube, the viewpoint's position and direction both changed at the same time. You also can shift the viewpoint up-down or left-right
without
changing its direction. (This is similar to the side-scrolling effect in the classic Mario and Sonic video games.)
::当你绕着立方体旋转时,视角的位置和方向同时发生变化.你也可以将视角向上或向下或向右移动,而不会改变其方向. (这类似于经典的"马里奥"和"索尼克"电子游戏中的侧向滚动效果.)
This is called
panning
, and it's an important skill to master. Try it now:
::这叫做"翻转",
-
Activate a 3D View window by placing the mouse pointer inside it.
::通过将鼠标指针放置在3D视图窗口中来激活. -
Now you can:
-
Use Shift + SCROLL to pan up and down.
::使用Shift+SCROLL来向上和向下滑动. -
Use Ctrl + Num2 and Ctrl + Num8 to pan up and down in small increments.
::使用Ctrl+Num2和Ctrl+Num8在小步骤上下滑动. -
Use Ctrl + SCROLL to pan left and right.
::使用Ctrl+SCROLL向左转向右. -
Use Ctrl + Num4 and Ctrl + Num6 to pan left and right in small increments.
::使用Ctrl+Num4和Ctrl+Num6在小步骤中向左和向右移动. -
Click and drag with Shift + MMB or Shift + Alt + LMB to pan freely in the viewplane.
::单击并用Shift + MMB或Shift + Alt + LMB拖动, 在视图平面中自由移动.
::现在可以:使用Shift+SCROLL向上和向下滑动.使用Ctrl+Num2和Ctrl+Num8在小步骤上下滑动.使用Ctrl+SCROLL在左和右滑动.使用Ctrl+Num4和Ctrl+Num6在小步骤左和右滑动.点击和拖动Shift+MMB或Shift+Alt+LMB在视图平面自由滑动. -
Use Shift + SCROLL to pan up and down.
You will likely find this to be a distraction in some cases. To move the viewpoint position back to the center, snap the cursor to the center, then click
View → Align View → Center View to Cursor
. You could also snap the cursor to the center then press Ctrl + Num. .
::您可能会发现这在某些情况下会分散注意力. 要将视点位置移回中心,请将光标点击到中心,然后单击"查看" → "对齐视图" → "向光标点击中心视图". 您也可以将光标点击到中心,然后按Ctrl + Num.
In versions ≥2.74 you can also use Alt + Home to center the view to the cursor.
::在≥2.74版本中,您还可以使用Alt+Home将视图置于光标的中心.
Centering
::集中
When you zoom or rotate the view, you always zoom or rotate around the center of the view.
::图像的中心是图像的中心.
To make sure everything in your scene is visible:
::确保场景中的所有内容都能看到:
-
Press Home .
::按下"首页"
To center the view on an arbitrary point:
::为了将视图集中在任意点上:
-
Move the 3D cursor to the point of interest.
::移动3D光标到感兴趣的点. -
Verify the cursor position from a second viewpoint.
::从第二个角度检查光标位置. -
Press Alt + Home to center the view.
::按下 Alt + 首页键以将视图置于中间.
To center the view on an object in the scene:
::为了将视图集中在场景中的对象上:
-
Make sure Blender is in Object Mode.
::确保混合器在对象模式. -
Zoom out until the object is in the viewport.
::放大到物体在视窗中. -
If any objects are selected, use A (or
Select → Select/Deselect All
) to deselect them.
::如果选中了任何对象,请使用A (或选择 → 选择/删除所有) 来取消选择. -
Select the object of interest by clicking RMB on it.
::通过点击人民币来选择感兴趣的物体. -
Press Num. to center the view.
::按一下"号"以将视图置于中心.
Jumping to the Camera's Viewpoint
::跳到相机的视角
To see the scene as the virtual camera sees it, press Num0 . Afterwards, you can rotate, pan, and zoom normally, but the virtual camera will not follow. To go back to your previous view, press Num0 again. (In the latest versions of Blender, the virtual camera can be made to follow all the changes made in viewpoint while in camera view by checking the option "Lock Camera to View" on the Transform panel. Hit N on your keyboard to bring up the transform panel. To disable this option uncheck "Lock Camera to View.")
::为了看到虚拟摄像机看到的场景,按下Num0 .之后,您可以正常旋转,旋转和放大,但虚拟摄像机不会跟踪.返回之前的视图,再次按Num0. (在最新版本的Blender中,可以通过在转换面板上检查"锁定摄像机查看"选项,使虚拟摄像机跟踪在视图中所做的所有更改.按键上N来显示转换面板.为了禁用此选项,请取消"锁定摄像机查看"选项.
Zooming into a Selected Area
::放大到一个选定的区域
Suppose you want to get an extreme closeup of a particular area. Because there's no center mark on the viewport, you might have to pan and zoom several times to get the desired view.
::假设你想从某个特定区域进行极端近距离拍摄. 因为视窗上没有中位标记, 你可能需要几次旋转和放大图像以获得所需的视图.
The shortcut for zooming to an area is:
::缩小一个区域的快捷方式是:
-
Activate a 3D view window that contains the area of interest.
::激活一个包含感兴趣区域的3D视图窗口. -
Press Shift + B . A crosshair appears in the viewport.
::按下Shift+B. 在视窗中出现一个十字线. -
Click and drag with LMB to draw a rectangle around the area of interest.
::通过点击和拖动LMB, 绘制一个四角形围绕感兴趣的区域. -
When you release LMB , the viewport will zoom in on the area you selected.
::视窗将放开LMB, 将放大您选择的区域.
View Navigation
视图导航
You can also change your viewpoint in the 3D view by “walking” or “flying” through it. To activate this, press SHIFT + F . By default in Blender 2.70, this puts you in “walk” mode. Earlier versions only offered “fly” mode. (In Blender 2.70 and later, you can choose which one you prefer in User Preferences, under the Input tab.)
::您还可以通过"走路"或"飞行"来改变3D视图中的视角. 为了激活此功能,按SHIFT+F. 在Blender2.70中,默认情况下,这将您置于"走路"模式. 早期版本只提供"飞行"模式. (在Blender2.70及后版本中,您可以在输入选项卡下,在用户偏好中选择您喜欢的模式).
In both modes, helpful prompts appear in the header of the 3D view window to remind you of the key functions while the mode is in effect. When you have reached the position and orientation you want, press LMB or ENTER or SPACE to end the navigation mode and stay there, or RMB or ESC to abandon the navigation mode and be teleported immediately back to your original position and orientation. (In 2.77+, pressing SPACE will teleport you to where the cross hairs point towards.)
::在两个模式中,有助于提示显示在3D视图窗口的标题中,提醒您在模式有效时的关键功能.当您达到所需的位置和方向时,按下LMB或ENTER或SPACE以结束导航模式并保持在该位置,或RMB或ESC以离开导航模式并立即传送回原始位置和方向. (在2.77+中,按下SPACE将传送到十字线指向的位置.
Walk Mode
::步行模式
In this mode, you move the mouse to turn your view up/down/left/right, and W , A , S and D or the corresponding arrow keys to move forward, left, back or right, and E and Q to move up or down respectively. Hold a movement key down to keep moving. Movement stops as soon as you release it. Pressing MMB will “teleport” you close to whatever objects lie within the crosshairs at the centre of the view.
::在此模式中,您移动鼠标将视图向上/向下/向左/向右转动,W,A,S和D或相应的箭头键分别向前,向左,向后或向右移动,E和Q分别向上或向下移动.按住移动键继续移动.一旦释放,移动就停止.按下MMB将您"远程传输"到视图中心的十字线内的任何物体.
You can also use TAB to turn on gravity. Make sure there is a floor or other object under you to land on! With gravity on, you can no longer use the vertical movement keys, but you can use V to make jumps. Press TAB again to turn gravity off.
::您还可以使用TAB来打开重力. 确保您下面有地板或其他物体可以降落! 随着重力打开,您不再可以使用垂直运动键,但您可以使用V来跳跃. 再按TAB来关闭重力.
Fly Mode
::飞行模式
In this older mode, moving the mouse to change the view works the same as in Walk mode, but the above direction keys ( W , A , S , D , E , Q and the arrows) apply “thrust” in the respective directions, so you keep moving after releasing the key. Press the key repeatedly to increase your speed in that direction, or press the key for the
opposite
thrust direction to reduce your speed. You can roll the mouse wheel up to apply forward thrust, or roll it down to apply backward thrust.
::在这个旧模式中,移动鼠标来改变视图与步行模式相同,但上述方向键 (W , A , S , D , E , Q 和箭头) 在各自的方向中应用"推力",因此您在释放键后继续移动.按键多次以增加您的速度,或按键对立推力方向以降低您的速度.您可以将鼠标轮滚动以应用前向推力,或将其滚动向下以应用后向推力.
Your current velocity vector automatically changes direction with you when you turn. Thus, you can apply a single burst of sideways thrust while facing an object, then, without applying any additional thrust, keep turning to face the object, and you will go right around it.
::当你转动时,当前速度向量会自动改变方向.因此,当你面对一个物体时,你可以一次向侧推力,然后,不加任何额外的推力,继续转向面对物体,然后你会绕过它.
Visibility Layers
可见性层
Every object in the scene is assigned to one or more of 20 visibility layers.
::每个场景中的物体都被分配到20个可见度层中的一个或多个.
Visibility layers have many uses:
::可见性层有很多用途:
-
You can put scenery, characters, particles, and lamps in different layers, to help organize your scene.
::您可以把场景,人物,粒子和灯光放在不同的层, -
By changing which layers are visible, you can simplify your view of the scene and work with only one or two layers at a time.
::通过改变可见的层, 您可以简化您的视图, 并同时只使用一到两层. -
When rendering, only visible layers are included. You can use this to render your scene layer by layer, checking each layer separately.
::染时,只包括可见的层.你可以用此来逐层染你的场景,单独检查每一个层. -
You can configure lamps to illuminate only objects in the same layer.
::您可以配置灯光只能照亮同一层中的物体.

Right: Viewing all 20 layers.
In Object Mode, you can tell which layers are visible by looking at the twenty small boxes located in the 3D View header between the Transform Orientation menu and the "Lock" button. The top row of boxes represents layers 1 through 10, with 1 being the leftmost and 10 being the rightmost. Similarly, the bottom row of boxes represents layers 11 through 20.
::在对象模式中,您可以通过查看位于3D视图标题中的20个小框在转换定向菜单和"锁"按之间来判断哪些层是可见的.顶层框代表1到10层,其中1是最左边的,10是最右边的.同样,底层框代表11到20层.
Hotkeys
::热键
-
To view just one of layers 1 - 9, press 1KEY .. 9KEY .
::为了查看1-9层中的一个,按1Key... 9Key. -
To view just layer 10, press 0Key .
::只有在第10层, 按0Key. -
To view just one of layers 11 - 19, press ALT + 1KEY .. ALT + 9KEY
::要查看11-19层中的一个,请按下ALT+1KEY .. ALT+9KEY -
To view just layer 20, press ALT + 0KEY .
::为了仅查看20层,请按下ALT+0KEY. -
To toggle the visibility of one of layers 1 - 9 without affecting the visibility of the other layers, press SHIFT + 1KEY .. SHIFT + 9KEY .
::要在不影响其他层的可见性的情况下切换1 - 9层中的一个可见性,请按 SHIFT + 1KEY .. SHIFT + 9KEY. -
To toggle the visibility of layer 10 without affecting the visibility of the other layers, press SHIFT + 0KEY .
::要在不影响其他层的可见性的情况下切换第10层的可见性,请按 SHIFT + 0KEY . -
To toggle the visibility of one of layers 11 .. 19 without affecting the visibility of the other layers, press ALT + SHIFT + 1KEY .. ALT + SHIFT + 9KEY .
::要在不影响其他层的可见性的情况下切换层11...19中的一个可见性,请按ALT+SHIFT+1KEY...ALT+SHIFT+9KEY. -
To toggle the visibility of layer 20 without affecting the visibility of the other layers, press ALT + SHIFT + 0KEY .
::要在不影响其他层的可见性的情况下切换20层的可见性,请按ALT+SHIFT+0KEY. -
To make all layers visible at once, press ~ . Press ~ again to return to your previous layer visibility setting.
::按下~,然后再按下~,恢复到之前的层可见性设置.
|
|
The hotkeys in this section
will not work
if you've enabled numpad emulation in the User Preferences window. See
the "User Preferences Windows" module
for more details.
|
Holding down Shift while selecting a layer (by keyboard or mouse) will, instead of making only that layer visible, toggle the visibility. In this way, you can select combinations or to hide particular layers.
::按住Shift键盘或鼠标选择一个层时,将会转换可见性,而不是只让该层可见. 这样,您可以选择组合或隐藏特定层.
The key to press to select all layers at once differs by keyboard layout. It is:
::按键一次选择所有层,按键盘布局不同.按键是:
-
¬' (the key under Esc) on UK keyboards,
::在英国键盘上, -
`~ US,
::美国, -
ö German, Swedish, Finnish and Hungarian,
::德语,瑞典语,芬兰语和匈牙利语, -
¨ Swiss German,
::瑞士德语, -
æ Danish,
::丹麦语, -
ù AZERTY,
:: -
ø Norwegian,
::挪威语 -
Ñ Spanish,
::西班牙语, -
ç Portuguese,
::葡萄牙语, -
" Brazilian Portuguese,
::"巴西葡萄牙人, -
ò Italian, and
::意大利, -
ё Russian.
::俄罗斯人.
After pressing the aforementioned key, holding down Shift while pressing it again will restore the visibility settings you had
before
you made all layers visible.
::按下Shift键, 按下Shift键将恢复您在所有层显示之前的可见性设置.
When only one layer is selected, new objects are automatically assigned to that layer. When two or more layers are visible, new objects are assigned to the most recently visible layer.
::当只选择一个层时,新对象会自动分配到该层.当两个或更多层可见时,新对象会被分配到最近可见的层.
Count Your Polys
数一数你的保单
If you want to count the polygons in your scene, the data is available in the Info Header.
::如果您想计算场景中的多边形,
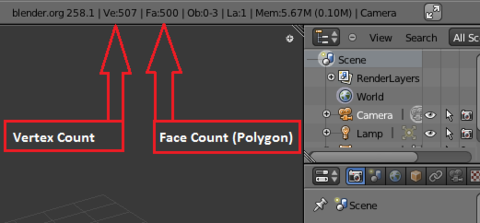
As you can see in the above image, this scene has 507 vertices and 500 faces (polygons).
::像上图所示,这个景象有507个顶点和500个面 (多边形).