Blender 3D:零基础到专业级-单元2:基本建模和着色
Textures
are laid on top of materials to give them complicated colors and other effects. An object is covered with a material, which might contain several textures: An image texture of stone, a texture to make the stone look bumpy, and a texture to make the stone deform in different ways.
::材料上铺设了纹理,使其具有复杂的颜色和其他效果.一个物体被一种材料覆盖,它可能包含几个纹理:石头的图像纹理,使石头看起来凸的纹理,以及使石头以不同的方式变形的纹理.
A texture may be an
image
or
Template:LCMS
a
computed function
. What the texture does and how it is mapped onto your object is set in the material buttons. Some commonly used texture types are shown on the page
Using Textures
.
::纹理可以是图像或Template:LCMS计算函数.纹理的作用以及它如何映射到你的对象是设置在材料按.一些常用的纹理类型显示在页面使用纹理.
This tutorial uses the file from the
Quickie Material
tutorial. If you didn't do it before, go back and do it now.
::如果您之前没有做过,请回去现在做.
Making It Mottled
::让它变得斑
Step 1: Adding Texture to the Material
::第一步:增添材料的质地
-
In a Properties window, switch to
Texture
 context.
::在属性窗口中,切换到质感上下文. -
A default texture,
Tex
, should already be available and set to
Type:
None
.
-
If not, click one of the
Texture Slots
(the ones with chequered icons) and click the
New
button.
::如果没有,请点击其中一个纹理插槽 (有标的插槽) 并点击新按. -
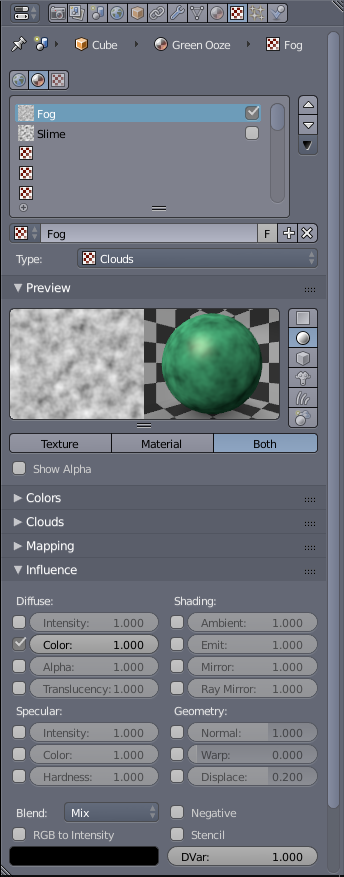
Set the
Type
to
Clouds
.
::设置类型为云.
::默认的纹理,Tex,应该已经可用并设置为类型:无.如果没有,请单击其中一个纹理插槽 (带有标的插槽) 并单击新按.将类型设置为云. -
If not, click one of the
Texture Slots
(the ones with chequered icons) and click the
New
button.
-
The Texture
Preview
panel will now reflect this change. However, said change will not be reflected in the 3D view window.
-
You can do a quick render (
F12
) to see the change. However, you'll have to re-render every time you change a setting to see its effect.
::您可以快速染 (F12) 查看变化. 但是,您必须每次更改设置时重新染以查看其效果. -
Otherwise you can click the
Material
button in the Texture
Preview
panel to see the changes to the material. (Click
Both
to see them side-by-side.)
::否则,您可以点击"质感预览"面板中的"材料"按,查看材料的变化. (点击"两者"以看到它们并排). -
A better, albeit more resource intensive option would be to change the
Display Mode
to
Rendered
. (
Shift
+
Z
in the 3D view window or Selecting the Display mode from the 3D view Header.

Viewport Shading menu highlighting the Rendered option.
::更好的,虽然更资源密集的选项是将显示模式更改为染. (在3D视图窗口中按Shift+Z或从3D视图标题中选择显示模式.视图窗口遮光菜单突出显示染选项.
::纹理预览面板现在将反映这一变化. 然而,该变化将不会反映在3D视图窗口中. 您可以快速染 (F12) 来查看变化. 然而,您必须每次更改设置以查看其效果时重新染. 否则,您可以单击纹理预览面板中的材料按来查看材料的变化. (单击两者以并排查看它们.) 更好的,虽然更资源密集的选项是将显示模式更改为染. (在3D视图窗口中,Shift+Z或从3D视图标题选择显示模式. 显示显示显示的菜单中,突出染选项. -
You can do a quick render (
F12
) to see the change. However, you'll have to re-render every time you change a setting to see its effect.
Step 2: Refining the Texture
::第二步: 精细 调整 质地
-
Once you use one of the ways to preview your work, you'll see Green and Magenta mixed in resembling a polished granite texture.
-
This is the default colour for any generated texture. Now all you have to do is change it to
black
.
::现在只需要将其更改为黑色. -
But before that scroll down to the
Mapping
panel and make sure that
Coordinates
is set to
Generated, Global
or
Object
(for best results).
::确保坐标设置为生成,全球或对象 (以获得最佳结果). -
Scroll down to the
Influence
panel, and click on the colour swatch and drag the reticule in the bar to the right all the way down.
::滚动到"影响"面板,然后点击颜色样本,然后将中的网状物拖向右边,
::您可以使用这些方法预览您的作品,然后将绿色和红色混合在一起,看起来像抛光的花岩纹理.这是任何生成的纹理的默认颜色.现在您只需要将其更改为黑色.但在此之前,向下滚动到映射面板,并确保坐标设置为生成,全球或对象 (以获得最佳结果).向下滚动到影响面板,然后点击颜色样本,并将网格拉向右边的子拖向右边. -
This is the default colour for any generated texture. Now all you have to do is change it to
black
.
-
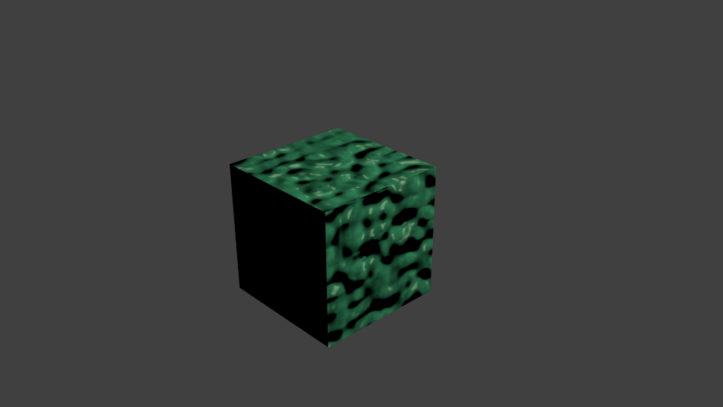
Now the texture should look more or less like green granite
Render result in 3D view.
::现在的纹理应该看起来或多或少像绿色花岩 染结果在3D视图.
Making It Bumpy
::让它变得
Step 1: Adding a second Texture to the Material
::步骤1:为材料添加第二种质地
-
In a Properties window, switch to
Texture
 context.
::在属性窗口中,切换到质感上下文. -
The
Cloud
texture you just created will be listed in a slot.
-
To create an additional texture click a second texture slot and then click
New
button.
::单击第二个纹理插槽,然后单击新按. -
Change the texture
Type
to
Stucci
.
::改变质地类型为Stucci.
::您刚创建的云纹理将在一个槽中列出. 要创建另一个纹理,请单击第二个纹理槽,然后单击新按. 将纹理类型更改为Stucci. -
To create an additional texture click a second texture slot and then click
New
button.
-
Now if you preview this texture you'll only notice a bit of magenta mixed in with the previous texture.
::现在,如果你预览这个纹理, 你只会注意到一点红色与前面的纹理混合在一起.
Step 2: Making the texture a Bump-Map
::步骤2:使纹理成为Bump-Map
-
Scroll down to the
Mapping
panel and make sure the
Coordinates
is set to
Generated, Global
or
Object
for best results.
::确保坐标设置为生成,全球或对象以获得最佳结果. -
Scroll down to
Influence
panel uncheck
Color
and check
Normal
under
Geometry
, then set it to
4
.
::在"几何"下面选择"正常",然后设置为4. -
If required, set the
Method
under Bump Mapping to a higher Quality.
::如果需要,请将"凸映射"中的方法设置为更高的质量.
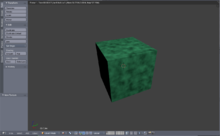
The render result should look like the one on the right.
::染结果应该像右边的样子.
Now mess around with the various settings we discussed, Particularly the settings in
Clouds
/
Stucci
,
Mapping
and
Influence
panels. Also try the whole tutorial (
Quickie Material
&
Quickie Texture
) with a sphere and other shapes.
::现在,我们可以尝试使用我们讨论过的各种设置,特别是云/Stucci,映射和影响面板中的设置.
Some Closing words
::几句最后的话
The downside of bump-mapping, as you may have noticed, is that it only provides an illusion of depth/bumpiness. The edges will still be straight as in the render. For curved surfaces the outline will still look spotless while the centre looks deformed, plus shadows will still render smooth compromising the illusion. An alternative technique is displacement-mapping which actually deforms the mesh as per a texture to produce depth in the mesh, with the downside of creating a higher poly mesh.
::凸起映射的缺点是它只提供深度/凸起的错觉.边缘仍然像染一样直.对于曲的表面,轮仍然看起来无,而中心看起来变形,加上阴影仍然会使幻觉变得光滑.另一个替代技术是移位映射,它实际上根据纹理变形网格,以产生网格的深度,但创建更高的多网格的缺点是.
With bump-mapping in general, you will get a greater effect on smoothly curved surfaces with high specularity as compared to flat surfaces with low specularity.
::一般来说,在高光谱的平滑曲面上,与光谱性较低的平面相比,在凸起映射上,你会得到更大的效果.