Blender 3D:第四单元:与高级教程起飞
Introduction
::引言 时间
You may have heard various people talk about HDR images. (WETA, Lucas, even Tim Sweeny). HDR images are part of a technology called HDRi which stands for "High Dynamic Range (image)". So... what on earth does that mean?
::您可能听说过很多人谈论HDR图像. (WETA,卢卡斯,甚至蒂姆·斯威尼).HDR图像是称为HDR的技术的一部分,HDR代表"高动态范围 (图像) ".那么...这意味着什么?
Here's a link to Wikipedia's article on
the HDR format
which I personally give all my credit to Paul Debevec for putting it to use for computer graphics purposes. Anyway, before you start trying to understand the usefulness of HDRi, please read the wikipedia link.
::对于高清视频,我个人认为是Paul Debevec的功劳. 无论如何,在你开始了解高清视频的有用性之前,请阅读维基百科的链接.
Also, visit
Paul Debevec's website
if you've got some more time to spare.
::如果您有更多的时间,
To sum up the excitement of HDR CG, think of it like the hype of the next-generation videogames that are about to come out, except set the stage for 1996 instead of 2006. Paul Debevec pioneered paralax mapping, HDR lighting, image-based modeling, his latest work includes some even more amazing technologies, and for the record he's my hero too.
::总结一下HDRCG的兴奋, 想象一下它就像即将推出的下一代电子游戏的作, 只是为1996而不是2006年奠定了基础. 保罗·德贝维克是偏光映射,HDR照明,基于图像的建模的先驱, 他的最新作品包括了一些更令人惊叹的技术, 并且为了纪录他也是我的英雄.
To use HDRi images for 3D rendering, you need something called a
light probe
...
::为了使用HDR图像进行3D染, 你需要一种叫做光探测器的东西...
Definitions
::定义
- HDRI
HDRI stands for
High Dynamic Range Imaging
, and is basically an image format that contains from the deepest shadow up to the brightest highlight information. While an 'ordinary' digital image contains only 8 bits of information per color (red, green, blue) which gives you 256 gradations per color, the HDR image format stores the 3 colors with floating point accuracy. Thus the 'depth' from dark to light per color is virtually unlimited. Using HDR images in a 3D environment will result in very realistic and convincing shadows, highlights and reflections. This is very important for realistic emulation of chrome for example.
::HDRI是高动态范围成像的简称,它基本上是一个包含从最深的阴影到最明亮的亮点信息的图像格式.而"普通"的数字图像只包含每种颜色 (红色,绿色,蓝色) 的8位信息,这为您提供每种颜色256个度化,而HDR图像格式则以浮点精度存储3种颜色.因此,每种颜色的"深度"从黑暗到亮点几乎是无限的.在3D环境中使用HDR图像将导致非常现实的和令人信服的阴影,亮点和反射.这对于例如的现实模拟非常重要.
- Light Probe
A Light Probe is a HDR image containing 360 by 360 degrees (
solid angle
4π
steradians
) image information. In other words : it's a 360 degree spherical panorama image, not only looking around the horizon, but also up and down. Thus a Light Probe image contains all visible information as can be seen from a specific point, wherever you turn your head.
::光探测器是一种包含360度×360度 (固角4π斯特拉迪安) 图像信息的HDR图像.换句话说:它是一个360度的球形全景图像,不仅看向地平线,还看向上和下.因此,光探测器图像包含所有可见的信息,无论你向何处转头,都可以从特定的点看到.
Usage
::使用
Given that a Light Probe image is an 'all around' image with a high dynamic range, it's the perfect solution for your 'world' background, especially for a 3D animation.
::鉴于光探测器图像是具有高动态范围的"全方位"图像,
Quick Tutorial
(for experienced blendies)
::快速教程 (经验丰富的白)
First of all, you'll need an HDR image. There is a whole range at
http://debevec.org/Probes/
that you can download for free. (There are even more at
http://blenderartists.org/forum/showthread.php?t=24038
). I will use the St. Peter's Basilica probe, but any other HDR image will do just fine.
::首先,你需要一个HDR图像. 在http://debevec.org/Probes/有很多图像,你可以免费下载. (在http://blenderartists.org/forum/showthread.php?t=24038) 还有更多图像. 我会使用圣彼得大教堂的探针,但是任何其他HDR图像都很好.
To apply the HDRI environment to your scene:
::如何将HDR环境应用到您的场景中:
-
Go to the shading settings (press F5) and click the World button.
::按下F5按下"世界"按. -
Enable "Real" to force the horizon to stay still, as opposed to follow the camera
::启用"真实"以迫使地平线保持静止,而不是跟随摄像机 -
If you're rendering with Blender Internal (ver. 2.49), go to "Ambient Occlusion" tab and activate "Ambient Occlusion", then activate "Sky Texture". Skip this step if you're using external renderers.
::如果您使用Blender Internal (2.49版本) 进行染,请进入"环境封闭"选项卡并激活"环境封闭",然后激活"天空纹理".如果您使用外部染器,请跳过此步骤. -
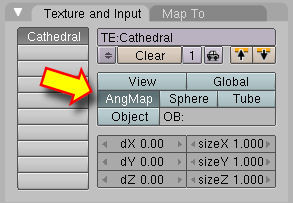
In the "Texture and Input" tab, click "Add New" and "Angmap".
::在"文本和输入"选项卡中,点击"添加新"和"Angmap". -
Then go to the "Map To" tab and deactivate "Blend" and activate "Hori".
::然后进入"地图到"选项卡, 禁用"混合"并激活"Hori". -
Now go to the Texture settings (press F6) and change the "Texture Type" to "Image".
::现在进入"纹理设置" (按F6) 并将"纹理类型"更改为"图像". -
Click the "Load Image" button and locate your HDR image.
::按下"加载图像"按,找到您的HDR图像. -
If you're using YafRay or other external renderers, you need to turn on Global Illumination and to set the quality to something other than "none".
::需要打开全球照明, 并将质量设置为"无"以外的东西.
Step-by-step Tutorial
::步骤指导
Build a simple scene
::建立一个简单的场景
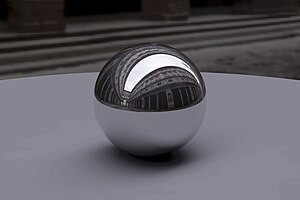
To see the advantage of using a 360 by 360 world image, the simplest example to demonstrate this is a scene with a mirrored sphere.
::为了了解使用360x360世界图像的优点,最简单的例子就是一个镜子球的场景.
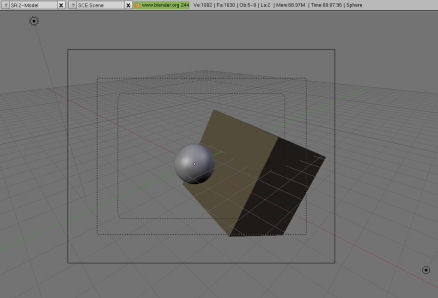
-
Add a sphere and a cube to your scene and place them in a bit of an interesting position. (note that I added a second lamp to light up the shadow part of the cube)
::给你的场景添加一个球和一个立方体,并把它们放在一个有趣的位置. (请注意,我添加了第二个灯照亮立方体的阴影部分) -
Perhaps give the cube a different color than the default grey.
::也许给立方体一个不同颜色的默认灰色.
-
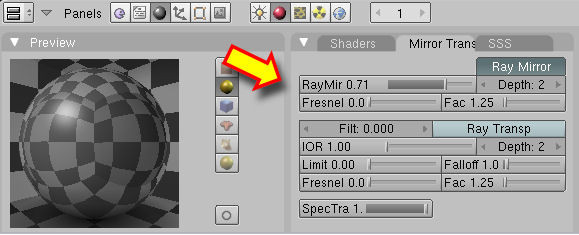
Give the sphere a mirrored material : go to the
Shading -> Material
panel (F5) and find the
Mirror Trans
buttons.
::给球体一个镜像材料:进入影子 -> 材料面板 (F5) 并找到镜像转换按. -
Check that
Ray Mirror
button is pressed. If it is not, check it.
::检查Ray Mirror按是否被按下. 如果没有,请检查. -
Set the
RayMir
value to a value of 0.5 or higher. Your preview should show the reflection of the checkboard environment.
::设置RayMir值为0.5或更高. 您的预览应该显示检查板环境的反射.
Render with HDR (Blender Internal v2.49)
::使用HDR进行染 (混合器内部v2.49)
-
Download a HDR image (see Paul Debevec's website)
::下载一个HDR图像 (见Paul Debevec的网站) -
Go to the shading settings (press F5) and click the World button.
::按下F5按下"世界"按.
-
Go to "Ambient Occlusion" tab and activate "Ambient Occlusion", then make sure "Raytrace" is chosen as gather method, and activate "Sky Texture"
::确保"Raytrace"被选为收集方法,并激活"天空纹理" -
Adjust quality settings:
-
Increasing number of samples reduces noise, but increases render times
::增加样本数量可以减少噪音,但也可以增加染时间 -
Adaptive QMC is faster, but generates more noise than Constant QMC
::适应式QMC比常量QMC更快,但产生更多噪音
::调整质量设置:样本数量的增加会减少噪音,但会增加染时间 适应性QMC更快,但会产生比常量QMC更大的噪音 -
Increasing number of samples reduces noise, but increases render times
-
In the "Texture and Input" tab, click "Add New" and "Angmap"
::在"文本和输入"选项卡中,点击"添加新"和"Angmap" -
Then go to the "Map To" tab and deactivate "Blend" and activate "Hori".
::然后进入"地图到"选项卡, 禁用"混合"并激活"Hori". -
Now go to the Texture settings (press F6) and change the "Texture Type" to "Image".
::现在进入"纹理设置" (按F6) 并将"纹理类型"更改为"图像". -
Click the "Load Image" button and locate your HDR image.
::按下"加载图像"按,找到您的HDR图像.
Render with HDR (Blender Internal v2.69)
::使用HDR进行染 (混合器内部v2.69)
-
Download a HDR image (see Paul Debevec's website)
::下载一个HDR图像 (见Paul Debevec的网站) -
Go to Properties tab and click the World button.In the World Section check the "Real Sky" Button
::在世界部分, 检查"真实天空"按 -
(optional)Go to "Ambient Occlusion" section and activate "Ambient Occlusion", then make sure "Raytrace" is chosen as gather method in Gather section"
::确保"Raytrace"被选为收集方法在收集部分" -
(optional)Adjust quality settings:
-
Increasing number of samples reduces noise, but increases render times
::增加样本数量可以减少噪音,但也可以增加染时间 -
Adaptive QMC is faster, but generates more noise than Constant QMC
::适应式QMC比常量QMC更快,但产生更多噪音
:可选) 调整质量设置:样本数量增加会减少噪音,但会增加染时间 适应性QMC更快,但会产生比常量QMC更大的噪音
-
Increasing number of samples reduces noise, but increases render times
-
In the Properties tab click Texture button->then click on 'show world texture'->then select type as 'image or movie'->then in mapping section select coordinates as 'Angmap'->then in in influence section uncheck the 'blend' button and check the 'horizon' button.
::在属性选项卡中,单击"纹理"按->然后单击"显示世界纹理"->然后选择"图像或电影"类型->然后在映射部分选择"Angmap"坐标->然后在影响部分取消选项"混合"按,并选中"地平线"按. -
In the Image section click on open button and locate your HDR image and Load it.
::在图片部分点击打开按, 找到您的HDR图片并加载它.
Render with YafRay
::使用YafRay进行染
-
Download a HDR image (see Paul Debevec's website).
::您可以下载HDR图像 (见Paul Debevec的网站). -
Go to the shading settings (press F5) and click the World button.
::按下F5按下"世界"按. -
In the "Texture and Input" tab, click "Add New" and "Angmap". Note that the Angmap button is the important thing to tell Blender that this file is a Light Probe file !
::在"文本和输入"选项卡中,点击"新增"和"Angmap".请注意,Angmap按是告诉Blender这个文件是一个Light Probe文件的重要内容! -
Then go to the "Map To" tab and deactivate "Blend" and activate "Hori".
::然后进入"地图到"选项卡, 禁用"混合"并激活"Hori". -
Now go to the Texture settings (press F6) and change the "Texture Type" to "Image".
::现在进入"纹理设置" (按F6) 并将"纹理类型"更改为"图像". -
Click the "Load Image" button and locate your HDR image.
::按下"加载图像"按,找到您的HDR图像.
(optional step, as it was not needed for my setup
:可选步骤,因为它不需要我的设置
- 5. Press F10 and change the "Blender Internal" to "YafRay". You need to turn on Global Illumination and to set the quality to something other than "none". Note that the YafRay renderer does not come standard with the Blender installation. You need to download and install this separately.
Your result should look like this: (Rendering: left with Blender, right with YafRay) Click for larger version
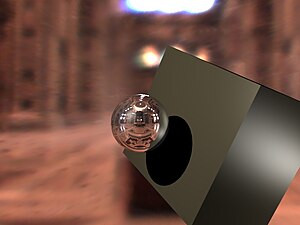
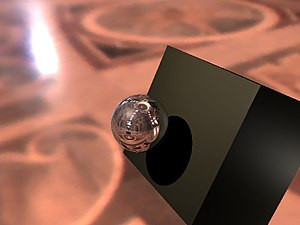
Note that the reflecting ball reflects the whole interior from every angle, even though we added just a single image to the World settings !
::结果应该是这样的: (染:左边使用Blender,右边使用YafRay) 点击更大的版本请注意,反射球从每个角度反射整个内部,即使我们只添加了一个图像到世界设置!