Blender 3D:第四单元:与高级教程起飞
This tutorial will show you how to make advanced terrain such as mountains using Blender and gimp or any other image editing software. Blender has the ability to use height maps to create meshes. Height maps are black and white images with white representing the highest point and black the lowest.
::本教程将向您展示如何使用Blender和gimp或任何其他图像编辑软件创建高级地形,例如山脉.Blender有使用高度地图创建网格的能力.高度地图是黑白图像,白色代表最高点,黑色代表最低点.
Creating the heightmap image
::创建高度图像
Note:
This entire Tutorial presumes that you are already familiar with other Editing Software, such as GIMP... and already know how to create "textures" with that software. However, you do not have to use another program to obtain a texture. At the end of the next section, they show you how to generate a random 'cloud' texture which you can use directly. Do not worry about GIMP or Photoshop. Just skip the rest of this section and most of the next one.
::注意:整个教程假定你已经熟悉其他编辑软件,如GIMP...并且已经知道如何使用该软件创建"纹理".但是,你不需要使用其他程序来获得纹理.在下一节的末尾,他们向你展示如何生成随机的"云"纹理,你可以直接使用.不要担心GIMP或Photoshop.只要跳过本节的其余部分和下一节的大多数内容.
To begin with, open your image editing software. This part applies to Gimp only (downloadable at
http://gimp.org
), if you use another program you will have to do it another way.
::首先,打开您的图像编辑软件. 这部分仅适用于Gimp (可从http://gimp.org下载),如果您使用其他程序,则必须用另一种方式进行.
First use the "New" menu option to create an image 1600 wide by 1200 tall. Go to
Filters
→
Render
→
Clouds
→
Plasma
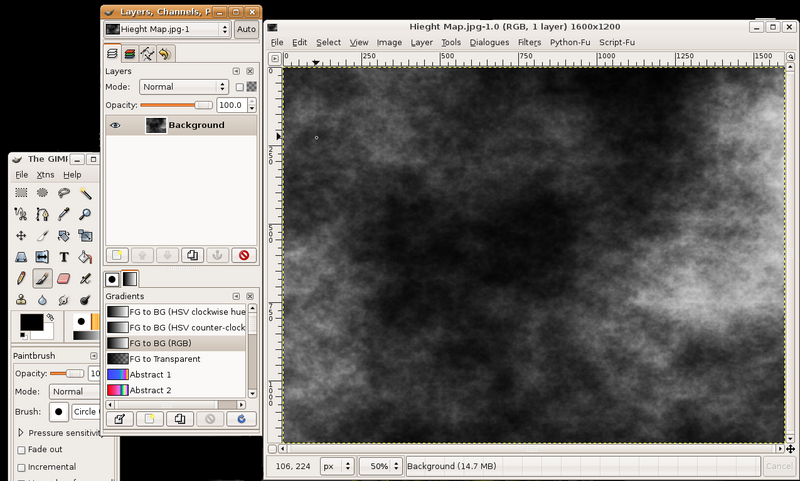
(In Photoshop, this is Filter > Render > Clouds). For this example just use the default settings, it doesn't really matter. Click OK. You should now have a nice colorful image. We don't want that, we want it in black and white. Make sure your Gradient is set to "FG to BG(RGB)"(this is the default anyway) and that your foreground color is black and the background color is white. Go to
Colors
→
Map
→
Gradient Map
. This will convert it to black and white for you.
::首先使用"新"菜单选项创建一个宽度为1600x高度为1200的图像.进入过器 → 染 → 云 → 等离子体 (在Photoshop中,这是过器 > 染 > 云).对于这个例子,只需使用默认设置,它并不重要.点击OK. 现在你应该有一个漂亮的彩色图像. 我们不想要那个,我们想要它是黑白的. 确保你的渐变设置为"FG到BG (RGB) " (这就是默认的) 和你的前景颜色是黑色和背景颜色是白色.进入颜色图 → 渐变图. 这将将将它转换为黑白为你.
Save your image as PNG or JPEG.
::保存图像为PNG或JPEG.
It should look something like this
::它应该看起来像这样
Create grid and add the image as texture
::创建网格并添加图像作为纹理
Open Blender and delete the default cube.
::打开混合器并删除默认的立方体.
Add a grid (
SPACE
→
Add
→
Mesh
→
Grid
) with resolutions 32 and 32 from top view. Do not scale the grid just yet, zoom instead if you wish to take a closer look at your grid. It will be explained later why you shouldn't scale now.
::从上方查看,添加一个分辨率为 32 的网格 (SPACE → Add → Mesh → Grid).如果您想更仔细地看看您的网格,请不要现在缩放网格,而是放大.为什么您不应该现在缩放将在稍后解释.
| Note : When I followed this tutorial it didn't work - the vertices in the grid were moving sideways rather than vertically. It turns out I needed to TAB into object mode after creating the grid, then hit CTRL+AKEY to reset the transformation, then TAB back into edit mode. If someone could explain why that was necessary, or what it does exactly, that would be helpful. |
-
-
Response 1
: You should create the basic shape and outline in object mode, then edit the details in edit mode, kinda like the names imply.
::答案1:你应该在对象模式中创建基本形状和轮, 然后在编辑模式中编辑细节, 就像名称所暗示的那样. -
Response 2
: When you create an object using the Front or Side views while having
Aligned to View
selected in the
Edit Methods
in
Blender Settings Panel
, the Local Z axis of the object will be pointing to the Global Y or X axis, respectively. For the matter of this tutorial, if you do that, you'll be forced to rotate the object 90º in X or Y, before going on. That's where problems may begin, if you rotate it in
Edit Mode
which doesn't change local axis orientations. In that case you'll be forced to reset transformations (
Ctrl+A
->
Scale and Rotation to ObData
). However, if you rotate it in
Object Mode
, and if you make sure the Local Z axis points upwards after the rotation, you should be seeing good results later on.
( To see the Local orientations of an object, Press
F7
for the
Object Panel
(the one with three arrows, 4th from the left) and in the
Draw
pane click the
Axis
button.)
::答案2:当您使用前方或侧面视图创建一个对象,同时在混合器设置面板中选择了"对齐到视图" (Aligned to View),对象的本地Z轴将分别指向全球Y或X轴.对于本教程而言,如果您这样做,您将被迫在继续前,将对象以X或Y轴旋转90o.如果您在编辑模式中旋转,而本地轴方向不会改变,问题可能就会开始.在这种情况下,您将被迫重置转换 (Ctrl+A -> 缩放和旋转到ObData).然而,如果您在对象模式中旋转,并确保本地Z轴在旋转后向上指点,则应该在后面看到良好的结果. (为了查看对象的本地方向,按
-
Response 1
: You should create the basic shape and outline in object mode, then edit the details in edit mode, kinda like the names imply.
Click
F5
to go to the
Shading panel
. By default the
Material buttons
button should be selected (button with red ball), but if it isn't then click on it. If this window has a panel named
Preview
and it is empty then look to the right for the
Links and Pipeline
panel. Here you should find an
Add New
button beneath
Link to Object
, click on it. 3 more panels should appear when you do this. You should find the
Texture buttons
button, it is just to the right of the
Material button
and is black & yellow. You may also just hit
F6
. Now you should get two new panels titled
Preview
and
Texture
, in the
Texture
panel you'll find an
Add new
button, click it. Where the button just was it should now be a text field saying something like "TE:Tex.001", click in the text field and write "height" instead. Look a bit to the right and down for a dropdown menu allowing you to choose
Texture Type
, click it and select
Image
. Two more panels will appear and the rightmost should be
Image
with a
Load
button.
::按F5进入"影子"面板.默认情况下,应该选择"材料按" (带红球的按),但如果没有,则点击它.如果这个窗口有一个名为"预览"的面板,并且它是空的,那么请向右查看"链接和管道"面板.在这里,您应该找到"链接到对象"的下方的"添加新"按,点击它.当您这样做时,应该有3个面板出现.您应该找到"纹理按",它位于"材料"按的右边,是黑色和黄色的.您也可以点击F6.现在您应该得到两个名为"预览"和"纹理"的新面板,在"纹理"面板中您会找到一个新的按,点击它.刚才
| Note: The Texture buttons button is not part of the windows that pop up after you click Add New button, but it directly to the right of the Material button that is a red ball. |
| Note: If you can't find the Texture Type menu, press F6 . Once you press F6 , or the Texture buttons button, you'll see another panel, also called Texture . This one, however, shows a Texture Type menu after you select Add new . Having two very similar panels can be a nasty trap. |
Before you load the image take a look at the
Map Image
panel. About in the middle there should be 5 buttons,
Extend
,
Clip
,
ClipCube
,
Repeat
and
Checker
. Select
Clip
or your heightmap may wrap around the grid (if this doesn't make sense then do this tutorial twice, one where you keep
Repeat
selected and one without. In that case make sure there's some bright white spots in your height map on each edge).
::在加载图像之前,请看看地图图像面板.在中间应该有5个按,扩展,剪切,剪切,重复和检查.选择剪切或您的高度图可能会绕过网格 (如果这没有意义,那么请两次执行此教程,其中一个是您保持重复选择,另一个没有.在这种情况下,请确保在您的高度图中每个边缘都有一些明亮的白色点.
Click the
Load
button and load the heightmap you just created in your favourite image editing software.
::按下"加载"按, 打开你喜欢的图片编辑软件中刚刚创建的高度图.
If you're going for the random cloud-type image, though, you can make it from within Blender itself - when you add a texture, in the menu where you select 'image,' before actually selecting it, pick 'clouds' instead, and play with the settings.
::您可以在Blender中自行创建 - - 当您添加纹理时, 在您选择"图像"的菜单中,

Click the
Material buttons
button again (the red ball button) and look in the
Preview
panel. If this just shows a black ball then click on the uppermost button just to the right of the black ball.
::按一下"材料按"按 (红色球按),然后在"预览"面板中查看.如果它只显示一个黑色球,请点击黑色球右侧的最上方的按.

Use texture as heightmap
::使用纹理作为高度图
(Blender 2.5+ note: Now you do this using a "Displace" modifier that applies the Texture you created.)
::现在使用"移位"修改器来实现此操作,
Look to the top right of the rightmost panel, the window should have 3 panes titled
Texture
,
Map Input
and
Map To
. Click on the
Map To
pane. A whole lot of buttons will appear:
::在最右边的窗口中,应该有三个窗格,分别是"纹理","地图输入"和"地图转移".点击"地图转移"窗格,会出现很多按:
-
Turn off the
Col
button. "Col" stands for "color," and we don't want our plane to be
colored
by this texture.
::关闭Col按. "Col"是"颜色",我们不希望我们的飞机被这种纹理所染色. -
All of these buttons should be turned off: we're not going to be using this texture to "Map To" anything. Instead, we'll be using it to deform the actual geometry.
::所有这些按都应该被关闭:我们不会使用这种纹理来"映射到"任何东西. 相反,我们会用它来扭曲实际的几何形状.
Go to the
Edit window
(
F9
) and enter edit mode (
TAB
) if you're in
Object Mode
. Go to either front or side view so you can see what you are doing. Click the
Noise
button in the
Mesh Tools
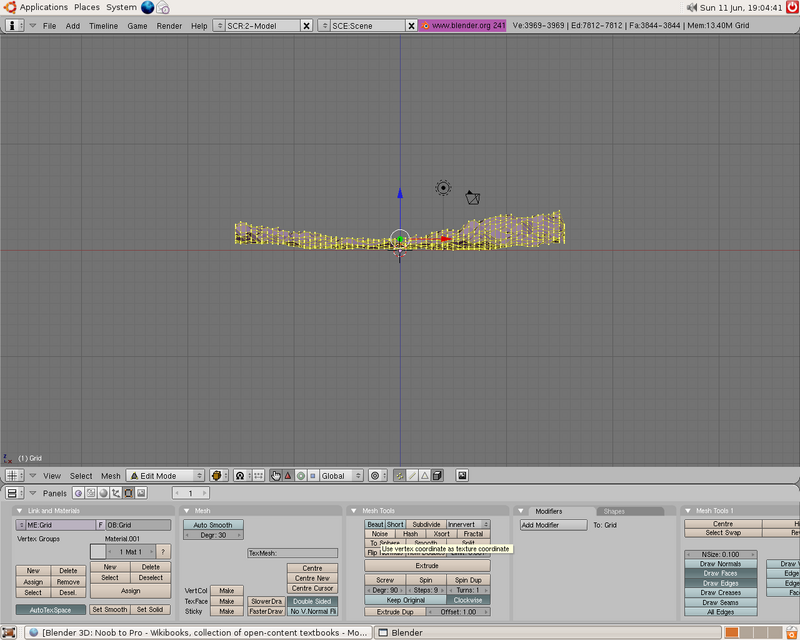
-panel (it's located in the top left corner of this panel) and your grid should start to change shape.
::进入编辑窗口 (F9) 并进入编辑模式 (TAB) 如果您处于对象模式. 进入前方或侧面视图,以便您可以看到您正在做什么. 点击网格工具面板中的噪音按 (它位于该面板的左上角),您的网格应该开始改变形状.
Note:
make sure all your vertices are selected with AKEY or whatever you want to use to select. If not selected,
Noise
won't do anything!
::注意:请确保您所有的顶点都使用AKEY或您想要使用的任何选择. 如果没有选择,Noise将不会做任何事情!
-
(While you could, theoretically, use this to your advantage ... intentionally de-selecting vertices that you don't want to influence ... in practice that's quite awkward if for some reason you have to do it again. It's much easier to leave any such areas, that you don't want to influence, "completely white" in the image.)
:虽然理论上可以利用这一点,故意删除你不想影响的顶点,但实际上,如果你不得不再次这样做,那就相当尬了.在图像中,让任何你不想影响的区域"完全白色"更容易.
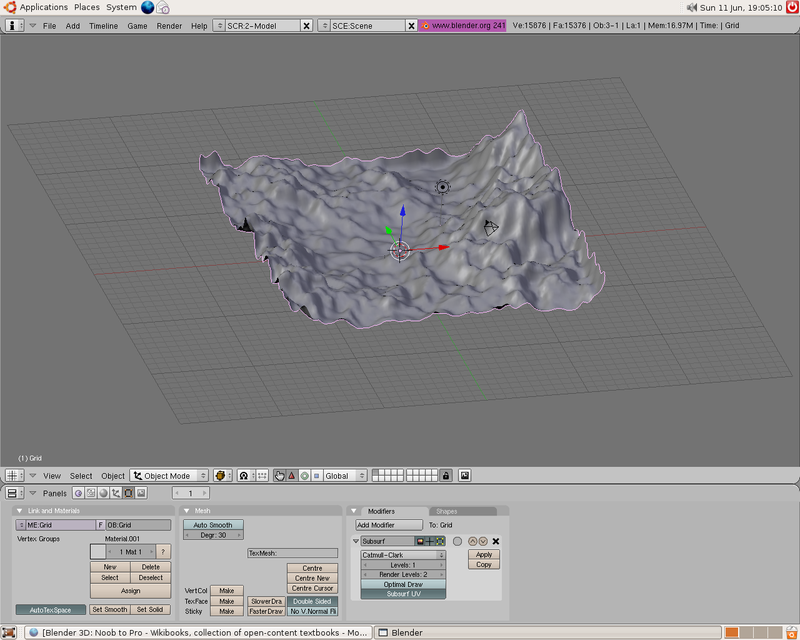
Continue clicking the button until the terrain has reached the height you want and voilà, you have just made terrain using heightmaps. You may want to subsurf the shape to get a smoother effect. If you wish to scale your new landscape then now is the time. There seems to be a bug or gotcha causing your heightmap to be tiled on your grid rather than resized if you scale the grid before applying the heightmap. Hopefully someone familiar with blender will clarify how this should be done properly, but until then this method will work.
::继续点击按,直到地形达到您想要的高度,然后 voilà,您刚刚使用高度图制作了地形.您可能想将形状加上表面以获得更光滑的效果.如果您希望调整您的新景观,那么现在是时候.如果您在应用高度图之前调整了网格,似乎存在一个错误或导致您的高度图在网格上被而不是重新缩小.希望熟悉混合器的人能澄清如何正确地完成这一操作,但直到那时,这种方法将工作.
Tips:
::提示:
1. If you want a more jagged landscape then adjust the contrast on the image editing software
::1. 如果您想要一个更的景观,然后调整对比度在图像编辑软件
2. Once you've finished using the
Noise
button in the
Mesh Tools
panel as shown above, the texture is no longer needed: the effect it has made on the geometry of the object is permanent. If texture-resources are tight, you can remove it now. But it's advisable to keep it, unchanged, in case you need to re-do your work at some time in the future. If you want to use other kinds of texture-maps (
Col
or,
Nor
mal maps, and so-forth), you can use the landscape-image as a handy reference (say in a background-layer in your painting program) for correct placement of these features, but you should not alter the landscape-image itself).
::2. 一旦你完成了使用"Noise"按在"网格工具"面板中,如上所示,纹理不再需要:它对对象的几何构造的影响是永久的.如果纹理资源紧张,你可以现在删除它.但建议保持它不变,以防你需要在未来某个时候重新做你的工作.如果你想使用其他类型的纹理图 (颜色,正常图等),你可以使用景观图像作为一个方便的参考 (比如在绘画程序中的背景图层中) 进行正确的放置这些功能,但你不应该改变景观图像本身.
3. Height maps can also be used to make city terrain. Draw white squares on a black background. If you do this make sure you make the squares perfectly parallel to the sides of the image. This prevents jagged edges to buildings. You can also use gray squares to adjust the buildings to different heights.
::3.高度地图也可以用来做城市地形.在黑色背景上画白色方块.如果你这样做,请确保方块与图像的侧面完全平行.这可以防止建筑物的凸边缘.你也可以使用灰色方块来调整建筑物的不同高度.
4. The "Noise" mesh-editing button displaces vertices in the object's Z-Axis and negative Z-Axis only. To deform your mesh's other dimensions, simply rotate your object and "apply rotation," or rotate the vertices in edit mode, and apply Noise. Then, rotate it back again to get your original orientation.
::4. "噪音"网格编辑按只会将对象的Z轴和负Z轴的顶点移动. 要变形您的网格的其他维度,只需旋转您的对象并"应用旋转",或在编辑模式中旋转顶点,并应用噪音. 然后,再次旋转它以获得原始方向.
5. The "Noise" button permanently modifies your mesh according to the material texture. Each click adds onto the current mesh. For a temporary effect, map the texture to
Disp
(lacement) for a render-time effect
(and do not click the "Noise" button at all)
. In object/edit mode your object will appear normal, but will render deformed.
::5. "噪音"按根据材料质地永久修改您的网格.每次点击都会添加到当前的网格上.为了获得临时效果,将质地映射到Disp (位置) 进行染时间效果 (并且根本不点击"噪音"按).在对象/编辑模式中,您的对象将出现正常,但将染变形.
6.
Note:
The "Noise" mesh-editing
button,
as used here, is not the same as the "Noise"
texture
that is referred to in other tutorials!
::6. 注意:这里使用的"噪音"网格编辑按与其他教程中提到的"噪音"纹理不同!