Blender 3D:第四单元:与高级教程起飞
Mountains
::山地
I was playing around in Blender several months ago and messing with cloud textures when I found a great way to make landscapes entirely within Blender (without height maps from The Gimp or some other application) and decided to make a tutorial (yes, it does use the noise tool).
::发现一个很好的方法, 完全在Blender中创建景观 (不需要Gimp或其他应用程序的高度地图),
For 2.7X blenderers out there:
::对于那些使用2.7X的机:
though this is a 2.4 based tutorial it works fine for 2.7X versions. The only big difference that doesn't work is that the normal button in the influence panel instead of map to panel, and the diffuse shader they mention later is actually in the material's context and in the diffuse panel.
::虽然这是一个基于2.4的教程,但它对2.7X版本很好. 唯一不起作用的巨大区别是影响面板中的正常按而不是映射到面板,
Making the Mesh
::网格的制作
To start, open up Blender and with the cube selected, press the
XKEY
and click Erase Selected Objects.
::开始时,打开Blender,选择立方体,按XKEY,然后单击"删除选项".
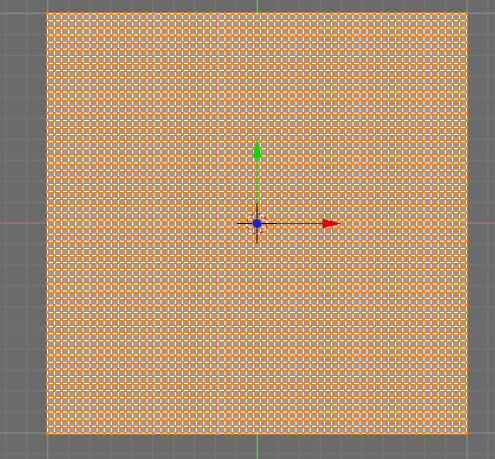
Add a grid (
SPACE
--> Add--> Mesh--> Grid), using whatever numbers you like, remembering that bigger numbers means more vertices. For this tutorial, I'll use 60 for x and y resolution. Scale the grid up, but only a little bit (I went up to 1.3) as the texture won't make very tall landscape with a very big grid. Press the
F5
key to go to the Materials tab, then add a new material.
::添加一个网格 (SPACE-->Add-->Mesh-->Grid),使用任何你喜欢的数字,记住更大的数字意味着更多的顶点. 在本教程中,我会使用60为x和y分辨率. 缩放网格,但只有一个小点 (我上升到1.3) 作为质地不会做一个非常高的景观与一个非常大的网格. 按F5键去材料选项卡,然后添加一个新的材料.
Displace and Shade
::移动和遮阳
Now press the
F6
key to go the Textures panel, and add a cloud texture in the very first slot (slot 0).
::现在按F6键进入纹理面板, 在第一个插槽 (插槽0) 添加云纹理.
After Pressing F6, look at the windows on the bottom. To the left is the "preview" window and next to that (to the right) is a
Texture
window with an
Add
button... click that and then go to the little pull down menu that shows up just below and to the right. From there, find and select "Clouds"... and now, continue!
::在按F6后,看看底部的窗口. 左边是"预览"窗口,旁边 (右边) 是一个带有添加按的纹理窗口...点击它,然后进入显示在下面右边的小拉下菜单. 从那里,找到并选择"云"...现在,继续!
You may be wondering how we are going to make landscape with a cloud texture, when you could just use the Gimp height map plugin, Terragen, or the A.N.T. modeling script right in Blender. Well, we are going to make the landscape with a
height map.
The color determines the height: white = very tall; grey = halfway tall; black = no height. This makes the cloud texture a very good candidate for land.
::现在,我们将用高度图来制作景观. 颜色决定高度:白色=非常高;灰色=半高;黑色=没有高. 这使得云层结构成为土地的非常好候选.
The next thing we are going to do is adjust the size. You can set the noise size to whatever you want, but I want to have several bigger pieces of landscape, instead of a bunch of little ones so I'm setting noise size to 1.00 and noise depth to 6, as I want a high level of detail. (The
Preview
immediately shows you the effect of your "tweaks" as you make them.)
::接下来我们要做的是调整大小.你可以把噪音大小设置为你想要的,但是我想要有几个更大的景观片段,而不是一堆小的,所以我把噪音大小设置为1.00和噪音深度为6,因为我想要一个高层次的细节. (预览会立即显示你在做"调整"时的效果.
Noob Note:
You can hold shift and click the number next to noise size then just type 1 and press enter instead of using the arrows. The same applies for NoiseDepth, almost every other setting in blender changes like this as well.
::您可以按住shift,然后点击噪声大小旁边的数字,然后输入1并按Enter,而不是使用箭头.
At the top, we can select
Hard noise
or
Soft noise.
Each gives a different landscape, so experiment with them. Next, go to the
Colors
tab (it's right next to the texture button by default). Adjust the brightness and contrast as required. For "Hard noise," try a brightness of 1.9 and a contrast of 3.45. For "Soft noise," a brightness around 1.0 to 1.2 should be fine.
::在顶部,我们可以选择"硬噪声"或"软噪声".每个都提供不同的景观,因此可以尝试它们.接下来,进入"颜色"选项卡 (默认位于纹理按旁边).根据需要调整亮度和对比度.对于"硬噪声",尝试亮度为1.9和对比度为3.45.对于"软噪声",亮度在1.0到1.2之间应该是可以的.
Noob Note:
The above noob note applies to the brightness setting as well!
::对于光亮设置也适用!
Jump back to material buttons with
F5
and go into the "Map To" panel. Turn off
col
and press
nor
once.
::跳回材料按F5进入"地图到"面板. 关闭col,按一下nore一次.
Noob Note:
I had a difficult time finding the "Map To" so if you are too... This is one of the several small Windows that opens at the bottom of your screen after pressing
F5
and for me, it was on the far, far right, off my screen. I had to use my mouse wheel to scroll the Windows to the side to bring it into view and found it as a Tab on a Window with two other tabs. "Col" and "Nor" are buttons in the
Map To
Tab.
::笔记:我很难找到"地图到"所以如果你也...这是几个小窗口之一,在屏幕的底部打开后按F5和我,它是在远,远右,我的屏幕. 我不得不使用鼠标轮滚动窗口到侧面带来视图,并发现它作为一个窗口上的Tab与其他两个选项卡. "Col"和"Nor"是按在地图到选项卡.
Another Noob note:
In version 2.66, the "map to" equivalent is found in the texture window (under the tab "influence") there you can adjust the color and normal settings. they are referred to by their full names.
::在图表窗口中 (在"影响"选项卡下), 您可以调整颜色和正常设置.
-
What the buttons are for:
The "Map To" settings determine which various attributes of the material will be affected by our "cloudy texture."
-
"Col" refers to "
col
or." We turn it off here, because we don't want our surface to
look
"cloudy."
::我们关掉它,因为我们不想让我们的表面看起来"阴暗". -
"Nor" refers to "surface
nor
mals." This is the angle at which light seems to reflect from the surface. (The so-called "bump map.")
::"Nor"是指"表面正常".这是光似乎从表面反射的角度. (所谓的"撞击图"). -
Experiment with the other "Map To" buttons, as well! For instance, "Disp" (for "
disp
lacement) actually causes a map to deform the geometry of a surface... but doing so only during rendering.
::试试其他"Map To"按!例如",Disp" (用于"移位") 实际上会导致地图变形表面的几何形状...但只在染过程中这样做.
::按的用途: "Map To"设置决定了材料的哪些属性会受到我们"阴暗的纹理"的影响. "Col"是指"颜色".我们在这里关闭它,因为我们不希望我们的表面看起来"阴暗". "Nor"是指"表面正常".这就是光似乎从表面反射的角度. (所谓的"撞击地图".) 也可以尝试其他"Map To"按!例如",Disp" (用于"位移") 实际上会导致地图扭曲表面的几何...但仅在染过程中这样做. -
"Col" refers to "
col
or." We turn it off here, because we don't want our surface to
look
"cloudy."
In this tutorial, as you will see, we are going to
combine
several techniques to produce a very rocky surface. Here, we are changing the way that the surface reflects light. Then, we'll actually deform the surface geometry.
::在这个教程中,正如你将看到的,我们将结合几种技术来产生一个非常岩石的表面. 在这里,我们改变了表面反射光的方式. 然后,我们实际上将变形表面的几何形状.
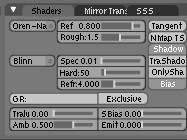
Turn the
nor
value all the way up, to 25 (that will give it a nice rocky look). Go into the
Shaders
tab and then change the "Diffuse Shader" (the top left selector, defaulting to "Lambert") to "Oren-Nayer," and the "Specular Shader" (the 2nd selector, defaulting to "CookTorr") to "Blinn." Adjust the
Rough
value in Oren-Nayer to 1.5 (rock is really rough). Also, set the
Spec
value to 0.01 and
Hard
to 25. Now we are ready to make some mountains!
::转换 nor 值,至 25 (这将给它一个漂亮的岩石的外观).进入 Shaders 选项卡,然后改变"分散的影子" (左上选择器,默认为"兰伯特") "奥伦-奈耶",和"镜像影子" (第二个选择器,默认为"CookTorr") "Blinn. "调整 Oren-奈耶的粗度值为 1.5 (岩石真的很粗).还设置了 0.01 的特征值和25 硬度.现在我们准备好做一些山!
-
Trivia note:
In computer graphics, a "shader" is a mathematical function, and they're customarily named after the clever people who invented them. These functions determine exactly how the cloudy-texture will "map to" the attributes
(e.g.
"Nor"...) that we selected.
::简要说明:在计算机图形中",遮光器"是一个数学函数,它们通常以发明者的聪明人名字命名.这些函数确切地决定了云纹理将如何"映射到"我们选择的属性 (例如"Nor"...).
Making Mountains
::创造山脉
Press
TAB
to go into edit mode and press the
AKEY
twice, in case you had any specific vertices selected. Go into the front view and press the "Noise" button(located under mesh tools in
F9
). You should see the vertices jump up a good bit.
::按TAB进入编辑模式,然后按AKEY两次,以防你有选择的特定顶点.进入前视图,按"噪音"按 (位于F9的网格工具下).你应该看到顶点跳起来很大.
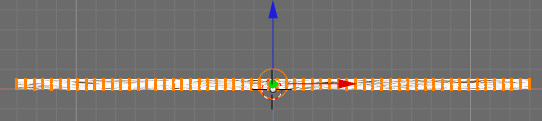
If not, you may have scaled your grid up too much, so make it somewhat smaller. Depending on how high you want your mountains, press the
Noise
button to your required amount, though I pressed it 8 more times. The mesh doesn't look very good right now, as it is not only blocky, but it is missing that last bit of random detail.
::根据你想要的山的高度,按下噪音按到你需要的数量,虽然我按了它8次. 网格现在看起来不太好,因为它不仅是块状的,而且它缺少最后一点随机的细节.
-
Important note!
The
mesh-editing button
named "Noise" causes a permanent change to the geometry of the object in the "Z"-axis, as provided by the texture. (The vertices actually
moved,
and their new position is permanent.)
-
There is also a
procedural texture
named "Noise," but that is just pure coincidence. The two are unrelated, both in what they do and in how they work.
::另外还有一种叫做"噪音"的程序性质, 但这只是纯粹的巧合. 这两种在所做的事和工作方式上是无关的.
::重要提示:网格编辑按"噪音"会导致对象在"Z"轴上的几何结构的永久变化,正如纹理所提供的. (顶点实际上移动了,它们的新位置是永久的.) 还有一个程序纹理叫做"噪音",但这只是纯粹的巧合.这两者在它们所做的事情和它们的工作方式上是无关的. -
There is also a
procedural texture
named "Noise," but that is just pure coincidence. The two are unrelated, both in what they do and in how they work.
-
Important note!
Those using Blender 2.5 Beta in order to get the height map to affect the geometry you will need to use the displace
modifier
instead.
::重要提示!使用Blender 2.5 Beta的人,为了让高度图影响几何,需要使用移位修改器.
If you are not in edit mode, go into it and select all the vertices. Press
Fractal
(in the same row as
Noise
under mesh tools) and enter a value of 15 in the random factor. Hopefully, your system can manage all these vertices: if not, then don't do any fractal subdivide. If you want to, you can use a smaller value in the fractal box and do it several more times for more displacement. Be careful, though: too much randomness will cause vertices to separate, causing tears in the mesh that you will have to fix by hand.
::如果您不在编辑模式中,进入它并选择所有顶点.按分数 (在网格工具下与噪音相同的行中) 并在随机因子中输入 15 的值.希望您的系统能够管理所有这些顶点:如果不是,那么不要进行任何分数分类.如果您想要,可以在分数框中使用较小的值并多次进行更大的位移.但是,请注意:过多的随机性会导致顶点分离,导致网格中出现裂,您必须手动修复.如果您的系统无法处理这些顶点,请在编辑模式中选择分数.
Finally, tab out of edit mode and press
Set Smooth.
Then, if you want to make the mesh even more smoother, add a
Subsurf
modifier, with what ever level you want. (I'm going with 1 for faster render times.)
::最后,切出编辑模式,按下"设置光滑".然后,如果您想使网格更光滑,请添加一个Subsurf修改器,随时随地修改. (我使用1来加快染时间.)
If you desire, you can scale up the mesh however big you want though for close-ups, you may want another level of subsurf or another subdivide. Then, apply colors, set up the lights, and render! A word to the wise, however: this process creates a huge file (about 986kb).
::图像的图像可以在任何位置进行分类,例如在图像的下方.如果您愿意,您可以将网格扩大到您想要的尺寸,但对于近距离的照片,您可能需要另一层次的下面或另一个分区.然后,应用颜色,设置灯光,并染!然而,一个明智的词:这个过程创建了一个巨大的文件 (大约986kb).
Discussion
::讨论
You have just made mountains all in Blender, without having to generate height maps in The Gimp, or any other program. The next step is to go beyond the tutorial. Try using different noise sizes and noise basis, and even try using other textures like musgrave and marble. Or try using two textures and see the conclusion. The possibilities are almost infinite! Have fun.
::你刚刚用Blender制作了山,不用用Gimp或其他程序生成高度图. 下一步是超越教程. 尝试使用不同的噪声大小和噪声基础,甚至尝试使用其他纹理,如和大理石. 或者尝试使用两个纹理,看看结论. 可能性几乎是无限的! 玩得开心.
Observe
how the technique illustrated
this
tutorial is "the same, yet different" from the one demonstrated in the tutorial for "height maps":
::观察本教程所示的技术与"高度图"教程中的技术是"相同的,但不同":
-
A
procedural texture
was used to supply changes to the
Nor
mal Mapping of the object at render time. (This is the angle at which the object reflects light.) (The "height mapping" tutorial did not do this.)
::使用程序纹理来提供对象在染时的正常映射的更改. (这是对象反射光的角度.) ("高度映射"教程没有这样做.) -
Then, the
mesh-editing button
(also...) named "Noise" was used to deform the actual geometry of the mesh. (This
is
the same technique used in the "Height Map" tutorial, although a different kind of texture .. an image .. was used.)
::然后,使用网格编辑按 (也称为"噪声") 来扭曲网格的实际几何形状. (这与"高度地图"教程中使用的相同技术,尽管使用了不同类型的纹理...图像...). -
The texture, once used for the height-mapping (deformations) was left in place, still mapped to the surface "Nor"mals. The result will be a
very
mountainous landscape.
::曾经用于高度映射 (变形) 的纹理被留在原地,仍然映射到表面的"Nor"mals.结果将是一个非常山地景观.
Yep! The techniques shown in all of these terrain-modeling tutorials
can
be combined! And, they frequently are. Very often the most satisfactory results are obtained by combining several different techniques. You could have used an image-map (from the "Height Mapping" tutorial) to deform the geometry, then used the "noisy
Nor
mal-mapping" idea from the first part of this tutorial, and even used smoothing. All at the same time. The choice is yours.
::!所有这些地形建模教程中的技术都可以结合起来!而且,它们经常是. 非常经常,通过结合几个不同的技术获得最令人满意的结果. 你可能使用图像图 (来自"高度映射"教程) 来扭曲几何形状,然后使用本教程第一部分的"噪音正常映射"想法,甚至使用平滑. 一起. 选择是你的.
When using "Map To," remember that a single material can have several different textures applied to it, each one mapped to the same or to different attributes. This mapping can even be
animated.
::当使用"Map To"时,请记住,一个材料可以有多种不同的纹理,每个纹理都与相同的或不同的属性映射.这种映射甚至可以动画.
Experiment! The sky's the limit!
::实验!天空是极限!