Blender 3D:第四单元:与高级教程起飞
Introduction
::引言
I worked with a group to make a small animation for class and I was responsible for the environment modeling. I really liked the results of the process I used, so I decided to share it with others. By the end of this tutorial you'll have the know-how to create your own flexible, realistic terrain utilizing multiple textures for different ground types. This tutorial assumes that you have the very basic understanding of using Blender (how to add/remove a mesh, how to change views, etc...) I use the following textures in this demo. Feel free to use them if you don't have something on hand to use.
::我和一个小组一起为课堂制作了一个小动画,我负责环境建模.我真的很喜欢我使用的过程的结果,所以我决定与其他人分享.在本教程结束时,你将有知识来创建你自己的灵活,现实地形,使用多种纹理用于不同地形类型.本教程假设你对使用Blender有非常基本的了解 (如何添加/删除网格,如何更改视图等等).我在本演示中使用以下纹理.如果你没有什么可用的东西,请随时使用它们.
NOTE:
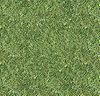
This page uses a different grass texture for licensing reasons (sorry).
::注:由于许可原因,本页面使用不同的草纹理 (抱歉).
Creating the Canvas
::画布的制作
The "canvas" that we'll use for our terrain is an evenly spaced grid of vertices. Open a new project, delete the default cube, and
add a grid mesh
. Use whatever size you want. The more vertices you have, the more detailed and realistic your landscape will appear, but don't get crazy with it since we'll apply subsurfacing at the end to smooth it out. At the same time, you do want enough vertices to prevent sharp edges, and we'll need them in the second tutorial when we cover texture stenciling. So consider how big you want your landscape and try to find a reasonable balance. I like to start with 100x100. The grid will be pretty small, so scale the entire thing up, let's say by a factor of 20. This grid will be used to build our landscape by pulling hills and mountains out of it.
::我们将使用的地形"画布"是平分的顶点网格. 打开一个新项目,删除默认立方体,并添加网格网格. 使用任何尺寸你想要的. 你有多个顶点,你的景观将会更详细和现实,但不要疯狂,因为我们将在最后应用地下表面来平滑它. 同时,你确实想要足够的顶点来防止尖端,我们将在第二个教程中需要它们,当我们涵盖纹理笔时. 所以考虑你想要你的景观有多大,并试图找到合理的平衡. 我喜欢从100x100开始. 网格将是相当小,所以把整个东西扩大,比如说是20倍. 这个网格将被用来构建我们的景观,通过把山丘和山脉拉出来.
Noob Note:
If you don't want to have to delete the default cube every time you open a new file, just delete the cube once so you have the blank window (only lamp and camera left) . Then select
File
-
Save default settings
or hit
Ctrl+U
. From now on, each new project you create will start off without the cube.
::笔记:如果您不想每次打开新文件时删除默认立方体,只需删除立方体一次,这样您就有空窗口 (只剩下灯和相机). 然后选择"文件 - 保存默认设置"或按Ctrl+U. 从现在开始,您创建的每个新项目都将在没有立方体的情况下启动.
Molding the Mountains
::塑造山脉
The key to making good mountains is using the proportional edit mode (
OKEY
) and constantly adjusting the radius of influence. If you've already gone through the
Mountains Out Of Molehills
tutorial then this section will be familiar. One major difference is that in this tutorial I recommend rotating the 3D view around so you have a good view of all three axes instead of working in the front or sides view. Using the proportional editing tool affects multiple vertices, and it helps to see what effect your changes are having as you make them.
::制作好山的关键是使用比例编辑模式 (OKEY) 并不断调整影响半径.如果你已经通过了山脉出了摩尔山教程,那么这个部分将是熟悉的.一个主要的区别在于,在这个教程中,我建议旋转3D视图,这样你就可以在前面或侧面视图中工作,而不是在所有三个轴上都能看到一个好的视图.使用比例编辑工具会影响多个顶点,它有助于看到你在做出更改时会产生什么影响.
-
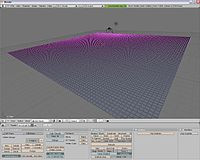
Go ahead and turn on proportional editing, either by pressing
OKEY
or clicking on the grey ring on the 3D View header. You have to be in Edit Mode to select this option. Once proportional editing is enabled, the ring will appear orange and a new drop-down menu will appear next to it with different falloff styles. Select Smooth if it is not already selected.
::继续,通过按键OK或点击3D视图头部的灰色环打开比例编辑.您必须处于编辑模式中才能选择此选项.一旦启用比例编辑,则将出现色的环,并将在其旁边显示一个新的下拉菜单,其中包含不同的落差样式.如果尚未选择,请选择平滑.
![]()
-
Select any random vertex and grab it (
GKEY
). You will see a ring around the vertex you are grabbing. This is the radius of influence, and only vertices inside this ring are affected by the transformation. If you are doing this in the orthographic view from the front, side, or top, then this will be obvious. But if you're at a view where you can see all three axes, then it may be less obvious.
::选择任意一个随机顶点并抓取它 (GKEY). 你将看到一个环绕着你抓取的顶点. 这是影响半径, 只有这个环内的顶点受到转换的影响. 如果你在正面,侧面或顶部的正写视图中这样做, 那么这将是显而易见的. 但如果你在一个可以看到所有三个轴的视图中, 那么它可能不那么明显.
-
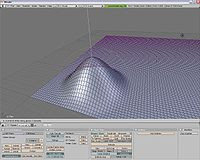
Restrict movement to the z-axis (
ZKEY
) and translate the vertex upward. Throughout this entire process you ONLY want to translate along the z-axis. If you start moving vertices in the x or y directions, things become distorted and you get some nasty creases. Play around with adjusting the size of the radius of influence (
Mouse Wheel
) to get steeper or flatter hills.
::限制运动到z轴 (ZKEY) 并将顶点翻译向上.在整个过程中,你只想沿z轴翻译.如果你开始在x或y方向移动顶点,事情会变得扭曲,你会得到一些不好看的纹.玩弄调整影响半径的大小 (鼠标轮) 以获得更的或更平的山丘.
-
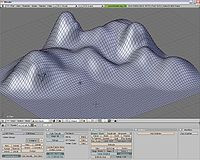
Keep repeating this process with different size radii and different heights until you have a decent mountain range, but leave an area flat. We'll be using that spot later in the second tutorial. Don't be afraid to occasionally translate some vertices down instead of up to create depressions in the hills. Remember, variety is the spice of life. Very few things in nature are naturally geometric, so mix up your hills and especially make sure they overlap. How often do you see a nice, smooth hill all by itself in nature?
::保持重复这个过程与不同的尺寸半径和不同的高度,直到你有一个体面的山脉,但留下一个平面.我们将在第二个教程中使用该点.不要害怕偶尔翻译一些顶点下而不是在山丘上创建陷.记住,多样性是生命的香料.自然界中很少有自然的几何,所以把你的山丘混合起来,特别是确保它们重叠.你在自然界中经常看到一个漂亮的,光滑的山丘.
Note:
You'll notice in my screenshot that I have reduced the size of my grid. For simplicity's sake, I didn't feel like filling an entire 100x100 grid with mountains since this can take some time.
::笔记:在我的截图中,你会注意到我已经缩小了网格的大小.为了简单,我不想用山填满一个100x100的网格,因为这可能需要一些时间.
-
Well now, that's looking pretty good! Now, there's one problem with our hills so far. They're too smooth! Let's bumpify them a little. Change the falloff type from Smooth to Random.
::现在看起来很好! 现在,我们目前的山丘有一个问题. 它们太光滑了! 让我们稍微一下. 把落类型从光滑改为随机.

-
Select a single vertex and grab it (
GKEY
). We're still working on the z-axis only, to restrict your movement with the
ZKEY
. Now when you move the vertex up and down, all vertices in the radius of influence will also move but with a random falloff instead of smoothly. It only takes a little movement to get the effect we want, so something around 0.5-1.0 is enough. Mix up moving up and down with different vertices, again to add variety to the scene.
::选择一个顶点并抓住它 (GKEY). 我们还在使用z轴,以限制你的运动. 当你向上和向下移动顶点时,影响半径中的所有顶点也会移动,但随机的落差而不是平稳. 仅需要一点点的运动才能得到我们想要的效果,所以大约0.5-1.0就足够了. 将上下移动与不同的顶点混合起来,再次增加场景的多样性. -
Once you have your landscape the way you like it, add a subsurf modifier under the Editing tab (
F9
) and select Catmull-Clark. This will smooth out your terrain a little so that it's not too rough. Given the number of vertices you already have, it's not necessary to have a higher render value than 1 unless you just REALLY want it to be smooth, but I don't recommend it. Land is supposed to be bumpy and rocky, we just don't want sharp edges.
::一旦你有你喜欢的方式,在编辑选项卡 (F9) 下添加一个底面修改器,并选择Catmull-Clark. 这将使你的地形稍微平滑,这样它就不会太粗. 考虑到你已经有了顶点的数量,没有必要有一个比1高的染值,除非你真的想让它平滑,但我不推它. 地面应该是凸和岩石,我们只是不想要尖的边缘.
Noob note:
If you're making mountains using Random Falloff and the peaks stick up too much: in Edit mode, select the points in the area around the peak using circle select, then press
WKEY
and click 'Smooth' until you're satisfied (or, in the Editing tab (
F9
), click the 'Smooth' button).
::笔记:如果您使用随机落差制作山峰,而山峰太立:在编辑模式下,使用圆形选择选择,然后按WKEY,然后点击'Smooth'直到您满意 (或者在编辑选项卡 (F9) 中,点击'Smooth'按).
Useful Tip
Proportional editing can be used on multiple vertices simultaneously. This is especially useful if you're trying to create a cliff face or a river bed. Use the box tool (
BKEY
) to select a group of vertices and then translate them. Keep in mind that the size of the radius of influence determines how many vertices around
EACH VERTEX
will be influenced. So suppose you have a 5 vertex radius, that means that 5 vertices all the way around your selected region will be influenced.
::有用提示 比例编辑可以同时在多个顶点上使用.如果您试图创建悬崖面或河床,这尤其有用.使用框工具 (BKEY) 选择一组顶点,然后翻译它们.请记住,影响半径的大小决定每个顶点周围的顶点将受到影响.假设您有5个顶点半径,这意味着您选择的区域周围的5个顶点将受到影响.
Texturing the Terrain
::土地的结构
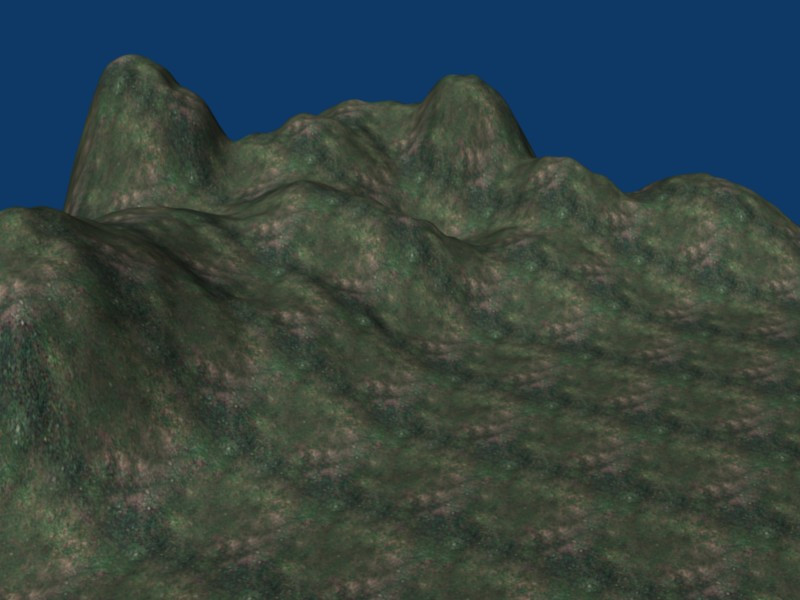
Alright! We've got some pretty nice hills now! But there's still a few problems. Hills shouldn't be white, and hills shouldn't be SHINY! Let's dress them up a little, shall we?
::现在我们有了一些很漂亮的山丘!但仍然有一些问题.山丘不应该是白色的,山丘不应该是闪亮的!让我们把它们装饰一下吧?
-
With your landscape selected, go to the Shading Panel (
F5
) and add a new material.
::选择了你的景观, 进入影子面板 (F5) 并添加新材料. -
Under the Shaders tab, drop the Specular value to 0.
::在"影像"选项卡下,将"镜像"值降至0. -
Go to the Texture tab (
F6
) and add a new texture.
::进入"纹理"选项卡 (F6) 并添加一个新的纹理. -
In the Texture Type drop down menu, select Image.
::在"纹理类型"下拉菜单中,选择"图像". -
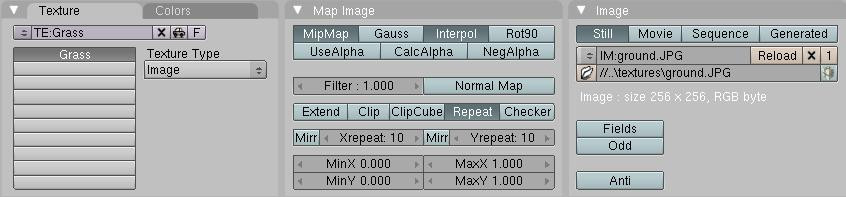
Two new tabs will appear. In the Image tab, click Load and load a texture from file.
::在图像选项卡中,单击"加载"并从文件加载纹理. -
In the Map Image tab, increase the Xrepeat and Yrepeat. Depending on the size of your terrain and the image that you use (please use something that tiles!), these values will vary. I've used 10 for each in this tutorial.
::在地图图像选项卡中,增加Xrepeat和Yrepeat. 取决于您的地形大小和您使用的图像 (请使用!) 这些值将有所不同. 我在本教程中使用了10个值.
(
Noob note:
Render the scene (F12) to see the applied texture) (
Noob note:
A quicker way to do this is by using the render preview tool, 3d view window - render preview, View--> Render Preview or press
SHIFT
-->
PKEY
) (
Noob note:
you may also select shaded in the Viewport Shading menu next to where you select object mode or edit mode to see your texture on your mountains without rendering, however it does slow your computer down some which could make editing frustrating. So only do this if you want to see what your textures look like, then switch back to solid for more editing.)
:Noob注意: 染场景 (F12) 看到应用的纹理) (Noob注意: 快速的方式是使用染预览工具, 3D 视图窗口 - 染预览, 视图 -> 染预览或按 SHIFT -> PKEY) (Noob注意: 你也可以选择在视图窗口的染菜单中选择遮的位置, 选择对象模式或编辑模式以在没有染的情况下看到你的山脉上的纹理, 然而它会使你的计算机慢一些, 这可能会让编辑令人丧. 所以只要你想看到你的纹理是什么样子, 然后再转回固体进行更多的编辑.
-
Finally, let's do something about the lighting. Go to Object Mode (
TAB
) if you're not already there and select the lamp. Choose the Shading Panel (
F5
) and then click the icon that looks like a light bulb to display the Lamp buttons. Change the lamp to a sun and up the energy to 1.5. You may also need to increase the distance if your terrain is large, or rotate it around if you don't like where it's pointing. The dashed line coming out of the light is the direction. Play around with different angles and energy values for the sun to get different times of day in your scene.
::最后,让我们来看看照明.如果您还没有进入到该位置,请进入对象模式 (TAB) 并选择灯.选择遮阳面板 (F5),然后点击像灯泡一样的图标以显示灯泡按.将灯光更换为太阳,并将能量提高到1.5.如果您的地形很大,您可能需要增加距离,或者如果您不喜欢它指向的方向,则需要旋转它.光线的点线是方向.在您的场景中,使用不同的角度和能量值来让太阳获得不同的时间.
And there you have it! Your landscape is now textured with some nice grass to make it look a little more realistic. Play around with hill sizes and roughness if you're not satisfied with your landscape, but try not to be too picky. Nature shouldn't look too sculpted. Remember, you won't notice a change in texture unless you render your image.
::现在,你的景观已经有了一些漂亮的草,使它看起来更真实.如果你不满意你的景观,你可以玩弄山丘的大小和粗度,但不要太挑.自然不应该看起来太雕刻.记住,除非你染你的图像,否则你不会注意到纹理的变化.
NOTE
If you went with the suggested 100x100 grid, the rendering process could definitely take some time depending on your system, especially if you have ray tracing and shadows enabled. To boost the rendering speed, go to the Scene panel (
F10
) and under Rendering, disable the buttons that say
Shadow
and
Ray
. Also note that because we've created some hills, your camera may now be under the terrain. Switch to the camera view (
NUM0
) to see what your camera sees and move it if you need to.
::注意:如果您使用建议的100x100网格,染过程可能会花费一些时间,取决于您的系统,特别是如果您已启用射线跟踪和影子.为了提高染速度,请进入场景面板 (F10) 和染下,禁用说影子和射线的按.还请注意,由于我们已经创建了一些山丘,您的摄像头现在可能在地形下.切换到摄像头视图 (NUM0) 查看您的摄像头看到的内容,并在需要时移动它.
Join us next time as we explore how to make the landscape look even better using texture stenciling!
::让我们一起探索如何使用纹理版画使景观看起来更美好!
Reader Contributions
::读者贡献
I'm mainly doing this so the hills look better and more realistic. Reading this will consume more time than doing it. I'm making everything clear for beginners. It will only take about 8 minutes more for your hills to end up like this:
::我主要是这样做,使山丘看起来更好,更真实. 阅读这将消耗更多的时间比做它. 我让一切清楚的初学者. 它只需要大约8分钟的山丘结束这样:
-
First step to achieve it is to switch from the default lamp to Sun.
-
You do this by clicking on the default and go to the shading tab (F5)
::你通过点击默认进行此操作,然后进入遮光选项卡 (F5) -
Click on
Sun
.
::按一下"太阳" -
Go to
rotate manipulator mode
with Ctrl Alt R.
::用Ctrl Alt R转换操作模式 -
Rotate the sun until the dotted line is in your desired position. That is where the main energy will go. It will differ if you want to achieve the different time of day. You can make the distance greater or less with
dist.
. I kept mine at default 30.
::旋转太阳直到点线处于你想要的位置. 这就是主要能量的方向. 如果你想实现不同时间,它将会有所不同. 你可以用dist.使距离更大或更小. 我把我的默认设置为30.
::实现它的第一步是从默认灯切换到太阳.你这样做是通过点击默认,然后进入遮阳选项卡 (F5) 点击太阳.转向操纵模式,使用Ctrl Alt R.旋转太阳直到点线处于你想要的位置.这就是主要能量将去的地方.如果您想实现不同时间,它将不同.你可以使距离更大或更小.我把我的默认设置为30. -
You do this by clicking on the default and go to the shading tab (F5)
-
Now let's make more realistic, paler sunlight.
-
In the RGB slider, set R for 1, G for 1, and B for .848.
::在RGB滑块中,设置R为1,G为1,B为0.848. -
Set energy for 1.63. This will all differ for different times of day, so set your east and west in your head, and the later into the day, the further the sun to the west and the more orange. For midday, keep the energy on 1.63 and put the sun right above your hills. I set mine for earlier in the morning.
::设置能量为1.63 这将会因不同时间而不同,所以在头脑中设置你的东和西,在晚些时候,太阳越向西,越色. 午间,保持能量在1.63 并且把太阳放在你的山上. 我设置我的早晨.
::现在让我们更现实,更淡淡的阳光. 在RGB滑块中,设置R为1,G为1,B为0.848. 设置能量为1.63. 这将会因不同时间而不同,所以在头脑中设置你的东和西,在日后,太阳越远到西方,越色. 中午,保持能量在1.63并把太阳放在你的山上. 我设置我的早上. -
In the RGB slider, set R for 1, G for 1, and B for .848.
-
Now click on the picture of a globe to change the background.
::现在点击地球图片, 改变背景. -
Click on the
blend
button for a more realistic looking sky. On the left of the World toolbar, that will be the color of lower down in the sky and the right sliders will be the color of the top of the sky. Naturally, the top should be darker blue than the bottom.
-
It will differ for different times of the day. So you might want something different from this. But I set up mine for the morning using the settings below:
-
The left HoRGB sliders to 0.50, 0.68, and 1.
::现在我们可以看到一个小的图像, -
The right ZeRGB sliders to 0.11, 0.25, and 0.66.
::现在我们可以看到右边的ZerGB滑块是0.11,0.25和0.66.
::对于不同时间的不同,它会有所不同.所以你可能想要不同的东西.但是我设置了我的早晨使用下面的设置:左侧的HoRGB滑块到0.50,0.68,和1.右侧的ZeRGB滑块到0.11,0.25,和0.66. -
The left HoRGB sliders to 0.50, 0.68, and 1.
::按一下混合按以获得更真实的天空. 在世界工具的左侧,这将是天空中下方的颜色,右侧滑块将是天空顶部的颜色. 当然,顶部应该是深蓝色的. 它将在一天的不同时间不同. 所以你可能想要不同的东西. 但是我为早晨设置了下面的设置:左侧的HoRGB滑块到0.50,0.68和1. 右侧的ZeRGB滑块到0.11,0.25和0.66. -
It will differ for different times of the day. So you might want something different from this. But I set up mine for the morning using the settings below:
-
Now for the texture.
This
won't differ for the times of day, but it will differ for what type of landscape you want.
::现在来看看纹理. 这不会因时间而异, 但它会因你想要的景观而异. -
Download a nice texture from google or an artists website.
-
Go back to Blender, go to Texture buttons (F6)
::回到混合器,去纹理按 (F6) -
Click add new
::点击新增 -
Select
image
for the texture type
::选择图像的纹理类型 -
Go to the
image
toolbar, and upload the texture. Blender will only allow you to upload from the Blender documents, unless if you click on the up and down arrows on the top left of the screen and choose the place where you saved the texture (or picture).
::进入图像工具,并上传纹理. 除非您点击屏幕左上方的上下箭头并选择保存纹理 (或图片) 的位置,否则Blender只允许您从Blender文档上传. -
After uploading, the X and Y repeats should be smallish, like 6x6, so the changes aren't noticeable. It will look ugly in the preview, but it will look nice after its wrapped.
::图像在上传后,X和Y重复应该很小,像6x6,所以变化不会被注意到. 在预览中看起来很丑,但在包装后看起来很好.
::从google或艺术家网站下载一个漂亮的纹理.回到Blender,进入纹理按 (F6) 点击添加新图片选择纹理类型进入图片工具,并上传纹理.Blender只允许您从Blender文件上传,除非您点击屏幕左上方的上下箭头并选择保存纹理 (或图片) 的位置.上传后,X和Y重复应该很小,例如6x6,这样变化就不会被注意到.在预览中看起来很丑,但在包装后看起来很好. -
Go back to Blender, go to Texture buttons (F6)
-
Render, and 1 minute later, voila! Those are nice looking hills!
::,一分钟后, !这些看起来很漂亮的山丘! -
Now boast in front of your friends!
::现在在你的朋友面前吹嘘!
Noob Note:
You need to have your landscape selected if you are in object mode to change the texture, otherwise it will change the texture of the world.
::如果您在对象模式下, 您需要选择您的景观来改变纹理,
Reader Contributions 2
::读者贡献 2
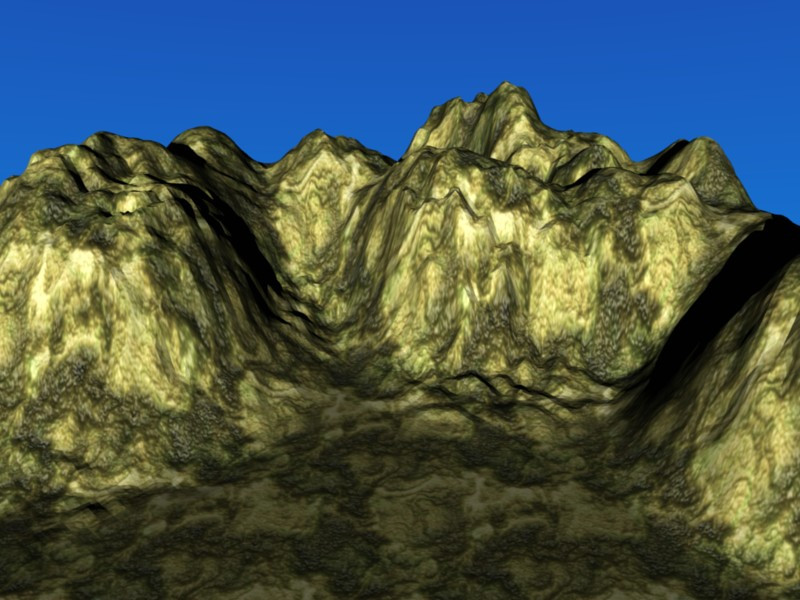
You can have an even better result if you use the texture to "bumpmap" the mountains.
::如果使用这种纹理来"撞击"山脉,
-
Press
F5
until you are into Material Buttons
::按F5直到你进入材料按 -
Select the
Map to
tab
::选择该页面的地图 -
Click on
Nor
once (the
Col
option must stay selected as well)
::点击"没有" (必须保持选择"col"选项) -
Slide the
Nor
slider to 5 or more (might differ depending on texture size and repeat options)
::滑块 Nor 滑块移动到 5 或更多 (可能因纹理大小和重复选项而不同) -
Render with
F12
::使用F12进行染
Reader Contributions 3
::读者贡献 3
Alternately from making the hill model manually, you can use a program like
L3DT
. It uses various algorithms to generate very detailed and realistic terrain heightmaps. It also lets you edit them in a more intuitive way than Blender does. After you have L3DT make your height map, you can export it as a .x file, which you can import into Blender.
Noob Note:
That can be done by going into File->Import->DirectX(.x). And there you have a very realistic landscape mesh with a lot less work. (Noob Question: I want to use Unity3d game engine to create a game, but i want to use blender to create landscapes. To create massive world landscapes, does anybody have any tips? as Unity limits any mesh to 65000 vertices, which i've already passed with my method without doing half the map.)
::另外,你可以使用L3DT这样的程序来手动制作山坡模型.它使用各种算法来生成非常详细和现实的地形高度图.它还让你以比Blender更直观的方式编辑它们.你让L3DT制作你的高度图后,你可以将其导出为一个.x文件,然后导入到Blender. 诺布注意:可以通过进入File->Import->DirectX (). x) 进行.在那里你有一个非常现实的景观网格,工作要少得多. 问题 (诺布:我想使用Unity3d游戏引擎创建游戏,但我想使用Blender创建景观.创建巨大的世界景观,有没有人有任何建议?作为Unity网格的任何限制,到65,000个顶点,我已经通过了我的地图方法
-If you are using unity 3d just use it for the terrain. Download the terrain toolbox and just use .raw images. Or simply generate from there and save. 65,000 verts is plenty btw. If you insist on using blender for the terrain then model a high poly terrain fist consisting of around 1 mil+ verts. bake the normal map and ambient occlusion decimate your terrain to around 10k or w/e looks good for the game. Then bam you got 10k terrain that looks like 1mil. But to be honest blender terrain texturing is a pain compared to unity. Anyhow hope that helps.
::-如果你使用Unity 3D,只需使用地形.下载地形工具箱,只需使用.raw图像.或者简单地从那里生成并保存. 65,000 verts是很多.如果你坚持使用混合器用于地形,那么模型一个高多地形拳头,包括大约1 mil+ verts.烤正常地图和环境封闭,将你的地形减少到大约10k或w/e看起来很好.然后你得到了10k地形看起来像1mil.但老实说,混合器地形纹理与Unity相比是个痛苦.无论如何,希望这有所帮助.