Blender 3D:第四单元:与高级教程起飞
In this tutorial, I will show you how to export your beautiful terrain to a heightmap that can be used in most 3D graphics engines. The benefit to doing this as opposed to just exporting your mesh is that many engines have a special process for dealing with terrains as opposed to regular meshes where it divides the terrain up into different sections so that it can subdivide regions closer to the camera more for greater detail, and also cull (not render) regions outside the camera's field of view, saving precious processing time. This structure is called an
oct tree
and is a highly optimized way to render large meshes such as terrains.
::在本教程中,我将向您展示如何将您的美丽地形导出到一个可以在大多数3D图形引擎中使用的高度图.这样做的好处是,许多引擎有特殊的处理地形的过程,而不是普通的网格,它将地形分成不同的部分,以便可以更详细地分别区域接近相机,并除 (不染) 区域外的相机视野,节省宝贵的处理时间.这种结构被称为八分树,是染大型网格的高度优化的方法,例如地形.
Before I begin, I must give credit to the
Creating a Heightmap from a Plane
tutorial on the
Blender wiki
. This is how I learned to do this trick, and most of what I will cover came from this tutorial. I'm simply including it here with the other landscaping tutorials I've written for convenience.
::在我开始之前,我必须赞扬Blender wiki上的创建平面教程的高度图. 这就是我学会了这个技巧的方法,我将涵盖的大部分内容来自这个教程. 我只是将它与我写的其他景观教程一起包括在此.
A Word About Heightmaps
::关于高度图的几个字
I will briefly cover what a heightmap is and how it's useful for those who may not know. If you are familiar with heightmaps, you can skip ahead to the next section.
::对于那些可能不知道的人来说,它是什么,以及如何有用. 如果你对高度图有所了解,你可以跳到下一节.

A heightmap is a grayscale image that uses various shades of gray to represent different elevations across a map. Since the images are 8-bit (with the exception of some RAW formats that are 16-bit), you have 256 different shades of gray, ranging from pure black (0) to pure white (255). Black represents the lowest elevation on the map, while white represents the highest. Many 3D graphics engines already have functions to read in a heightmap and generate terrain from it. The way it does this is it creates a grid of vertices (like we are going to do in Blender in just a moment), and uses the heightmap to determine the elevation of each point on the grid. The more intense the pixel color (the closer it is to white), the higher the elevation of that vertex. In most cases, if the resolution of the heightmap is smaller than the resolution of the terrain, the engine will interpolate the vertices in between those set by the heightmap. For example, if your heightmap is 256x256 and your terrain is 1024x1024, your heightmap will determine the elevation of every fourth vertex, and the three in between will be interpolated.
::高度图是一种灰度图像,它使用各种灰色的色调来表示地图上的不同高度.由于图像是8位 (除了一些16位的RAW格式),你有256种不同的灰色,从纯黑 (0) 到纯白 (255).黑色代表地图上的最低高度,而白色代表最高.许多3D图形引擎已经具有在高度图中读取并从中生成地形的功能.它这样做的方式是它创建一个顶点网格 (如我们将在Blender中做的一下),并使用高度图来确定网格上的每个点的高度.图像像的像素颜色越强烈 (它越接近白色),那么该顶点的高度就越高.在大多数情况下,如果高度的分辨率小于地形的分辨率,引擎将在地图中的
Note that these values do not represent the absolute height of any given pixel, but rather the height relative to the rest of the map. That is, your heightmap does not represent a landscape with altitudes ranging from 0 to 256. When importing a heightmap, you can specify the minimum and maximum altitudes for the map, and the whole thing gets scaled. For example, suppose you decide the minimum is 1000 feet, and the maximum is 5000 feet. When the terrain is rendered, black pixels will represent 1000, white pixels will represent 5000, and a pixel that is exactly in between black and white (128) will represent 3000 feet (half of the sum of min and max). This makes heightmaps relatively flexible.
::注意这些值并不代表任何给定的像素的绝对高度,而是与地图其余部分相对的高度.也就是说,你的高度图并不代表一个高度从0到256的景观.当导入高度图时,你可以指定地图的最小和最大高度,整个东西就会缩放.例如,假设你决定最小为1000英尺,最大为5000英尺.当地形呈现时,黑色像素将代表1000英尺,白色像素将代表5000英尺,而正好在黑色和白色之间 (128) 的像素将代表3000英尺 (min和max的总和的一半).这使得高度图相对灵活.
Unfortunately, as you may have already noticed, there is a limitation of using heightmaps. Since you only have 256 shades of gray, you only have 256 possible elevations. This causes a problem. No matter how precise your vertices may be in the mesh that you model, no matter how smooth you may have it looking, each point will get rounded off to an integer value between 0 and 255. When used to render a terrain, this can cause a "stair step" effect as the terrain goes from one discrete elevation to the next instead of making a smooth transition. But there are ways to avoid this, which I will cover later.
::不幸的是,正如你可能已经注意到的,使用高度图有局限性.因为你只有256种灰色的阴影,你只有256种可能的高度.这会导致一个问题.无论你在模拟的网格中,你的顶点有多精确,无论你看起来多么光滑,每个点都会被圆到0到255之间的整数值.当用于染地形时,这会导致"梯级"效应,因为地形从一个离散的高度转移到下一个而不是顺利过渡.但是有办法避免这一点,我会稍后讨论.
I apologize if you're scratching your head right now saying "Huh?" For a further explanation and example, check the Wikipedia page on
heightmaps
.
::对于进一步的解释和例子,请查看维基百科的高度图页面.
Creating the Material
::创作材料
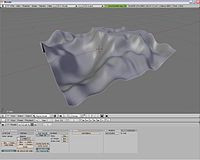
To begin this tutorial, I will assume that you already have a landscape that you want to create a heightmap for. If not, read my first tutorial,
Landscape Modeling I: Basic Terrain
, to quickly create something.
WORD OF CAUTION
!!! If you've already created a landscape, try to remember the exact size of the plane that you used. If you're about to make one, it's okay to scale the plane to have a larger surface to work with, but REMEMBER how much you scale it by. This will make things easier later. I recommend just working with the default 2x2 plane or grid and zooming in on it. You may also want to backup your scene since we'll be changing a few things
::为了开始这个教程,我会假设你已经有一个你想要创建一个高度图的景观.如果没有,请阅读我的第一个教程,景观建模I:基本地形,快速创建一些东西. 警告!!!如果你已经创建了一个景观,试着记住你使用的平面的确切尺寸.如果你要做一个,可以缩放平面以获得更大的表面,但记住你缩放多少. 这将使事情更容易. 我建议只使用默认的2x2平面或网格并放大它. 你也可能想备份你的场景,因为我们将改变一些事情
To create the material we need, do the following steps:
::为了创建所需的材料,请执行以下步骤:
-
Remove any existing materials that may be applied to the terrain.
::移除任何可能被应用在地形上的现有材料.
Note
: to remove a material, I think you need to go to the links and pipeline window in the shader section and click the little "X" underneath the words "link to Object"
::删除一个材料, 我认为你需要去链接和管道窗口在遮光部分, 并点击字眼"链接到对象"下面的小"X"
-
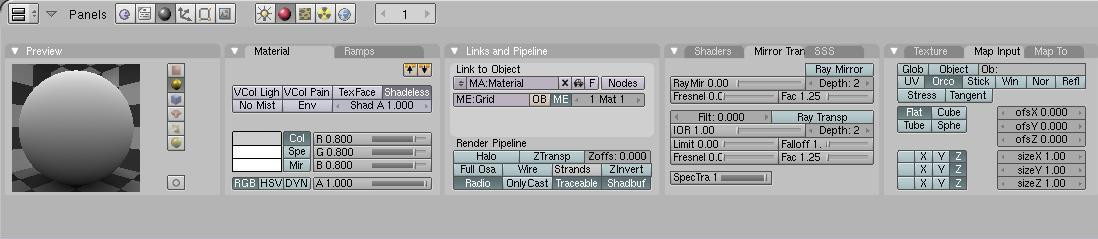
Add a new material in the Shading tab (
F5
).
::在"影子"选项卡 (F5) 中添加新材料. -
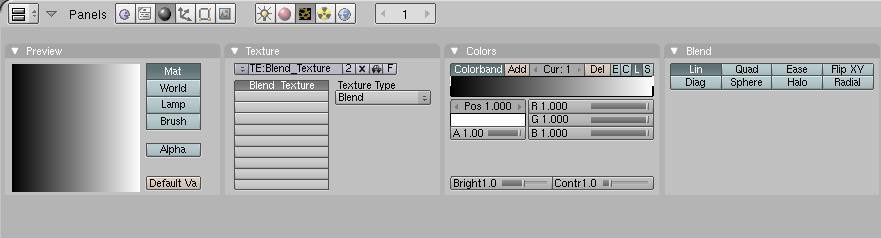
Go to the Textures tab (
F6
) and add a new texture. This should be the only texture on your material.
::进入"纹理"选项卡 (F6) 并添加一个新的纹理. 这应该是您的材料上的唯一纹理. -
From the Texture Type drop down menu, select Blend.
::在"纹理类型"下拉菜单中,选择"混合". -
In the same window, find the Colors tab and select Colorband. This will let us define the blend pattern, which by default fades from black with full transparency to a solid cyan. Why cyan? I have no idea. It's an odd default.
::在同一个窗口中,找到"颜色"选项卡,选择"色带". 这将让我们定义混合模式,默认从黑色完全透明变为色. 为什么色? 我不知道. 这是一个奇怪的默认. -
Select the black color by clicking on the left side of the colorband. You should see a little black and white bar selected.
::选择黑色的颜色,点击左侧的色带. 你应该看到一个小黑白条选择. -
Increase the Alpha all the way up to 1 by adjusting the slider labeled "A".
::通过调整标有"A"的滑块, 将阿尔法增加到1. -
Select the cyan color and change this to a solid white.
::选择蓝色,然后将其更改为纯白色. -
What you have now should look like my colorband below.
::现在的你应该看起来像我下面的彩色带.
-
Return to the Materials tab (the red ball icon next to the cheese looking icon).
::回到"材料"选项卡 (在奶酪图标旁边的红色球图标). -
In the Material pane, select the Shadeless option to disable lighting on the material.
::在"材料"窗格中,选择"无阴影"选项以禁用材料上的照明. -
To the right, find the pane labeled Map Input. In the bottom of this pane is a grid that by default reads:
::在右边,找到标有"地图输入"的窗格. 在这个窗格的底部有一个网格,默认读数是:
X
YZ
X
Y
Z
XY
Z
::没有任何的
-
Set all three rows to
Z
so that the texture will map entirely to the Z coordinate.
::设置所有三行为Z,使得纹理完全映射到Z坐标. -
In the preview window to the left, if you select the sphere or cube you should see that it goes from black on the bottom to white on the top. That's the effect we want for the terrain. Remember, in a heightmap, black represents the lowest point and white the highest.
::在左边的预览窗口中,如果您选择球体或立方体,您应该看到它从底部的黑色变为顶部的白色. 这就是我们想要的地形效果. 请记住,在高度图中,黑色代表最低点,白色代表最高点.
-
Finally, switch back to the Editing tab (
F9
) and click the Set Smooth button to enable
Gouraud shading
so that everything appears smooth.
::最后,回到编辑选项卡 (F9) 按一下"设置光滑"按,启用Gouraud影像,使所有内容看起来光滑.
Setting up the Camera
::设置摄像头
That's all we need to do for the terrain itself. Now what we're going to do is setup the camera in such a way that when we render the scene we'll get an orthographic projection straight down on the terrain so that we can save it as our heightmap.
::现在我们要做的是设置摄像头, 当我们染场景时, 我们将得到一个直线投影到地面,
-
If you still have any lights or cameras in the scene, delete them.
::如果您还在现场有任何灯光或摄像头,请删除它们. -
Switch to the top view (
NUM7
) and place the 3D cursor at the origin (0, 0, 0) by left clicking near the origin, hitting
SHIFT+SKEY
and selecting
Cursor to Grid
. (An easier way is: hitting 'SHIFT+SKEY' and selecting 'Cursor to Center')
::切换到顶部视图 (NUM7) 并将3D光标放在原点 (0, 0, 0) 附近,按左键点击原点,按 SHIFT+SKEY,选择光标到网格. (更简单的方式是:按'SHIFT+SKEY'并选择'光标到中心') -
Add a new camera,
Space->Add->Camera
. This will add a new camera to the scene that is looking straight down.
::添加一个新的摄像头, 空间->添加->摄像头. 这将添加一个新的摄像头, 直接向下看.
-
Switch to a side view (
NUM1
or
NUM3
) and move the camera up the Z axis so that it is above the highest point in your terrain. Even though the view is going to be orthographic, and therefore distance doesn't matter, the entire terrain still needs to be in front of the camera.
::切换到侧视图 (NUM1或NUM3),并将摄像头向上移动到Z轴上,使其位于地形中最高点以上.即使视图是正写的,因此距离并不重要,整个地形仍然需要在摄像头前面. -
Now, with the camera selected, go to the Editing tab (
F9
) and select the "Orthographic" button. This will change the camera to an orthographic projection which basically ignores the z-coordinate for all vertices (except for determining which pixels should be in front of others).
::现在,选择了相机,进入编辑选项卡 (F9) 并选择"正写"按. 这将将把相机转换为正写投影,基本上忽略所有顶点的z坐标 (除了确定哪些像素应该在其他顶点前). -
Just above the orthographic button is a value labeled "Scale". Remember earlier when I told you to remember how big your terrain is? This is why.
::字形按的上面有一个值标有"Scale". 记得我之前告诉你记住你的地形有多大? -
Change the Scale of the lens (default: 6) to match the size of your terrain. If you left the plane the default size, this should be 2. If you scaled the plane up by a factor of 20, as suggested in the "Landscape Modeling I: Basic Terrain" tutorial, this should be 40 (the plane is initially 2 units square).
::改变镜头的尺度 (默认:6),以匹配你的地形大小.如果你把平面留在默认大小,这应该是2.如果你把平面缩小了20的因子,如"景观建模I:基本地形"教程所建议的那样,这应该是40 (平面最初是2单位平方). -
Now go to the scene tab (
F10
) and under Format, change the SizeX and SizeY to be the size you want your heightmap to be. For most graphics engines, this is required to be either a power of 2 (2^n) or one more than a power of 2 (2^n+1). So try something like 256 (or 257 if you need it to be 2^n+1).
::现在进入场景选项卡 (F10) 在格式下,将SizeX和SizeY更改为您想要的高度图的尺寸.对于大多数图形引擎,这需要是2的2次方 (2^n) 或一个以上的2的2次方 (2^n+1).所以尝试像256 (或257如果你需要它是2^n+1).
-
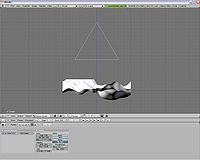
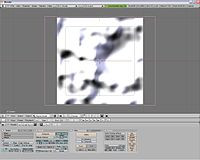
Now, if you switch to the camera view (
NUM0
) you should see a "flat" square that completely fills the dotted box which represents the camera's field of view.
::现在,如果您切换到相机视图 (NUM0), 您应该看到一个"平面"方形, 完全填充了点框,
-
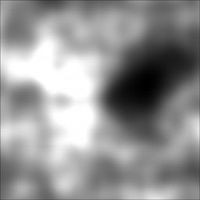
Render the scene (
F12
). You should be looking at your heightmap. Hit
F3
to save the rendered image and you're good to go!
::染场景 (F12). 你应该看你的高度图. 按F3保存染图像,你就可以了!
Since this image has no color, and some engines require that your heighmap be a grayscale image (only one color channel instead of three), select the BW button in the Format pane before rendering. This will render it as a grayscale image instead of a color image.
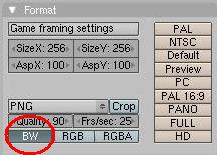
::由于此图像没有颜色,并且一些引擎要求您的高度图像是灰度图像 (仅有一个颜色通道而不是三个),在染前选择格式窗格中的BW按. 这将使其作为灰度图像而不是彩色图像.
Avoid Stair-Stepping
::避免踩楼梯
As mentioned earlier, exporting the heightmap as an 8-bit image (Blender doesn't support any 16-bit formats that I'm aware of) has the drawback that you only have 256 discrete height values which can cause a stair-step effect when the terrain is subdivided. Ideally, you could use an application that can export the image in a 16-bit raw format, such as Terragen. But this is a Blender tutorial, so we'll not go into that. =P
::像之前提到的,将高度图像导出为8位图像 (Blender不支持任何16位格式,我知道) 有缺点,你只有256个离散的高度值,当地形被分成部分时,可能会导致梯级效应.理想情况下,你可以使用一个可以导出16位原始格式的图像的应用程序,例如Terragen.但这是一个Blender教程,所以我们不会讨论这个问题. =P
Reducing the resolution
::减少分辨率
One way you can "smooth" out the rendered terrain is to actually reduce the resolution of the heightmap. This may sound counter intuitive, but bear with me. Suppose you have a heightmap that is a simple blend from black to white going from left to right. If your heightmap is 1024x1024, you will get 4 columns of each height since you only have 256 different values. In other words, your grayscale will look something like this:
::您可以"平滑"染地形的一种方法是实际减少高度图的分辨率.这可能听起来反直观,但请耐心听.假设您有一个从左到右从黑到白的简单混合的高度图.如果您的高度图是1024x1024,您将得到每个高度的4个列,因为您只有256个不同的值.换句话说,您的灰度将看起来像这样:
00001111222233334444...
00001111222233334444...
00001111222233334444...
00001111222233334444...
00001111222233334444...
00001111222233334444...
If you try to render terrain from this, you'll get 4 points with 0 altitude, 4 with 1, 4 with 2, and so on, creating the stair-step effect.
::如果试图从这里染地形, 您将得到4个点, 高度为0,4个点, 1,4个点, 2个点, 如此一来, 产生阶梯效应.
Now suppose you make the same heightmap, but reduce its size to 256x256. Now you'll have 1 column for each height, and your grayscale will look something like this:
::现在假设你做同样的高度图, 但减少其大小到256x256. 现在你将有一个列每一个高度, 和你的灰度将看起来像这样:
012345678...
012345678...
012345678...
012345678...
You may be thinking, "But then my terrain will be smaller, or less detailed." But it turns out the opposite is actually true. Consider applying the above heightmap to a terrain that is 1024x1024. The values from your heightmap will be applied to every 4th vertex, and the ones in between will be interpolated. So instead of having something like:
::你可能会想:"但是我的地形会更小,或者更少的细节. "但事实恰恰相反. 考虑将上面的高度图应用于1024x1024的地形. 您的高度图中的值将应用于每4个顶点,中间的值将被插入. 所以,而不是像这样:
0.0 0.0 0.0 0.0 1.0 1.0 1.0 1.0 2.0
which is what you would get with the 1024x1024 heightmap, you'll actually get something like this:
::这就是你用1024x1024的高度图得到的,你实际上会得到这样的东西:
0.0 0.25 0.5 0.75 1.0 1.25 1.5 1.75 2.0
Where the integers are the values from your heightmap and the fractions are interpolated values. This is assuming that whatever engine you are using will interpolate the values between heights read in from the heightmap.
::整数是从你的高度图中的值, 分数是插入值. 这假设你使用的任何引擎都会插入从高度图读取的高度之间的值.
At the present time, this is the only method I have verified that helps reduce the effects of stair-stepping. As I try different techniques I will update this page with them. For example, I know that Adobe Photoshop can export images in 16-bit raw formats, but I haven't tried it yet so I don't want to suggest it as a solution.
::目前,这是我验证的唯一一种方法,有助于减少楼梯的作用.当我尝试不同的技术时,我将与他们更新此页面.例如,我知道Adobe Photoshop可以以16位原始格式导出图像,但我还没有尝试过,所以我不想建议它作为解决方案.