Blender 3D:第四单元:与高级教程起飞
Compositing
is the combination of multiple sources of visual input into a single, final image. This is common functionality in expensive, commercial video editors. Some of these (such as Adobe After Effects) use a layer-based compositing engine. Others (such as Apple Shake, The Foundry's Nuke, and eyeon fusion) use a more powerful node-based compositing engine. Blender features a very advanced and powerful compositing engine through the use of the Nodes Editor window. Although the challenge of learning to use nodes may seem intimidating, it can be very rewarding because of the professional-looking final products that can be easily produced.
::构成是将多个视觉输入源组合成一个单一的最终图像.这是昂贵的商业视频编辑器中常见的功能.其中一些 (如Adobe After Effects) 使用基于层的构成引擎. 其他 (如Apple Shake,The Foundry's Nuke和eyeon fusion) 使用更强大的基于节点的构成引擎. Blender通过使用节点编辑器窗口提供了一个非常先进和强大的构成引擎. 虽然学习使用节点的挑战可能看起来很吓人,但由于可以轻松地制作出专业外观的最终产品,它可以非常有价值.
Compositing Example
::复合的例子
In this tutorial, we will see how compositing, combined with
render layers
, can produce some effects that are difficult or impossible to achieve just by straight rendering of a 3D model.
::在本教程中,我们将看到如何将组合与染层结合起来,
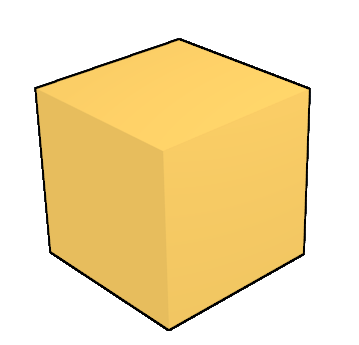
Start with a new Blender document. For a change, let’s use the default cube. Assign it a new material. Keep all the settings at default, but in the Shading panel, set the Emit value to 1.0 and give it an interesting diffuse colour.
::首先使用一个新的Blender文档. 作为改变,让我们使用默认的立方体. 赋予它一个新的材料. 保持所有设置默认,但在阴影面板中,将发射值设置为1.0并赋予它一个有趣的分散色.
Go to the Render context
![]() , look for the Post Processing panel, and check the “Edge” box. This will draw a black outline around all objects. If you hit F12 to render right now, you should see something like this:
, look for the Post Processing panel, and check the “Edge” box. This will draw a black outline around all objects. If you hit F12 to render right now, you should see something like this:
::进入染上下文,查找后处理面板,并勾选"边缘"框. 这将在所有对象周围绘制一个黑色轮. 如果您现在按F12进行染,您应该看到这样的东西:
So far, not very exciting. Now go to the Render Layers context
![]() . You should see there is already an initial default layer called “RenderLayer”. If you look in its Layer panel, you should see checkboxes indicating all the passes of the rendering process to include in this layer. Look for the “Edge” checkbox, and uncheck that. Now click the + icon next to the list of layers, to add a new layer. Look in its Layer panel, make sure “Edge” is checked, and
un
check all the other checkboxes in the “Include:” section.
. You should see there is already an initial default layer called “RenderLayer”. If you look in its Layer panel, you should see checkboxes indicating all the passes of the rendering process to include in this layer. Look for the “Edge” checkbox, and uncheck that. Now click the + icon next to the list of layers, to add a new layer. Look in its Layer panel, make sure “Edge” is checked, and
un
check all the other checkboxes in the “Include:” section.
::现在进入染层的上下文. 你应该看到已经有一个初始的默认层叫做RenderLayer. 如果你看它的Layer面板,你应该看到检查框,显示染过程的所有通道将包括在这个层. 寻找边的检查框,并取消选项. 现在点击层列表旁边的+图标,添加一个新的层. 看它的Layer面板,确保边被勾选,并取消选项所有其他检查框在Include:部分.
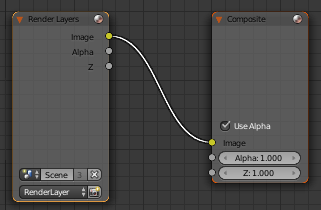
Now open up a Node Editor window, and look for the three icons to the right of the menus, showing what kind of nodes to edit:
![]() ; click on the middle one (if it’s not already selected) to enable compositing nodes. Now check the “Use Nodes” box to the right of it. You should now see the initial default node setup, with a single Render Layers node feeding the initial default render layer directly to the output:
; click on the middle one (if it’s not already selected) to enable compositing nodes. Now check the “Use Nodes” box to the right of it. You should now see the initial default node setup, with a single Render Layers node feeding the initial default render layer directly to the output:
::现在打开一个节点编辑器窗口,在菜单右边寻找三个图标,显示要编辑的节点:;点击中间的 (如果它还没有被选择) 启用编译节点.现在检查右边的"使用节点"框.现在你应该看到初始的默认节点设置,一个单个染层节点直接向输出输送初始默认染层:
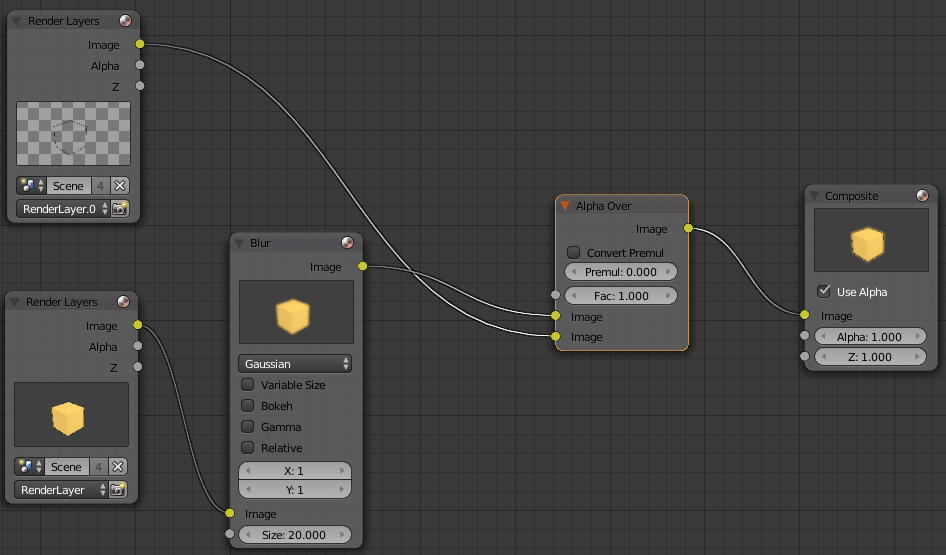
Add another Render Layers node. From its layer popup menu, select the second render layer you created, the one producing the edge outlines (which should be called “RenderLayer.001” if you didn’t change its name).
::添加另一个染层节点.从它的层弹出菜单中,选择您创建的第二个染层,即产生边缘轮的染层 (如果您没有更改它的名称,则应该称为RenderLayer.001).
Now, add a Blur node (Filter submenu of the Add menu). The default Gaussian kind of blur will do fine. Put nonzero values (e.g. 1) into the X and Y fields (otherwise the blur Size value will have no effect). Give it a Size value of, say, 20. Connect the Image output of the first render layer (the one doing everything except the edge outlines) into its Image input.
::现在,添加一个模糊节点 (添加菜单的过子菜单). 默认的高斯模糊将很好. 将非零值 (例如1) 放入 X 和 Y 字段 (否则模糊大小值将没有影响). 给它一个大小值,例如 20. 将第一个染层的图像输出 (除了边缘轮之外的所有内容) 连接到其图像输入中.
Add an Alpha Over node (from the Color submenu of the Add menu). Feed the Image output from the Blur node into its
upper
image input, and the Image output from the second render layer (the one producing the outline edges) into its
lower
image input. Leave the Factor at its default 1.0. Connect the Image output of this Alpha Over node to the Image input of the Composite node (the final output).
::添加一个Alpha Over节点 (从Add菜单的Color子菜单).将图像输出从模糊节点输入到它的上图像输入,并将图像输出从第二个染层 (产生轮边缘的图像) 输入到它的下图像输入.将Factor留在默认的1.0.将此Alpha Over节点的图像输出连接到复合节点的图像输入 (最终输出).
When you are done, check that your connections look like this (remember, the exact positions of the nodes are unimportant, except for clarity; what’s important is the connections between them):
::完成后,请检查您的连接是否看起来像这样 (请记住,节点的确切位置并不重要,除了清晰度;重要的是它们之间的连接):
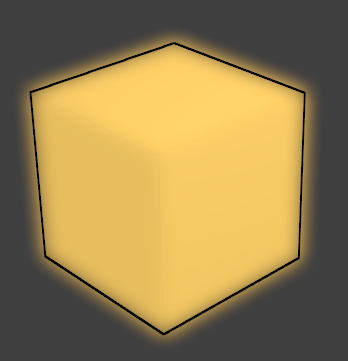
The effect of this is to blur the rendering of the cube (apart from the edge outline), and then put the edge outline back on top of it. If you hit F12 to render now, you should see something like this:
::这样做会使立方体的染模糊 (除了边界轮),然后把边界轮放到上面.如果按F12染现在,你应该看到这样的东西:
Things to Try
::尝试的事情
What happens if you put different values into the X and Y fields of the Blur node? Try making the X value different from the Y value.
::如果在模糊节点的 X 和 Y 字段中输入不同的值会发生什么? 试着使 X 值与 Y 值不同.
What happens if you get the inputs the wrong way round into the Alpha Over node?
::如果输入错误的方向进入Alpha Over节点会发生什么?
Try the other blur types available from the menu in the Blur node.
::尝试使用其他模糊类型,
Other Tutorials
::其他教程
Composite Nodes Video Tutorial (2.49b):
http://www.youtube.com/watch?v=AAnxoJsdAAM
::复合节点视频教程 (2.49b):
Vector Blur Tutorial (2.49b):
http://www.youtube.com/watch?v=qY4WcNgEXv8
::矢量模糊教程 (2.49b):
Depth of Field (DOF) Using Composite Nodes (2.49b):
http://www.youtube.com/watch?v=HBomEv-bEtw
::复合节点 (2.49b) 的场深度: