Blender 3D:第四单元:与高级教程起飞
You may be familiar with the time-travelling machine known as the
TARDIS
, which is much bigger inside than it appears from the outside. Alternatively, you may have come across the concept of a
portal
in science fiction, which lets you instantaneously move from one space/time location to another, just by taking a step.
::你可能已经熟悉了被称为Tardis的时间旅行机器,它在内面比外面大得多. 另外,你也可能在科幻小说中遇到了门户的概念,它让你能够立即从一个空间/时间位置移动到另一个位置,只要迈出一步.
In this tutorial, we will see how to create an animation where a doorway leads from one world into a completely different world that clearly cannot be occupying the same space as the original world. We will be making use of multiple
scenes
within a single Blender document, as well as
matte nodes
in the compositor to combine them together. The overall workflow will consist of these steps:
::在本教程中,我们将看到如何创建一个动画,其中一个门口从一个世界带入一个完全不同的世界,显然不能占用与原始世界相同的空间.我们将在一个单一的Blender文档中使用多个场景,以及在作曲器中的色节点来将它们组合在一起.整体工作流将包括这些步骤:
-
Create a scene representing the “Outer” world (the world outside the doorway, which is also the world where the observer is located.)
::创建一个代表"外界"的场景 (门口外的世界,也是观察者所在的世界). -
Assign a specially-coloured material to the doorway in the “Outer” scene, which will be come transparent when composited.
::在"外面"的场景中,将特殊的彩色材料用于门口,在复合时将变得透明. -
Define a camera movement panning around the “Outer” world, to accentuate the portal illusion.
::定义一个摄像机运动, 围绕"外界"进行旋转, 以突出地呈现门户的幻象. -
Create a scene representing the “Inner” world, which is visible through the doorway.
::创建一个场景,代表"内在世界",它是通过门口可见的. -
Copy the exact same camera movement from the “Outer” world to the “Inner” one, so the view through the door remains consistent with what is seen on both sides. (This is why it is best to keep the two scenes in the same Blender document.)
::将完全相同的摄像机运动从"外界"转移到"内界",这样通过门的视图与两边的视图保持一致. (这就是为什么最好将两个场景保留在同一张混合文件中). -
Render out separate animation sequences for the “Outer” and “Inner” scenes.
::提供单独的动画序列,用于"外面"和"内在"的场景. -
Create a third scene purely for compositing purposes, bringing in the two previously-rendered animation sequences.
::创建第三个场景纯粹是为了编译目的, 带来两个之前染的动画序列. -
Render out the complete composited result sequence.
::呈现完整的复合结果序列.
The actual modelling we are doing here will be very simple, not to say crude, just to illustrate the basic principle; feel free to create your own more elaborate and more interesting scenes, once you have mastered the basic technique!
::实际上我们在这里所做的模拟将是非常简单的,不说粗的,只是为了说明基本原则;一旦你掌握了基本技术,请随时创建你自己的更精细和更有趣的场景!
The Outer Scene
::外观的场景
Start with a new Blender document. Change the Scene name to “Outer”. We will use the default cube as our portal object (why not?). Make it taller, so the front face has about the right proportions for a doorway. Add a plane for a floor just underneath. Go back to the portal, TAB into Edit mode, select the front face, and I nset it just a little bit, for a door frame. Switch to face-select mode, and select just the inner face; give this a new bright green material, and be sure to select the “Shadeless” option in the Shading panel under Materials
![]() settings. Making it shadeless ensures that the whole doorway has a uniform colour regardless of lighting; the exact colour doesn’t matter, so long as nothing else in the scene comes too close to the same colour. Green is the colour traditionally used for
chroma-key
work in movies.
settings. Making it shadeless ensures that the whole doorway has a uniform colour regardless of lighting; the exact colour doesn’t matter, so long as nothing else in the scene comes too close to the same colour. Green is the colour traditionally used for
chroma-key
work in movies.
::开始使用一个新的Blender文档. 将场景名称更改为"外面". 我们将使用默认的立方体作为门户对象 (为什么不呢?). 让它更高,这样前面的比例就会对门口有正确的比例. 添加一个平面,用于一层的地板. 回到门口,TAB进入编辑模式,选择前面,然后我只设置一点,作为门框. 切换到面部选择模式,只选择内面; 给这个一个新的明亮绿色材料,并确保在材料设置下的遮面板中选择"无阴影"选项. 让它无阴影确保整个门口具有统一的颜色,无论照明; 颜色并不重要,只要场景中的其他东西都不太接近相同的颜色. 绿色
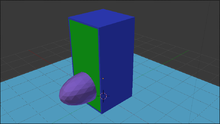
Your basic scene setup should look something like this. Apart from the doorway material as discussed above, none of the other material assignments really matter. Note the egg-shaped object (stretched-out sphere) I added poking halfway through the doorway: this object will also appear in the inner scene, reinforcing the idea of a doorway between worlds that you can actually move through.
::基本的场景设置应该是这样的.除了上面讨论的门口材料,其他材料的分配都不重要.请注意我添加的卵状物体 (伸展的球体) 穿过门口:这个物体也会出现在内部场景中,加强你实际可以穿过的世界之间的门口的想法.
Animating The Camera
::动画摄像机
Still in the Outer scene, add an Empty object at the default 3D cursor location. Parent the camera to this; now I nsert a LocRot keyframe for the Empty at frame 1, then go to, say frame 51, rotate the Empty about the Z axis by -90° (so the view moves across to the opposite side of the but still showing the doorway), and I nsert another LocRot keyframe.
::仍然在外景中,在默认的3D光标位置添加一个空物体. 将相机关键字相机; 现在我在1中插入空的LocRot键框,然后进入,比如51,将空的空物体旋转到Z轴上-90° (这样视图会移动到对面的位置,但仍然显示门口),然后我插入另一个LocRot键框.
While you’re at it, make the following changes in the Render
![]() Context:
Context:
::在此过程中,请在染上下文中进行以下更改:
-
Set the end frame for the animation frame range to 51.
::设置动画范围的终端为51 -
In the Shading panel, make sure the output format is PNG, and set the Output path to
//output frames/. Putting the rendered frames from this scene into their own directory will avoid any mixups with the other scene renders.
::在"影像"面板中,请确保输出格式为PNG,并将输出路径设置为 //output frames/.将此场景中的染置到其自己的目录中将避免与其他场景染器的混.
If you were to render this scene animation out now, you should end up with something that looks like at right.
::如果现在把这个动画呈现出来, 结果应该是像是对的.
The Inner Scene
::内部的场景

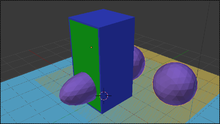
In the Scene popup menu, click the “+” icon to create a second scene. Choose the option “Link Objects”: this means the new scene will initially share exactly the same objects as the first scene. (Sharing the same objects, rather than making copies of them, just makes it easier if you need to make any changes to those objects; those changes are automatically visible in all scenes sharing the same objects.) Name the new scene “Inner”. We only want it to share the camera (and its pivot Empty) and lighting, and that purple egg thingy that is travelling between the worlds. So select the portal box and floor, and delete them. Create some new objects to make up this inner world, something like at right. Note I gave the inner world its own floor, with a contrasting colour.
::在"场景"弹出菜单中,点击"+"图标创建第二个场景.选择"链接对象"选项:这意味着新场景最初将与第一场景完全相同的对象共享. (共享相同的对象,而不是复制它们,只是使您需要对这些对象进行任何更改变得更容易;这些更改在共享相同对象的所有场景中都会自动可见.) 命名新场景"内在".我们只希望它共享摄像头 (及其轴心) 和光线,以及在世界之间旅行的紫色蛋东西.所以选择门户框和内地板,并删除它们.创建一些新对象来构建这个世界,就像右边一样.注意,我给了内世界自己的地板,用对比的颜色.
Tip:
In the Scene
![]() Context, there is a “Background” field in the Scene panel, where you can choose another scene to overlay this one. This is what I did in the screenshot at right, just so I could make sure those balls in the Inner world lie behind the portal door. Don’t forget to
remove this Background scene setting
when you are done. Otherwise the Outer scene will show up in the render for the Inner scene, which we don’t want!
Context, there is a “Background” field in the Scene panel, where you can choose another scene to overlay this one. This is what I did in the screenshot at right, just so I could make sure those balls in the Inner world lie behind the portal door. Don’t forget to
remove this Background scene setting
when you are done. Otherwise the Outer scene will show up in the render for the Inner scene, which we don’t want!
::提示:在场景背景中,在场景面板中有一个"背景"字段,您可以选择另一个场景来覆盖这个. 这是我在右边的截图中所做的,只是为了确保那些在门口后面的内世界中的球. 完成后不要忘记删除此背景场景设置. 否则外景将显示在内景的染中,我们不希望!
Inner Scene Animation
::内部场景动画
When you created the Inner scene, it would have inherited the same Render
![]() settings as for the first scene: the same frame rate and number of frames to render. Just make one change: in the Output panel, set the path to
settings as for the first scene: the same frame rate and number of frames to render. Just make one change: in the Output panel, set the path to
//inner frames/
, so as to keep the rendered frames separate from the Outer scene.
::创建内幕时,它将继承与第一幕相同的染设置:相同的率和染数.只需做出一个更改:在输出面板中,将路径设置为 //inner frames/,以便将染与外幕分开.
Now when you render out the animation of this scene, you should end up with something like at right.
::现在当你染出这个场景的动画时, 你应该得到这样的结果.
Compositing It All Together
::整合所有内容
Now, make a third Scene, just for the compositing. In the menu that appears when you click “+” next to the scene name, choose “New” to create a new Scene with nothing in it. Call this scene “Compositing”. Leave it empty; we won’t actually be rendering any 3D content in this scene.
::现在,只为编译而创建第三个场景.在您点击场景名旁的"+"菜单中,选择"新"以创建一个没有任何内容的新场景.将此场景称为"编译". 让它空;我们实际上不会在此场景中染任何3D内容.
Open up a Node Editor window, and change the node editor type to Compositing nodes. Check the “Use Nodes” box; you will see the usual initial two nodes, “Render Layers” (representing the rendering of the 3D objects in the scene), and “Composite” for the final output from the compositor. Get rid of the Render Layers node; we won’t need it at all (and anyway, it won’t work without a camera in this Scene).
::打开一个节点编辑器窗口,并将节点编辑器类型更改为编译节点. 勾选"使用节点"框;您将看到通常的前两个节点,即"染层" (代表场景中的3D对象的染),以及"复合"为编译器的最终输出. 删除染层节点;我们根本不需要它 (无论如何,在这个场景中没有摄像头,它也不会工作).
Instead, SHIFT + A dd an Input→Movie Clip node. Click its Open button, go to the “inner frames” subdirectory where the Inner scene has put its rendered frames, and select A ll the PNG files you find there to make up this movie clip. Click the “Open Clip” button to confirm and return to the Node Editor.
::选择"转换"键,然后按"开放"按,然后进入"内幕"的"内幕"子目录,选择"全部"的PNG文件,然后将其转换为"电影剪辑".点击"开放剪辑"按,确认并返回"节点编辑器".
SHIFT + A add a second Input→Movie Clip node. Click its Open button, and this time go the “outer frames” subdirectory where the Outer scene has put its rendered frames, and select A ll the PNG files you find there to make up this movie clip. Click the “Open Clip” button to confirm and return to the Node Editor.
::SHIFT + A 添加第二个输入→电影剪辑节点.点击其打开按,然后进入"外部"子目录,选择"All"的 PNG 文件,以创建此电影剪辑.点击"打开剪辑"按以确认并返回节点编辑器.
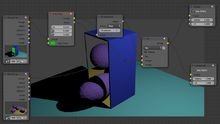
Now put together the complete node setup as at right. Note the use of a Matte→Color Key (
not
Chroma Key) node to make the doorway transparent. To choose the right colour, bring up the colour picker for the “Key Color” input terminal, and use the eye dropper to click on the door part of the thumbnail image in the Movie Clip node for the Outer scene. Note I had to add a Filter→Dilate/Erode node with a Distance of -1, otherwise I had a little trace of green showing at the edge of the doorway. The computed colour-key mask then feeds a Color→Mix node which causes the Inner scene to show through exactly where the door is located in the Outer scene, but nowhere else! Simple, isn’t it?
::现在将完整的节点设置放在一起. 注意使用Matte→Color Key (而不是Chroma Key) 节点来使门口透明. 为了选择正确的颜色,为Key Color输入终端带来颜色选择器,并使用眼滴器点击外景电影剪辑节点中的缩略图像的门部分. 注意我必须添加Filter→Dilate/Erode节点,距离为-1 ,否则我在门口边缘显示一点绿色. 计算的颜色键面罩然后为Color→Mix节点提供,这使得内景显示出门口位于外景的位置,但没有其他地方! 简单,不是吗?
Now, make one final change to the Render
![]() settings, setting the path in the Output panel to
settings, setting the path in the Output panel to
//composite frames/
to keep them separate from the two input scenes.
::现在, 给染设置做最后一个更改, 在输出面板中设置路径为 //composite frames/ 以使它们与两个输入场景分开.
Now when you render out the Compositing scene, you should end up with an animation something like at right.
::现在当你染出组合场景时, 你应该最终得到一个动画,
More On Lighting
::更多关于照明
In this example, I gave both scenes the same lighting. But in general there is no reason for this; in fact, giving the two scenes completely different lighting (e.g. night in one, day in the other) would emphasize the jarring discontinuity in moving between them.
::在这个例子中,我给了两个场景相同的照明.但总的来说没有理由这样做;事实上,给两个场景完全不同的照明 (例如,一个是夜晚,另一个是白天) 将强调它们之间移动的不连续性.
However, you might then have to deal with the issue of light spilling from one world to the other through the doorway. This could be faked by judicious placement of additional lights.
::您可能会遇到从一个世界到另一个世界透过门口的光线问题.
Further exploration of this issue is left up to the reader. ;)
::更多的探索这个问题是留给读者.