Blender 3D:第四单元:与高级教程起飞
This tutorial will redo the previous
Ray Tracing
lesson, this time using Cycles rendering. Start with a copy of the same document you created last time; we will keep the same geometry, but redo all the materials, and then you can compare the final results to see how the different renderers perform.
::这门教程将重复上一课的光线追踪, 这次使用循环染. 首先要复制上次创建的相同文档; 我们将保持相同的几何形状, 但重复所有材料, 然后你可以比较最终结果, 看看不同的染器的性能如何.
Open the ray-tracing document. Switch the renderer
 to Cycles. We previously defined two materials: the world background with the “magic” texture, and the glass for the cubes. So we will need to redo these.
::打开光线追踪文件. 将染器切换到循环. 我们之前定义了两个材料:世界背景与"魔术"纹理, 和玻璃为立方体. 所以我们需要重做这些.
For all but the most basic plain diffuse materials, Cycles requires you to use the Node Editor. You should have done the
prior introduction
to this; please review that, if not. Cycles material nodes are not the same as Blender Internal
material nodes
; but the basic mechanics of node editing are the same.
::除了最基本的平面扩散材料外,Cycles 要求您使用节点编辑器.您应该先做了此项引入;请检查一下,如果没有.Cycles 材料节点与 Blender 内部材料节点不同;但节点编辑的基本机制是一样的.
The Magic Sky
::魔幻的天空
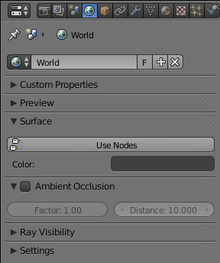
Let’s try fixing the background material first. Go to the World
![]() context in the Properties
context in the Properties
![]() window. It should look something like at right. What happened to all the world settings? Nearly all of them have disappeared!
window. It should look something like at right. What happened to all the world settings? Nearly all of them have disappeared!
::让我们先尝试修复背景材料. 在属性窗口中,进入世界背景. 它应该看起来像右边. 所有的世界设置怎么了? 几乎都消失了!
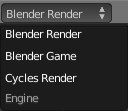
But see that big “Use Nodes” button? It’s big so that you will find it hard to miss. Click it.
::现在,你看到了那个大"使用节点"按.
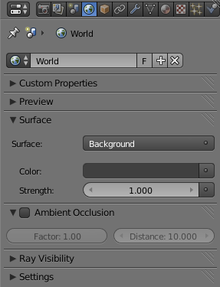
OK! Now there are a few more settings, but still not much. For all the fun stuff, we must go into the Node Editor.
::现在还有几个设置,但仍然不多. 为了所有有趣的东西,我们必须进入节点编辑器.
You probably have a Timeline
![]() window across the bottom of your Blender screen layout. Change the window type to Node Editor
window across the bottom of your Blender screen layout. Change the window type to Node Editor
![]() , and increase its height. (Or add a new window if you don’t already have one, and make it a Node Editor.) In its header, next to the menu titles, you should see a group of 3 icons
, and increase its height. (Or add a new window if you don’t already have one, and make it a Node Editor.) In its header, next to the menu titles, you should see a group of 3 icons
![]() indicating what type of nodes you want to edit: if you hover over them, from left to right, you should see tooltips identifying them as respectively “shader nodes” (i.e. Cycles materials), “compositing nodes” and “texture nodes”. It is the “shader nodes” we want.
indicating what type of nodes you want to edit: if you hover over them, from left to right, you should see tooltips identifying them as respectively “shader nodes” (i.e. Cycles materials), “compositing nodes” and “texture nodes”. It is the “shader nodes” we want.
::你可能在你的Blender屏幕布局底部有一个时间表窗口. 将窗口类型更改为节点编辑器,并增加其高度. (或者如果您还没有一个,则添加一个新窗口,并将其作为节点编辑器.) 在它的头部,在菜单标题旁边,你应该看到一个显示你想编辑哪种类型的节点的3个图标组:如果您从左向右移动它们,你应该看到工具提示,分别识别它们为遮节点 (即循环材料),构成节点和纹理节点.我们想要的是遮节点.
|
|
Cycles doesn’t use the Texture Node Editor.
It may be confusing to see this mode of the Node Editor still available with Cycles chosen as the renderer, but don’t bother using it. All setup of textures in Cycles is done within the Shader/Material Node Editor.
|
With shader nodes selected, you will see another pair of icons
![]() appear immediately to the right of these three: these indicate whether to edit shader nodes for a selected Object, or for the World. It is the World that we want.
appear immediately to the right of these three: these indicate whether to edit shader nodes for a selected Object, or for the World. It is the World that we want.
::选择了遮光节点,您会看到另外一对图标出现在这三个图标的右边:这些图标表明是否要为所选的对象编辑遮光节点,或者为世界.这是我们想要的世界.
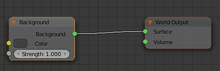
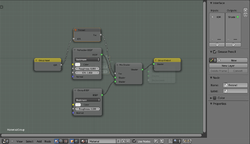
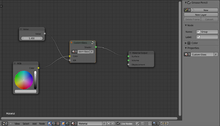
Soon as you select the World shader, the following should appear in the Node Editor window. Note the special “Background” and “World Output” nodes: you must have these in the World shader, but note that “Color” input terminal on the Background node? That’s just itching to have something plugged into it.
::选择世界影像器后,在节点编辑器窗口中应该出现以下内容. 注意特殊的"背景"和"世界输出"节点:您必须在世界影像器中拥有这些,但请注意"背景"节点上的"颜色"输入终端? 只是有点,要插入一些东西.
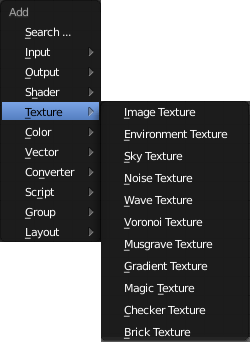
Bring up the menu to add a node, with SHIFT + A . Look for the Texture submenu, which should look like at right. Select the “Magic Texture” item.
::通过SHIFT+A,将添加节点的菜单打开. 寻找纹理子菜单,该子菜单应该看起来像右边. 选择"魔幻纹理"项.
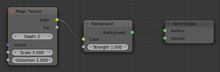
This will add a new node representing the texture; connect its “Color” output to the “Color” input on the Background node, like at right.
::这将添加一个新节点来表示纹理;将它的"颜色"输出连接到"背景"节点上的"颜色"输入,如右图.
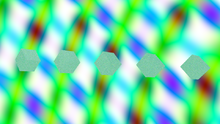
Now if you hit F12 to render, you should see your new magic World background.
::现在如果按F12进行染, 您应该看到新的魔幻世界背景.
Here Comes The Glass
::这里是玻璃
Make sure the cubes are selected in the 3D view. Go to the Materials
![]() context in the Properties window. As before, you will see very few settings, and a big “Use Nodes” button. Click it.
context in the Properties window. As before, you will see very few settings, and a big “Use Nodes” button. Click it.
::确保立方体在3D视图中被选中. 进入属性窗口的材料上下文. 如前面,您将看到很少的设置,以及一个大的"使用节点"按. 点击它.
In the Node Editor, remember there are two icons for selecting what type of shader/material nodes to edit, the Object one and the World one? Click the Object one this time.
::记住,在节点编辑器中,有两个图标可以选择要编辑的影子/材料节点类型, 目标一个和世界一个?
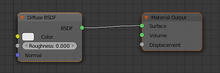
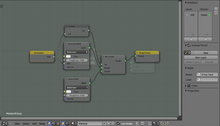
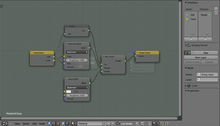
As before, you will see an initial default node setup, like at right.
::像右边那样, 您将看到一个初始的默认节点设置.
This time, there is only one node that needs to be present for the node setup to work correctly, and that is the Material Output node. Click with RMB on the node titled “Diffuse BSDF”, and press DEL to get rid of it.
::这次,只有一个节点需要存在,以便节点设置正确工作,那就是材料输出节点.点击RMB标题为"扩散BSDF"的节点,并按DEL来消除它.
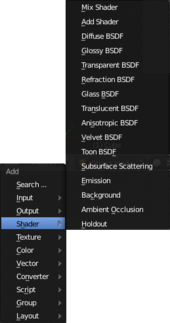
Now bring up the Add SHIFT + A menu, and this time look for the Shader submenu. We will need three items from here, so add them one at a time:
::现在打开添加SHIFT+A菜单,然后再看看Shader子菜单. 我们需要从这里添加三个项目,所以要一次添加一个:
-
A Glossy BSDF to give the shiny surface (note the default Roughness setting in this node is 0.2, set it to zero)
::一个光泽的BSDF给光亮的表面 (注意默认的粗度设置在这个节点是0.2,设置为零) -
A Refraction BSDF to give the effect of light refracting through the transparent material, and
::具有反射BSDF,使光通过透明材料折射的效果,以及 -
A Mix Shader to combine the two.
::混合影像器将两者结合起来.
Ah, but how do we combine the two? Remember the
Fresnel factor
we talked about in the Blender Internal tutorial? Well, in Cycles, there’s a node for that!
::现在我们可以把它们结合起来. 记得我们在Blender内部教程中谈过的弗雷内尔因子吗? 在Cycles中,有一个节点!
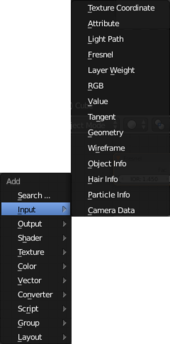
In the Add SHIFT + A menu, bring up the Input submenu. In there, you will see a Fresnel node type. Add one of these. You will see it starts with a default IOR (Index of Refraction) value of 1.45, which is about right for glass.
::在添加SHIFT+A菜单中,打开输入子菜单. 在那里,你会看到一个弗雷内尔节点类型. 添加其中一个. 你会看到它以1.45的默认IOR (折射率) 值开始,这对玻璃来说是正确的.
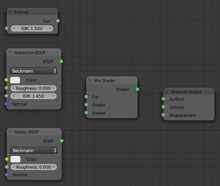
Finally, connect together your little collection of nodes like this. See how the Fresnel factor controls the mixing proportion of the Glossy and Refraction shaders? A larger input factor to the Mix shader means a higher proportion of its second (lower) shader input, while a smaller factor gives a higher proportion of its first (upper) shader input. The higher output Fresnel factor corresponds to the regions closer to the edges of the object, where you want more reflection, while the lower value corresponds to the interior regions, where you want more transparency.
::最后,将您的小组节点连接在一起. 看看弗雷内尔因子如何控制光泽和折射遮光器的混合比例? 混合遮光器的输入因子较大意味着其第二个 (下) 遮光器输入的比例较高,而较小的因子则意味着其第一个 (上) 遮光器输入的比例较高. 较高的输出弗雷内尔因子对应于更接近物体边缘的区域,您想要更多的反射,而较低的值对应于更透明的内部区域.
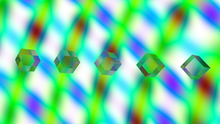
And finally finally, hit F12 to see what the result looks like.
::现在我们可以看到结果.
|
|
Does it look grainy, and not as clear as this? Increase the number of samples in the Sampling panel in the Render
|
.
|
|
Why not just use the Glass BSDF?
You might have seen this in the Add Shader menu, above. However, this doesn’t seem to produce the right effect: it seems little different to the Refraction BSDF, without providing much in the way of glossy reflections.
|
Adjustable Refraction
::可调节的折射率
You may have noticed that the above collection of nodes includes
two
different fields labelled “IOR”: the one on the Fresnel node, and the one on the Refraction BSDF. The former governs the transition between transparency and reflectivity, while the latter governs the actual refraction through the material. In the real world, the two would always be the same, since they are the same physical quantity.
::你可能已经注意到,上面的节点集合包括两个不同的字段标记为"IOR":弗雷内尔节点上的一个,以及反射BSDF上的一个.前者控制透明度和反射率之间的过渡,而后者控制通过材料的实际折射.在现实世界中,这两个总是相同的,因为它们是相同的物理量.
With the
right IOR
, this same node setup can be used to represent other transparent materials. Instead of having to set the value in two places, why not just set it in one?
::通过正确的IOR,同样的节点设置可以用来表示其他透明材料.
To do this, add SHIFT + A another node, from the Input submenu, of type Value. This will feed a fixed value that you specify into any number of output terminals. Connect its Value output to the two IOR inputs, on the Fresnel and Refraction BSDF nodes. Here I have set its value to 1.45, which is a suitable value for glass.
::为了做到这一点,从输入子菜单中添加值的另一个节点. 这将为任意数量的输出终端输入您指定的固定的值. 将其值输出连接到两个IOR输入,在Fresnel和折射BSDF节点上. 这里我将其值设置为1.45,这是玻璃的合适值.
A Reusable Custom Shader
::一个可重复使用的定制影子
What if you wanted to have multiple transparent materials in a document? Would you need to go through all the above setup every single time?
::如果您想在文件中使用多种透明材料, 您是否需要每次都做上述所有设置?
Naturally you wouldn’t. Instead, you can define a custom
node group
, and insert that into a Node Editor setup wherever you want, as many times as you want.
::您可以定义一个自定义的节点组, 并将其插入到节点编辑器设置中,
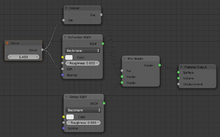
Start with the node setup as in the previous screen shot. Select RMB the Value node supplying the IOR value, and DEL ete it. Now look at the remaining four nodes, the Fresnel input and the three shader nodes (apart from the material output)? Select these, and only these, in any of the usual ways: press A once or twice to deselect everything, then RMB on the first node and SHIFT + RMB on the rest, or drag a B ox selection around the desired nodes.
::开始与节点设置,如在上一张屏幕截图.选择RMB提供IOR值的值节点,并 DEL ete它.现在看看剩余的四个节点,弗雷内尔输入和三个遮光器节点 (除了材料输出)?选择这些,只有这些,在任何通常的方式:按A一次或两次取消选择一切,然后在第一个节点上RMB和SHIFT + RMB在剩余的,或拖动一个B牛选择周围的所需节点.

Now, with these nodes selected, select “Make Group” from the “Node” menu, or use the keyboard shortcut CTRL + G . Also press N to bring up the Properties shelf at the right side of the Node Editor window. The result should look like at right. Notice a couple of things:
::现在,选择了这些节点,从"节点"菜单中选择"创建组",或使用键盘快捷键CTRL + G.还按N以显示节点编辑器窗口右侧的属性架.结果应该看起来像右边.注意一两件事:
-
The greenish background indicates you are editing a node group, not the entire node setup
::绿色背景表示你正在编辑一个节点组, 而不是整个节点设置 -
The blocks with yellow headers, labelled “Group Input” and “Group Output”: these define the input and output terminals for the entire node group: inputs to the group appear as outputs on the Group Input block, and outputs from the group appear as inputs to the Group Output block. Any terminals within the group not connected to these will not be visible outside the group.
::带有黄色标题的块标记为"组输入"和"组输出":这些定义了整个节点组的输入和输出终端:组的输入显示为组输入块的输出,组的输出显示为组输出块的输入.组内没有连接到这些终端的任何终端都不会在组外可见.
You can press TAB to switch out of editing the node group and back into editing the entire node setup, where you will see your group appear as a single block entitled “NodeGroup”. Try this if you want to have a look, then press TAB to get back into editing the group again, because we haven’t finished setting it up yet.
::你可以按TAB,从编辑节点组切换回编辑整个节点设置,你会看到你的组显示为一个单一的块标题为"节点组".如果你想看看,请尝试此操作,然后按TAB,重新开始编辑组,因为我们还没有完成设置.
First of all, we need an input to specify the IOR value. Click on the IOR input terminal on the Fresnel node, and drag to the right edge of the Group Input node. Blender should automatically create an output terminal named “IOR” on the Group Input node, with a wire running to the Fresnel IOR input.
::首先,我们需要一个输入来指定 IOR 值.点击弗雷内尔节点上的 IOR 输入终端,然后拖到组输入节点的右边.混合器应该自动在组输入节点上创建一个名为 IOR的输出终端,并连接到弗雷内尔 IOR 输入.
Now click on this Group Input IOR terminal, and drag another wire to the IOR input on the Refraction BSDF node.
::现在点击这个组输入 IOR 终端,并拖动另一根线到 IOR 输入上的折射 BSDF 节点.
Glass often has a colour. This colour affects light passing through the material, while glossy reflections remain uncoloured.
::玻璃通常具有颜色.这种颜色会影响光线穿过材料,而光泽反射则保持无色.
To create a colour input terminal for our node group, just drag from the “Color” input terminal on the Refraction BSDF node to the right edge of the Group Input node; as before, Blender will automatically add a new Group Input terminal and connection.
::为了为我们的节点组创建一个颜色输入终端,只需从色输入终端拖动折射BSDF节点到组输入节点的右边;像以前一样,Blender 将自动添加一个新的组输入终端和连接.
Now press TAB to finish editing your custom node group. This will take you back to the overall node setup, with your custom node still selected. Its name will be shown in the Properties panel in the Properties shelf at the right; change this from the default “NodeGroup” to something more meaningful, like “Custom Glass”.
::现在按TAB完成编辑自定义节点组. 这将带您回到整体节点设置,您的自定义节点仍然被选择. 它的名字将显示在右边的属性架上的属性面板中; 将此从默认的"节点组"更改为更有意义的,比如"自定义玻璃".
And now you can add back the input Value node you deleted, to supply a value to the IOR terminal. And similarly you can add an RGB node to feed into the glass colour. Or, since each value only needs to feed one input terminal, you can type them directly into the unconnected inputs on your Custom Glass node.
::现在你可以重新添加你删除的输入值节点,为IOR终端提供一个值.同样,你可以添加一个RGB节点来输入玻璃颜色.或者,由于每个值只需要输入一个输入终端,你可以直接输入到你自定义玻璃节点上的未连接的输入.
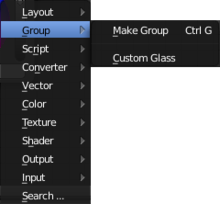
And furthermore, your custom node is now present in the Add Group menu, ready for you to insert somewhere else, in this or another node setup.
::现在在添加组菜单中, 准备好在这个或另一个节点设置中插入.
Note that the node definition itself is not duplicated when you insert another instance of your custom node. Each instance operates on its own separate input values and produces its own corresponding separate output values, but any changes you may subsequently make to the internal definition of the node group will automatically take effect everywhere you’ve already used it.
::请注意,当你插入另一个自定义节点实例时,节点定义本身不会重复.每个实例都以其自己的单独输入值运行,并产生相应的单独输出值,但你随后对节点组的内部定义所做的任何更改都将自动生效.