Blender 3D:第四单元:与高级教程起飞
You
previously learned
how to model an eyeball using just procedural textures with the Blender Internal renderer. This page will redo the exercise using the Cycles renderer.
::之前你已经学会了如何使用Blender内部染器仅仅使用程序纹理来建模眼球. 这页将使用Cycles染器重做练习.
Note:
The BI version of the tutorial relied on a quirk of the Musgrave texture, in that a certain combination of settings produced a nice pattern of radial ridges for modelling the iris of the eye. While Cycles also has a Musgrave texture, I was not able to reproduce the same effect. However, Cycles has a much more powerful material node system, and in particular by transforming to
polar coordinates
and applying a radial scaling, I was able to get a suitable pattern of radial ridges using just a simple Noise texture.
::注意:教程的 BI 版本依赖于 Musgrave 纹理的奇特特点,其中一个特定的设置组合产生了用于模拟眼睛虹膜的 nice 辐射的图案.虽然 Cycles 也具有 Musgrave 纹理,但我无法再现同样的效果.然而,Cycles 具有更强大的材料节点系统,特别是通过转换为极坐标和应用辐射缩放,我能够使用简单的 Noise 纹理获得合适的辐射图案.
Why Procedural?
::为什么是程序性?
Rather than mess around with intricate manipulations of procedural texture generators, the previous tutoral
Creating Pixar-Looking Eyes
used an image for the iris texture. This simplifies some things, but it has its own drawbacks:
::之前的教程"创建像斯的眼睛"使用了虹膜纹理的图像,而不是纠于程序性纹理生成器的复杂操作.这简化了一些事情,但它有其自身的缺点:
-
How do you create this image texture? Do you hand-paint it? If the resolution is not high enough, or the patterns or colours are not right, you must redo it.
::如何创建图像纹理? 您是否手绘? 如果分辨率不够高,或者图案或颜色不合适, -
It’s a separate file you have to remember to include with your project. The Cycles renderer does not (yet) support packing images into the
.blend
file.
::您必须记住将其与您的项目一起包含. Cycles 染器 (尚未) 支持将图像包装到 .blend 文件中.
As you will see below, a procedural node setup gives you plenty of opportunities to tweak parameters, to produce effects that are subtly (or not-so-subtly) different. This allows for a great deal of variety, with very little effort—once you have worked out the node setup, of course.
::程序节点设置给你提供了大量调整参数的机会,产生微妙 (或不太微妙) 的不同效果. 这允许大量的变化,当然,一旦你确定了节点设置,很少的努力.
Creating the Mesh
::创建网格
The modelling part of the exercise is exactly the same as in the BI version. If you already have a mesh that you did for the BI tutorial, feel free to reuse that and skip to the next section. Otherwise, continue reading.
::练习的建模部分与BI版本完全相同.如果您已经在BI教程中做了一个网格,请随时重新使用并跳到下一节.否则,请继续阅读.
The mesh will consist of two modified UV spheres, one just slightly inside the other. The outer mesh will have a material that is both transparent and reflective; at the front of the eye, this will represent the
cornea
(where the light enters the eye), while over the rest of the eye, it will add shininess to the eyeball. The inner mesh will make up the remaining three major parts of the eye that are visible from outside:
::网格将由两个修改后的紫外球组成,一个在另一颗微微的内部.外网将具有透明和反射的材料;在眼睛的前面,这将代表角膜 (光线进入眼睛的位置),而在眼睛的其他部分,它将增加眼球的光泽.内网将构成眼睛的剩余三个主要部分,从外面可见:
-
the
sclera
, the white part of the eyeball
::眼球的白色部分 -
the
iris
, the variously-coloured ring of muscle that surrounds the hole that actually lets in the light, and
::虹膜是肌肉的环形, 环绕着光线的孔, -
the
pupil
, the hole where the light goes into the interior of the eye.
::瞳孔是光线进入眼睛内部的孔.
Start in Object mode. Get rid of the default cube. SHIFT + A dd a new UV sphere mesh; 24 rings and segments should be sufficient. Switch to front view NUM1 , and check the “Align to View” box that should have appeared in the panel at the bottom of the Tool Shelf. This will be the inner mesh.
::开始在对象模式. 摆脱默认的立方体. SHIFT + A dd一个新的紫外球网;24个环和段应该足够. 切换到前视图NUM1,并勾选"对齐到视图"框,该框应该出现在工具架底部的面板中. 这将是内网.
TAB into Edit mode; make sure the entire mesh is selected; SHIFT + D uplicate it, and S cale it slightly up to create the outer mesh. (You may find it easier to work in wireframe Z mode.) H ide the outer mesh you just created for now, to make it easier to work on the inner one.
::按TAB进入编辑模式;确保选择了整个网格;SHIFT+D复制它,然后稍微向上滑动以创建外部网格. (您可能会发现在线框Z模式中工作更容易.) 创建您刚刚创建的外部网格,以便更容易地在内部网格上工作.
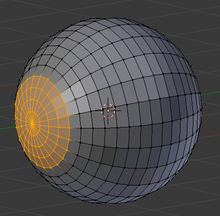
Select RMB the single vertex at the front of the inner mesh. Now press NUM+ four times to extend the selection to include the first four rings of vertices out from this front vertex. The selection should look like at right.
::选择内网的前面的单个顶点. 现在按NUM+四次,扩展选择,包括从前面的顶点的前四个环. 选择应该看起来像右边.
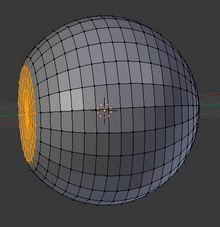
Now flatten the selected vertices with the sequence S Y 0KEY ENTER . Next, reduce the protrusion of the resulting flattened disc with G Y and moving it a little closer to the rest of the eyeball. The result should look like at right.
::现在用S Y 0KEY ENTER序列平整选定的顶点.接下来,用G Y减少得到的平整盘的突出,并将其稍微靠近眼球的其余部分.结果应该看起来像右边.
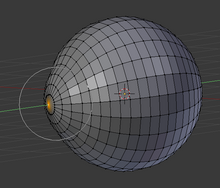
This will do for shaping the inner mesh. Now to do the outer one. Unhide it ALT + H . Select RMB just the frontmost vertex. In the Mesh menu, set Proportional Editing to “Connected” and Proportional Editing Falloff to “Root”. Now move the selected vertex forward with G Y , and use the mouse wheel at the same time to adjust the proportional editing influence until you make a bulge that is about the right proportions for a human cornea.
::现在,将选定的顶点移动向前,并同时使用鼠标轮调整比例编辑影响,直到您制作出一个大约与人类角膜相对应的比例的凸起. 按下图中的图形,将图形的图形进行编辑. 按下图中的图形,将图形的图形进行编辑. 按下图中的图形,将图形的图形进行编辑. 按下图中的图形,将图形的图形进行编辑. 按下图中的图形,将图形的图形进行编辑. 按下图中的图形,将图形的图形进行编辑. 按下图中的图形,将图形的图形进行编辑. 按下图中的图形,将图形的图形进行编辑.
OK, that’s the modelling done, now on to the fun part—creating the materials in Cycles.
::现在我们来看"Cycles"中的创建材料.
UV-Mapping the Iris
::虹膜的紫外线映射
The iris pattern needs to be correctly located so that the radial striations are symmetrically arranged around the centre. To control the placement of the iris texture, we need to set up a UV map.
::虹膜的图案需要正确地定位,使其中心的辐射条纹对称地排列. 为了控制虹膜的位置,我们需要设置紫外线图.
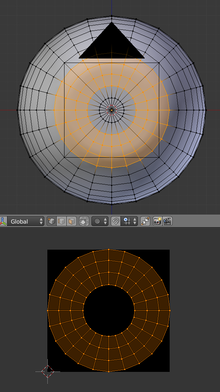
Set your layout to have both a 3D view and a UV/Image Editor view, as at right. Create a new image in the Image Editor; this will be just a dummy for the UV unwrapping, so its size and contents do not matter.
::设置您的布局,以具有3D视图和UV/图像编辑器视图,如右图.在图像编辑器中创建一个新的图像;这将只是UV解封的模,因此它的大小和内容无关紧要.
Make sure you are in Edit mode in the 3D view. H ide the outer mesh, to reduce the clutter. Switch to frontal view NUM1 . Make sure ( A once or twice) nothing is initially selected. Select the rings of vertices that will make up the iris, as at right. Bring up the U nwrap menu, and select “Project from View (Bounds)”. This should unwrap the selected vertices, exactly as they look in the frontal view, and place them neatly within the bounds of the dummy image, as in the lower window in the screenshot at right.
::确保在3D视图中处于编辑模式. 设置外网格,以减少杂乱. 切换到前视图NUM1. 确保 (A一次或两次) 没有初选. 选择将构成虹膜的顶点环,如右图. 打开U nwrap菜单,并选择"Project from View (Bounds) ". 这应该解开选定的顶点,正如它们在前视图中看起来一样,并将它们整齐地放置在模拟图像的边界内,如右图下窗口中.
Creating the Materials
::创造材料
The Cornea
::视角膜
For the outer mesh, you can set up a material similar to the one previously discussed in
A Glass Material in Cycles
. Only, instead of an IOR of 1.45 (glass), use a value like 1.33 (water), since water is the main constituent of the transparent tissue (as indeed of all human tissue).
::对于外网,你可以使用类似于"循环中的玻璃材料"中讨论过的材料.但不要使用1.45 (玻璃) 的IOR,而是使用1.33 (水) 的IOR,因为水是透明组织 (以及所有人体组织) 的主要组成部分.
The Sclera
::斯克莱拉
The material for the white of the eye needs a little tracery of red blood vessels, but not too much. Here the network of blood vessels is provided by a Wave texture node with a very high distortion setting. This is then put through a Bright/Contrast node: enhanced contrast to sharpen the edges, and reduced brightness to make the blood vessels very pale. This value is then fed to a Mix RGB node to mix between the white of the main part of the eyeball and the red of the blood vessels.
::眼睛白色的材料需要一些红色血管的痕迹,但不要太多. 这里,血管网络由具有非常高扭曲设置的波纹结提供. 然后通过亮度/对比度结:增强对比度以加快边缘,减少亮度使血管非常白. 然后将此值输入混合RGB结以混合眼球主部分的白色和血管的红色. 眼球的白色与红色之间的对比度是不同的,但在眼睛中,眼睛的白色与红色之间的对比度是不同的. 眼球的白色与红色之间的对比度是不同的,但在眼睛中,眼睛的白色与红色之间的对比度是不同的. 眼睛的白色与红色之间的对比度是不同的,但在眼睛中,眼睛的白色与红
The original tutorial added some shininess to this material. However, since the cornea material is already shiny, and already overlaying the entire eyeball, it seemed redundant to have shininess here as well.
::由于角膜已经是光亮的,并且已经覆盖了整个眼球,所以在这里也显得多余的光亮.
The Iris
::虹彩
This is the fun one, because it will require the most intricate Cycles node programming.
::需要最复杂的Cycles节点编程.

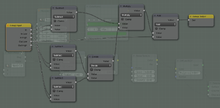
As previously mentioned, we have to convert some texture coordinates from
rectangular
to polar coordinates. The node group at right will achieve this. It looks quite complicated! However, it becomes easier to understand if you take it step by step:
::像之前提到的,我们必须将一些纹理坐标从矩形转换为极坐标.右边的节点组将实现这一点.看起来相当复杂!但是,如果您一步一步地理解它,就更容易理解:
-
The two rows of 3 nodes each at the upper left (each containing a Subtract followed by two Multiply nodes) take the incoming X (upper row) and Y (lower row) values, subtract 0.5 to convert the range from 0..1 to -0.5..+0.5, multiply by 2 so the range is now -1..+1, and takes the square of each value. These are then added and the square root (Power of 0.5) of the result taken, to give the distance of the point from the origin, in the range 0..1. In other words, it is computing the equation
. This is the Mag output from the node group.
::左上方的两个列3个节点 (每个列包含一个减去接着两个乘积节点) 取入来的X (上一行) 和Y (下一行) 值,减去0.5以将范围从0..1转换为-0.5..+0.5,乘以2使范围现在为-1..+1,并取每个值的平方. 然后将它们加起来,取出结果的平方根 (0.5的权力),以给出点与原点的距离,在0.1范围内. 换句话说,它计算了方程r = x 2 + y 2. 这是节点组的Mag输出. -
The bottom-most row of nodes divides X by Y (actually it should be Y by X, but that doesn’t matter for our purposes) to compute a slope, and then uses the arctangent function to get the angle of this slope. This value is in radians, so it is divided by 1.571 (
or close enough) to convert it to the range 0..1. This becomes the Angle output from the node group.
::最下一行节点将X除以Y (实际上应该是Y除以X,但这对我们的目的无关) 来计算斜率,然后使用弧函数来获得该斜率的角度.这个值是以半径数,所以它被除以1.571 (π2或足够接近) 来转换为范围0..1.这成为节点组的角度输出.
 . This is the Mag output from the node group.
 or close enough) to convert it to the range 0..1. This becomes the Angle output from the node group.
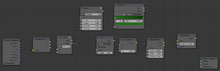
Now we use the above node group in
this
node setup. Note the “Separate RGB” and “Combine RGB” nodes: they are not separating/combining RGB colour components, but
XYZ coordinate components
. In both cases, the components are scalar reals, so mathematically speaking, this (ab)use of the separate/combine RGB functions is perfectly all right. Note also how we ignore the B component (i.e. the Z coordinate), since we are only dealing with a two-dimensional texture.
::现在我们在这个节点设置中使用上述节点组. 注意"分离RGB"和"组合RGB"节点:它们不是分离/组合RGB颜色组件,而是XYZ坐标组件. 在这两种情况下,组件都是标数实数,所以从数学上讲,这种 (滥用) 分离/组合RGB函数是完全正常的. 还要注意我们如何忽略B组件 (即Z坐标),因为我们只处理二维纹理.
After separating out the X and Y values, these are fed through the Rectangular→Polar conversion node group we created above. But then note how the Mag value is put through a division by 4 to stretch out the texture radially: this is the secret to getting the radial ridges in the iris texture. After the coordinate components are recombined, they are used to control a Noise texture, which then gives a bump map to the iris material.
::在分离出X和Y值之后,这些被输入我们上面创建的矩形→极转换节点组.然后注意Mag值如何通过4的除法来辐射拉伸纹理:这是获得虹膜纹理中的辐射脊的秘密.在重新组合了坐标组件后,它们被用来控制噪声纹理,然后给虹膜材料提供一个凸起图.
But we’re not done yet.
There is still some more node magic to wield, to get a radial gradation in colour from the centre to the edge of the iris. To build that, we will need another node group, as at right. This one is called “Rescale”: it takes a value in an input range (defined by the “In Low” and “In High” inputs) and linearly transforms it to an output range (defined by the “Out Low” and “Out High” inputs). Or, using mathematical symbols
for the input value,
for the output value, and
,
,
and
for In Low, In High, Out Low and Out High respectively, this node group implements the transformation
![]() .
.
::但是我们还没有完成. 还有一些节点魔术要使用,从虹膜的中心到边缘的颜色得到一个辐射分级. 为了构建它,我们需要另一个节点组,如右图. 这一个称为 缩放:它取一个输入范围中的值 (定义由 低 和 高 输入) 并线性地将其转换为输出范围 (定义由 低 和 高 输入). 或者,使用数学符号 x 为输入值, y 为输出值,以及 0 x , x 1 , y 0 和 y 1 分别为 低,高,外和高,这个节点组实现了 y (x) = x − 0 (x) y 1 − 0 (x) x − 1 x + y 0
输出
 for the input value,
 for the output value, and
 ,
,
 ,
,
 and
and
 for In Low, In High, Out Low and Out High respectively, this node group implements the transformation
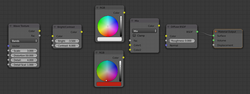
And now, here’s how we add a use of the Rescale node group to our iris material node setup. We use it to transform the Mag polar coordinate (distance from centre), and then use that to drive a colour ramp that actually controls the diffuse colour of the iris. Here I have done a gradation from light green to dark green; feel free to substitute whatever eye colours and gradations you choose.
::现在,我们将如何在虹膜材料节点设置中添加 Rescale 节点组的使用.我们将它用于转换 Mag 极坐标 (距离中心的距离),然后使用它来驱动一个颜色,实际上控制虹膜的扩散颜色.这里我已经从浅绿色到深绿色进行了分级;随意替换您选择的眼睛颜色和分级.
The Pupil
::学生的
Here I just used a simple black diffuse material. The original tutorial added some subtle suggestion of red blood vessels, similar to the sclera; you could do that here if you want, but I thought the effect was too subtle to see, so I didn’t bother.
::现在我只使用一个简单的黑色散射材料. 原始教程添加了一些微妙的建议红血管,类似于膜;你可以在这里如果你想要,但我认为效果太微妙看到,所以我不费心.
The Final Result
::最终的结果
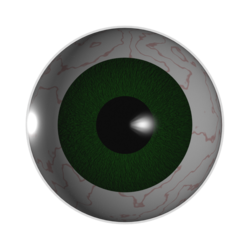
And here is what the final render might look like.
::最终的染可能是这样的.
Parameters to Tweak
::需要调整的参数
The above node setups are quite complex, but they offer many opportunities for experimentation.
::虽然上面的节点设置相当复杂, 但它们提供了许多实验机会.
For example, in the Sclera material, try tweaking the Bright/Contrast settings, to see how that affects the result. Make the red blood vessels more prominent, and the eye looks bloodshot!
::试着调整亮度/对比度设置, 看看这会如何影响结果. 让红色血管更突出, 眼睛看起来会红血!
In the Iris material, you can change the eye colour (of course). But also try changing the radial striations: see how they look if they are larger. Why did I put the Rescale node there? It was to let you increase or decrease the effect of the colour ramp, without having to edit the ramp itself.
::在虹膜材料中,你可以改变眼睛的颜色 (当然). 但也试着改变辐射条纹:看看它们看起来如何如果它们更大. 我为什么把重缩节点放在那里? 它是让你增加或减少颜色的效果,而无需编辑的坡道本身.