Blender 3D:各种各样的教程
Start a new scene in Blender
::在Blender中启动新场景
-
Delete the default cube.
::删除默认的立方体.
Prepare the individual particles
::准备单个的粒子
Go to layer 2 -
::进入第二层

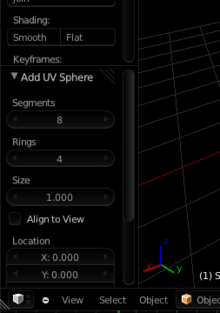
Add a UV Sphere with 8 segments and 6 rings(Go to the toolshelf and change the values)
::添加一个UV球体8段和6个环 ((去工具架和改变值)
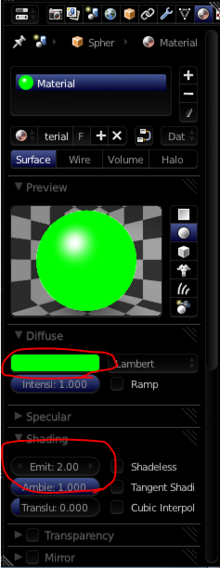
Add a new material with any bright color. Change the emit value to 2 or higher -
::添加任何明亮颜色的新材料. 将发射值更改为2或更高 -
Note - if you want a single-coloured version,
you can skip a few of the following steps -
Duplication of the particles
::粒子的复制
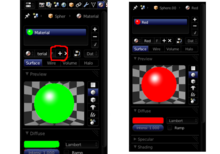
Duplicate the sphere and move it nearby ( Shift + D ). Duplicate the material by clicking on the 'plus' button indicated in the picture below. Change the color to another bright color
::复制球体并将其移动到附近 (Shift + D). 复制材料点击下图中显示的'加'按. 改变颜色到另一个明亮的颜色
Important note - Not clicking the plus button will change the
color of the previous sphere also.
Repeat this process until you are satisfied with the no. of spheres with different colours. Now create a group ( Ctrl + G ) Name it anything you like in the toolshelf ( T toggles the toolshelf).
::现在创建一个组 (Ctrl + G) 在工具架中给它任何你喜欢的名称 (T 切换工具架).
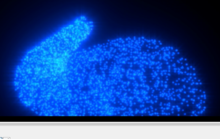
Now you're ready to start creating the animation and particles!
::现在你准备好开始创建动画和粒子了!
Defining the motion of the particles
::定义粒子的运动
Go back to layer 1.
::返回第一层.
Creating the path for the particles to follow
::创造粒子遵循的路径
If you haven't learnt about
Bezier curves
already, go ahead and do so now.
::如果你还没有学到贝齐尔曲线, 现在就学一下吧.
Add a bezier curve, and tab into edit mode. Now you have to model the path by extruding and subdividing the curve. The shape of the curve defines the path of the particles. After you are done with the curve, you can proceed to create the emission object.
::添加一个贝济尔曲线,然后进入编辑模式.现在你必须通过挤出和分别曲线来建模路径.曲线的形状定义了粒子的路径.你完成了曲线后,你可以继续创建辐射对象.
Creating the 'emitter' of the particles
::创造粒子的发射器
Add a UV Sphere with 32 segments and 16 rings. This is going to be the emitter, i.e. the object that gives out those coloured spheres.
::添加一个32个段和16个环的紫外线球, 这将是发射器,
This is going to have a completely transparent material since hiding it hides the whole thing.
::隐藏它就隐藏了整个东西.
So go to material properties, add a new material. Scroll down to the Transparency panel, check it and change the alpha value to zero, making it completely transparent. Also change the specular intensity to zero. Leave everything else as such.
::进入材料属性,添加新材料. 滚动到透明度面板,检查它,并将α值更改为零,使其完全透明. 也将光谱强度更改为零. 其他一切都保持原样.
Making the sphere follow the path
::让球体沿着路径
In this part, you are going to make the sphere follow the curve you had modeled earlier. Select the cube, and add a Follow Path Constraint. Select the target, i.e. the curve and click on Animate Path. All these steps speak for themselves, there's no need for me to explain. You could check follow curve, but since this is a sphere this is not needed. All it does is make the object face the direction it is moving towards.
::在这个部分,你将使球跟随你之前模拟的曲线. 选择立方体,并添加跟随路径约束. 选择目标,即曲线,然后点击动态路径. 所有这些步骤都代表自己,我不需要解释. 你可以检查跟随曲线,但由于这是一个球,这不需要. 它所做的就是让物体面向它移动的方向.
As for the speed of the object, you can change it by -
::对于物体的速度,你可以改变它 -
-
Select the curve.
::选择一个曲线. -
Go to Object properties -
::进入对象属性

-
Scroll down to Path Animation panel.
::滚动到路径动画面板. -
Change Path Animation Frames value to the no. of frames you want the animation to last. I prefer it to be 150.
::改变路径动画值为你想要动画持续的数. 我更喜欢它是150.
In the end, make a few changes until you are satisfied with the result. Now you are ready to proceed to part 2.
::现在,你准备好继续第二部分.