Blender 3D:各种各样的教程
How the Spin Tool Works
::旋转工具的工作原理
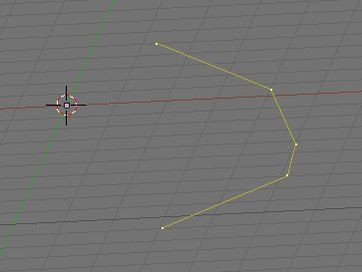
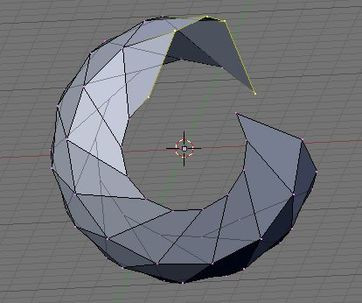
The Spin tool works by making copies of the selected vertices in a radial array around an axis indicated by the 3d cursor. Each copies of vertices are connected to previous vertices that corresponds to it with necessary geometry, i.e. edges and planes.
::旋转工具通过在3d光标指定的轴周围的辐射阵列中复制选定的顶点.每个顶点的复制与与它相对应的前面的顶点连接,并提供必要的几何形状,即边缘和平面.
A picture explains this more clearly.
::一张图片更清楚地解释了这一点.

Note that the copied vertices are arranged in a radial array around our 3d cursor and parallel to our view plane.
::复制的顶点是以一个辐射阵列的形式排列在我们的3D光标周围,
Typical Work Flow
::典型的工作流程
1) Make half of the outline of our object with connected vertices. If you want to model a wineglass, make the half of the outline of the wineglass.
::1) 通过连接顶点, 构成对象的半边形. 如果你想模拟一个酒杯, 构成酒杯的半边形.
2) Spin our outline. After this the Spin tool would complete our object.
::2) 旋转我们的轮.此后旋转工具将完成我们的对象.
3) Clean up the resulting mesh. The mesh created by the Spin tool is not so perfect so we had to "clean" it up.
::3) 清理得到的网格. 旋转工具创建的网格不太完美,所以我们不得不"清理"它.
Modeling Half of the Outline
::模拟一半的轮
To start we make half of the outline. Here we do it by creating vertices.
::首先我们做出一半的轮.
Open Blender. Don't remove the default cube since we are going to use it. If you don't have any object after you open Blender (like mine), add a mesh object. Any of them will do. I tend to use the plane. At this time it is good to give your object a proper name. Name it sensibly, like "wineglass" if we are modeling a wineglass. This will help us locate it if there comes a time when we have a lot of objects in our scene. We don't want to have all objects to be called cube.001, sphere.003 or something. That could get confusing.
::打开Blender.不要删除默认的立方体,因为我们要使用它.如果你打开Blender后没有任何对象 (像我一样),添加一个网格对象.它们中的任何一个都会做.我倾向于使用平面.此时很好给你的对象一个适当的名字.如果我们在建模一个酒杯,那么给它一个明智的名字,比如"酒杯".这将帮助我们找到它,如果我们在场景中有很多对象.我们不想让所有对象被称为cube.001,sphere.003或其他东西.这可能会令人困惑.
Hit Tab key to enter Edit Mode, if we are not in there yet. Select all vertices by hitting AKey, then delete them with XKey -> Vertices. Then go to the front view by hitting Num1.
::按下 Tab 键进入编辑模式,如果我们还没有进入. 通过按下 AKey 选择所有顶点,然后用 XKey -> 顶点删除它们. 然后通过按 Num1 进入前视图.
Now, we are going to make the outline by creating vertices. Press and hold CtrlKey then click the left mouse button. A new vertex will be created. Click the left mouse button again, another vertex will be created but this time it is connected to the previous vertex by an edge. Click again to add more vertices. We are going to use this to create our outline.
::现在,我们将通过创建顶点来做出轮. 按住CtrlKey然后点击鼠标的左键. 一个新的顶点将被创建. 再次点击鼠标的左键,另一个顶点将被创建,但这次它将通过边缘连接到前一个顶点. 再次点击添加更多的顶点. 我们将使用它来创建我们的轮.
You might notice that the 3d manipulator (red, green and blue arrows) could get in the way. Deactivate it by hitting Ctrl+Space Bar, then select Enable/Disable, or by clicking the white pointing hand icon in the 3d view window.
::通过按Ctrl+空格,然后选择启用/禁用,或点击3D视图窗口中的白色指向手图标来禁用它.
Let's start making the outline. Delete our previously created vertices first. Using what we have learned, let's create vertices again but this time let's add them to form some sort of outline. Let's be creative here. It could be anything you want. Here I've made two to illustrate two situations that we might encounter when modeling with the Spin tool. That is, modeling objects that are hollow or non-hollow.
::让我们开始做轮. 首先删除我们以前创建的顶点. 使用我们所学到的,让我们再次创建顶点,但这次让我们添加它们来形成某种轮. 让我们在这里创造性. 它可以是你想要的任何东西. 这里我已经做了两个来说明我们可能遇到的两个情况时,用Spin工具建模. 也就是说,建模的对象是空洞的或非空洞的.
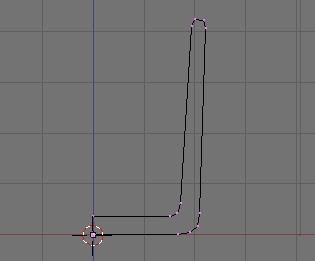
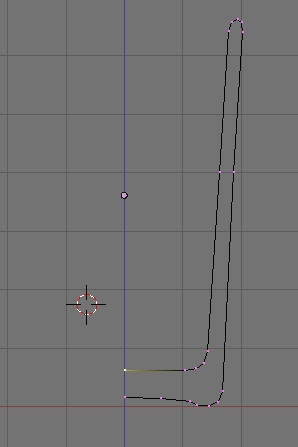
The first one is an outline of a glass. Here, we are modeling an object that is not hollow. We had two vertices that are located in the center of our would-be glass bottom. We need to align the two central vertices perfectly along the z axis. Select this two vertices then scale it along the x axis to zero (SKey, xKey, 0Key, Enter).
::第一个是玻璃的轮. 这里,我们模拟的是一个不空洞的物体. 我们有两个顶点位于我们未来的玻璃底部的中心. 我们需要在z轴上完美对齐两个中心顶点. 选择这两个顶点,然后沿x轴缩放到零 (SKey,xKey,0Key,Enter).
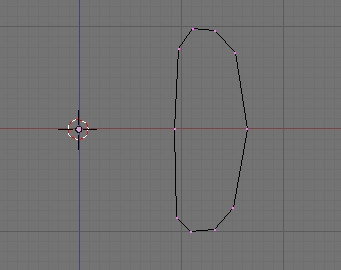
The second one we will make into a napkin ring. This time our outline is closed and no vertices are located in the center of our would be napkin ring. Here we are modeling an object that is hollow.
::现在我们将把它变成一个纸巾环. 这次我们的轮是封闭的,没有顶点位于我们纸巾环的中心. 这里我们模拟的是一个空洞的物体.
To make the closed outline, select the two vertices on the open side then press FKey. The two vertices will be bridged by an edge, thus closing the outline.
::为了形成封闭的轮,选择开放侧的两个顶点,然后按FKey. 两顶点将被边缘所桥接,从而封闭轮.
Adjust vertices when necessary.
::调整顶点,如果有必要.
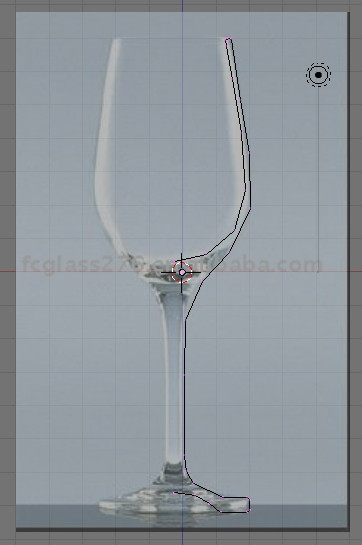
For those who may like to have an image in the background to guide them. Upload a background image by selecting the View menu from the 3d View Window then select "Background Image". A new internal window will appear. Click "Use Background Image" Button, then click "Load". Navigate to where the Image is located, select it, then click "SELECT IMAGE". Our image will appear on the 3d Window as a background. Bellow, I used a picture of a wineglass.
::对于那些可能希望在背景图像以指导他们. 通过选择"视图"菜单从3D视图窗口上传一个背景图像,然后选择"背景图像". 一个新的内部窗口将出现. 点击"使用背景图像"按,然后点击"加载". 导航到图像的位置,选择它,然后点击"选择图像". 我们的图像将出现在3D窗口作为背景. 下面,我使用了一张葡萄酒杯的图片.
Spinning Our Outline
::我们的轮
Now that the outline is finished, we are ready to use it with the Spin tool
::现在轮完成了,我们准备使用它与旋转工具
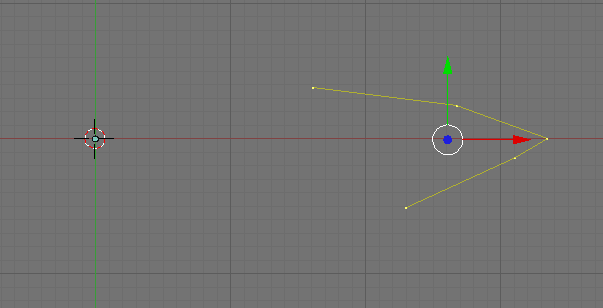
Two things you must know is that the Spin tool is dependent on the location of the 3d cursor, and view where we activate our Spin tool.
::您必须知道的两件事是, 旋转工具取决于3D光标的位置,
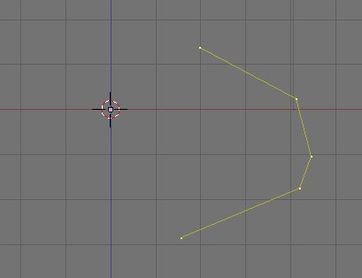
Here is our setup with the vertices all selected. In the nest pictures are results when this shape is spun with the 3d cursor at different locations.
::在这些图片中, 图形在不同位置用3D光标旋转时的结果.
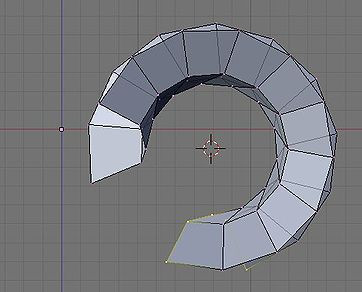
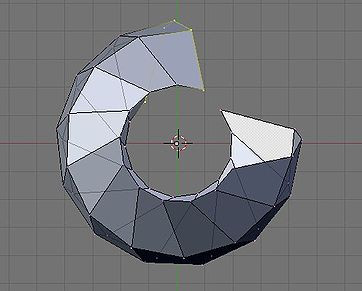
Here we have the same shape but is spun around in different views.
::这里我们有相同的形状, 但是在不同的观点旋转.

Note that its important only to place the 3d cursor properly relative to the view where you are going to use the Spin tool
::重要的是,只要把3d光标与你将要使用旋转工具的视图相对正确地放置
Placing Our 3d Cursor
We can see that the location of our 3d cursor is very important in Spin modeling so we need to know how to place it properly. If you prepare it to be, the cursor would already be in position after we make our outline but accidents happen and we accidentally misplaced our 3d cursor. Here are some ways we could make our 3d cursor go to the place where we want it to be.
::我们可以看到,在旋转模型中,我们3D光标的位置非常重要,所以我们需要知道如何正确地放置它.如果我们准备好它,光标在我们做出轮之后就已经在位置,但意外发生了,我们不小心把我们的3D光标放在错位.这里有一些方法,我们可以让我们的3D光标去我们想要的地方.
Snapping
Snapping the 3D cursor is a quick and simple way to place our 3d cursor to its proper location. In the 3d window, hit Shift + SKey. A list of options would appear. We are interested with the last three options, namely the cursor snaps options. They are the Cursor->Selection, Cursor->Grid and Cursor->Active. The name are pretty descriptive but we'll give a short description here.
::快速切割3D光标是一个快速简单的方式,可以将我们的3D光标放置到适当的位置.在3D窗口中,按Shift+SKey.一个选项列表会出现.我们对最后三个选项感兴趣,即光标切割选项.它们是光标->选择,光标->网格和光标->活动.名称很简单,但我们会在这里给出简短的描述.
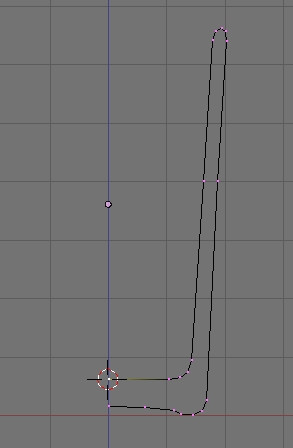
Cursor->Selection places the cursor to the exact location of our selected element or elements. In case of multiple selected elements, our cursor is placed on the median of the selected elements. In edit mode, select a vertex and use Cursor->Selection snap to it. Our 3d cursor would jump to the exact place where our selected vertex is located.
::标签->选择将标签放置在我们选择的元素或元素的确切位置上.如果有多个选定的元素,我们的标签将放置在选定的元素的中位数上.在编辑模式中,选择一个顶点并使用标签->选择对它进行快速切换.我们的3d标签将跳到我们选择的顶点的确切位置.
Cursor->Selection snapping is especially useful when modeling non hollow objects because there are vertex or vertices located at the center of our model to snap to. Just select one central vertex and snap to it.
::选择快速是特别有用的,因为在模型的中心有顶点或顶点可以快速到达.只需选择一个中心顶点,就快速到达.
Cursor->Grid snaps the cursor to the nearest cross of the visible grid. Try clicking at a center of a square in our Blender's grid and use it. See its effect.
::标记符->格子将标记符快速移到可见格子中最近的交叉点. 尝试点击在混合器的格子中一个正方形的中心并使用它. 看看它的效果.
Cursor->Grid snapping is useful for spin modeling hollow models. Usually if you are careful, our object outline would be on a plane that contains one of the axises. If we make our outline in front view as advised, go to the top view (or side view depending on what we are modeling). If you are doing okay, you will see all our vertices aligned perfectly along the x axis. It just a matter of LMB close to a cross on the grid that contains our objects center then snap to it.
::线索->网格截取对于旋转模拟空洞模型很有用.通常如果你小心,我们的对象轮将在包含轴之一的平面上.如果我们按照建议在前视图中做出轮,请进入顶视图 (或侧视图,取决于我们在模拟什么).如果你做得好,你会看到我们所有的顶点沿x轴完美对齐.这只是一个LMB接近包含对象中心的网格上的十字路口,然后将其截取.
Cursor->Active might not be so helpful in spin modeling. Cursor->Active snaps the cursor to the active element (usually the element that is last to be selected). Try it by selecting several vertices, then do Cursor->Active snap. The vertex where the 3d cursor goes is the active element in your selection.
::标签->Active可能在旋转建模中没有那么有用. 标签->Active将标签点击到活动元素 (通常是最后被选择的元素). 尝试选择几个顶点,然后做标签->Active. 3D标签点击的顶点是您选择中的活动元素.
Spin Tool Parameters
The spin accepts two parameters to execute its function. These are Degrees (degr) and Steps.
::旋转接受两个参数来执行其功能.这些是度 (degr) 和步骤.
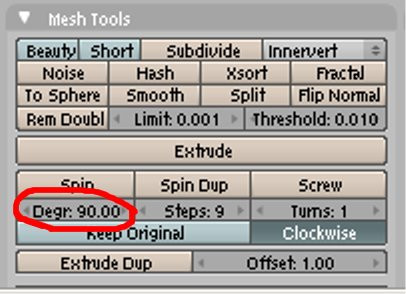
Degrees
specifies the angle at which the selected geometry will be rotated from its initial position around the axis. It accepts values in degrees. A 360 degrees value being a whole turn around the axis. Values lesser than 360 produces something like a wedge is sliced from the side of the form.
::度指定了从初始位置旋转到轴周围的角度.它接受的值是度. 360度的值是轴周围的整个转向. 值小于360产生类似于从形式的侧面切割形的东西.
|
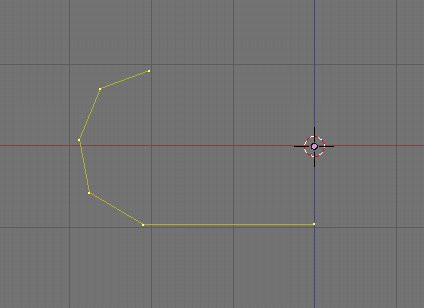
| Sample Outline |
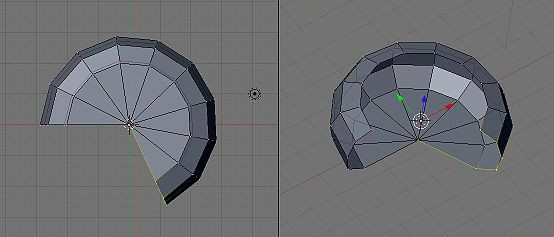
|
| Sample Outline Spun with Degress parameter set at 245 degrees |
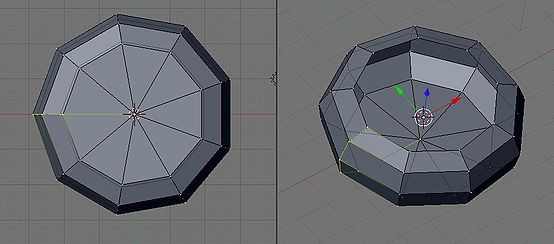
|
| Sample Outline Spun with Degress parameter set at 360 degrees |
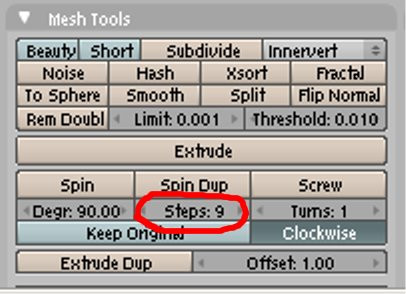
Steps
specifies the number of "copies" of the selected geometry the spin tool makes that it arranges in a radial array around the 3d cursor. A higher value result in much rounder form.
::步骤指定了旋转工具在3D光标周围排列成一个辐射阵列的所选几何的"副本"的数量.较高的值会导致更圆的形式.

|
| Sample Outline Spun with Steps parameter set at 4 steps |
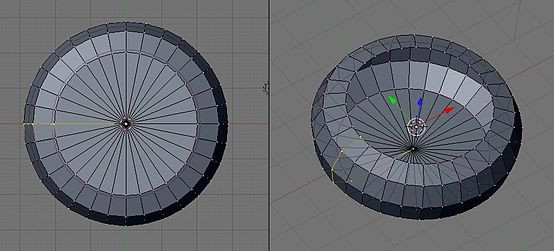
|
| Sample Outline Spun with Steps parameter set at 32 steps |
Cleaning Up the resulting Mesh
::清理由此产生的网
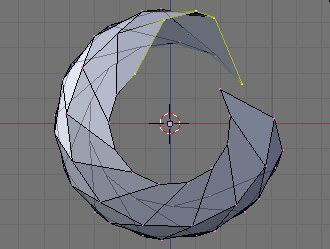
After using the spin tool, a little clean up work might be necessary, especially if you specified a 360 degree turn. Though the mesh looks clean to the eye, the tool actually make geometries (vertices) that are in the same blender position as another one. So what might look like one vertex may actually be two. A simple way to clean up our mesh would be to select the whole geometry then activating the "remove doubles" from the specials menu ( Wkey(Specials Menu) -> remove doubles or Wkey->6key). This would remove these problem geometries, finds vertices that are too close to each other and merging them to one.
::旋转工具使用后,可能需要做一些清理工作,特别是如果你指定了360度转.虽然网格看起来很干净,但工具实际上会在与另一个混合器位置相同的几何形状 (顶点).所以看起来像一个顶点实际上可能是两个.清理我们的网格的一个简单方法是选择整个几何形状,然后从特殊菜单 (Wkey(Specials Menu) ->删除双重或Wkey->6key) 激活"删除双重".这将删除这些问题几何形状,找到彼此太接近的顶点并将它们合并为一个.
Post Modeling
::后期建模
After the lathe able parts are done it would be ready to adding non latheable parts. For example a cup may have a bowl-like body, that we could use the spintool. Alas the handle can't be so we had to put it there after. Depending on the geometry added. This geometries could be formed from the mesh itself or be adding in a separate mesh.
::经过加工后,可以再添加其他不可加工的部件.例如,杯子可能有碗形的体,我们可以使用旋转刀.可惜手柄不能这样,所以我们必须把它放在那里.根据添加的几何形状.这些几何形状可以从网格本身形成,也可以在单独的网格中添加.